Operating Guide
Page 18
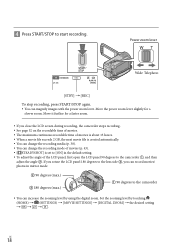
... 2 GB, the next movie file is created automatically. You can change the recording media (p. 38). You can change the recording mode of the LCD panel, first open the LCD panel 90 degrees to the camcorder , and then adjust the angle . US 18 Move it further for a slower zoom.... Set the zooming level by using the digital zoom. Move the power zoom lever slightly for a faster zoom. If you ...
... 2 GB, the next movie file is created automatically. You can change the recording media (p. 38). You can change the recording mode of the LCD panel, first open the LCD panel 90 degrees to the camcorder , and then adjust the angle . US 18 Move it further for a slower zoom.... Set the zooming level by using the digital zoom. Move the power zoom lever slightly for a faster zoom. If you ...
Operating Guide
Page 43
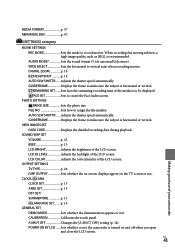
...16 GENERAL SET DEMO MODE Sets whether the demonstration appears or not. Sets whether or not the camcorder is horizontal or vertical. US 43 Making good use of the LCD screen. When recording fast moving subjects, a high image quality, such as [HQ], is horizontal or vertical. DIGITAL ZOOM ...CLOCK SET p. 15 AREA SET p. 15 DST SET/ SUMMERTIME p. 15 LANGUAGE SET......... FILE NO Sets how to create the Face Index screen. REMAINING SET........ FACE SET Sets to assign the file number. PHOTO SETTINGS IMAGE SIZE Sets the photo size. CALIBRATION Calibrates the touch panel. ...
...16 GENERAL SET DEMO MODE Sets whether the demonstration appears or not. Sets whether or not the camcorder is horizontal or vertical. US 43 Making good use of the LCD screen. When recording fast moving subjects, a high image quality, such as [HQ], is horizontal or vertical. DIGITAL ZOOM ...CLOCK SET p. 15 AREA SET p. 15 DST SET/ SUMMERTIME p. 15 LANGUAGE SET......... FILE NO Sets how to create the Face Index screen. REMAINING SET........ FACE SET Sets to assign the file number. PHOTO SETTINGS IMAGE SIZE Sets the photo size. CALIBRATION Calibrates the touch panel. ...


