Operating Instructions
Page 4
...10 Installing the battery pack 10 Charging the battery pack 11 Connecting to mini DV tapes 130 Enlarging still images recorded on a tape - Digital program editing 58 Identifying the parts and controls ......... 158 Using with ...mini DV tape - Tape PB ZOOM 49 Quickly locating a scene using a personal computer 125 Copying the image recorded on "Memory Stick"s to a wall outlet 13 Customizing Your Camcorder Changing the menu settings 84 Resetting the date and time 92 Step 2 Inserting a cassette 14 "Memory Stick" Operations Recording - Image protection 134 with digital...
...10 Installing the battery pack 10 Charging the battery pack 11 Connecting to mini DV tapes 130 Enlarging still images recorded on a tape - Digital program editing 58 Identifying the parts and controls ......... 158 Using with ...mini DV tape - Tape PB ZOOM 49 Quickly locating a scene using a personal computer 125 Copying the image recorded on "Memory Stick"s to a wall outlet 13 Customizing Your Camcorder Changing the menu settings 84 Resetting the date and time 92 Step 2 Inserting a cassette 14 "Memory Stick" Operations Recording - Image protection 134 with digital...
Operating Instructions
Page 8
...on whether the tape has the cassette memory or not are: - For details, see this manual, buttons and settings on your camcorder are : - You see page 138. Tapes with cassette memory are operated only with the cassette memory are shown in the ... Memory). 8 Date search (p. 52) - Labeling a cassette (p. 82). The functions which require different operations depending on the DV format. Making your camcorder. Photo search (p. 54). Getting started - When you carry out an operation, you use mini DV cassettes with cassette memory . You can hear a beep sound to CAMERA. e.g.
...on whether the tape has the cassette memory or not are: - For details, see this manual, buttons and settings on your camcorder are : - You see page 138. Tapes with cassette memory are operated only with the cassette memory are shown in the ... Memory). 8 Date search (p. 52) - Labeling a cassette (p. 82). The functions which require different operations depending on the DV format. Making your camcorder. Photo search (p. 54). Getting started - When you carry out an operation, you use mini DV cassettes with cassette memory . You can hear a beep sound to CAMERA. e.g.
Operating Instructions
Page 54
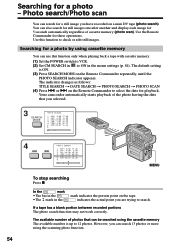
... Commander to search. Searching for these operations. Your camcorder automatically starts playback of photos that you can be searched using the scanning photo function. 54 In the mark • The bar in the • The mark in the menu settings (p. 84). or > on a mini DV tape (photo search). The available number of the...
... Commander to search. Searching for these operations. Your camcorder automatically starts playback of photos that you can be searched using the scanning photo function. 54 In the mark • The bar in the • The mark in the menu settings (p. 84). or > on a mini DV tape (photo search). The available number of the...
Operating Instructions
Page 56
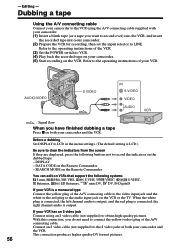
...S video jacks of both your camcorder. (2) Prepare the VCR for recording, then set the input selector to clear the indicators from the screen If they are displayed, press the following systems 8 mm, Hi8, VHS, S-VHS, VHSC, S-VHSC, Betamax, ED Betamax, mini DV, DV, Digital8 If your VCR is ...output. Dubbing a tape Using the A/V connecting cable Connect your camcorder to the VCR using an S video cable (not supplied) to record over) into the VCR, and ...
...S video jacks of both your camcorder. (2) Prepare the VCR for recording, then set the input selector to clear the indicators from the screen If they are displayed, press the following systems 8 mm, Hi8, VHS, S-VHS, VHSC, S-VHSC, Betamax, ED Betamax, mini DV, DV, Digital8 If your VCR is ...output. Dubbing a tape Using the A/V connecting cable Connect your camcorder to the VCR using an S video cable (not supplied) to record over) into the VCR, and ...
Operating Instructions
Page 88
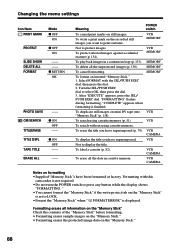
z RETURN OK PHOTO SAVE -- Select FORMAT with this camcorder is finished. "FORMATTING" flashes during formatting. VCR To search using cassette memory. VCR To search without using cassette memory (p. 51). " • You cannot format the "Memory Stick" if the write-protect tab on mini DV tape onto "Memory Stick"(p. 118). ERASE ALL -- VCR CAMERA To...
z RETURN OK PHOTO SAVE -- Select FORMAT with this camcorder is finished. "FORMATTING" flashes during formatting. VCR To search using cassette memory. VCR To search without using cassette memory (p. 51). " • You cannot format the "Memory Stick" if the write-protect tab on mini DV tape onto "Memory Stick"(p. 118). ERASE ALL -- VCR CAMERA To...
Operating Instructions
Page 89
... SP (Standard Play) mode. To increase the recording time to be written properly between scenes. When you play back the tape on your camcorder, we recommend using a Sony Excellence/Master mini DV cassette so that you record a tape in the 16-bit mode (1 stereo sound with high quality). To record in the LP mode... you record in the SP and LP modes on one tape or you record in the LP mode, we recommend playing the tape on other camcorders or VCRs, noise may occur in pictures or sound. •When you record some scenes in the 12-bit mode (2 stereo sounds). To display date...
... SP (Standard Play) mode. To increase the recording time to be written properly between scenes. When you play back the tape on your camcorder, we recommend using a Sony Excellence/Master mini DV cassette so that you record a tape in the 16-bit mode (1 stereo sound with high quality). To record in the LP mode... you record in the SP and LP modes on one tape or you record in the LP mode, we recommend playing the tape on other camcorders or VCRs, noise may occur in pictures or sound. •When you record some scenes in the 12-bit mode (2 stereo sounds). To display date...
Operating Instructions
Page 108
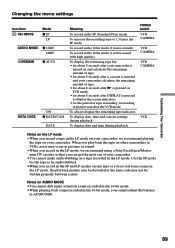
...If you press PHOTO lightly in moving picture data recorded on a mini DV tape and record it as a still image on a "Memory Stick." Before operation •Insert a recorded mini DV tape into your camcorder. •Insert a "Memory Stick" into your camcorder. As well do not turn the power off , eject a... and record it as a still image Your camcorder can also take in the playback mode Your camcorder stops momentarily. The picture recorded on the mini DV tape is incompatible with your camcorder because its format does not conform with your camcorder. (1) Set the POWER switch to 640 ...
...If you press PHOTO lightly in moving picture data recorded on a mini DV tape and record it as a still image on a "Memory Stick." Before operation •Insert a recorded mini DV tape into your camcorder. •Insert a "Memory Stick" into your camcorder. As well do not turn the power off , eject a... and record it as a still image Your camcorder can also take in the playback mode Your camcorder stops momentarily. The picture recorded on the mini DV tape is incompatible with your camcorder because its format does not conform with your camcorder. (1) Set the POWER switch to 640 ...
Operating Instructions
Page 109
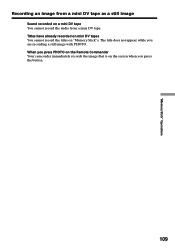
The title does not appear while you press PHOTO on the Remote Commander Your camcorder immediately records the image that is on a mini DV tape You cannot record the audio from a mini DV tape as a still image Sound recorded on the screen when you press the button. 109 "Memory Stick" Operations Recording an image from a mini DV tape. When you are recording a still image with PHOTO. Titles have already recorded on mini DV tapes You cannot record the titles on "Memory Stick"s.
The title does not appear while you press PHOTO on the Remote Commander Your camcorder immediately records the image that is on a mini DV tape You cannot record the audio from a mini DV tape as a still image Sound recorded on the screen when you press the button. 109 "Memory Stick" Operations Recording an image from a mini DV tape. When you are recording a still image with PHOTO. Titles have already recorded on mini DV tapes You cannot record the titles on "Memory Stick"s.
Operating Instructions
Page 110
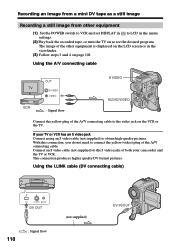
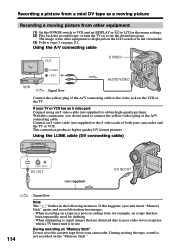
...the video jack on page 108. Using the i.LINK cable (DV connecting cable) DV S VIDEO LANC DV OUT 110 : Signal flow (not supplied) DV IN/OUT This connection produces higher quality DV format pictures. Recording an image from a mini DV tape as a still image Recording a still image from other equipment... is displayed on the LCD screen or in the menu settings. (2) Play back the recorded tape, or turn the TV on to obtain high-quality pictures. If your camcorder...
...the video jack on page 108. Using the i.LINK cable (DV connecting cable) DV S VIDEO LANC DV OUT 110 : Signal flow (not supplied) DV IN/OUT This connection produces higher quality DV format pictures. Recording an image from a mini DV tape as a still image Recording a still image from other equipment... is displayed on the LCD screen or in the menu settings. (2) Play back the recorded tape, or turn the TV on to obtain high-quality pictures. If your camcorder...
Operating Instructions
Page 112
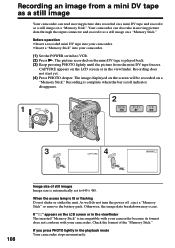
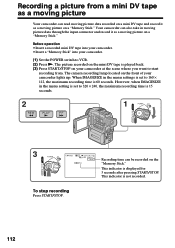
...scene where you want to 320 × 240, the maximum recording time is played back. (3) Press START/STOP on your camcorder lights up. The picture recorded on the mini DV tape is 15 seconds. 2 REW PLAY FF VCR 1 POWER LOCK MEMORY OFF(CHR) CAMERA 3 POWER LOCK 4 0min ...5SEC ] Recording time can be recorded on a "Memory Stick." Recording a picture from . Before operation •Insert a recorded mini DV tape into your camcorder. •Insert a "Memory Stick" into your camcorder. (1) Set the POWER switch to 160 × 112, the maximum recording time is set to VCR. (2) Press N. ...
...scene where you want to 320 × 240, the maximum recording time is played back. (3) Press START/STOP on your camcorder lights up. The picture recorded on the mini DV tape is 15 seconds. 2 REW PLAY FF VCR 1 POWER LOCK MEMORY OFF(CHR) CAMERA 3 POWER LOCK 4 0min ...5SEC ] Recording time can be recorded on a "Memory Stick." Recording a picture from . Before operation •Insert a recorded mini DV tape into your camcorder. •Insert a "Memory Stick" into your camcorder. (1) Set the POWER switch to 160 × 112, the maximum recording time is set to VCR. (2) Press N. ...
Operating Instructions
Page 113
Data code recorded on a mini DV tape You cannot record the data code recorded on "Memory Stick"s. When the access lamp is displayed Sound that cannot be recorded by your camcorder has been recorded. Connect the A/V connecting cable to play back the image (p. 114). 113 As well do not turn the power off , eject...
Data code recorded on a mini DV tape You cannot record the data code recorded on "Memory Stick"s. When the access lamp is displayed Sound that cannot be recorded by your camcorder has been recorded. Connect the A/V connecting cable to play back the image (p. 114). 113 As well do not turn the power off , eject...
Operating Instructions
Page 114
...example, on the VCR or the TV. If your camcorder and the TV or VCR. Connect an S video cable (not supplied) to obtain high-quality pictures. Using the i.LINK cable (DV connecting cable) DV S VIDEO LANC DV OUT (not supplied) DV IN/OUT 114 : Signal flow Note The " ... The image of the A/V connecting cable to see the desired program. Recording a picture from a mini DV tape as a moving picture Recording a moving picture from your camcorder. This connection produces higher quality DV format pictures. Using the A/V connecting cable S VIDEO OUT S VIDEO VIDEO AUDIO/VIDEO : Signal flow...
...example, on the VCR or the TV. If your camcorder and the TV or VCR. Connect an S video cable (not supplied) to obtain high-quality pictures. Using the i.LINK cable (DV connecting cable) DV S VIDEO LANC DV OUT (not supplied) DV IN/OUT 114 : Signal flow Note The " ... The image of the A/V connecting cable to see the desired program. Recording a picture from a mini DV tape as a moving picture Recording a moving picture from your camcorder. This connection produces higher quality DV format pictures. Using the A/V connecting cable S VIDEO OUT S VIDEO VIDEO AUDIO/VIDEO : Signal flow...
Operating Instructions
Page 116
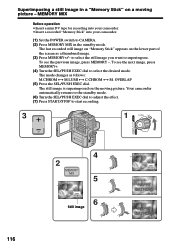
...screen as follows: M.CHROM y M.LUMI y C.CHROM y M. MEMORY MIX Before operation •Insert a mini DV tape for recording into your camcorder. •Insert a recorded "Memory Stick" into your camcorder. (1) Set the POWER switch to select the desired mode. To see the next image, press MEMORY+....) CAMERA 116 4 2 MEMORY MIX 5 M. The still image is superimposed on a moving picture. LUMI I 100-0021 M. LUMI 100-0021 M. Your camcorder automatically returns to the standby mode. (6) Turn the SEL/PUSH EXEC dial to adjust the effect. (7) Press START/STOP to superimpose. LUMI I I ...
...screen as follows: M.CHROM y M.LUMI y C.CHROM y M. MEMORY MIX Before operation •Insert a mini DV tape for recording into your camcorder. •Insert a recorded "Memory Stick" into your camcorder. (1) Set the POWER switch to select the desired mode. To see the next image, press MEMORY+....) CAMERA 116 4 2 MEMORY MIX 5 M. The still image is superimposed on a moving picture. LUMI I 100-0021 M. LUMI 100-0021 M. Your camcorder automatically returns to the standby mode. (6) Turn the SEL/PUSH EXEC dial to adjust the effect. (7) Press START/STOP to superimpose. LUMI I I ...

Operating Instructions
Page 118
... Using the search function, you can automatically take in only still images from mini DV tapes and record them on a "Memory Stick" in the viewfinder. (5) Press PHOTO firmly. The still image from a mini DV tape - END is displayed when copying is displayed. The number of still images...the LCD screen or in sequence. Copying still images from the mini DV tape is recorded on a "Memory Stick." Before operation • Insert a recorded mini DV tape into your camcorder and rewind the tape. • Insert a "Memory Stick" into your camcorder. (1) Set the POWER switch to VCR. (2) Press MENU...
... Using the search function, you can automatically take in only still images from mini DV tapes and record them on a "Memory Stick" in the viewfinder. (5) Press PHOTO firmly. The still image from a mini DV tape - END is displayed when copying is displayed. The number of still images...the LCD screen or in sequence. Copying still images from the mini DV tape is recorded on a "Memory Stick." Before operation • Insert a recorded mini DV tape into your camcorder and rewind the tape. • Insert a "Memory Stick" into your camcorder. (1) Set the POWER switch to VCR. (2) Press MENU...
Operating Instructions
Page 119
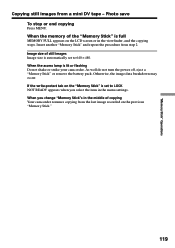
..., the image data breakdown may occur. Photo save To stop or end copying Press MENU. Insert another "Memory Stick" and repeat the procedure from a mini DV tape - Image size of the "Memory Stick" is set to LOCK NOT READY appears when you change "Memory Stick"s in the menu settings. If the... in the viewfinder, and the copying stops. When the memory of still images Image size is lit or flashing Do not shake or strike your camcorder. "Memory Stick" Operations Copying still images from step 2. When the access lamp is automatically set to 640 × 480. As well do not ...
..., the image data breakdown may occur. Photo save To stop or end copying Press MENU. Insert another "Memory Stick" and repeat the procedure from a mini DV tape - Image size of the "Memory Stick" is set to LOCK NOT READY appears when you change "Memory Stick"s in the menu settings. If the... in the viewfinder, and the copying stops. When the memory of still images Image size is lit or flashing Do not shake or strike your camcorder. "Memory Stick" Operations Copying still images from step 2. When the access lamp is automatically set to 640 × 480. As well do not ...
Operating Instructions
Page 130
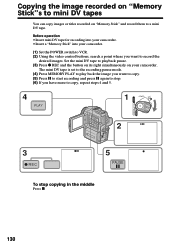
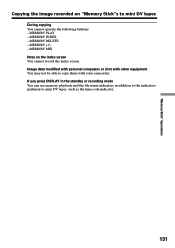
Before operation •Insert mini DV tape for recording into your camcorder. •Insert a "Memory Stick" into your camcorder. The mini DV tape is set to the recording pause mode. (4) Press MEMORY PLAY to play back the image you want to copy, repeat steps 4 and 5. 4 ...middle Press x. 130 Set the mini DV tape to a mini DV tape. Copying the image recorded on "Memory Stick"s to mini DV tapes You can copy images or titles recorded on "Memory Stick" and record them to playback pause. (3) Press z REC and the button on its right simultaneously on your camcorder. (1) Set the POWER switch...
Before operation •Insert mini DV tape for recording into your camcorder. •Insert a "Memory Stick" into your camcorder. The mini DV tape is set to the recording pause mode. (4) Press MEMORY PLAY to play back the image you want to copy, repeat steps 4 and 5. 4 ...middle Press x. 130 Set the mini DV tape to a mini DV tape. Copying the image recorded on "Memory Stick"s to mini DV tapes You can copy images or titles recorded on "Memory Stick" and record them to playback pause. (3) Press z REC and the button on its right simultaneously on your camcorder. (1) Set the POWER switch...
Operating Instructions
Page 131
... to copy them with your camcorder. MEMORY DELETE - "Memory Stick" Operations Copying the image recorded on the index screen You cannot record the index screen. Image data modified with personal computers or shot with other equipment You may not be able to mini DV tapes During copying You cannot ...operate the following buttons: - MEMORY INDEX - If you press DISPLAY in the standby or recording mode You can see memory playback and the file name indicators in addition to the indicators pertinent to mini DV tapes, such as the...
... to copy them with your camcorder. MEMORY DELETE - "Memory Stick" Operations Copying the image recorded on the index screen You cannot record the index screen. Image data modified with personal computers or shot with other equipment You may not be able to mini DV tapes During copying You cannot ...operate the following buttons: - MEMORY INDEX - If you press DISPLAY in the standby or recording mode You can see memory playback and the file name indicators in addition to the indicators pertinent to mini DV tapes, such as the...
Operating Instructions
Page 132
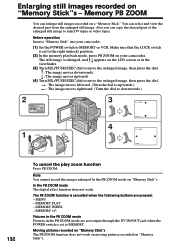
...image moves leftward. (Turn the dial to upwards.) T : The image moves rightward. (Turn the dial to mini DV tapes or video tapes. MEMORY INDEX - Memory PB ZOOM You can select and view the desired part from ... to move the enlarged image, then press the dial. In the PB ZOOM mode The digital effect function does not work on moving pictures recorded on "Memory Stick"s - Moving pictures ...the following buttons are pressed: - MEMORY PLAY - Before operation Insert a "Memory Stick" into your camcorder. Pictures in the PB ZOOM mode Pictures in the viewfinder. (3) Turn SEL/PUSH EXEC dial to ...
...image moves leftward. (Turn the dial to upwards.) T : The image moves rightward. (Turn the dial to mini DV tapes or video tapes. MEMORY INDEX - Memory PB ZOOM You can select and view the desired part from ... to move the enlarged image, then press the dial. In the PB ZOOM mode The digital effect function does not work on moving pictures recorded on "Memory Stick"s - Moving pictures ...the following buttons are pressed: - MEMORY PLAY - Before operation Insert a "Memory Stick" into your camcorder. Pictures in the PB ZOOM mode Pictures in the viewfinder. (3) Turn SEL/PUSH EXEC dial to ...
Operating Instructions
Page 138
... protection of software which is 4KB. The functions using a digital video camera recorder without cassette memory. you have ejected the cassette while recording. - Your camcorder can accommodate tapes having a memory capacity of mini DV cassette. Additional Information - Usable cassettes Selecting cassette types You...control signals for copyright protection of software. Copyright signal When you use the mini DV cassette only*. When you try to the end of mini DV cassettes: with . Your camcorder can use the tape with is played back on the cassette The memory ...
... protection of software which is 4KB. The functions using a digital video camera recorder without cassette memory. you have ejected the cassette while recording. - Your camcorder can accommodate tapes having a memory capacity of mini DV cassette. Additional Information - Usable cassettes Selecting cassette types You...control signals for copyright protection of software. Copyright signal When you use the mini DV cassette only*. When you try to the end of mini DV cassettes: with . Your camcorder can use the tape with is played back on the cassette The memory ...
Operating Instructions
Page 139
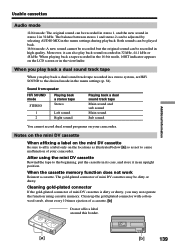
... stereo 1 and stereo 2 can be adjusted by selecting AUDIO MIX in high quality. Notes on the mini DV cassette When affixing a label on the mini DV cassette Be sure to affix a label only on your camcorder. Both sounds can be played back. 16-bit mode: A new sound cannot be recorded but the... of your camcorder. When you play back a dual sound track tape When you may be recorded in stereo 1, and the new sound in stereo 2 in 32 kHz. Cleaning gold-plated connector If the gold-plated connector of mini DV cassettes may not operate the function using the mini DV cassette Rewind ...
... stereo 1 and stereo 2 can be adjusted by selecting AUDIO MIX in high quality. Notes on the mini DV cassette When affixing a label on the mini DV cassette Be sure to affix a label only on your camcorder. Both sounds can be played back. 16-bit mode: A new sound cannot be recorded but the... of your camcorder. When you play back a dual sound track tape When you may be recorded in stereo 1, and the new sound in stereo 2 in 32 kHz. Cleaning gold-plated connector If the gold-plated connector of mini DV cassettes may not operate the function using the mini DV cassette Rewind ...


