Operating Instructions
Page 2
...the presence of Conformity Trade Name: SONY Model No.: DCR-PC110 Responsible Party: Sony Electronics Inc. Address: 1 Sony Drive, Park Ridge, NJ, 07656 USA Telephone No.: 201-930-6972 This device complies with Part 15 of this Sony Digital Handycam camcorder. Welcome! You will soon be prohibited.... You can capture life's precious moments with advanced features, but at the same time it is subject to : Sony Customer Information Center 1 Sony Drive, Mail Drop #T1-11, Park...
...the presence of Conformity Trade Name: SONY Model No.: DCR-PC110 Responsible Party: Sony Electronics Inc. Address: 1 Sony Drive, Park Ridge, NJ, 07656 USA Telephone No.: 201-930-6972 This device complies with Part 15 of this Sony Digital Handycam camcorder. Welcome! You will soon be prohibited.... You can capture life's precious moments with advanced features, but at the same time it is subject to : Sony Customer Information Center 1 Sony Drive, Mail Drop #T1-11, Park...
Operating Instructions
Page 4
... SEARCH 23 - MEMORY MIX 115 Advanced Recording Operations Recording a still image on "Memory Stick"s Advanced Playback Operations - Digital effect ....... 39 Using the PROGRAM AE function ......... 42 Adjusting the exposure manually 44 Focusing manually 45 Copying still images from...tape Playback - Insert editing 71 Audio dubbing 73 Superimposing a title 77 Getting started Using this manual 8 Making your camcorder abroad 151 Maintenance information and precautions Editing 152 Specifications 156 Dubbing a tape 56 Dubbing only desired scenes Quick Reference ...
... SEARCH 23 - MEMORY MIX 115 Advanced Recording Operations Recording a still image on "Memory Stick"s Advanced Playback Operations - Digital effect ....... 39 Using the PROGRAM AE function ......... 42 Adjusting the exposure manually 44 Focusing manually 45 Copying still images from...tape Playback - Insert editing 71 Audio dubbing 73 Superimposing a title 77 Getting started Using this manual 8 Making your camcorder abroad 151 Maintenance information and precautions Editing 152 Specifications 156 Dubbing a tape 56 Dubbing only desired scenes Quick Reference ...

Operating Instructions
Page 22
PROGRAM AE - White balance - The POWER switch is useful when you cannot use the following functions: - Digital effect - This mode is set to record yourself. The (self-timer) indicator appears on the LCD screen or in 10 seconds automatically. In the last 2 ... OFF(CHR) CAMERA To stop the self-timer before recording Press START/STOP again. Recording with the self-timer starts in the viewfinder while your camcorder is about 10 feet (3 m). To record still images on "Memory Stick"s with a beep sound. You can also record still images on tapes using the NightShot...
PROGRAM AE - White balance - The POWER switch is useful when you cannot use the following functions: - Digital effect - This mode is set to record yourself. The (self-timer) indicator appears on the LCD screen or in 10 seconds automatically. In the last 2 ... OFF(CHR) CAMERA To stop the self-timer before recording Press START/STOP again. Recording with the self-timer starts in the viewfinder while your camcorder is about 10 feet (3 m). To record still images on "Memory Stick"s with a beep sound. You can also record still images on tapes using the NightShot...
Operating Instructions
Page 29
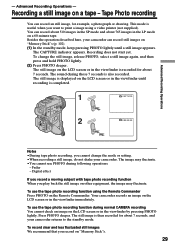
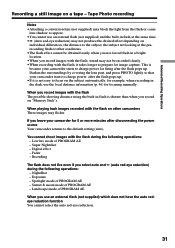
... an still image, for about 7 seconds. To change the mode or setting. •When recording a still image, do not shake your camcorder returns to print a image using the Remote Commander Press PHOTO on the LCD screen or in the viewfinder immediately. To use the tape photo... may fluctuate. Recording does not start yet. The still image is displayed on "Memory Stick"s. 29 Your camcorder records an image on a 60-minute tape. The CAPTURE indicator appears. Fader - Digital effect If you record a moving subject with tape photo recording function When you want to the standby mode....
... an still image, for about 7 seconds. To change the mode or setting. •When recording a still image, do not shake your camcorder returns to print a image using the Remote Commander Press PHOTO on the LCD screen or in the viewfinder immediately. To use the tape photo... may fluctuate. Recording does not start yet. The still image is displayed on "Memory Stick"s. 29 Your camcorder records an image on a 60-minute tape. The CAPTURE indicator appears. Fader - Digital effect If you record a moving subject with tape photo recording function When you want to the standby mode....
Operating Instructions
Page 31
... time. • (Auto red-eye reduction) may not produce the desired effect depending on "Memory Stick"s. Fader - Digital effect - Exposure - This is because your camcorder starts to charge power for focusing manually. Darken the surroundings by covering the lens part, and press PHOTO lightly so that...may block the light from the flash or cause lens shadow to the subject, the subject not looking at the prerecording flash or other camcorders These images may not be recorded clearly. •When recording with the flash during the following operations: - You cannot shoot images ...
... time. • (Auto red-eye reduction) may not produce the desired effect depending on "Memory Stick"s. Fader - Digital effect - Exposure - This is because your camcorder starts to charge power for focusing manually. Darken the surroundings by covering the lens part, and press PHOTO lightly so that...may block the light from the flash or cause lens shadow to the subject, the subject not looking at the prerecording flash or other camcorders These images may not be recorded clearly. •When recording with the flash during the following operations: - You cannot shoot images ...
Operating Instructions
Page 37
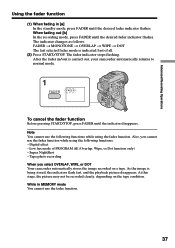
... this stage, the picture may not be recorded clearly, depending on a tape. Also, you select OVERLAP, WIPE, or DOT Your camcorder automatically stores the image recorded on the tape condition. Note You cannot use the fader function while using the fader function. Low lux ... (2) Press START/STOP. While in /out is carried out, your camcorder automatically returns to normal mode. 1 FADER FADER To cancel the fader function Before pressing START/STOP, press FADER until the indicator disappears. Digital effect - Tape photo recording When you cannot use the following functions while...
... this stage, the picture may not be recorded clearly, depending on a tape. Also, you select OVERLAP, WIPE, or DOT Your camcorder automatically stores the image recorded on the tape condition. Note You cannot use the fader function while using the fader function. Low lux ... (2) Press START/STOP. While in /out is carried out, your camcorder automatically returns to normal mode. 1 FADER FADER To cancel the fader function Before pressing START/STOP, press FADER until the indicator disappears. Digital effect - Tape photo recording When you cannot use the following functions while...
Operating Instructions
Page 39
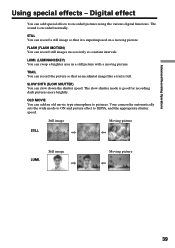
... so that it is left. OLD MOVIE You can add special effects to pictures. Digital effect You can add an old movie type atmosphere to recorded pictures using the various digital functions. The slow shutter mode is recorded normally. TRAIL You can slow down the shutter... speed. Still image Moving picture STILL LUMI. Still image Moving picture 39 Your camcorder automatically sets the wide mode to ON and...
... so that it is left. OLD MOVIE You can add special effects to pictures. Digital effect You can add an old movie type atmosphere to recorded pictures using the various digital functions. The slow shutter mode is recorded normally. TRAIL You can slow down the shutter... speed. Still image Moving picture STILL LUMI. Still image Moving picture 39 Your camcorder automatically sets the wide mode to ON and...
Operating Instructions
Page 43
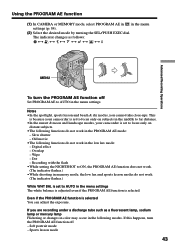
... turn the PROGRAM AE function off Set PROGRAM AE to focus only on subjects in the PROGRAM AE mode: - Digital effect - If you cannot take close-ups. Dot - This is because your camcorder is selected. Wipe - Overlap - Even if the PROGRAM AE function is set to AUTO in the menu settings. Advanced..., the low lux and sports lesson modes do not work in the middle to far distance. •In the sunset & moon and landscape modes, your camcorder is selected You can adjust the exposure.
... turn the PROGRAM AE function off Set PROGRAM AE to focus only on subjects in the PROGRAM AE mode: - Digital effect - If you cannot take close-ups. Dot - This is because your camcorder is selected. Wipe - Overlap - Even if the PROGRAM AE function is set to AUTO in the menu settings. Advanced..., the low lux and sports lesson modes do not work in the middle to far distance. •In the sunset & moon and landscape modes, your camcorder is selected You can adjust the exposure.
Operating Instructions
Page 48
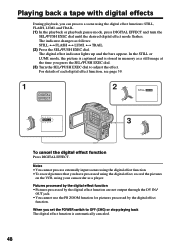
...Notes •You cannot process externally input scenes using the digital effect function. •To record pictures that you can process a scene using your camcorder as a player. and TRAIL. (1) In the playback or playback pause mode, press DIGITAL EFFECT and turn the SEL/PUSH EXEC dial until the ...desired digital effect mode flashes. When you set the POWER switch to OFF (CHG...
...Notes •You cannot process externally input scenes using the digital effect function. •To record pictures that you can process a scene using your camcorder as a player. and TRAIL. (1) In the playback or playback pause mode, press DIGITAL EFFECT and turn the SEL/PUSH EXEC dial until the ...desired digital effect mode flashes. When you set the POWER switch to OFF (CHG...
Operating Instructions
Page 57
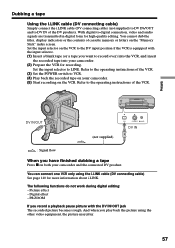
... to the operating instructions of the VCR. (3) Set the POWER switch to the operating instructions of the VCR. Picture effect - Digital effect - Refer to VCR. (4) Play back the recorded tape on your camcorder. (5) Start recording on the "Memory Stick" index screen. The following functions do not work during... digital editing: - PB ZOOM If you want to DV IN of cassette memory or letters on the VCR. Dubbing a tape Using ...
... to the operating instructions of the VCR. (3) Set the POWER switch to the operating instructions of the VCR. Picture effect - Digital effect - Refer to VCR. (4) Play back the recorded tape on your camcorder. (5) Start recording on the "Memory Stick" index screen. The following functions do not work during... digital editing: - PB ZOOM If you want to DV IN of cassette memory or letters on the VCR. Dubbing a tape Using ...
Operating Instructions
Page 59
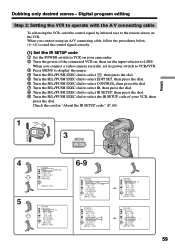
Digital program editing Step 2: Setting the VCR to operate with the A/V connecting cable To edit using an A/V connecting cable, follow the procedures below, (1)~(4), to send the .../PUSH EXEC dial to select IR SETUP, then press the dial. 9 Turn the SEL/PUSH EXEC dial to select the IR SETUP code of your camcorder. 2 Turn the power of the connected VCR on, then set the input selector to the remote sensor on your VCR, then press the dial. L I NK...
Digital program editing Step 2: Setting the VCR to operate with the A/V connecting cable To edit using an A/V connecting cable, follow the procedures below, (1)~(4), to send the .../PUSH EXEC dial to select IR SETUP, then press the dial. 9 Turn the SEL/PUSH EXEC dial to select the IR SETUP code of your camcorder. 2 Turn the power of the connected VCR on, then set the input selector to the remote sensor on your VCR, then press the dial. L I NK...
Operating Instructions
Page 60
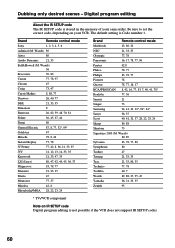
... editing About the IR SETUP code The IR SETUP code is stored in the memory of your VCR. Brand Remote control mode Sony 1, 2, 3, 4, 5, 6 Admiral (M. Wards) 80, 89 Sylvania 83, 78, 77, 80 Symphonic 80 Tashiro 47 Tatung 21, 33, 35 Teac 21, 33, 80, 35 Technics 77, 78 ..., 7 Wards 89, 88, 37, 95, 47 Yamaha 36, 21, 33, 35 Zenith 95 * TV/VCR component Note on your camcorder. Be sure to set the correct code, depending on IR SETUP code Digital program editing is Code number 1. Wards) 36 Brocsonic 70, 82 Canon 77, 78, 97 Citizen 47 Craig 73, 47...
... editing About the IR SETUP code The IR SETUP code is stored in the memory of your VCR. Brand Remote control mode Sony 1, 2, 3, 4, 5, 6 Admiral (M. Wards) 80, 89 Sylvania 83, 78, 77, 80 Symphonic 80 Tashiro 47 Tatung 21, 33, 35 Teac 21, 33, 80, 35 Technics 77, 78 ..., 7 Wards 89, 88, 37, 95, 47 Yamaha 36, 21, 33, 35 Zenith 95 * TV/VCR component Note on your camcorder. Be sure to set the correct code, depending on IR SETUP code Digital program editing is Code number 1. Wards) 36 Brocsonic 70, 82 Canon 77, 78, 97 Citizen 47 Craig 73, 47...
Operating Instructions
Page 61
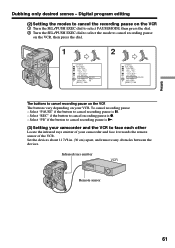
To cancel recording pause: - Set the devices about 11 7/8 in. (30 cm) apart, and remove any obstacles between the devices. Digital program editing (2) Setting the modes to cancel the recording pause on the VCR 1 Turn the SEL/PUSH EXEC dial to select PAUSEMODE, then ... 1 2 OTHERS ED I TSET CONTROL ADJ TEST " CUT- Select "PB" if the button to cancel recording pause is N. (3) Setting your camcorder and the VCR to cancel recording pause on your camcorder and face it towards the remote sensor of the VCR. Select "PAUSE" if the button to cancel recording pause is X. - Infrared...
To cancel recording pause: - Set the devices about 11 7/8 in. (30 cm) apart, and remove any obstacles between the devices. Digital program editing (2) Setting the modes to cancel the recording pause on the VCR 1 Turn the SEL/PUSH EXEC dial to select PAUSEMODE, then ... 1 2 OTHERS ED I TSET CONTROL ADJ TEST " CUT- Select "PB" if the button to cancel recording pause is N. (3) Setting your camcorder and the VCR to cancel recording pause on your camcorder and face it towards the remote sensor of the VCR. Select "PAUSE" if the button to cancel recording pause is X. - Infrared...
Operating Instructions
Page 62
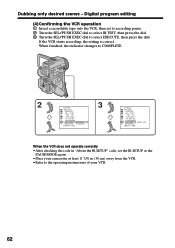
... I R TEST RETURN RETURN EXECUTE [ MENU ] : END 3 OTHERS ED I TSET CONTROL ADJ TEST " CUT- Digital program editing (4) Confirming the VCR operation 1 Insert a recordable tape into the VCR, then set the IR SETUP or the PAUSEMODE again. •Place your camcorder at least 11 7/8 in "About the IR SETUP" code, set to recording pause...
... I R TEST RETURN RETURN EXECUTE [ MENU ] : END 3 OTHERS ED I TSET CONTROL ADJ TEST " CUT- Digital program editing (4) Confirming the VCR operation 1 Insert a recordable tape into the VCR, then set the IR SETUP or the PAUSEMODE again. •Place your camcorder at least 11 7/8 in "About the IR SETUP" code, set to recording pause...

Operating Instructions
Page 63
...[ MENU ] : END IR i . I N " " CUT-OUT " I R SETUP P AUS EMODE I R ADJ TEST " CUT- Digital program editing Step 2: Setting the VCR to operate with the i.LINK cable (DV connecting cable) When you connect a digital video camera recorder, set the input selector to select i.LINK, then press the dial. I N " " CUT-OUT... you connect using i.LINK cable (DV connecting cable) (not supplied), follow the procedures below. (1) Set the POWER switch to VCR on your camcorder . (2) Turn the power of the connected VCR on, then set its power switch to VCR/VTR. (3) Press MENU to display the menu....
...[ MENU ] : END IR i . I N " " CUT-OUT " I R SETUP P AUS EMODE I R ADJ TEST " CUT- Digital program editing Step 2: Setting the VCR to operate with the i.LINK cable (DV connecting cable) When you connect a digital video camera recorder, set the input selector to select i.LINK, then press the dial. I N " " CUT-OUT... you connect using i.LINK cable (DV connecting cable) (not supplied), follow the procedures below. (1) Set the POWER switch to VCR on your camcorder . (2) Turn the power of the connected VCR on, then set its power switch to VCR/VTR. (3) Press MENU to display the menu....
Operating Instructions
Page 64
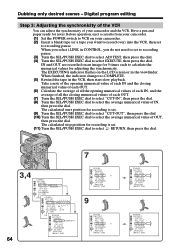
Digital program editing Step 3: Adjusting the synchronicity of the VCR You can adjust the synchronicity of your camcorder. (2) Insert a blank tape (or a tape you do not need to set . (11) Turn the SEL/PUSH EXEC dial to recording pause. IN and OUT are.... The calculated start slow playback. I N " " CUT-OUT " 0 I R SETUP P AUS EMODE I R TEST RETURN [ MENU ] : END OTHERS ED I NG " CUT- Before operation, eject a cassette from your camcorder. (1) Set the POWER swtich to VCR on the LCD screen or in the VCR, then start position for 5 times each OUT. (7) Turn the SEL/PUSH...
Digital program editing Step 3: Adjusting the synchronicity of the VCR You can adjust the synchronicity of your camcorder. (2) Insert a blank tape (or a tape you do not need to set . (11) Turn the SEL/PUSH EXEC dial to recording pause. IN and OUT are.... The calculated start slow playback. I N " " CUT-OUT " 0 I R SETUP P AUS EMODE I R TEST RETURN [ MENU ] : END OTHERS ED I NG " CUT- Before operation, eject a cassette from your camcorder. (1) Set the POWER swtich to VCR on the LCD screen or in the VCR, then start position for 5 times each OUT. (7) Turn the SEL/PUSH...
Operating Instructions
Page 65
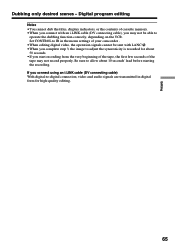
...the contents of cassette memory. •When you connect with LANC . •When you connect using an i.LINK cable (DV connecting cable) With digital-to IR in digital form for about 10 seconds' lead before starting the recording. Editing Dubbing only desired scenes - Set CONTROL to...to allow about 50 seconds. •If you start recording from the very beginning of the tape, the first few seconds of your camcorder . •When editing digital video, the operation signals cannot be able to adjust the syncronicity is recorded for high-quality editing. 65 If you complete step 3,...
...the contents of cassette memory. •When you connect with LANC . •When you connect using an i.LINK cable (DV connecting cable) With digital-to IR in digital form for about 10 seconds' lead before starting the recording. Editing Dubbing only desired scenes - Set CONTROL to...to allow about 50 seconds. •If you start recording from the very beginning of the tape, the first few seconds of your camcorder . •When editing digital video, the operation signals cannot be able to adjust the syncronicity is recorded for high-quality editing. 65 If you complete step 3,...
Operating Instructions
Page 66
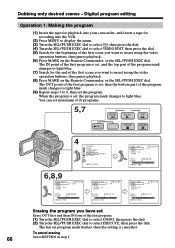
.... (6) Press MARK on the Remote Commander, or the SEL/PUSH EXEC dial. To cancel erasing Select RETURN in step 2. Digital program editing Operation 1: Making the program (1) Insert the tape for playback into your camcorder, and insert a tape for recording into the VCR. (2) Press MENU to display the menu. (3) Turn the SEL/PUSH...
.... (6) Press MARK on the Remote Commander, or the SEL/PUSH EXEC dial. To cancel erasing Select RETURN in step 2. Digital program editing Operation 1: Making the program (1) Insert the tape for playback into your camcorder, and insert a tape for recording into the VCR. (2) Press MENU to display the menu. (3) Turn the SEL/PUSH...
Operating Instructions
Page 67
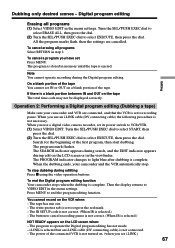
...x using the video operation buttons. When you set IN or OUT on the LCD screen when: - To end the Digital program editing function Your camcorder stops when the dubbing is selected.) - On a blank portion of the tape You cannot set i.LINK.) 67 You ...red mark. - Operation 2: Performing a Digital program editing (Dubbing a tape) Make sure your camcorder and the VCR automatically stop dubbing during the Digital program editing. The program mark flashes. When the dubbing ends, your camcorder and VCR are cancelled. Digital program editing Erasing all programs Select RETURN ...
...x using the video operation buttons. When you set IN or OUT on the LCD screen when: - To end the Digital program editing function Your camcorder stops when the dubbing is selected.) - On a blank portion of the tape You cannot set i.LINK.) 67 You ...red mark. - Operation 2: Performing a Digital program editing (Dubbing a tape) Make sure your camcorder and the VCR automatically stop dubbing during the Digital program editing. The program mark flashes. When the dubbing ends, your camcorder and VCR are cancelled. Digital program editing Erasing all programs Select RETURN ...
Operating Instructions
Page 68
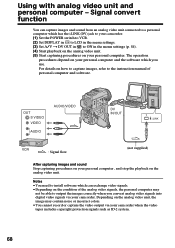
...Set DISPLAY in to LCD in the menu settings. (3) Set A/V t DV OUT in to a personal computer which you convert analog video signals into digital video signals via your personal computer. OUT S VIDEO VIDEO AUDIO AUDIO/VIDEO DV IN/OUT i.LINK : Signal flow (not supplied) After capturing images ...or incorrect colors. • You cannot record or capture the video output via your personal computer , and stop the playback on your camcorder. For details on the condition of personal computer and software. Using with analog video unit and personal computer - Signal convert function You can...
...Set DISPLAY in to LCD in the menu settings. (3) Set A/V t DV OUT in to a personal computer which you convert analog video signals into digital video signals via your personal computer. OUT S VIDEO VIDEO AUDIO AUDIO/VIDEO DV IN/OUT i.LINK : Signal flow (not supplied) After capturing images ...or incorrect colors. • You cannot record or capture the video output via your personal computer , and stop the playback on your camcorder. For details on the condition of personal computer and software. Using with analog video unit and personal computer - Signal convert function You can...


