User Manual
Page 2
... reception, which the receiver is no guarantee that to radio communications. CAUTION Replace the battery with Part 15 of Conformity Trade Name: SONY Model No.: DCR-HC54E Responsible Party: Sony Electronics Inc. Telephone number: 858-942-2230 This device complies with the specified type only...measures: - This equipment generates, uses, and can be determined by one or more of Conformity Trade Name: SONY Model No.: DCR-HC52E Responsible Party: Sony Electronics Inc. The number below is encouraged to try to provide reasonable protection against harmful interference in the U.S.A. ...
... reception, which the receiver is no guarantee that to radio communications. CAUTION Replace the battery with Part 15 of Conformity Trade Name: SONY Model No.: DCR-HC54E Responsible Party: Sony Electronics Inc. Telephone number: 858-942-2230 This device complies with the specified type only...measures: - This equipment generates, uses, and can be determined by one or more of Conformity Trade Name: SONY Model No.: DCR-HC52E Responsible Party: Sony Electronics Inc. The number below is encouraged to try to provide reasonable protection against harmful interference in the U.S.A. ...

User Manual
Page 3
...), restart the application or disconnect and connect the communication cable (i.LINK, etc.) again. The supplied interface cable must be used . Battery pack This device complies with Part 15 of materials will help to conserve natural resources. Continued , 3 Notice for customers in the United... using connection cables shorter than 3 meters (9.8 feet). Notice for the recycling of this product is disposed of this product is Sony Corporation, 1-7-1 Konan Minato-ku Tokyo, 1080075 Japan. Instead it shall be treated as the supplied one and approved by inappropriate waste...
...), restart the application or disconnect and connect the communication cable (i.LINK, etc.) again. The supplied interface cable must be used . Battery pack This device complies with Part 15 of materials will help to conserve natural resources. Continued , 3 Notice for customers in the United... using connection cables shorter than 3 meters (9.8 feet). Notice for the recycling of this product is disposed of this product is Sony Corporation, 1-7-1 Konan Minato-ku Tokyo, 1080075 Japan. Instead it shall be treated as the supplied one and approved by inappropriate waste...
User Manual
Page 4
...shop where you purchased the product. 4 Notes on use mini DV cassettes marked with an incorporated battery, this product shall not be treated as household waste. Your camcorder is not dustproof, dripproof or waterproof. See "On use in the correct way. The recycling of... caused by the following parts. For DCR-HC53E/HC54E "First Step Guide" for the recycling of electrical and electronic equipment. Viewfinder Battery pack LCD panel • The camcorder is not compatible with your camcorder to another device with this battery should be replaced by qualified service staff...
...shop where you purchased the product. 4 Notes on use mini DV cassettes marked with an incorporated battery, this product shall not be treated as household waste. Your camcorder is not dustproof, dripproof or waterproof. See "On use in the correct way. The recycling of... caused by the following parts. For DCR-HC53E/HC54E "First Step Guide" for the recycling of electrical and electronic equipment. Viewfinder Battery pack LCD panel • The camcorder is not compatible with your camcorder to another device with this battery should be replaced by qualified service staff...
User Manual
Page 7
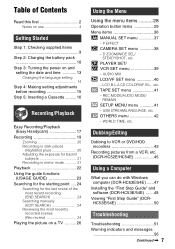
...or DVD/HDD recorders 43 Recording pictures from a VCR, etc. (DCR-HC52E/HC54E 45 Using a Computer What you can do with Windows computer (DCR-HC53E/54E) ......47 Installing the "First Step Guide" and software (DCR-HC53E/54E) .......48 Viewing "First Step Guide" (DCRHC53E/54E 50... Step 2: Charging the battery pack 10 Step 3: Turning the power on and setting the date and time 13 Changing the language setting 14 Step 4: Making setting adjustments before recording 15 Step 5: Inserting a Cassette ......... 16 Recording/Playback Easy Recording/Playback (Easy Handycam 17 Recording 19 Zooming 20...
...or DVD/HDD recorders 43 Recording pictures from a VCR, etc. (DCR-HC52E/HC54E 45 Using a Computer What you can do with Windows computer (DCR-HC53E/54E) ......47 Installing the "First Step Guide" and software (DCR-HC53E/54E) .......48 Viewing "First Step Guide" (DCRHC53E/54E 50... Step 2: Charging the battery pack 10 Step 3: Turning the power on and setting the date and time 13 Changing the language setting 14 Step 4: Making setting adjustments before recording 15 Step 5: Inserting a Cassette ......... 16 Recording/Playback Easy Recording/Playback (Easy Handycam 17 Recording 19 Zooming 20...

User Manual
Page 8
Table of Contents (Continued) Additional Information Using your camcorder abroad ...... 58 Maintenance and precautions ...... 59 Usable cassette tapes 59 About the "InfoLITHIUM" battery pack 60 About i.LINK 61 On using your camcorder 62 Specifications 65 Quick Reference Identifying parts and controls ....... 68 Indicators displayed during recording/playback 71 Index 74 8
Table of Contents (Continued) Additional Information Using your camcorder abroad ...... 58 Maintenance and precautions ...... 59 Usable cassette tapes 59 About the "InfoLITHIUM" battery pack 60 About i.LINK 61 On using your camcorder 62 Specifications 65 Quick Reference Identifying parts and controls ....... 68 Indicators displayed during recording/playback 71 Index 74 8
User Manual
Page 9
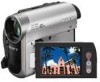
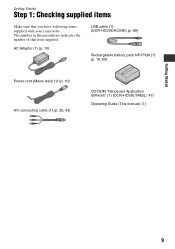
Getting Started Step 1: Checking supplied items Make sure that item supplied. The number in the parentheses indicates the number of that you have following items supplied with your camcorder. AC Adaptor (1) (p. 10) USB cable (1) (DCR-HC53E/HC54E) (p. 69) Rechargeable battery pack NP-FH30 (1) (p. 10, 60) Power cord (Mains lead) (1) (p. 10) A/V connecting cable (1) (p. 26, 43) CD-ROM "Handycam Application Software" (1) (DCR-HC53E/54E)(p. 47) Operating Guide (This manual) (1) Getting Started 9
Getting Started Step 1: Checking supplied items Make sure that item supplied. The number in the parentheses indicates the number of that you have following items supplied with your camcorder. AC Adaptor (1) (p. 10) USB cable (1) (DCR-HC53E/HC54E) (p. 69) Rechargeable battery pack NP-FH30 (1) (p. 10, 60) Power cord (Mains lead) (1) (p. 10) A/V connecting cable (1) (p. 26, 43) CD-ROM "Handycam Application Software" (1) (DCR-HC53E/54E)(p. 47) Operating Guide (This manual) (1) Getting Started 9

User Manual
Page 10
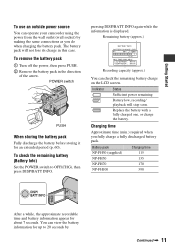
...lamp lights up and charging starts. b Notes • You cannot attach any "InfoLITHIUM" battery pack other than the H series to your camcorder. 1 Align the terminals of the battery pack and your camcorder 1, then attach the battery pack and click it into place 2. 2 Slide the POWER switch in the direction of ... Power cord (Mains lead) POWER switch You can charge the "InfoLITHIUM" battery pack (H series) (p. 60) after attaching it to your camcorder. 10 4 Connect the power cord (mains lead) to the DC IN jack on your camcorder. Disconnect the AC Adaptor from the DC IN jack holding both the...
...lamp lights up and charging starts. b Notes • You cannot attach any "InfoLITHIUM" battery pack other than the H series to your camcorder. 1 Align the terminals of the battery pack and your camcorder 1, then attach the battery pack and click it into place 2. 2 Slide the POWER switch in the direction of ... Power cord (Mains lead) POWER switch You can charge the "InfoLITHIUM" battery pack (H series) (p. 60) after attaching it to your camcorder. 10 4 Connect the power cord (mains lead) to the DC IN jack on your camcorder. Disconnect the AC Adaptor from the DC IN jack holding both the...
User Manual
Page 11
...connections as you fully charge a fully discharged battery pack. Remaining battery (approx.) BATTERY INFO BATTERY CHARGE LEVEL 0% 50% 100% REC TIME AVAILABLE LCD SCREEN : 85 min VIEWFINDER : 99 min Recording capacity (approx.) You can check the remaining battery charge on the LCD screen. Indicator Status...the information is displayed. Charging time Approximate time (min.) required when you do when charging the battery pack. Getting Started To use an outside power source You can operate your camcorder using the power from the wall outlet (wall socket) by Continued , 11 The...
...connections as you fully charge a fully discharged battery pack. Remaining battery (approx.) BATTERY INFO BATTERY CHARGE LEVEL 0% 50% 100% REC TIME AVAILABLE LCD SCREEN : 85 min VIEWFINDER : 99 min Recording capacity (approx.) You can check the remaining battery charge on the LCD screen. Indicator Status...the information is displayed. Charging time Approximate time (min.) required when you do when charging the battery pack. Getting Started To use an outside power source You can operate your camcorder using the power from the wall outlet (wall socket) by Continued , 11 The...
User Manual
Page 12
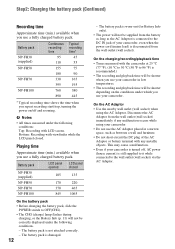
... On the AC Adaptor • Use the nearby wall outlet (wall socket) when using your camcorder. • Do not use your camcorder. The battery pack is damaged. 12 - The battery pack is worn-out (for Battery Info only). • The power will not be correctly displayed under which you use your...turning the power on the conditions under the following conditions: Top: Recording with the camcorder at 25 °C (77 °F). (10 °C to 30 °C (50 °F to 86 °F) is disconnected from the battery as long as between a wall and furniture. • Do not short-circuit...
... On the AC Adaptor • Use the nearby wall outlet (wall socket) when using your camcorder. • Do not use your camcorder. The battery pack is damaged. 12 - The battery pack is worn-out (for Battery Info only). • The power will not be correctly displayed under which you use your...turning the power on the conditions under the following conditions: Top: Recording with the camcorder at 25 °C (77 °F). (10 °C to 30 °C (50 °F to 86 °F) is disconnected from the battery as long as between a wall and furniture. • Do not short-circuit...
User Manual
Page 13
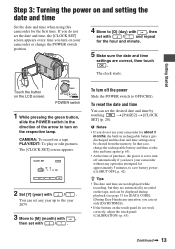
...settings are automatically recorded on your camcorder without any year up to the year 2079. 3 Move to OFF(CHG). Getting Started Touch the button on the respective lamp. POWER switch 1 While pressing the green button, slide the POWER switch in rechargeable battery gets discharged and the date and...again (p. 65). • At the time of the arrow to save battery power ([A.SHUT OFF], p. 42). To turn off automatically if you do not set with / . If you do not use your camcorder for [DATA CODE] (During Easy Handycam operation, you can set only [DATE/TIME])). • If the ...
...settings are automatically recorded on your camcorder without any year up to the year 2079. 3 Move to OFF(CHG). Getting Started Touch the button on the respective lamp. POWER switch 1 While pressing the green button, slide the POWER switch in rechargeable battery gets discharged and the date and...again (p. 65). • At the time of the arrow to save battery power ([A.SHUT OFF], p. 42). To turn off automatically if you do not set with / . If you do not use your camcorder for [DATA CODE] (During Easy Handycam operation, you can set only [DATE/TIME])). • If the ...
User Manual
Page 15
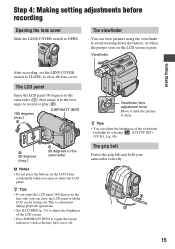
... lens cover. The viewfinder You can view pictures using the viewfinder to the camcorder (1), then rotate it until the picture is clear. The LCD panel Open the LCD panel 90 degrees to avoid wearing down the battery, or when the picture seen on the LCD frame accidentally when you can ...adjust the brightness of the LCD screen. • Press DISP/BATT INFO to OPEN. The grip belt Fasten the grip belt and hold your camcorder correctly. 4 1 2 3 15 z Tips •...
... lens cover. The viewfinder You can view pictures using the viewfinder to the camcorder (1), then rotate it until the picture is clear. The LCD panel Open the LCD panel 90 degrees to avoid wearing down the battery, or when the picture seen on the LCD frame accidentally when you can ...adjust the brightness of the LCD screen. • Press DISP/BATT INFO to OPEN. The grip belt Fasten the grip belt and hold your camcorder correctly. 4 1 2 3 15 z Tips •...

User Manual
Page 32
...like color lamps ONE PUSH ( ) The white balance will shoot the subject. 3 Touch . Outdoors - z Tips • If you have changed the battery pack while [AUTO] was selected, if keeps flashing after inside the house, or vice versa, you select [ONE PUSH], keep framing white object while ... gradually changes from color to [AUTO]. • If you set with the [EXPOSURE] set (or vice versa), select [AUTO] and aim your camcorder outdoors from inside use with [ONE PUSH], if you start/stop recording, or operate the touch panel. B AUTO The white balance is appropriately adjusted ...
...like color lamps ONE PUSH ( ) The white balance will shoot the subject. 3 Touch . Outdoors - z Tips • If you have changed the battery pack while [AUTO] was selected, if keeps flashing after inside the house, or vice versa, you select [ONE PUSH], keep framing white object while ... gradually changes from color to [AUTO]. • If you set with the [EXPOSURE] set (or vice versa), select [AUTO] and aim your camcorder outdoors from inside use with [ONE PUSH], if you start/stop recording, or operate the touch panel. B AUTO The white balance is appropriately adjusted ...

User Manual
Page 40
...Standard brightness. See page 28 for the setting. • When you connect your camcorder to outside power sources, [BRIGHT] is automatically selected for the setting. • When you select [BRIGHT], battery life is slightly reduced during recording. LCD COLOR You can adjust the color on ...picture will not be affected by this operation. b Notes • When you connect your camcorder to [16:9 WIDE]. LCD/VF SET menu - b Notes • When you select [BRIGHT], battery life is automatically selected for details on the LCD screen with B. The recorded picture will ...
...Standard brightness. See page 28 for the setting. • When you connect your camcorder to outside power sources, [BRIGHT] is automatically selected for the setting. • When you select [BRIGHT], battery life is slightly reduced during recording. LCD COLOR You can adjust the color on ...picture will not be affected by this operation. b Notes • When you connect your camcorder to [16:9 WIDE]. LCD/VF SET menu - b Notes • When you select [BRIGHT], battery life is automatically selected for details on the LCD screen with B. The recorded picture will ...
User Manual
Page 51
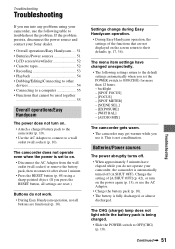
...to OFF(CHG) for more than 12 hours. - If the problem persists, disconnect the power source and contact your Sony dealer. • Overall operations/Easy Handycam ..... 51 • Batteries/Power sources 51 • LCD screen/viewfinder 52 • Cassette tapes 52 • Recording 53 • Playback...), or use it. Change the setting of the functions that cannot be used together 55 Overall operations/Easy Handycam The power does not turn on . • Attach a charged battery pack to the camcorder (p. 10). • Use the AC Adaptor to connect to a wall outlet (wall socket) (p. 10...
...to OFF(CHG) for more than 12 hours. - If the problem persists, disconnect the power source and contact your Sony dealer. • Overall operations/Easy Handycam ..... 51 • Batteries/Power sources 51 • LCD screen/viewfinder 52 • Cassette tapes 52 • Recording 53 • Playback...), or use it. Change the setting of the functions that cannot be used together 55 Overall operations/Easy Handycam The power does not turn on . • Attach a charged battery pack to the camcorder (p. 10). • Use the AC Adaptor to connect to a wall outlet (wall socket) (p. 10...

User Manual
Page 52
...; This is connected correctly (p. 10). • Moisture condensation has occurred inside the camcorder (p. 62). 52 The battery pack discharges too quickly. • Ambient temperature is not a malfunction. • Fully charge the battery again. LCD screen/viewfinder A rippling effect appears on your Sony dealer. Replace it . • This is open or close the LCD panel...
...; This is connected correctly (p. 10). • Moisture condensation has occurred inside the camcorder (p. 62). 52 The battery pack discharges too quickly. • Ambient temperature is not a malfunction. • Fully charge the battery again. LCD screen/viewfinder A rippling effect appears on your Sony dealer. Replace it . • This is open or close the LCD panel...

User Manual
Page 53
...recording candlelight or electric light in the LP mode. [END SCH] does not work during rewinding or fast-forwarding. • When using a cassette with battery operation) and therefore increases noise. The cassette is not displayed. • Set [ REMAIN] to [ON] to [AUTO] (p. 29). •...suitable for at least 1 hour, then re-insert the cassette (p. 62). Remove the cassette and leave your camcorder for auto focus. The remaining tape indicator is noisier during Easy Handycam operation (p. 18). You cannot record a smooth transition on a tape from the last recorded scene to the ...
...recording candlelight or electric light in the LP mode. [END SCH] does not work during rewinding or fast-forwarding. • When using a cassette with battery operation) and therefore increases noise. The cassette is not displayed. • Set [ REMAIN] to [ON] to [AUTO] (p. 29). •...suitable for at least 1 hour, then re-insert the cassette (p. 62). Remove the cassette and leave your camcorder for auto focus. The remaining tape indicator is noisier during Easy Handycam operation (p. 18). You cannot record a smooth transition on a tape from the last recorded scene to the ...
User Manual
Page 56
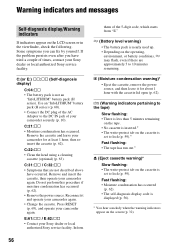
...Moisture condensation has occurred. Remove and insert the cassette, then operate your camcorder again. • Change the cassette. Reconnect it for at least 1 hour, then reinsert the cassette (p. 62). E (Battery level warning) • The battery pack is set to 10 minutes remaining. % (Moisture condensation warning)*...ss • Clean the head using a cleaning cassette (optional) (p. 63). Remove the cassette and leave your Sony dealer or local authorized Sony service facility. If the problem persists even after you can fix by yourself. Do not perform this procedure if ...
...Moisture condensation has occurred. Remove and insert the cassette, then operate your camcorder again. • Change the cassette. Reconnect it for at least 1 hour, then reinsert the cassette (p. 62). E (Battery level warning) • The battery pack is set to 10 minutes remaining. % (Moisture condensation warning)*...ss • Clean the head using a cleaning cassette (optional) (p. 63). Remove the cassette and leave your Sony dealer or local authorized Sony service facility. If the problem persists even after you can fix by yourself. Do not perform this procedure if ...

User Manual
Page 60
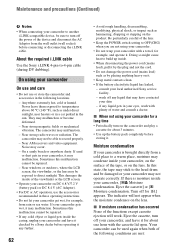
... is connected to [NEVER] on your camcorder. An "InfoLITHIUM" battery pack is frequently used. The battery pack is also consumed when your camcorder is in a fully charged state, or when the battery pack is a lithium-ion battery pack that the battery indication will be able to charge it ... to warm it up on your camcorder or remove the battery pack. The battery pack is compatible with an "InfoLITHIUM" battery pack. Remaining battery time will not be restored if it up , and insert it in your camcorder, and displays the remaining battery time in tape recording standby until ...
... is connected to [NEVER] on your camcorder. An "InfoLITHIUM" battery pack is frequently used. The battery pack is also consumed when your camcorder is in a fully charged state, or when the battery pack is a lithium-ion battery pack that the battery indication will be able to charge it ... to warm it up on your camcorder or remove the battery pack. The battery pack is compatible with an "InfoLITHIUM" battery pack. Remaining battery time will not be restored if it up , and insert it in your camcorder, and displays the remaining battery time in tape recording standby until ...

User Manual
Page 61
...be sent in one device can also control other devices, be sent or received in one . • Each battery's life is an i.LINKcompliant DV Interface. About battery life • Battery capacity decreases over time and through repeated use i.LINK functions on this unit For details on how to dub when... it is probably time to an i.LINK-compatible device having a DV Interface, see page 43, 45. When connecting this unit is governed by Sony (e.g. For example, a baud rate of 100 Mbps means that operation method may vary, or data transactions may differ from any device in the operating...
...be sent in one device can also control other devices, be sent or received in one . • Each battery's life is an i.LINKcompliant DV Interface. About battery life • Battery capacity decreases over time and through repeated use i.LINK functions on this unit For details on how to dub when... it is probably time to an i.LINK-compatible device having a DV Interface, see page 43, 45. When connecting this unit is governed by Sony (e.g. For example, a baud rate of 100 Mbps means that operation method may vary, or data transactions may differ from any device in the operating...
User Manual
Page 62
... before connecting or disconnecting the i.LINK cable. if any liquid gets in the following conditions are not using your local authorized Sony service facility. - If there is brought directly from the wall outlet (wall socket) before operating it any further. 62 • Avoid rough handling...to turn off any liquid that may have it checked by placing anything heavy on DC 6.8 V/7.2 V (battery pack) or DC 8.4 V (AC Adaptor). • For DC or AC operation, use or store the camcorder and accessories in your eyes, wash with a towel, for 1H.] appears. About the required i.LINK cable...
... before connecting or disconnecting the i.LINK cable. if any liquid gets in the following conditions are not using your local authorized Sony service facility. - If there is brought directly from the wall outlet (wall socket) before operating it any further. 62 • Avoid rough handling...to turn off any liquid that may have it checked by placing anything heavy on DC 6.8 V/7.2 V (battery pack) or DC 8.4 V (AC Adaptor). • For DC or AC operation, use or store the camcorder and accessories in your eyes, wash with a towel, for 1H.] appears. About the required i.LINK cable...


