User Manual
Page 2
...to radio communications. Telephone number: 858-942-2230 This device complies with Part 15 of Conformity Trade Name: SONY Model No.: DCR-HC52E Responsible Party: Sony Electronics Inc. These limits are cautioned that interference will not occur in a particular installation. Consult the dealer or... harmful interference in the U.S.A. CAUTION You are designed to comply with Part 15 of Conformity Trade Name: SONY Model No.: DCR-HC54E Responsible Party: Sony Electronics Inc. If this equipment does cause harmful interference to radio or television reception, which the receiver is...
...to radio communications. Telephone number: 858-942-2230 This device complies with Part 15 of Conformity Trade Name: SONY Model No.: DCR-HC52E Responsible Party: Sony Electronics Inc. These limits are cautioned that interference will not occur in a particular installation. Consult the dealer or... harmful interference in the U.S.A. CAUTION You are designed to comply with Part 15 of Conformity Trade Name: SONY Model No.: DCR-HC54E Responsible Party: Sony Electronics Inc. If this equipment does cause harmful interference to radio or television reception, which the receiver is...
User Manual
Page 4
... separate collection systems) This symbol on the battery or on how to another device with the Cassette Memory function (p. 59). For DCR-HC53E/HC54E "First Step Guide" for connecting the camcorder to the applicable collection point for safety, performance or data integrity reasons require a permanent connection with . By ensuring these batteries are...
... separate collection systems) This symbol on the battery or on how to another device with the Cassette Memory function (p. 59). For DCR-HC53E/HC54E "First Step Guide" for connecting the camcorder to the applicable collection point for safety, performance or data integrity reasons require a permanent connection with . By ensuring these batteries are...
User Manual
Page 5
...tiny black points and/or bright points (white, red, blue, or green in color) that is grayed out is indicated on the model DCR-HC54E. It adopts the MTF* measurement system for effective use. The model name is not available under the current recording or playback conditions. &#... or playback is equipped with a Carl Zeiss lens, which was developed jointly by Carl Zeiss, in Germany, and Sony Corporation, and produces superior images. About the Carl Zeiss lens Your camcorder is not possible due to change without notice. About menu items, LCD panel, viewfinder, and lens • A...
...tiny black points and/or bright points (white, red, blue, or green in color) that is grayed out is indicated on the model DCR-HC54E. It adopts the MTF* measurement system for effective use. The model name is not available under the current recording or playback conditions. &#... or playback is equipped with a Carl Zeiss lens, which was developed jointly by Carl Zeiss, in Germany, and Sony Corporation, and produces superior images. About the Carl Zeiss lens Your camcorder is not possible due to change without notice. About menu items, LCD panel, viewfinder, and lens • A...
User Manual
Page 7
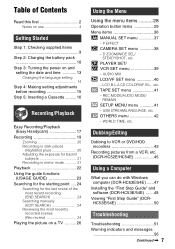
... setting 14 Step 4: Making setting adjustments before recording 15 Step 5: Inserting a Cassette ......... 16 Recording/Playback Easy Recording/Playback (Easy Handycam 17 Recording 19 Zooming 20 Recording in dark places (NightShot plus 20 Adjusting the exposure for backlit subjects 21 Recording in mirror mode ... or DVD/HDD recorders 43 Recording pictures from a VCR, etc. (DCR-HC52E/HC54E 45 Using a Computer What you can do with Windows computer (DCR-HC53E/54E) ......47 Installing the "First Step Guide" and software (DCR-HC53E/54E) .......48 Viewing "First Step Guide" (DCRHC53E/54E 50 ...
... setting 14 Step 4: Making setting adjustments before recording 15 Step 5: Inserting a Cassette ......... 16 Recording/Playback Easy Recording/Playback (Easy Handycam 17 Recording 19 Zooming 20 Recording in dark places (NightShot plus 20 Adjusting the exposure for backlit subjects 21 Recording in mirror mode ... or DVD/HDD recorders 43 Recording pictures from a VCR, etc. (DCR-HC52E/HC54E 45 Using a Computer What you can do with Windows computer (DCR-HC53E/54E) ......47 Installing the "First Step Guide" and software (DCR-HC53E/54E) .......48 Viewing "First Step Guide" (DCRHC53E/54E 50 ...
User Manual
Page 9
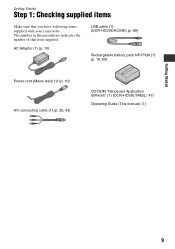
The number in the parentheses indicates the number of that you have following items supplied with your camcorder. AC Adaptor (1) (p. 10) USB cable (1) (DCR-HC53E/HC54E) (p. 69) Rechargeable battery pack NP-FH30 (1) (p. 10, 60) Power cord (Mains lead) (1) (p. 10) A/V connecting cable (1) (p. 26, 43) CD-ROM "Handycam Application Software" (1) (DCR-HC53E/54E)(p. 47) Operating Guide (This manual) (1) Getting Started 9 Getting Started Step 1: Checking supplied items Make sure that item supplied.
The number in the parentheses indicates the number of that you have following items supplied with your camcorder. AC Adaptor (1) (p. 10) USB cable (1) (DCR-HC53E/HC54E) (p. 69) Rechargeable battery pack NP-FH30 (1) (p. 10, 60) Power cord (Mains lead) (1) (p. 10) A/V connecting cable (1) (p. 26, 43) CD-ROM "Handycam Application Software" (1) (DCR-HC53E/54E)(p. 47) Operating Guide (This manual) (1) Getting Started 9 Getting Started Step 1: Checking supplied items Make sure that item supplied.
User Manual
Page 34
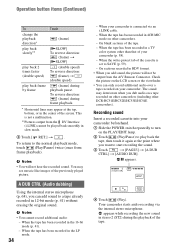
... deteriorate when you want to the normal playback mode, touch (Play/Pause) twice (once from the A/V Remote Connector. When your camcorder is not a malfunction. **Pictures output from the DV Interface (i.LINK) cannot be output from frame playback). On sections recorded in ... the original sound. Recording sound Insert a recorded cassette into your camcorder beforehand. 1 Slide the POWER switch repeatedly to a tape already recorded in a TV color system other DCR-HC51E/HC52E/HC53E/HC54E camcorders). This is connected via the internal stereo microphone. A DUB CTRL...
... deteriorate when you want to the normal playback mode, touch (Play/Pause) twice (once from the A/V Remote Connector. When your camcorder is not a malfunction. **Pictures output from the DV Interface (i.LINK) cannot be output from frame playback). On sections recorded in ... the original sound. Recording sound Insert a recorded cassette into your camcorder beforehand. 1 Slide the POWER switch repeatedly to a tape already recorded in a TV color system other DCR-HC51E/HC52E/HC53E/HC54E camcorders). This is connected via the internal stereo microphone. A DUB CTRL...

User Manual
Page 35
.../HC54E, then touch / to select [AUDIO MIX], then touch [EXEC]. HC51E/HC53E, or (VCR SET) for the DCR- REC CTRL (Recording control) (DCR-HC52E/HC54E) See page 45. To check the recorded sound 1 Play back the tape on other scenes, repeat step 2 to adjust the balance of the ...
.../HC54E, then touch / to select [AUDIO MIX], then touch [EXEC]. HC51E/HC53E, or (VCR SET) for the DCR- REC CTRL (Recording control) (DCR-HC52E/HC54E) See page 45. To check the recorded sound 1 Play back the tape on other scenes, repeat step 2 to adjust the balance of the ...
User Manual
Page 36
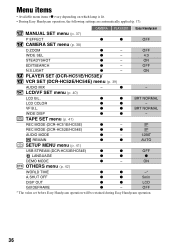
...on which lamp is lit. • During Easy Handycam operation, the following settings are automatically applied (p. 17). z z BRT NORMAL LCD COLOR z z - TAPE SET menu (p. 41) REC MODE (DCR-HC51E/HC53E) z - SP REC MODE (DCR-HC52E/HC54E) z z SP AUDIO MODE z ... z z LCD GUIDEFRAME z - ON PLAYER SET (DCR-HC51E/HC53E)/ VCR SET (DCR-HC52E/HC54E) menu (p. 39) AUDIO MIX - ON EDITSEARCH z - VF B.L. OFF N.S.LIGHT z - OFF * The value set before Easy Handycam operation will be retained during Easy Handycam operation. 36 z z BRT NORMAL WIDE DISP z...
...on which lamp is lit. • During Easy Handycam operation, the following settings are automatically applied (p. 17). z z BRT NORMAL LCD COLOR z z - TAPE SET menu (p. 41) REC MODE (DCR-HC51E/HC53E) z - SP REC MODE (DCR-HC52E/HC54E) z z SP AUDIO MODE z ... z z LCD GUIDEFRAME z - ON PLAYER SET (DCR-HC51E/HC53E)/ VCR SET (DCR-HC52E/HC54E) menu (p. 39) AUDIO MIX - ON EDITSEARCH z - VF B.L. OFF N.S.LIGHT z - OFF * The value set before Easy Handycam operation will be retained during Easy Handycam operation. 36 z z BRT NORMAL WIDE DISP z...

User Manual
Page 37
... appear in sepia. P EFFECT The default setting is marked with special effects on selecting menu items. P EFFECT (Picture effect) You can be output. • For DCR-HC52E/HC54E: You cannot add effects to a picture during playback. b Notes • Effects added to the playback pictures are selected. Using the Menu 37 The...
... appear in sepia. P EFFECT The default setting is marked with special effects on selecting menu items. P EFFECT (Picture effect) You can be output. • For DCR-HC52E/HC54E: You cannot add effects to a picture during playback. b Notes • Effects added to the playback pictures are selected. Using the Menu 37 The...

User Manual
Page 39
... • Do not cover the infrared port with your fingers or other objects (p. 68). • Remove the conversion lens (optional) if it is for the DCR-HC52E/HC54E. You can record clearer pictures by setting [N.S.LIGHT], which emits infrared light (invisible), to [OFF].
... • Do not cover the infrared port with your fingers or other objects (p. 68). • Remove the conversion lens (optional) if it is for the DCR-HC52E/HC54E. You can record clearer pictures by setting [N.S.LIGHT], which emits infrared light (invisible), to [OFF].
User Manual
Page 41
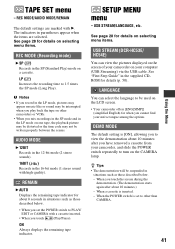
...situations such as those described below . - See page 28 for details on selecting menu items. USB STREAM (DCR-HC53E/ HC54E) You can select the language to be used on your camcorder, and slide the POWER switch repeatedly to 1.5 times the SP mode (Long Play). When the POWER switch...8226; The demonstration will be written properly between the scenes. LANGUAGE You can view the pictures displayed on the screen of your camcorder on the LCD screen. • Your camcorder offers [ENG[SIMP]] (simplified English) for about 10 minutes.) - When a cassette is [ON], allowing you to view the...
...situations such as those described below . - See page 28 for details on selecting menu items. USB STREAM (DCR-HC53E/ HC54E) You can select the language to be used on your camcorder, and slide the POWER switch repeatedly to 1.5 times the SP mode (Long Play). When the POWER switch...8226; The demonstration will be written properly between the scenes. LANGUAGE You can view the pictures displayed on the screen of your camcorder on the LCD screen. • Your camcorder offers [ENG[SIMP]] (simplified English) for about 10 minutes.) - When a cassette is [ON], allowing you to view the...
User Manual
Page 46
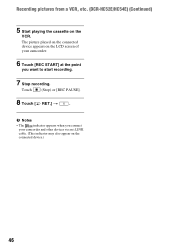
Touch (Stop) or [REC PAUSE]. 8 Touch [ RET.] t . Recording pictures from a VCR, etc. (DCR-HC52E/HC54E) (Continued) 5 Start playing the cassette on the connected device.) 46 b Notes • The indicator appears when you want to start recording. 7 Stop recording. The picture played on the connected device appears on the LCD screen of your camcorder. 6 Touch [REC START] at the point you connect your camcorder and other devices via an i.LINK cable. (This indicator may also appear on the VCR.
Touch (Stop) or [REC PAUSE]. 8 Touch [ RET.] t . Recording pictures from a VCR, etc. (DCR-HC52E/HC54E) (Continued) 5 Start playing the cassette on the connected device.) 46 b Notes • The indicator appears when you want to start recording. 7 Stop recording. The picture played on the connected device appears on the LCD screen of your camcorder. 6 Touch [REC START] at the point you connect your camcorder and other devices via an i.LINK cable. (This indicator may also appear on the VCR.
User Manual
Page 48
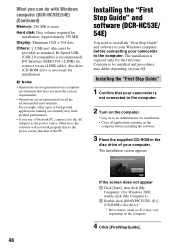
... in the disc drive of the PC. The installation screen appears. Installing the "First Step Guide" and software (DCR-HC53E/ 54E) You need to install the "First Step Guide" and software to your camcorder to the computer. If the screen does not appear 1 Click [Start], then click [My Computer]. (For Windows 2000...
... in the disc drive of the PC. The installation screen appears. Installing the "First Step Guide" and software (DCR-HC53E/ 54E) You need to install the "First Step Guide" and software to your camcorder to the computer. If the screen does not appear 1 Click [Start], then click [My Computer]. (For Windows 2000...

User Manual
Page 50
...HTML version of "First Step Guide" - When "First Step Guide" is recommended. Double-click the short-cut icon for Windows XP) t [Sony Picture Utility] t [FirstStepGuide] t Your camcorder's folder t "First Step Guide" in HTML. • To view "First Step Guide" in HTML without installing, copy the desired language ... displayed correctly due to the "First Step Guide" in PDF in the following cases: - Viewing "First Step Guide" (DCR-HC53E/54E) To view "First Step Guide" on your camcorder's "First Step Guide" on the CD-ROM, and then double-click [Index.html]. • Refer to the browser...
...HTML version of "First Step Guide" - When "First Step Guide" is recommended. Double-click the short-cut icon for Windows XP) t [Sony Picture Utility] t [FirstStepGuide] t Your camcorder's folder t "First Step Guide" in HTML. • To view "First Step Guide" in HTML without installing, copy the desired language ... displayed correctly due to the "First Step Guide" in PDF in the following cases: - Viewing "First Step Guide" (DCR-HC53E/54E) To view "First Step Guide" on your camcorder's "First Step Guide" on the CD-ROM, and then double-click [Index.html]. • Refer to the browser...
User Manual
Page 59
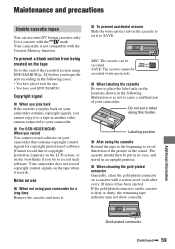
...be recorded. x For DCR-HC52E/HC54E: When you try to SAVE. REC SAVE SAVE: The cassette cannot be put a label along this border. The cassette should then be recorded (write-protected). Your camcorder does not record copyright control signals on your camcorder that contains copyright control ...REC: The cassette can use x When not using END SEARCH (p. 24) before you cannot copy it to your camcorder for copyright protection of your camcorder. Your camcorder is dirty or dusty, the remaining tape indicator may not show correctly. Do not put in its case, and...
...be recorded. x For DCR-HC52E/HC54E: When you try to SAVE. REC SAVE SAVE: The cassette cannot be put a label along this border. The cassette should then be recorded (write-protected). Your camcorder does not record copyright control signals on your camcorder that contains copyright control ...REC: The cassette can use x When not using END SEARCH (p. 24) before you cannot copy it to your camcorder for copyright protection of your camcorder. Your camcorder is dirty or dusty, the remaining tape indicator may not show correctly. Do not put in its case, and...
User Manual
Page 66
.../16 × 1 3/16 × 3 1/4 in .) (w/h/d) including the projecting parts with less than 2.2 kΩ (kilohms) USB jack (DCR-HC53E/HC54E) mini-B DV input/output jack (DCR-HC52E/ HC54E) i.LINK Interface (IEEE1394, 4-pin connector S100) DV output jack (DCR-HC51E/HC53E) i.LINK Interface (IEEE1394, 4-pin connector S100) LCD screen Picture 6.2 cm (2.5 type) Total dot number...
.../16 × 1 3/16 × 3 1/4 in .) (w/h/d) including the projecting parts with less than 2.2 kΩ (kilohms) USB jack (DCR-HC53E/HC54E) mini-B DV input/output jack (DCR-HC52E/ HC54E) i.LINK Interface (IEEE1394, 4-pin connector S100) DV output jack (DCR-HC51E/HC53E) i.LINK Interface (IEEE1394, 4-pin connector S100) LCD screen Picture 6.2 cm (2.5 type) Total dot number...

User Manual
Page 69
H BATT (battery release) PUSH button (11) I CHG (charge) lamp (10) J For DCR-HC53E/HC54E: (USB) jack K . (back light) button (21) Continued , 69 Quick Reference D LCD screen/touch panel (15, 71) E Zoom buttons (20) F REC START/STOP button (17, 19) G Speaker Playback sounds comes out from the speaker. For how to adjust the volume, see page 22. A DISP/BATT INFO button (11, 15) B EASY button (17) C RESET button Initializes all the settings, including the setting of the date and time.
H BATT (battery release) PUSH button (11) I CHG (charge) lamp (10) J For DCR-HC53E/HC54E: (USB) jack K . (back light) button (21) Continued , 69 Quick Reference D LCD screen/touch panel (15, 71) E Zoom buttons (20) F REC START/STOP button (17, 19) G Speaker Playback sounds comes out from the speaker. For how to adjust the volume, see page 22. A DISP/BATT INFO button (11, 15) B EASY button (17) C RESET button Initializes all the settings, including the setting of the date and time.

User Manual
Page 70
Identifying parts and controls (Continued) A POWER switch (13) B Viewfinder (15) C Eyecup (64) D Viewfinder lens adjustment lever (15) E For DCR-HC51E/HC53E: DV OUT interface (43) For DCR-HC52E/HC54E: DV interface (43, 45) F DC IN jack (10) G A/V Remote Connector (26, 43) H CAMERA, PLAY/EDIT lamp (13) I REC START/STOP button (17, 19) J Tripod receptacle Attach the tripod (optional: the length of the screw must be less than 5.5 mm (7/32 in.)) to the tripod receptacle using a tripod screw. 70
Identifying parts and controls (Continued) A POWER switch (13) B Viewfinder (15) C Eyecup (64) D Viewfinder lens adjustment lever (15) E For DCR-HC51E/HC53E: DV OUT interface (43) For DCR-HC52E/HC54E: DV interface (43, 45) F DC IN jack (10) G A/V Remote Connector (26, 43) H CAMERA, PLAY/EDIT lamp (13) I REC START/STOP button (17, 19) J Tripod receptacle Attach the tripod (optional: the length of the screw must be less than 5.5 mm (7/32 in.)) to the tripod receptacle using a tripod screw. 70


