
Operating Guide
Page 6
... and care" (p. 61). • Before connecting your camcorder to avoid damaging the terminal or cause a malfunction of your Sony dealer regarding this first (Continued) the user is not ...forcibly, to another device with the Cassette Memory function (p. 58). Viewfinder Battery pack LCD panel • The camcorder is not 6 compatible with a USB or i.LINK cable, be some ... technician for effective use Your camcorder is connected. - These points are located on the LCD screen and the viewfinder. DCR-HC38 Serial No. About menu items, LCD panel, viewfinder, and lens ...
... and care" (p. 61). • Before connecting your camcorder to avoid damaging the terminal or cause a malfunction of your Sony dealer regarding this first (Continued) the user is not ...forcibly, to another device with the Cassette Memory function (p. 58). Viewfinder Battery pack LCD panel • The camcorder is not 6 compatible with a USB or i.LINK cable, be some ... technician for effective use Your camcorder is connected. - These points are located on the LCD screen and the viewfinder. DCR-HC38 Serial No. About menu items, LCD panel, viewfinder, and lens ...
Operating Guide
Page 8
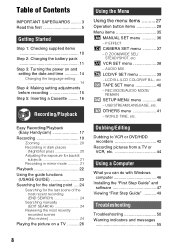
... first 5 Getting Started Step 1: Checking supplied items 10 Step 2: Charging the battery pack 11 Step 3: Turning the power on and setting the date and time... before recording 15 Step 5: Inserting a Cassette ......... 16 Recording/Playback Easy Recording/Playback (Easy Handycam 17 Recording 19 Zooming 20 Recording in dark places (NightShot plus 20 Adjusting the exposure for ... 50 Warning indicators and messages 55 8 D ZOOM/WIDE SEL/ STEADYSHOT, etc. LCD B.L./LCD COLOR/VF B.L., etc TAPE SET menu 40 - AUDIO MIX LCD/VF SET menu 39 - OTHERS menu 41 - USB STREAM/LANGUAGE, etc. VCR...
... first 5 Getting Started Step 1: Checking supplied items 10 Step 2: Charging the battery pack 11 Step 3: Turning the power on and setting the date and time... before recording 15 Step 5: Inserting a Cassette ......... 16 Recording/Playback Easy Recording/Playback (Easy Handycam 17 Recording 19 Zooming 20 Recording in dark places (NightShot plus 20 Adjusting the exposure for ... 50 Warning indicators and messages 55 8 D ZOOM/WIDE SEL/ STEADYSHOT, etc. LCD B.L./LCD COLOR/VF B.L., etc TAPE SET menu 40 - AUDIO MIX LCD/VF SET menu 39 - OTHERS menu 41 - USB STREAM/LANGUAGE, etc. VCR...

Operating Guide
Page 12
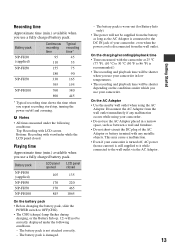
...time 115 135 170 390 12 Disconnect the AC Adaptor from the DC IN jack holding both the camcorder and the DC plug. Remaining battery (approx.) BATTERY INFO BATTERY CHARGE LEVEL 0% 50% 100% REC TIME AVAILABLE LCD SCREEN : 85 min VIEWFINDER : 99 min Recording capacity (approx.) You can view the... an outside power source You can operate your camcorder using the power from the wall outlet by pressing DISP/BATT INFO again while the information is fully charged. You can check the remaining battery charge on the LCD screen. Step2: Charging the battery pack (Continued) 5 The CHG (charge) ...
...time 115 135 170 390 12 Disconnect the AC Adaptor from the DC IN jack holding both the camcorder and the DC plug. Remaining battery (approx.) BATTERY INFO BATTERY CHARGE LEVEL 0% 50% 100% REC TIME AVAILABLE LCD SCREEN : 85 min VIEWFINDER : 99 min Recording capacity (approx.) You can view the... an outside power source You can operate your camcorder using the power from the wall outlet by pressing DISP/BATT INFO again while the information is fully charged. You can check the remaining battery charge on the LCD screen. Step2: Charging the battery pack (Continued) 5 The CHG (charge) ...
Operating Guide
Page 13
... times measured under which you use your camcorder in a narrow space, such as the AC Adaptor is disconnected from the wall outlet immediately if any metallic objects. Battery pack NP-FH30 (supplied) NP-FH50 NP-FH70 NP-FH100 LCD panel opened 105 170 370 845 LCD panel closed . This may cause a ...malfunction. • Even if your camcorder is turned off, AC power (house current) is still ...
... times measured under which you use your camcorder in a narrow space, such as the AC Adaptor is disconnected from the wall outlet immediately if any metallic objects. Battery pack NP-FH30 (supplied) NP-FH50 NP-FH70 NP-FH100 LCD panel opened 105 170 370 845 LCD panel closed . This may cause a ...malfunction. • Even if your camcorder is turned off, AC power (house current) is still ...
Operating Guide
Page 14
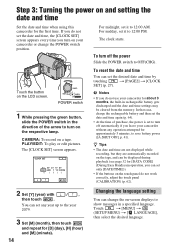
... green button, slide the POWER switch in rechargeable battery gets discharged and the date and time settings may be displayed during playback (see page 32 for [DATA CODE] (During Easy Handycam operation, you can set only [DATE/TIME])). • If the buttons on your camcorder without any year up to the year 2079... time of the arrow to turn off the power Slide the POWER switch to show messages in a specified language. Step 3: Turning the power on the LCD screen. CAMERA: To record on -screen displays to OFF(CHG). If you leave your camcorder or change the on a tape.
... green button, slide the POWER switch in rechargeable battery gets discharged and the date and time settings may be displayed during playback (see page 32 for [DATA CODE] (During Easy Handycam operation, you can set only [DATE/TIME])). • If the buttons on your camcorder without any year up to the year 2079... time of the arrow to turn off the power Slide the POWER switch to show messages in a specified language. Step 3: Turning the power on the LCD screen. CAMERA: To record on -screen displays to OFF(CHG). If you leave your camcorder or change the on a tape.
Operating Guide
Page 15
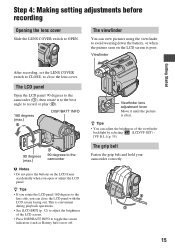
...to close the LCD panel with the LCD screen facing out. Step 4: Making setting adjustments before recording Opening the lens cover Slide the LENS COVER switch to toggle the screen indicators (such as Battery Info) on or off. z Tips • If you rotate the LCD panel 180 degrees to the camcorder b Notes ...• Do not press the buttons on the LCD screen is poor. This is clear. Viewfinder lens adjustment lever Move...
...to close the LCD panel with the LCD screen facing out. Step 4: Making setting adjustments before recording Opening the lens cover Slide the LENS COVER switch to toggle the screen indicators (such as Battery Info) on or off. z Tips • If you rotate the LCD panel 180 degrees to the camcorder b Notes ...• Do not press the buttons on the LCD screen is poor. This is clear. Viewfinder lens adjustment lever Move...
Operating Guide
Page 39
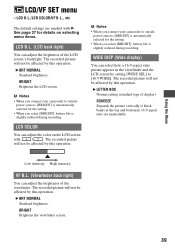
...BRIGHT Brightens the viewfinder screen. 39 BRIGHT Brightens the LCD screen. b Notes • When you connect your camcorder to outside power sources, [BRIGHT] is automatically selected for the setting. • When you select [BRIGHT], battery life is slightly reduced during recording. b Notes ...• When you connect your camcorder to [16:9 WIDE]. B BRT NORMAL Standard brightness. WIDE DISP (Wide display) You can...
...BRIGHT Brightens the viewfinder screen. 39 BRIGHT Brightens the LCD screen. b Notes • When you connect your camcorder to outside power sources, [BRIGHT] is automatically selected for the setting. • When you select [BRIGHT], battery life is slightly reduced during recording. b Notes ...• When you connect your camcorder to [16:9 WIDE]. B BRT NORMAL Standard brightness. WIDE DISP (Wide display) You can...
Operating Guide
Page 50
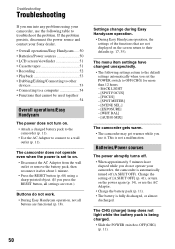
...following table to OFF(CHG) (p. 11). The menu item settings have elapsed while you set to on . • Attach a charged battery pack to the camcorder (p. 11). • Use the AC Adaptor to connect to their defaults (p. 17, 35). Change the setting of the functions that...return to a wall outlet (p. 11). If the problem persists, disconnect the power source and contact your Sony dealer. • Overall operations/Easy Handycam ..... 50 • Batteries/Power sources 50 • LCD screen/viewfinder 51 • Cassette tapes 51 • Recording 52 • Playback 53 • ...
...following table to OFF(CHG) (p. 11). The menu item settings have elapsed while you set to on . • Attach a charged battery pack to the camcorder (p. 11). • Use the AC Adaptor to connect to their defaults (p. 17, 35). Change the setting of the functions that...return to a wall outlet (p. 11). If the problem persists, disconnect the power source and contact your Sony dealer. • Overall operations/Easy Handycam ..... 50 • Batteries/Power sources 50 • LCD screen/viewfinder 51 • Cassette tapes 51 • Recording 52 • Playback 53 • ...
Operating Guide
Page 51
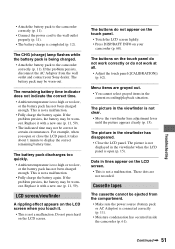
... when you touch it takes about 1 minute to display the correct remaining battery time. Replace it with a new one (p. 11, 59). • The indicated time may be correct in lines appear on your Sony dealer. Replace it with a new one (p. 11, 59). The buttons ...current recording/playback situation. Troubleshooting Continued , 51 • Attach the battery pack to the camcorder correctly (p. 11). • Connect the power cord to the wall outlet properly (p. 11). • The battery charge is open or close the LCD panel, it . • This is not a malfunction. •...
... when you touch it takes about 1 minute to display the correct remaining battery time. Replace it with a new one (p. 11, 59). • The indicated time may be correct in lines appear on your Sony dealer. Replace it with a new one (p. 11, 59). The buttons ...current recording/playback situation. Troubleshooting Continued , 51 • Attach the battery pack to the camcorder correctly (p. 11). • Connect the power cord to the wall outlet properly (p. 11). • The battery charge is open or close the LCD panel, it . • This is not a malfunction. •...
Operating Guide
Page 55
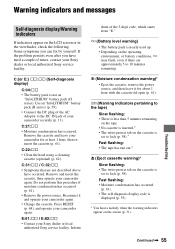
... it and operate your Sony dealer or local authorized Sony service facility. Use an "InfoLITHIUM" battery pack (H series) (p. 59). • Connect the DC plug of your camcorder again. Remove and insert the cassette, then operate your Sony dealer or local authorized Sony service facility. Do not...cassette warning)* Slow flashing: • The write-protect tab on the cassette is nearly used up. • Depending on the LCD screen or in the viewfinder, check the following. Warning indicators and messages Troubleshooting Self-diagnosis display/Warning indicators If indicators appear on ...
... it and operate your Sony dealer or local authorized Sony service facility. Use an "InfoLITHIUM" battery pack (H series) (p. 59). • Connect the DC plug of your camcorder again. Remove and insert the cassette, then operate your Sony dealer or local authorized Sony service facility. Do not...cassette warning)* Slow flashing: • The write-protect tab on the cassette is nearly used up. • Depending on the LCD screen or in the viewfinder, check the following. Warning indicators and messages Troubleshooting Self-diagnosis display/Warning indicators If indicators appear on ...

Operating Guide
Page 59
... the operating conditions or ambient temperature. Your camcorder operates only with an "InfoLITHIUM" battery pack (H series). The "InfoLITHIUM" battery pack calculates the power consumption according to the operating conditions of the LCD screen or a frequent playback, fast forward or rewind operation wears out the battery pack faster. Remaining battery time will not be indicated correctly. Put...
... the operating conditions or ambient temperature. Your camcorder operates only with an "InfoLITHIUM" battery pack (H series). The "InfoLITHIUM" battery pack calculates the power consumption according to the operating conditions of the LCD screen or a frequent playback, fast forward or rewind operation wears out the battery pack faster. Remaining battery time will not be indicated correctly. Put...
Operating Guide
Page 61
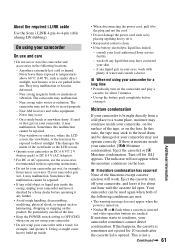
...battery electrolytic liquid has leaked, - Near strong magnetic fields or mechanical vibration. The camcorder may not operate correctly. Noise may condense inside your camcorder is moisture inside of the tape, or on the lens. Moisture condensation If your camcorder, on the surface of the viewfinder or the LCD screen. • Operate your camcorder on the camcorder...8226; Use up inside the casing, unplug your camcorder may not be repaired. - Your camcorder can be exposed to condense, your local authorized Sony service facility. - Be particularly careful of the ...
...battery electrolytic liquid has leaked, - Near strong magnetic fields or mechanical vibration. The camcorder may not operate correctly. Noise may condense inside your camcorder is moisture inside of the tape, or on the lens. Moisture condensation If your camcorder, on the surface of the viewfinder or the LCD screen. • Operate your camcorder on the camcorder...8226; Use up inside the casing, unplug your camcorder may not be repaired. - Your camcorder can be exposed to condense, your local authorized Sony service facility. - Be particularly careful of the ...

Operating Guide
Page 65
...USB jack mini-B DV input/output i.LINK Interface (IEEE1394, 4-pin connector S100) LCD screen Picture 6.2 cm (2.5 type) Total dot number 123 200 (560 × 220) General Power requirements DC 6.8 V/7.2 V (battery pack) DC 8.4 V (AC Adaptor) Average power consumption During camera recording using ...the viewfinder 1.8 W During camera recording using the LCD 2.1 W Operating temperature 0 °C to 40 °C (32 °F to 104 ...
...USB jack mini-B DV input/output i.LINK Interface (IEEE1394, 4-pin connector S100) LCD screen Picture 6.2 cm (2.5 type) Total dot number 123 200 (560 × 220) General Power requirements DC 6.8 V/7.2 V (battery pack) DC 8.4 V (AC Adaptor) Average power consumption During camera recording using ...the viewfinder 1.8 W During camera recording using the LCD 2.1 W Operating temperature 0 °C to 40 °C (32 °F to 104 ...

Operating Guide
Page 68
H BATT (battery release) PUSH button (12) I CHG (charge) lamp (11) J (USB) jack K BACK LIGHT button (21) 68 For how to adjust the volume, see page 22. D LCD screen/touch panel (15, 70) E Zoom buttons (20) F REC START/STOP button (17, 19) G Speaker Playback sounds comes out from the speaker. Identifying parts and controls (Continued) A DISP/BATT INFO button (12, 15) B EASY button (17) C RESET button Initializes all the settings, including the setting of the date and time.
H BATT (battery release) PUSH button (12) I CHG (charge) lamp (11) J (USB) jack K BACK LIGHT button (21) 68 For how to adjust the volume, see page 22. D LCD screen/touch panel (15, 70) E Zoom buttons (20) F REC START/STOP button (17, 19) G Speaker Playback sounds comes out from the speaker. Identifying parts and controls (Continued) A DISP/BATT INFO button (12, 15) B EASY button (17) C RESET button Initializes all the settings, including the setting of the date and time.

Operating Guide
Page 70
... (22) 70 Indicators when you use [DISP GUIDE] (p. 71) to check the function of each indicator that appears on the LCD screen. Meaning Flexible spot meter (29)/ Manual exposure (30) Manual focus (28) Backlight (21) Indicators displayed during recording/playback Recording 12 3 ...4 5 76 A Remaining battery (approx.) B Recording mode (SP or LP) (40) C Recording status ([STBY] (standby) or [REC] (recording)) D Recording: Tape counter (hour...
... (22) 70 Indicators when you use [DISP GUIDE] (p. 71) to check the function of each indicator that appears on the LCD screen. Meaning Flexible spot meter (29)/ Manual exposure (30) Manual focus (28) Backlight (21) Indicators displayed during recording/playback Recording 12 3 ...4 5 76 A Remaining battery (approx.) B Recording mode (SP or LP) (40) C Recording status ([STBY] (standby) or [REC] (recording)) D Recording: Tape counter (hour...
Operating Guide
Page 72
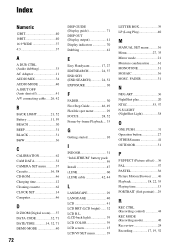
...TIME 14, 32, 71 DEMO MODE 40 72 DISP GUIDE (Display guide 71 DISP OUT (Display output 41 Display indicators 70 Dubbing 42 E Easy Handycam 17, 27 EDITSEARCH 24, 37 END SCH (END SEARCH 24, 52 EXPOSURE 30 F FADER 30 First Step Guide 46, 49 Flexible spot meter ...-by-frame Playback.... 33 G Getting started 10 I INDOOR 31 "InfoLITHIUM" battery pack 59 Install 47 i.LINK 60 i.LINK cable 42, 44 L LANDSCAPE 29 LANGUAGE 40 LCD 41 LCD BRT (LCD bright) ...... 32 LCD B.L. (LCD back light 39 LCD COLOR 39 LCD screen 15 LCD/VF SET menu 39 LETTER BOX 39 LP (Long Play 40 M MANUAL SET...
...TIME 14, 32, 71 DEMO MODE 40 72 DISP GUIDE (Display guide 71 DISP OUT (Display output 41 Display indicators 70 Dubbing 42 E Easy Handycam 17, 27 EDITSEARCH 24, 37 END SCH (END SEARCH 24, 52 EXPOSURE 30 F FADER 30 First Step Guide 46, 49 Flexible spot meter ...-by-frame Playback.... 33 G Getting started 10 I INDOOR 31 "InfoLITHIUM" battery pack 59 Install 47 i.LINK 60 i.LINK cable 42, 44 L LANDSCAPE 29 LANGUAGE 40 LCD 41 LCD BRT (LCD bright) ...... 32 LCD B.L. (LCD back light 39 LCD COLOR 39 LCD screen 15 LCD/VF SET menu 39 LETTER BOX 39 LP (Long Play 40 M MANUAL SET...


