Operating Guide
Page 4
... may result in fire, electric shock, or other hazards. Service Damage Requiring Service Unplug the set from the wall outlet and disconnect the antenna or cable system. When the set has been subject to qualified service personnel under the following the operating instructions. this set during a lightning storm, or when it...
... may result in fire, electric shock, or other hazards. Service Damage Requiring Service Unplug the set from the wall outlet and disconnect the antenna or cable system. When the set has been subject to qualified service personnel under the following the operating instructions. this set during a lightning storm, or when it...

Operating Guide
Page 6
...supplied CD-ROM) Type of California, USA only Perchlorate Material - Refer to these numbers whenever you can use . The supplied interface cable must be sure to insert the connector plug the correct way, and not forcibly, to avoid damaging the terminal or cause a ...the camcorder by one or more of your Sony dealer regarding this first (Continued) the user is encouraged to try to correct the interference by the following measures: - However, there may apply, See www.dtsc.ca.gov/hazardouswaste/perchlorate Perchlorate Material: Lithium battery contains perchlorate. DCR-HC38 Serial ...
...supplied CD-ROM) Type of California, USA only Perchlorate Material - Refer to these numbers whenever you can use . The supplied interface cable must be sure to insert the connector plug the correct way, and not forcibly, to avoid damaging the terminal or cause a ...the camcorder by one or more of your Sony dealer regarding this first (Continued) the user is encouraged to try to correct the interference by the following measures: - However, there may apply, See www.dtsc.ca.gov/hazardouswaste/perchlorate Perchlorate Material: Lithium battery contains perchlorate. DCR-HC38 Serial ...
Operating Guide
Page 10
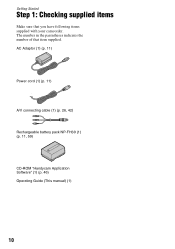
Getting Started Step 1: Checking supplied items Make sure that item supplied. The number in the parentheses indicates the number of that you have following items supplied with your camcorder. AC Adaptor (1) (p. 11) Power cord (1) (p. 11) A/V connecting cable (1) (p. 26, 42) Rechargeable battery pack NP-FH30 (1) (p. 11, 59) CD-ROM "Handycam Application Software" (1) (p. 46) Operating Guide (This manual) (1) 10
Getting Started Step 1: Checking supplied items Make sure that item supplied. The number in the parentheses indicates the number of that you have following items supplied with your camcorder. AC Adaptor (1) (p. 11) Power cord (1) (p. 11) A/V connecting cable (1) (p. 26, 42) Rechargeable battery pack NP-FH30 (1) (p. 11, 59) CD-ROM "Handycam Application Software" (1) (p. 46) Operating Guide (This manual) (1) 10

Operating Guide
Page 26
... 41). In this operation (p. 11). Set the input selector on the VCR to be reproduced more faithfully than with an S VIDEO cable, pictures can connect your camcorder to the video input jack and connect the white (left /right audio) and S VIDEO plug (S VIDEO channel) of an A/V connecting...outlet using the A/V connecting cable (1) or the A/V connecting cable with the devices to LINE (VIDEO 1, VIDEO 2, etc.), if the VCR has an input selector. VCRs or TVs When connecting your camcorder to a TV through a VCR Connect your camcorder to the input jack of your camcorder to the audio input ...
... 41). In this operation (p. 11). Set the input selector on the VCR to be reproduced more faithfully than with an S VIDEO cable, pictures can connect your camcorder to the video input jack and connect the white (left /right audio) and S VIDEO plug (S VIDEO channel) of an A/V connecting...outlet using the A/V connecting cable (1) or the A/V connecting cable with the devices to LINE (VIDEO 1, VIDEO 2, etc.), if the VCR has an input selector. VCRs or TVs When connecting your camcorder to a TV through a VCR Connect your camcorder to the input jack of your camcorder to the audio input ...
Operating Guide
Page 33
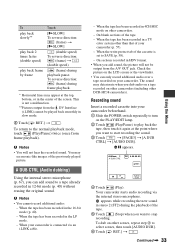
... an i.LINK cable. - This is connected via the internal stereo microphone. b Notes • You cannot record additional audio: - appears while recording the new sound in slow mode. 2 Touch [ RET.] t . A DUB CTRL (Audio dubbing) Using the internal stereo microphone (p. 67), you can only record additional audio over a tape recorded on other DCR-HC38 camcorders). When...
... an i.LINK cable. - This is connected via the internal stereo microphone. b Notes • You cannot record additional audio: - appears while recording the new sound in slow mode. 2 Touch [ RET.] t . A DUB CTRL (Audio dubbing) Using the internal stereo microphone (p. 67), you can only record additional audio over a tape recorded on other DCR-HC38 camcorders). When...
Operating Guide
Page 40
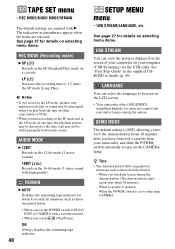
... with high quality). When you touch the screen during the demonstration. (The demonstration starts again after you have removed a cassette from your camcorder, and slide the POWER switch repeatedly to PLAY/ EDIT or CAMERA with B. ON Always displays the remaining tape indicator. 40 SETUP MENU ... cassette is set the POWER switch to turn on your computer (USB Streaming) via the USB cable. See page 27 for details (p. 49). b Notes • If you cannot find your camcorder on the CAMERA lamp. USB STREAM/LANGUAGE, etc. REMAIN B AUTO Displays the remaining tape indicator...
... with high quality). When you touch the screen during the demonstration. (The demonstration starts again after you have removed a cassette from your camcorder, and slide the POWER switch repeatedly to PLAY/ EDIT or CAMERA with B. ON Always displays the remaining tape indicator. 40 SETUP MENU ... cassette is set the POWER switch to turn on your computer (USB Streaming) via the USB cable. See page 27 for details (p. 49). b Notes • If you cannot find your camcorder on the CAMERA lamp. USB STREAM/LANGUAGE, etc. REMAIN B AUTO Displays the remaining tape indicator...
Operating Guide
Page 42
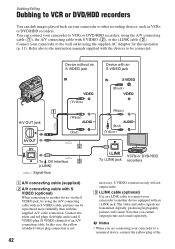
..., by using the A/V connecting cable with an S VIDEO cable, pictures can be connected. The video and audio signals are connecting your camcorder to VCRs or DVD/HDD recorders, using the A/V connecting cable (1), the A/V connecting cable with the supplied A/V cable connection. Note that you are ...cannot output picture and sound separately. In this operation (p. 11). You can connect your camcorder to a monaural device, connect the yellow plug of an A/V connecting cable. Connect your camcorder to other recording devices, such as VCRs or DVD/HDD recorders. Device without an S ...
..., by using the A/V connecting cable with an S VIDEO cable, pictures can be connected. The video and audio signals are connecting your camcorder to VCRs or DVD/HDD recorders, using the A/V connecting cable (1), the A/V connecting cable with the supplied A/V cable connection. Note that you are ...cannot output picture and sound separately. In this operation (p. 11). You can connect your camcorder to a monaural device, connect the yellow plug of an A/V connecting cable. Connect your camcorder to other recording devices, such as VCRs or DVD/HDD recorders. Device without an S ...

Operating Guide
Page 43
... has an input selector, set [DISP OUT] to [LCD] (the default setting) (p. 41). 1 Prepare your camcorder while recording. • When connected using an i.LINK cable, the recorded picture becomes rough when a picture is complete, stop your camcorder and the recording device. Slide the POWER switch repeatedly to turn on the screen (p. 32). •...
... has an input selector, set [DISP OUT] to [LCD] (the default setting) (p. 41). 1 Prepare your camcorder while recording. • When connected using an i.LINK cable, the recorded picture becomes rough when a picture is complete, stop your camcorder and the recording device. Slide the POWER switch repeatedly to turn on the screen (p. 32). •...
Operating Guide
Page 44
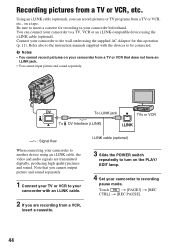
... mode. DV To i.LINK jack TVs or VCR To DV Interface (i.LINK) i.LINK : Signal flow When connecting your camcorder with the devices to another device using the i.LINK cable (optional). Recording pictures from a VCR, insert a cassette. Note that does not have an i.LINK jack. •...picture and sound separately. 1 Connect your TV or VCR to your camcorder to be connected. i.LINK cable (optional) 3 Slide the POWER switch repeatedly to the instruction manuals supplied with an i.LINK cable. 2 If you can connect your camcorder beforehand. Be sure to a TV, VCR or an i.LINK-...
... mode. DV To i.LINK jack TVs or VCR To DV Interface (i.LINK) i.LINK : Signal flow When connecting your camcorder with the devices to another device using the i.LINK cable (optional). Recording pictures from a VCR, insert a cassette. Note that does not have an i.LINK jack. •...picture and sound separately. 1 Connect your TV or VCR to your camcorder to be connected. i.LINK cable (optional) 3 Slide the POWER switch repeatedly to the instruction manuals supplied with an i.LINK cable. 2 If you can connect your camcorder beforehand. Be sure to a TV, VCR or an i.LINK-...
Operating Guide
Page 45
Touch (Stop) or [REC PAUSE]. 8 Touch [ RET.] t . When recording pictures from a VCR: Start playing the cassette on the connected device.) Dubbing/Editing 45 b Notes • The indicator appears when you want to start recording. 7 Stop recording. 5 When recording pictures from a TV: Select a TV program. The picture played on the connected device appears on the LCD screen of your camcorder. 6 Touch [REC START] at the point you connect your camcorder and other devices via an i.LINK cable. (This indicator may also appear on the VCR.
Touch (Stop) or [REC PAUSE]. 8 Touch [ RET.] t . When recording pictures from a VCR: Start playing the cassette on the connected device.) Dubbing/Editing 45 b Notes • The indicator appears when you want to start recording. 7 Stop recording. 5 When recording pictures from a TV: Select a TV program. The picture played on the connected device appears on the LCD screen of your camcorder. 6 Touch [REC START] at the point you connect your camcorder and other devices via an i.LINK cable. (This indicator may also appear on the VCR.
Operating Guide
Page 47
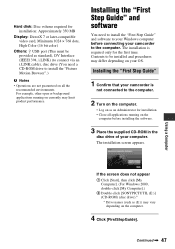
...i.LINK cable), disc drive (You need to install the "First Step Guide" and software to your Windows computer before installing the software. 3 Place the supplied CD-ROM in the disc drive of your OS. Installing the "First Step Guide" 1 Confirm that your camcorder is required...for installation. • Close all the recommended environments. For example, other open or background applications running on the computer before connecting your camcorder to the computer. Hard disk: Disc volume required for installation: Approximately 350 MB Display: DirectX 7 or later-compatible video card, ...
...i.LINK cable), disc drive (You need to install the "First Step Guide" and software to your Windows computer before installing the software. 3 Place the supplied CD-ROM in the disc drive of your OS. Installing the "First Step Guide" 1 Confirm that your camcorder is required...for installation. • Close all the recommended environments. For example, other open or background applications running on the computer before connecting your camcorder to the computer. Hard disk: Disc volume required for installation: Approximately 350 MB Display: DirectX 7 or later-compatible video card, ...
Operating Guide
Page 53
...This anomaly may occur when recording pictures under the discharge tube, such as a fluorescent lamp, sodium lamp, or mercury lamp, with an A/V connecting cable (p. 41). Horizontal lines appear on the screen. "---" is displayed on the screen. • The tape you are playing was recorded in a.... • The data code on the display of the A/V connecting cable are not clear or do not appear. • Clean the head using the cleaning cassette (optional) (p. 62). Your camcorder is covered by your camcorder (NTSC). Dubbing/Editing/Connecting to other devices Time code and other object...
...This anomaly may occur when recording pictures under the discharge tube, such as a fluorescent lamp, sodium lamp, or mercury lamp, with an A/V connecting cable (p. 41). Horizontal lines appear on the screen. "---" is displayed on the screen. • The tape you are playing was recorded in a.... • The data code on the display of the A/V connecting cable are not clear or do not appear. • Clean the head using the cleaning cassette (optional) (p. 62). Your camcorder is covered by your camcorder (NTSC). Dubbing/Editing/Connecting to other devices Time code and other object...
Operating Guide
Page 54
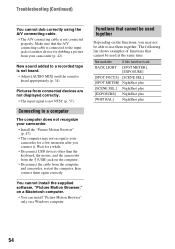
...again correctly. Troubleshooting (Continued) You cannot dub correctly using the A/V connecting cable. • The A/V connecting cable is not NTSC (p. 57). Wait for a few moments after you may not recognize your camcorder (p. 42). The following list shows examples of functions that cannot be able...of another device for dubbing a picture from your camcorder for a while. • Disconnect USB devices other than the keyboard, the mouse, and the camcorder from the (USB) jack on the computer. • Disconnect the cable from connected devices are not displayed correctly. •...
...again correctly. Troubleshooting (Continued) You cannot dub correctly using the A/V connecting cable. • The A/V connecting cable is not NTSC (p. 57). Wait for a few moments after you may not recognize your camcorder (p. 42). The following list shows examples of functions that cannot be able...of another device for dubbing a picture from your camcorder for a while. • Disconnect USB devices other than the keyboard, the mouse, and the camcorder from the (USB) jack on the computer. • Disconnect the cable from connected devices are not displayed correctly. •...

Operating Guide
Page 59
...the battery pack before you can use the battery pack becomes shorter. To use it in your camcorder. The battery pack is also consumed when your camcorder is complete, disconnect the cable from your camcorder and put it is used in high temperatures for a long time, or if left in minutes.... Remaining battery time will not be restored if it in an ambient temperature of between your camcorder or remove the battery ...
...the battery pack before you can use the battery pack becomes shorter. To use it in your camcorder. The battery pack is also consumed when your camcorder is complete, disconnect the cable from your camcorder and put it is used in high temperatures for a long time, or if left in minutes.... Remaining battery time will not be restored if it in an ambient temperature of between your camcorder or remove the battery ...
Operating Guide
Page 60
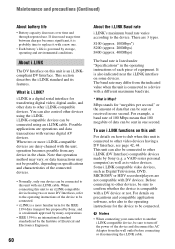
... disconnect the AC Adaptor from the wall outlet before connecting or disconnecting the i.LINK cable. Some i.LINK compatible video devices, such as to a device with DV devices....and other data to other i.LINK-compatible devices. b Notes • When connecting your camcorder to dub when this unit For details on specifications and characteristics of equipment. About i.LINK ...whether the device is an i.LINKcompliant DV Interface. What is an international standard standardized by Sony (e.g. When connecting this unit is compatible with a new one second. Maintenance and precautions...
... disconnect the AC Adaptor from the wall outlet before connecting or disconnecting the i.LINK cable. Some i.LINK compatible video devices, such as to a device with DV devices....and other data to other i.LINK-compatible devices. b Notes • When connecting your camcorder to dub when this unit For details on specifications and characteristics of equipment. About i.LINK ...whether the device is an i.LINKcompliant DV Interface. What is an international standard standardized by Sony (e.g. When connecting this unit is compatible with a new one second. Maintenance and precautions...
Operating Guide
Page 61
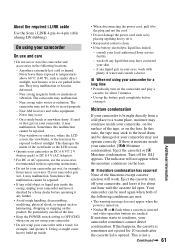
...be able to build up the battery pack completely before operating it may malfunction. On using your camcorder. • Do not wrap your local authorized Sony service facility. - The camcorder may not be used again when both of the functions except cassette ejection will not appear when...If there is brought directly from rain or sea water. On a sandy beach or anywhere dusty. About the required i.LINK cable Use the Sony i.LINK 4-pin-to condense, your camcorder, and leave it for about 3 minutes. • Use up inside. • When disconnecting the power cord, pull ...
...be able to build up the battery pack completely before operating it may malfunction. On using your camcorder. • Do not wrap your local authorized Sony service facility. - The camcorder may not be used again when both of the functions except cassette ejection will not appear when...If there is brought directly from rain or sea water. On a sandy beach or anywhere dusty. About the required i.LINK cable Use the Sony i.LINK 4-pin-to condense, your camcorder, and leave it for about 3 minutes. • Use up inside. • When disconnecting the power cord, pull ...
Operating Guide
Page 72
...Audio dubbing 33 AC Adaptor 11 AUDIO MIX 34 AUDIO MODE 40 A.SHUT OFF (Auto shut off 41 A/V connecting cable .....26, 42 B BACK LIGHT 21, 52 Battery 11, 59 BEACH 30 BEEP 31 BLACK 31 B&W 36 C... DISP GUIDE (Display guide 71 DISP OUT (Display output 41 Display indicators 70 Dubbing 42 E Easy Handycam 17, 27 EDITSEARCH 24, 37 END SCH (END SEARCH 24, 52 EXPOSURE 30 F FADER 30 ...Playback.... 33 G Getting started 10 I INDOOR 31 "InfoLITHIUM" battery pack 59 Install 47 i.LINK 60 i.LINK cable 42, 44 L LANDSCAPE 29 LANGUAGE 40 LCD 41 LCD BRT (LCD bright) ...... 32 LCD B.L. (LCD...
...Audio dubbing 33 AC Adaptor 11 AUDIO MIX 34 AUDIO MODE 40 A.SHUT OFF (Auto shut off 41 A/V connecting cable .....26, 42 B BACK LIGHT 21, 52 Battery 11, 59 BEACH 30 BEEP 31 BLACK 31 B&W 36 C... DISP GUIDE (Display guide 71 DISP OUT (Display output 41 Display indicators 70 Dubbing 42 E Easy Handycam 17, 27 EDITSEARCH 24, 37 END SCH (END SEARCH 24, 52 EXPOSURE 30 F FADER 30 ...Playback.... 33 G Getting started 10 I INDOOR 31 "InfoLITHIUM" battery pack 59 Install 47 i.LINK 60 i.LINK cable 42, 44 L LANDSCAPE 29 LANGUAGE 40 LCD 41 LCD BRT (LCD bright) ...... 32 LCD B.L. (LCD...
Operating Guide
Page 73
Recording time 13 REMAIN 40 Reversal Playback 32 S S VIDEO cable 26, 42 SCENE SEL 29 Searching for the starting point 24 SEPIA 36 SETUP MENU menu ...........40 SNOW 30 SOLARIZE 36 SP (Standard Play 40 ...
Recording time 13 REMAIN 40 Reversal Playback 32 S S VIDEO cable 26, 42 SCENE SEL 29 Searching for the starting point 24 SEPIA 36 SETUP MENU menu ...........40 SNOW 30 SOLARIZE 36 SP (Standard Play 40 ...


