
Operating Guide
Page 6
...Type of your camcorder • You can use in order to comply with the limits for help. See "On use and care" (p. 61). • Before connecting your Sony dealer regarding ... "First Step Guide" for connecting the camcorder to avoid damaging the terminal or cause a malfunction of cassette you call your camcorder to another device with a USB or i.LINK cable, be some tiny ...the camcorder • Do not hold the camcorder by one or more of the pixels are located on use Your camcorder is supplied with two kinds of California, USA only Perchlorate Material - DCR-HC38 Serial...
...Type of your camcorder • You can use in order to comply with the limits for help. See "On use and care" (p. 61). • Before connecting your Sony dealer regarding ... "First Step Guide" for connecting the camcorder to avoid damaging the terminal or cause a malfunction of cassette you call your camcorder to another device with a USB or i.LINK cable, be some tiny ...the camcorder • Do not hold the camcorder by one or more of the pixels are located on use Your camcorder is supplied with two kinds of California, USA only Perchlorate Material - DCR-HC38 Serial...
Operating Guide
Page 8
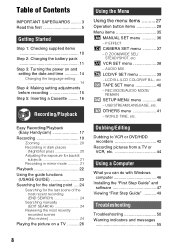
USB STREAM/LANGUAGE, etc. OTHERS menu 41 - Dubbing/Editing Dubbing to VCR or DVD/HDD recorders 42 Recording pictures from a TV or VCR, etc 44 Using a ... and time 14 Changing the language setting 14 Step 4: Making setting adjustments before recording 15 Step 5: Inserting a Cassette ......... 16 Recording/Playback Easy Recording/Playback (Easy Handycam 17 Recording 19 Zooming 20 Recording in dark places (NightShot plus 20 Adjusting the exposure for backlit subjects 21 Recording in mirror mode 21 Playback...
USB STREAM/LANGUAGE, etc. OTHERS menu 41 - Dubbing/Editing Dubbing to VCR or DVD/HDD recorders 42 Recording pictures from a TV or VCR, etc 44 Using a ... and time 14 Changing the language setting 14 Step 4: Making setting adjustments before recording 15 Step 5: Inserting a Cassette ......... 16 Recording/Playback Easy Recording/Playback (Easy Handycam 17 Recording 19 Zooming 20 Recording in dark places (NightShot plus 20 Adjusting the exposure for backlit subjects 21 Recording in mirror mode 21 Playback...
Operating Guide
Page 35
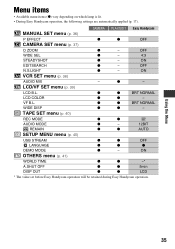
...39) LCD B.L. z z BRT NORMAL LCD COLOR z z - z z BRT NORMAL WIDE DISP z z - ON EDITSEARCH z - z - CAMERA PLAY/EDIT Easy Handycam MANUAL SET menu (p. 36) P EFFECT z z OFF CAMERA SET menu (p. 37) D ZOOM z - Menu items • Available menu items (z) vary depending on which...AUDIO MIX - TAPE SET menu (p. 40) REC MODE z z SP AUDIO MODE z - 12BIT REMAIN z z AUTO SETUP MENU menu (p. 40) USB STREAM z z OFF LANGUAGE z z z DEMO MODE z - ON OTHERS menu (p. 41) WORLD TIME z z -* A.SHUT OFF z z 5min DISP OUT z...
...39) LCD B.L. z z BRT NORMAL LCD COLOR z z - z z BRT NORMAL WIDE DISP z z - ON EDITSEARCH z - z - CAMERA PLAY/EDIT Easy Handycam MANUAL SET menu (p. 36) P EFFECT z z OFF CAMERA SET menu (p. 37) D ZOOM z - Menu items • Available menu items (z) vary depending on which...AUDIO MIX - TAPE SET menu (p. 40) REC MODE z z SP AUDIO MODE z - 12BIT REMAIN z z AUTO SETUP MENU menu (p. 40) USB STREAM z z OFF LANGUAGE z z z DEMO MODE z - ON OTHERS menu (p. 41) WORLD TIME z z -* A.SHUT OFF z z 5min DISP OUT z...
Operating Guide
Page 40
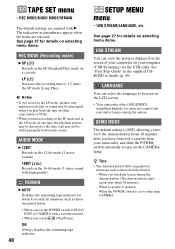
... the remaining tape indicator for details on your native tongue among the options. LANGUAGE You can view the pictures displayed on the screen of your camcorder on selecting menu items. REC MODE (Recording mode) B SP (SP) Records in situations such as those described below . - When a....) - The indicators in the supplied CDROM for details on the LCD screen. • Your camcorder offers [ENG[SIMP]] (simplified English) for when you to be written properly between the scenes. USB STREAM/LANGUAGE, etc. See "First Step Guide" in parentheses appear when the items are marked...
... the remaining tape indicator for details on your native tongue among the options. LANGUAGE You can view the pictures displayed on the screen of your camcorder on selecting menu items. REC MODE (Recording mode) B SP (SP) Records in situations such as those described below . - When a....) - The indicators in the supplied CDROM for details on the LCD screen. • Your camcorder offers [ENG[SIMP]] (simplified English) for when you to be written properly between the scenes. USB STREAM/LANGUAGE, etc. See "First Step Guide" in parentheses appear when the items are marked...
Operating Guide
Page 47
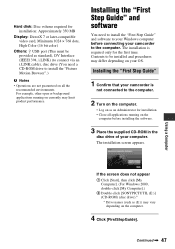
...to the computer. 2 Turn on the computer. • Log on as an Administrator for the first time. Installing the "First Step Guide" 1 Confirm that your camcorder is required only for installation. • Close all the recommended environments. The installation screen appears. Using a Computer If the screen does not appear 1 Click [Start...volume required for installation: Approximately 350 MB Display: DirectX 7 or later-compatible video card, Minimum 1024 × 768 dots, High Color (16 bit color) Others: USB port (This must be installed and procedures may differ depending on your OS.
...to the computer. 2 Turn on the computer. • Log on as an Administrator for the first time. Installing the "First Step Guide" 1 Confirm that your camcorder is required only for installation. • Close all the recommended environments. The installation screen appears. Using a Computer If the screen does not appear 1 Click [Start...volume required for installation: Approximately 350 MB Display: DirectX 7 or later-compatible video card, Minimum 1024 × 768 dots, High Color (16 bit color) Others: USB port (This must be installed and procedures may differ depending on your OS.
Operating Guide
Page 54
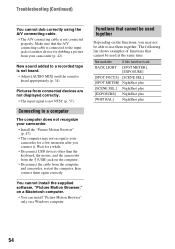
...shows examples of functions that cannot be able to the input jack of another device for dubbing a picture from the computer and camcorder, restart the computer, then connect them together. Pictures from connected devices are not displayed correctly. • The input signal ... not NTSC (p. 57). New sound added to a computer The computer does not recognize your camcorder for a while. • Disconnect USB devices other than the keyboard, the mouse, and the camcorder from the (USB) jack on a Windows computer. Not available If this function is heard appropriately (p. 34). ...
...shows examples of functions that cannot be able to the input jack of another device for dubbing a picture from the computer and camcorder, restart the computer, then connect them together. Pictures from connected devices are not displayed correctly. • The input signal ... not NTSC (p. 57). New sound added to a computer The computer does not recognize your camcorder for a while. • Disconnect USB devices other than the keyboard, the mouse, and the camcorder from the (USB) jack on a Windows computer. Not available If this function is heard appropriately (p. 34). ...

Operating Guide
Page 65
...; (ohms) Chrominance signal: 0.286 Vp-p, 75 Ω (ohms) Audio signal: 327 mV (at load impedance 47 kΩ (kilohms)), Output impedance with less than 2.2 kΩ (kilohms) USB jack mini-B DV input/output i.LINK Interface (IEEE1394, 4-pin connector S100) LCD screen Picture 6.2 cm (2.5 type) Total dot number 123 200 (560 × 220) General...
...; (ohms) Chrominance signal: 0.286 Vp-p, 75 Ω (ohms) Audio signal: 327 mV (at load impedance 47 kΩ (kilohms)), Output impedance with less than 2.2 kΩ (kilohms) USB jack mini-B DV input/output i.LINK Interface (IEEE1394, 4-pin connector S100) LCD screen Picture 6.2 cm (2.5 type) Total dot number 123 200 (560 × 220) General...

Operating Guide
Page 68
H BATT (battery release) PUSH button (12) I CHG (charge) lamp (11) J (USB) jack K BACK LIGHT button (21) 68 D LCD screen/touch panel (15, 70) E Zoom buttons (20) F REC START/STOP button (17, 19) G Speaker Playback sounds comes out from the speaker. Identifying parts and controls (Continued) A DISP/BATT INFO button (12, 15) B EASY button (17) C RESET button Initializes all the settings, including the setting of the date and time. For how to adjust the volume, see page 22.
H BATT (battery release) PUSH button (12) I CHG (charge) lamp (11) J (USB) jack K BACK LIGHT button (21) 68 D LCD screen/touch panel (15, 70) E Zoom buttons (20) F REC START/STOP button (17, 19) G Speaker Playback sounds comes out from the speaker. Identifying parts and controls (Continued) A DISP/BATT INFO button (12, 15) B EASY button (17) C RESET button Initializes all the settings, including the setting of the date and time. For how to adjust the volume, see page 22.
Operating Guide
Page 73
... Quick Reference T Tape counter 70 TAPE SET menu 40 Time code 70 Tripod 69 TV 26 TV color systems 57 TWILIGHT 29 U USAGE GUIDE 23 USB STREAM 40 Using abroad 57 V V SPD PLAY (Various speed playback) .....32 73
... Quick Reference T Tape counter 70 TAPE SET menu 40 Time code 70 Tripod 69 TV 26 TV color systems 57 TWILIGHT 29 U USAGE GUIDE 23 USB STREAM 40 Using abroad 57 V V SPD PLAY (Various speed playback) .....32 73


