Operating Guide
Page 8
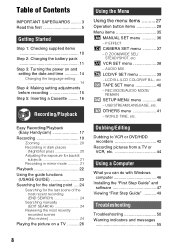
... setting 14 Step 4: Making setting adjustments before recording 15 Step 5: Inserting a Cassette ......... 16 Recording/Playback Easy Recording/Playback (Easy Handycam 17 Recording 19 Zooming 20 Recording in dark places (NightShot plus 20 Adjusting the exposure for backlit subjects 21 Recording in mirror mode...VCR or DVD/HDD recorders 42 Recording pictures from a TV or VCR, etc 44 Using a Computer What you can do with Windows computer 46 Installing the "First Step Guide" and software 47 Viewing "First Step Guide 49 Troubleshooting Troubleshooting 50 Warning indicators and messages ...
... setting 14 Step 4: Making setting adjustments before recording 15 Step 5: Inserting a Cassette ......... 16 Recording/Playback Easy Recording/Playback (Easy Handycam 17 Recording 19 Zooming 20 Recording in dark places (NightShot plus 20 Adjusting the exposure for backlit subjects 21 Recording in mirror mode...VCR or DVD/HDD recorders 42 Recording pictures from a TV or VCR, etc 44 Using a Computer What you can do with Windows computer 46 Installing the "First Step Guide" and software 47 Viewing "First Step Guide 49 Troubleshooting Troubleshooting 50 Warning indicators and messages ...
Operating Guide
Page 16
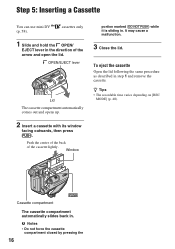
... Tips • The recordable time varies depending on [REC MODE] (p. 40). cassettes only 1 Slide and hold the OPEN/ EJECT lever in . Window portion marked {DO NOT PUSH} while it is sliding in the direction of the cassette lightly. To eject the cassette Open the lid following the... same procedure as described in . OPEN/EJECT lever Lid The cassette compartment automatically comes out and opens up. 2 Insert a cassette with its window facing outwards, then press . Step 5: Inserting a Cassette You can use mini DV (p. 58). It may cause a malfunction. 3 Close the lid. ...
... Tips • The recordable time varies depending on [REC MODE] (p. 40). cassettes only 1 Slide and hold the OPEN/ EJECT lever in . Window portion marked {DO NOT PUSH} while it is sliding in the direction of the cassette lightly. To eject the cassette Open the lid following the... same procedure as described in . OPEN/EJECT lever Lid The cassette compartment automatically comes out and opens up. 2 Insert a cassette with its window facing outwards, then press . Step 5: Inserting a Cassette You can use mini DV (p. 58). It may cause a malfunction. 3 Close the lid. ...

Operating Guide
Page 29
...00:00 AUTO END Touch the point where you set [SPOT METER], [EXPOSURE] is strong contrast between the camcorder and the subject. This setting also prevents your camcorder from appearing excessively white when subjects are lit by strong light. Continued , 29 Using the Menu LANDSCAPE* ( ...) Select to prevent people's faces from focusing on the screen. b Notes • If you want to fix and adjust the exposure on glass or metal mesh in windows...
...00:00 AUTO END Touch the point where you set [SPOT METER], [EXPOSURE] is strong contrast between the camcorder and the subject. This setting also prevents your camcorder from appearing excessively white when subjects are lit by strong light. Continued , 29 Using the Menu LANDSCAPE* ( ...) Select to prevent people's faces from focusing on the screen. b Notes • If you want to fix and adjust the exposure on glass or metal mesh in windows...
Operating Guide
Page 46
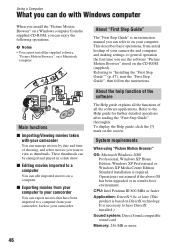
...to have been imported to a computer from your computer to your camcorder. System requirements When using "Picture Motion Browser" OS: Microsoft Windows 2000 Professional, Windows XP Home Edition, Windows XP Professional or Windows XP Media Center Edition Standard installation is not assured if the above... on the CD-ROM (supplied). Main functions x Importing/Viewing movies taken with Windows computer When you install the "Picture Motion Browser" on a Windows computer from initial hookup of your camcorder You can manage movies by date and time of all the software applications. About...
...to have been imported to a computer from your computer to your camcorder. System requirements When using "Picture Motion Browser" OS: Microsoft Windows 2000 Professional, Windows XP Home Edition, Windows XP Professional or Windows XP Media Center Edition Standard installation is not assured if the above... on the CD-ROM (supplied). Main functions x Importing/Viewing movies taken with Windows computer When you install the "Picture Motion Browser" on a Windows computer from initial hookup of your camcorder You can manage movies by date and time of all the software applications. About...
Operating Guide
Page 47
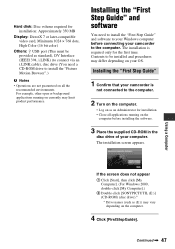
... running on currently may limit product performance. Installing the "First Step Guide" and software You need a CD-ROM drive to your Windows computer before installing the software. 3 Place the supplied CD-ROM in the disc drive of your computer. Using a Computer If the...screen does not appear 1 Click [Start], then click [My Computer]. (For Windows 2000, double-click [My Computer].) 2 Double-click [SONYPICTUTIL (E:)] (CD-ROM) (disc drive).* * Drive names (such as (E:)) may differ depending on your camcorder to the computer. 2 Turn on the computer. • Log on the computer...
... running on currently may limit product performance. Installing the "First Step Guide" and software You need a CD-ROM drive to your Windows computer before installing the software. 3 Place the supplied CD-ROM in the disc drive of your computer. Using a Computer If the...screen does not appear 1 Click [Start], then click [My Computer]. (For Windows 2000, double-click [My Computer].) 2 Double-click [SONYPICTUTIL (E:)] (CD-ROM) (disc drive).* * Drive names (such as (E:)) may differ depending on your camcorder to the computer. 2 Turn on the computer. • Log on the computer...
Operating Guide
Page 49
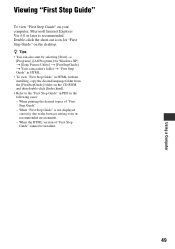
... later is not displayed correctly due to the "First Step Guide" in PDF in recommended environment. - Double-click the short-cut icon for Windows XP) t [Sony Picture Utility] t [FirstStepGuide] t Your camcorder's folder t "First Step Guide" in HTML. • To view "First Step Guide" in HTML without installing, copy the desired language folder from...
... later is not displayed correctly due to the "First Step Guide" in PDF in recommended environment. - Double-click the short-cut icon for Windows XP) t [Sony Picture Utility] t [FirstStepGuide] t Your camcorder's folder t "First Step Guide" in HTML. • To view "First Step Guide" in HTML without installing, copy the desired language folder from...
Operating Guide
Page 54
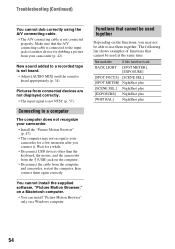
...(p. 34). Connecting to the input jack of functions that the A/V connecting cable is connected to a computer The computer does not recognize your camcorder. • Install the "Picture Motion Browser" (p. 47). • The computer may not be able to a recorded tape is not heard...until the sound is not NTSC (p. 57). Wait for a few moments after you may not recognize your camcorder (p. 42). Functions that cannot be used together Depending on a Windows computer. New sound added to use them again correctly. Troubleshooting (Continued) You cannot dub correctly using the ...
...(p. 34). Connecting to the input jack of functions that the A/V connecting cable is connected to a computer The computer does not recognize your camcorder. • Install the "Picture Motion Browser" (p. 47). • The computer may not be able to a recorded tape is not heard...until the sound is not NTSC (p. 57). Wait for a few moments after you may not recognize your camcorder (p. 42). Functions that cannot be used together Depending on a Windows computer. New sound added to use them again correctly. Troubleshooting (Continued) You cannot dub correctly using the ...
Operating Guide
Page 61
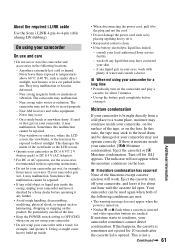
...windows or outdoors, where the LCD screen, the viewfinder, or the lens may malfunction. Near strong radio waves or radiation. Be particularly careful of the following locations. - Near strong magnetic fields or mechanical vibration. About the required i.LINK cable Use the Sony i.LINK 4-pin-to condense, your camcorder... sometimes cannot detect condensation. Turn off your camcorder, and leave it for example, and operate it may occur. - Near AM...
...windows or outdoors, where the LCD screen, the viewfinder, or the lens may malfunction. Near strong radio waves or radiation. Be particularly careful of the following locations. - Near strong magnetic fields or mechanical vibration. About the required i.LINK cable Use the Sony i.LINK 4-pin-to condense, your camcorder... sometimes cannot detect condensation. Turn off your camcorder, and leave it for example, and operate it may occur. - Near AM...
Operating Guide
Page 66
...other countries. • Macintosh is a registered trademark of U.S. On trademarks • "Handycam" and are registered trademarks of Sony Corporation. • "InfoLITHIUM" is a trademark of Sony Corporation. • i.LINK and are trademarks of Sony Corporation. • is a trademark or registered trademark of Intel Corporation. • Adobe... of Adobe Systems Incorporated in the U.S. All other countries. • Pentium is a trademark. • Microsoft, Windows, and Windows Media are either registered trademarks or trademarks of their respective companies.
...other countries. • Macintosh is a registered trademark of U.S. On trademarks • "Handycam" and are registered trademarks of Sony Corporation. • "InfoLITHIUM" is a trademark of Sony Corporation. • i.LINK and are trademarks of Sony Corporation. • is a trademark or registered trademark of Intel Corporation. • Adobe... of Adobe Systems Incorporated in the U.S. All other countries. • Pentium is a trademark. • Microsoft, Windows, and Windows Media are either registered trademarks or trademarks of their respective companies.


