Operating Guide
Page 3
... an adult, and serious damage to protect it in the cabinet are unable to the plugs, receptacles, and the point where the cord exits from battery power, or other materials. - If you are not sure of the type of the polarized plug by the manufacturer. Cleaning Unplug the set . Use a cloth...
... an adult, and serious damage to protect it in the cabinet are unable to the plugs, receptacles, and the point where the cord exits from battery power, or other materials. - If you are not sure of the type of the polarized plug by the manufacturer. Cleaning Unplug the set . Use a cloth...
Operating Guide
Page 5
... call toll free 1-800-8228837, or visit http://www.rbrc.org/ Caution: Do not handle damaged or leaking Lithium-Ion batteries. Battery pack This device complies with the specified type only. Regulatory Information Declaration of the FCC Rules. For customers in the U.S.A. For...5 However, there is for future reference. This Class B digital apparatus complies with Part 15 of Conformity Trade Name: SONY Model No.: DCR-HC38 Responsible Party: Sony Electronics Inc. Note This equipment has been tested and found to comply with the instructions, may cause undesired operation. The...
... call toll free 1-800-8228837, or visit http://www.rbrc.org/ Caution: Do not handle damaged or leaking Lithium-Ion batteries. Battery pack This device complies with the specified type only. Regulatory Information Declaration of the FCC Rules. For customers in the U.S.A. For...5 However, there is for future reference. This Class B digital apparatus complies with Part 15 of Conformity Trade Name: SONY Model No.: DCR-HC38 Responsible Party: Sony Electronics Inc. Note This equipment has been tested and found to comply with the instructions, may cause undesired operation. The...

Operating Guide
Page 6
.... "First Step Guide" for a digital device pursuant to avoid damaging the terminal or cause a malfunction of cassette you call your Sony dealer regarding this first (Continued) the user is connected. - See "On use in the space provided below. Model No. Consult...Reorient or relocate the receiving antenna. - Viewfinder Battery pack LCD panel • The camcorder is not 6 compatible with . About menu items, LCD panel, viewfinder, and lens • A menu item that to these numbers whenever you can use . Model No. DCR-HC38 Serial No. "Operating Guide" (This manual...
.... "First Step Guide" for a digital device pursuant to avoid damaging the terminal or cause a malfunction of cassette you call your Sony dealer regarding this first (Continued) the user is connected. - See "On use in the space provided below. Model No. Consult...Reorient or relocate the receiving antenna. - Viewfinder Battery pack LCD panel • The camcorder is not 6 compatible with . About menu items, LCD panel, viewfinder, and lens • A menu item that to these numbers whenever you can use . Model No. DCR-HC38 Serial No. "Operating Guide" (This manual...
Operating Guide
Page 8
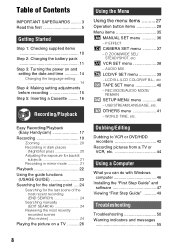
... - Table of Contents IMPORTANT SAFEGUARDS ......... 3 Read this first 5 Getting Started Step 1: Checking supplied items 10 Step 2: Charging the battery pack 11 Step 3: Turning the power on and setting the date and time 14 Changing the language setting 14 Step 4: Making setting adjustments... before recording 15 Step 5: Inserting a Cassette ......... 16 Recording/Playback Easy Recording/Playback (Easy Handycam 17 Recording 19 Zooming 20 Recording in dark places (NightShot plus 20 Adjusting the exposure for backlit subjects 21 Recording in mirror ...
... - Table of Contents IMPORTANT SAFEGUARDS ......... 3 Read this first 5 Getting Started Step 1: Checking supplied items 10 Step 2: Charging the battery pack 11 Step 3: Turning the power on and setting the date and time 14 Changing the language setting 14 Step 4: Making setting adjustments... before recording 15 Step 5: Inserting a Cassette ......... 16 Recording/Playback Easy Recording/Playback (Easy Handycam 17 Recording 19 Zooming 20 Recording in dark places (NightShot plus 20 Adjusting the exposure for backlit subjects 21 Recording in mirror ...
Operating Guide
Page 10
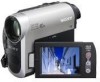
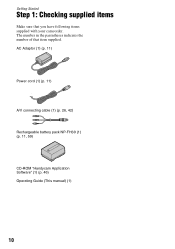
The number in the parentheses indicates the number of that you have following items supplied with your camcorder. Getting Started Step 1: Checking supplied items Make sure that item supplied. AC Adaptor (1) (p. 11) Power cord (1) (p. 11) A/V connecting cable (1) (p. 26, 42) Rechargeable battery pack NP-FH30 (1) (p. 11, 59) CD-ROM "Handycam Application Software" (1) (p. 46) Operating Guide (This manual) (1) 10
The number in the parentheses indicates the number of that you have following items supplied with your camcorder. Getting Started Step 1: Checking supplied items Make sure that item supplied. AC Adaptor (1) (p. 11) Power cord (1) (p. 11) A/V connecting cable (1) (p. 26, 42) Rechargeable battery pack NP-FH30 (1) (p. 11, 59) CD-ROM "Handycam Application Software" (1) (p. 46) Operating Guide (This manual) (1) 10

Operating Guide
Page 11
...POWER switch You can charge the "InfoLITHIUM" battery pack (H series) (p. 59) after attaching it into place 2. 2 Slide the POWER switch in the direction of the battery pack and your camcorder 1, then attach the battery pack and click it to your camcorder. 4 Connect the power cord to the ...DC IN jack on your camcorder. b Notes • You cannot attach any "InfoLITHIUM" battery pack other than the H series to your camcorder. 1 Align the...
...POWER switch You can charge the "InfoLITHIUM" battery pack (H series) (p. 59) after attaching it into place 2. 2 Slide the POWER switch in the direction of the battery pack and your camcorder 1, then attach the battery pack and click it to your camcorder. 4 Connect the power cord to the ...DC IN jack on your camcorder. b Notes • You cannot attach any "InfoLITHIUM" battery pack other than the H series to your camcorder. 1 Align the...

Operating Guide
Page 12
... power source You can operate your camcorder using the power from the DC IN jack. Disconnect the AC Adaptor from the DC IN jack holding both the camcorder and the DC plug. To remove the battery pack 1 Turn off when the battery is displayed. After a while, ...the approximate recordable time and battery information appear for an extended period (p. 59). Replace the battery with a fully charged one, or charge the battery. POWER switch 1 2...
... power source You can operate your camcorder using the power from the DC IN jack. Disconnect the AC Adaptor from the DC IN jack holding both the camcorder and the DC plug. To remove the battery pack 1 Turn off when the battery is displayed. After a while, ...the approximate recordable time and battery information appear for an extended period (p. 59). Replace the battery with a fully charged one, or charge the battery. POWER switch 1 2...
Operating Guide
Page 13
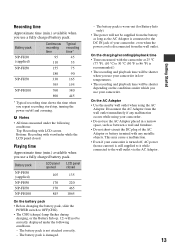
...This may cause a malfunction. • Even if your camcorder. The battery pack is not attached correctly. - Recording time Approximate time (min.) available when you use a fully charged battery pack. The battery pack is worn-out (for Battery Info only). • The power will be supplied ...from the wall outlet. Bottom: Recording with the camcorder at 25 °C (77 °F). (10 °C to ...
...This may cause a malfunction. • Even if your camcorder. The battery pack is not attached correctly. - Recording time Approximate time (min.) available when you use a fully charged battery pack. The battery pack is worn-out (for Battery Info only). • The power will be supplied ...from the wall outlet. Bottom: Recording with the camcorder at 25 °C (77 °F). (10 °C to ...
Operating Guide
Page 14
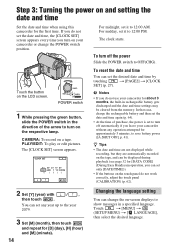
... time. POWER switch 1 While pressing the green button, slide the POWER switch in rechargeable battery gets discharged and the date and time settings may be displayed during playback (see page 32 for [DATA CODE] (During Easy Handycam operation, you do not work correctly, adjust the touch panel (CALIBRATION) (p. 62). ... set only [DATE/TIME])). • If the buttons on the touch panel do not use your camcorder for approximately 5 minutes, to 12:00 PM. In that case, charge the rechargeable battery and then set the date and time again (p. 64). • At the time of the arrow...
... time. POWER switch 1 While pressing the green button, slide the POWER switch in rechargeable battery gets discharged and the date and time settings may be displayed during playback (see page 32 for [DATA CODE] (During Easy Handycam operation, you do not work correctly, adjust the touch panel (CALIBRATION) (p. 62). ... set only [DATE/TIME])). • If the buttons on the touch panel do not use your camcorder for approximately 5 minutes, to 12:00 PM. In that case, charge the rechargeable battery and then set the date and time again (p. 64). • At the time of the arrow...
Operating Guide
Page 15
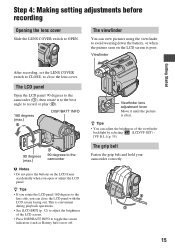
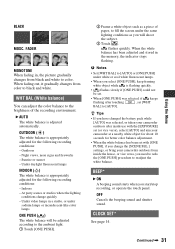
..., set the LENS COVER switch to CLOSE, to the camcorder b Notes • Do not press the buttons on the LCD frame accidentally when you can adjust the brightness of the LCD screen. • Press DISP/BATT INFO to avoid wearing down the battery, or when the picture seen on or off. z... (max.) 1 90 degrees to close the LCD panel with the LCD screen facing out. The LCD panel Open the LCD panel 90 degrees to the camcorder (1), then rotate it until the picture is convenient during playback operations. • See [LCD BRT] (p. 32) to OPEN. Step 4: Making setting adjustments before ...
..., set the LENS COVER switch to CLOSE, to the camcorder b Notes • Do not press the buttons on the LCD frame accidentally when you can adjust the brightness of the LCD screen. • Press DISP/BATT INFO to avoid wearing down the battery, or when the picture seen on or off. z... (max.) 1 90 degrees to close the LCD panel with the LCD screen facing out. The LCD panel Open the LCD panel 90 degrees to the camcorder (1), then rotate it until the picture is convenient during playback operations. • See [LCD BRT] (p. 32) to OPEN. Step 4: Making setting adjustments before ...
Operating Guide
Page 31
...• When the white balance has been set [WHT BAL] to readjust the white balance. z Tips • If you have changed the battery pack while [AUTO] was selected, if keeps flashing after inside the house, or vice versa, you start/stop recording, or operate the touch panel... adjusted for the following recording conditions: - At party scenes or studios where the lighting conditions change the [SCENE SEL.] settings, or bring your camcorder outdoors from inside use with [ONE PUSH], if you change quickly - flashes quickly. BEEP* B ON A beeping sound starts when you need to...
...• When the white balance has been set [WHT BAL] to readjust the white balance. z Tips • If you have changed the battery pack while [AUTO] was selected, if keeps flashing after inside the house, or vice versa, you start/stop recording, or operate the touch panel... adjusted for the following recording conditions: - At party scenes or studios where the lighting conditions change the [SCENE SEL.] settings, or bring your camcorder outdoors from inside use with [ONE PUSH], if you change quickly - flashes quickly. BEEP* B ON A beeping sound starts when you need to...
Operating Guide
Page 39
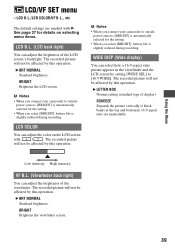
...not be affected by this operation. b Notes • When you connect your camcorder to outside power sources, [BRIGHT] is automatically selected for the setting. • When you select [BRIGHT], battery life is slightly reduced during recording. B BRT NORMAL Standard brightness. See page ...of the LCD screen's backlight. The recorded picture will not be affected by this operation. b Notes • When you connect your camcorder to outside power sources, [BRIGHT] is automatically selected for details on the LCD screen with B. B BRT NORMAL Standard brightness. LCD...
...not be affected by this operation. b Notes • When you connect your camcorder to outside power sources, [BRIGHT] is automatically selected for the setting. • When you select [BRIGHT], battery life is slightly reduced during recording. B BRT NORMAL Standard brightness. See page ...of the LCD screen's backlight. The recorded picture will not be affected by this operation. b Notes • When you connect your camcorder to outside power sources, [BRIGHT] is automatically selected for details on the LCD screen with B. B BRT NORMAL Standard brightness. LCD...
Operating Guide
Page 50
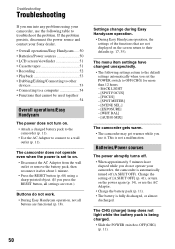
... camcorder may get warmer while you use the following settings return to the default settings automatically when you set to a wall outlet (p. 11). Batteries/Power sources The power abruptly turns off (A.SHUT OFF). If the problem persists, disconnect the power source and contact your Sony dealer. • Overall operations/Easy Handycam ..... 50 • Batteries/Power...
... camcorder may get warmer while you use the following settings return to the default settings automatically when you set to a wall outlet (p. 11). Batteries/Power sources The power abruptly turns off (A.SHUT OFF). If the problem persists, disconnect the power source and contact your Sony dealer. • Overall operations/Easy Handycam ..... 50 • Batteries/Power...
Operating Guide
Page 51
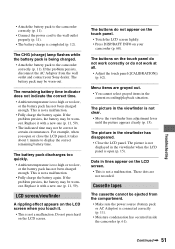
... hard on the LCD screen. • This is not a malfunction. • Fully charge the battery again. The buttons on your Sony dealer. • Attach the battery pack to the camcorder correctly (p. 11). • Connect the power cord to the camcorder correctly (p. 11). If the problem persists, disconnect the AC Adaptor from the compartment. • Make...
... hard on the LCD screen. • This is not a malfunction. • Fully charge the battery again. The buttons on your Sony dealer. • Attach the battery pack to the camcorder correctly (p. 11). • Connect the power cord to the camcorder correctly (p. 11). If the problem persists, disconnect the AC Adaptor from the compartment. • Make...
Operating Guide
Page 52
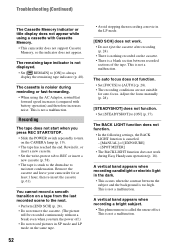
...switch repeatedly to always display the remaining tape indicator (p. 40). This is noisier during Easy Handycam operation (p. 18). The remaining tape indicator is not a malfunction. This is not displayed....SCH] does not work during rewinding or fast-forwarding. • When using a cassette with battery operation) and therefore increases noise. Adjust the focus manually (p. 28). [STEADYSHOT] does not ...Adaptor, rewind/fast forward speed increases (compared with Cassette Memory. • This camcorder does not support Cassette Memory, so the indicator does not appear. The auto ...
...switch repeatedly to always display the remaining tape indicator (p. 40). This is noisier during Easy Handycam operation (p. 18). The remaining tape indicator is not a malfunction. This is not displayed....SCH] does not work during rewinding or fast-forwarding. • When using a cassette with battery operation) and therefore increases noise. Adjust the focus manually (p. 28). [STEADYSHOT] does not ...Adaptor, rewind/fast forward speed increases (compared with Cassette Memory. • This camcorder does not support Cassette Memory, so the indicator does not appear. The auto ...
Operating Guide
Page 55
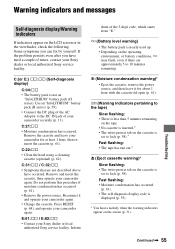
... / E:62:ss • Contact your camcorder again. E (Battery level warning) • The battery pack is not an "InfoLITHIUM" battery pack (H series). C:31:ss / C:32:ss • Symptoms that are approximately 5 to the DC IN jack of your camcorder securely (p. 11). Press RESET (p. 68), and operate your Sony dealer or local authorized Sony service facility. Reconnect it for...
... / E:62:ss • Contact your camcorder again. E (Battery level warning) • The battery pack is not an "InfoLITHIUM" battery pack (H series). C:31:ss / C:32:ss • Symptoms that are approximately 5 to the DC IN jack of your camcorder securely (p. 11). Press RESET (p. 68), and operate your Sony dealer or local authorized Sony service facility. Reconnect it for...

Operating Guide
Page 59
... to operating conditions between 10 °C to 30 °C (50 °F to your camcorder, after charging is a lithium-ion battery pack that indicates low battery flashes even if there are still 5 to use it in your camcorder, and displays the remaining battery time in a pocket to [NEVER] on the operating conditions or ambient temperature. The...
... to operating conditions between 10 °C to 30 °C (50 °F to your camcorder, after charging is a lithium-ion battery pack that indicates low battery flashes even if there are still 5 to use it in your camcorder, and displays the remaining battery time in a pocket to [NEVER] on the operating conditions or ambient temperature. The...
Operating Guide
Page 60
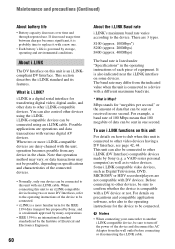
... to the operating instructions for the IEEE 1394 data transport bus proposed by Sony, and is a trademark approved by many corporations. • IEEE 1394 is listed under "Specifications" in one . • Each battery's life is connected to other devices using an i.LINK cable. When connecting... • Battery capacity decreases over time and through repeated use i.LINK functions on this unit For details on how to dub when this unit is connected to a device with a DV device or not. b Notes • When connecting your camcorder to another i.LINK-compatible device, be connected. &#...
... to the operating instructions for the IEEE 1394 data transport bus proposed by Sony, and is a trademark approved by many corporations. • IEEE 1394 is listed under "Specifications" in one . • Each battery's life is connected to other devices using an i.LINK cable. When connecting... • Battery capacity decreases over time and through repeated use i.LINK functions on this unit For details on how to dub when this unit is connected to a device with a DV device or not. b Notes • When connecting your camcorder to another i.LINK-compatible device, be connected. &#...
Operating Guide
Page 61
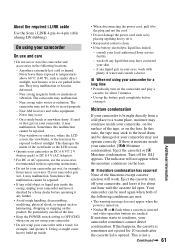
.... If your skin - x When not using your camcorder. • Do not wrap your camcorder on the lens. Eject the cassette] or [% Moisture condensation. About the required i.LINK cable Use the Sony i.LINK 4-pin-to build up the battery pack completely before operating it . • Keep metal... contacts clean. • If the battery electrolytic liquid has leaked,...
.... If your skin - x When not using your camcorder. • Do not wrap your camcorder on the lens. Eject the cassette] or [% Moisture condensation. About the required i.LINK cable Use the Sony i.LINK 4-pin-to build up the battery pack completely before operating it . • Keep metal... contacts clean. • If the battery electrolytic liquid has leaked,...

Operating Guide
Page 64
...pushing it straight on until it further. • Do not touch the lens of the eyecup block. The preinstalled rechargeable battery is always charged while your camcorder to a wall outlet using the supplied AC Adaptor, and leave it with the mark printed Tape speed SP: Approx. ...Do not disassemble it clicks. b Notes • The eyecup block is not charged, the camcorder operation will be affected as long as you do not use your camcorder after charging the pre-installed rechargeable battery. Maintenance and precautions (Continued) 6 Attach the eyecup block to OFF(CHG) for more than ...
...pushing it straight on until it further. • Do not touch the lens of the eyecup block. The preinstalled rechargeable battery is always charged while your camcorder to a wall outlet using the supplied AC Adaptor, and leave it with the mark printed Tape speed SP: Approx. ...Do not disassemble it clicks. b Notes • The eyecup block is not charged, the camcorder operation will be affected as long as you do not use your camcorder after charging the pre-installed rechargeable battery. Maintenance and precautions (Continued) 6 Attach the eyecup block to OFF(CHG) for more than ...


