Operating Guide
Page 3
... damaged or frayed. - Cleaning Unplug the set from the wall outlet before cleaning or polishing it from the wall outlet and disconnect the antenna or cable system. Installation Water and Moisture Do not use liquid cleaners or aerosol cleaners. Use only a cart, stand, tripod, bracket, or table recommended by a qualified technician...
... damaged or frayed. - Cleaning Unplug the set from the wall outlet before cleaning or polishing it from the wall outlet and disconnect the antenna or cable system. Installation Water and Moisture Do not use liquid cleaners or aerosol cleaners. Use only a cart, stand, tripod, bracket, or table recommended by a qualified technician...

Operating Guide
Page 5
...the FCC Rules. The supplied interface cable must be determined by turning the equipment off and on the supplied CD-ROM) (p. 97) Types of FCC Rules. For the State of Conformity Trade Name: SONY Model No.: DCR-DVD810 Responsible Party:Sony Electronics Inc. Telephone No.: 858... no guarantee that may cause undesired operation. special handling may cause harmful interference to operate this manual could void your camcorder You can use Sony Continued , 5 See page 13 for help. These limits are cautioned that any interference received, including interference that interference ...
...the FCC Rules. The supplied interface cable must be determined by turning the equipment off and on the supplied CD-ROM) (p. 97) Types of FCC Rules. For the State of Conformity Trade Name: SONY Model No.: DCR-DVD810 Responsible Party:Sony Electronics Inc. Telephone No.: 858... no guarantee that may cause undesired operation. special handling may cause harmful interference to operate this manual could void your camcorder You can use Sony Continued , 5 See page 13 for help. These limits are cautioned that any interference received, including interference that interference ...
Operating Guide
Page 6
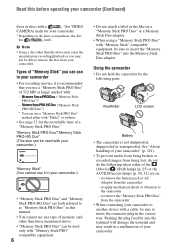
...Memory Stick PRO Duo"/"Memory Stick PRO-HG Duo" (This size can be used with "Mark2" or without. • See page 33 for your camcorder.) "Memory Stick" (You cannot use it is not dustproofed, dripproofed or waterproofed. to remove the "Memory Stick PRO Duo" from being lost, do... Duo" or a Memory Stick Duo adaptor. • When using a "Memory Stick PRO Duo" with a cable, be sure to insert the connector plug in your camcorder • For recording movies, it in your camcorder.) • "Memory Stick PRO Duo" and "Memory Stick PRO-HG Duo" are both referred to as "Memory...
...Memory Stick PRO Duo"/"Memory Stick PRO-HG Duo" (This size can be used with "Mark2" or without. • See page 33 for your camcorder.) "Memory Stick" (You cannot use it is not dustproofed, dripproofed or waterproofed. to remove the "Memory Stick PRO Duo" from being lost, do... Duo" or a Memory Stick Duo adaptor. • When using a "Memory Stick PRO Duo" with a cable, be sure to insert the connector plug in your camcorder • For recording movies, it in your camcorder.) • "Memory Stick PRO Duo" and "Memory Stick PRO-HG Duo" are both referred to as "Memory...
Operating Guide
Page 20
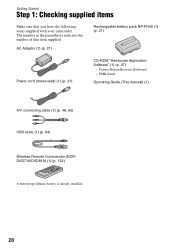
...you have the following items supplied with your camcorder. Getting Started Step 1: Checking supplied items Make sure that item supplied. PMB Guide Operating Guide (This manual) (1) A/V connecting cable (1) (p. 48, 62) USB cable (1) (p. 64) Wireless Remote Commander (...DCRDVD710/DVD810) (1) (p. 132) A button-type lithium battery is already installed. 20 AC Adaptor (1) (p. 21) Rechargeable battery pack NP-FH40 (1) (p. 21) Power cord (mains lead) (1) (p. 21) CD-ROM "Handycam Application Software"...
...you have the following items supplied with your camcorder. Getting Started Step 1: Checking supplied items Make sure that item supplied. PMB Guide Operating Guide (This manual) (1) A/V connecting cable (1) (p. 48, 62) USB cable (1) (p. 64) Wireless Remote Commander (...DCRDVD710/DVD810) (1) (p. 132) A button-type lithium battery is already installed. 20 AC Adaptor (1) (p. 21) Rechargeable battery pack NP-FH40 (1) (p. 21) Power cord (mains lead) (1) (p. 21) CD-ROM "Handycam Application Software"...
Operating Guide
Page 48
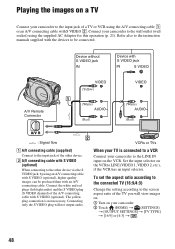
...the input jack of the other device. 2 A/V connecting cable with S VIDEO (optional) When connecting to the other device via the S VIDEO jack, by using an A/V connecting cable with S VIDEO (optional), higher quality images can be connected. Connect your camcorder to LINE (VIDEO 1, VIDEO 2, etc.), if the... VCR has an input selector. The yellow plug connection is connected to a VCR Connect your camcorder to the LINE IN input on...
...the input jack of the other device. 2 A/V connecting cable with S VIDEO (optional) When connecting to the other device via the S VIDEO jack, by using an A/V connecting cable with S VIDEO (optional), higher quality images can be connected. Connect your camcorder to LINE (VIDEO 1, VIDEO 2, etc.), if the... VCR has an input selector. The yellow plug connection is connected to a VCR Connect your camcorder to the LINE IN input on...

Operating Guide
Page 49
... has only one audio input jack) Connect the yellow plug of the A/V connecting cable to the video input jack and connect the white (left channel) or the red (right channel) plug to the audio input jack of your camcorder to a TV compatible with the ID-1/ID-2 system, set [TV TYPE] to [16...
... has only one audio input jack) Connect the yellow plug of the A/V connecting cable to the video input jack and connect the white (left channel) or the red (right channel) plug to the audio input jack of your camcorder to a TV compatible with the ID-1/ID-2 system, set [TV TYPE] to [16...
Operating Guide
Page 50
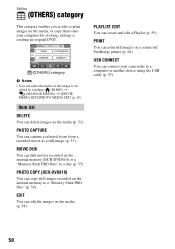
... (p. 51). Editing (OTHERS) category This category enables you to edit or print images on the media, or copy them onto your camcorder to a computer or another device using the USB cable (p. 97). 50 Item list DELETE You can dub movies recorded on the internal memory (DCR-DVD810) or a "Memory Stick PRO Duo...
... (p. 51). Editing (OTHERS) category This category enables you to edit or print images on the media, or copy them onto your camcorder to a computer or another device using the USB cable (p. 97). 50 Item list DELETE You can dub movies recorded on the internal memory (DCR-DVD810) or a "Memory Stick PRO Duo...

Operating Guide
Page 62
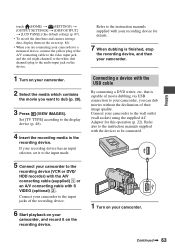
... Connecting a device with the A/V connecting cable You can dub movies played back on the screen of the following ways. B A/V connecting cable with S VIDEO (optional) When connecting to the other recording devices, such as a counter on your camcorder to the wall outlet (wall socket) ...using an A/V connecting cable with S VIDEO (optional), higher quality movies can be connected...
... Connecting a device with the A/V connecting cable You can dub movies played back on the screen of the following ways. B A/V connecting cable with S VIDEO (optional) When connecting to the other recording devices, such as a counter on your camcorder to the wall outlet (wall socket) ...using an A/V connecting cable with S VIDEO (optional), higher quality movies can be connected...
Operating Guide
Page 63
...details. 7 When dubbing is capable of movie dubbing via USB connection to your camcorder to the recording device (VCR or DVD/ HDD recorder) with the A/V connecting cable (supplied) 1 or an A/V connecting cable with the USB cable By connecting a DVD writer, etc. Refer also to the instruction manuals supplied ...time and camera settings data, display them on the screen (p. 84). • When you are connecting your camcorder to a monaural device, connect the yellow plug of the A/V connecting cable to the video input jack, and the red (right channel) or the white (left channel) plug to the...
...details. 7 When dubbing is capable of movie dubbing via USB connection to your camcorder to the recording device (VCR or DVD/ HDD recorder) with the A/V connecting cable (supplied) 1 or an A/V connecting cable with the USB cable By connecting a DVD writer, etc. Refer also to the instruction manuals supplied ...time and camera settings data, display them on the screen (p. 84). • When you are connecting your camcorder to a monaural device, connect the yellow plug of the A/V connecting cable to the video input jack, and the red (right channel) or the white (left channel) plug to the...
Operating Guide
Page 64
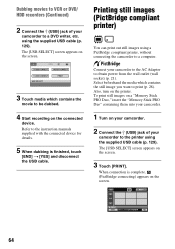
...Duo" containing them into your camcorder. 1 Turn on the printer. When connection is finished, touch [END] t [YES] and disconnect the USB cable. The [USB SELECT] screen appears on the screen. 64 Connect your camcorder to a DVD writer, etc. using the supplied USB cable (p. 129). Dubbing movies ...to VCR or DVD/ HDD recorders (Continued) 2 Connect the (USB) jack of your camcorder to the AC Adaptor to print...
...Duo" containing them into your camcorder. 1 Turn on the printer. When connection is finished, touch [END] t [YES] and disconnect the USB cable. The [USB SELECT] screen appears on the screen. 64 Connect your camcorder to a DVD writer, etc. using the supplied USB cable (p. 129). Dubbing movies ...to VCR or DVD/ HDD recorders (Continued) 2 Connect the (USB) jack of your camcorder to the AC Adaptor to print...
Operating Guide
Page 65
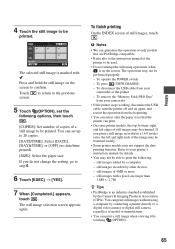
To remove the "Memory Stick PRO Duo" from your camcorder • If the printer stops working, disconnect the USB cable, turn the printer off and on again, and restart the operation from your printer's instruction manual for details. • You may not be printed. ... . [COPIES]: Set number of copies of model or manufacturer. • You can set the following operations when is marked with a pixel size larger than 3,680 × 2,760 z Tips • PictBridge is an industry standard established by touching (OPTION). 65 Press and hold the still image on the screen. The...
To remove the "Memory Stick PRO Duo" from your camcorder • If the printer stops working, disconnect the USB cable, turn the printer off and on again, and restart the operation from your printer's instruction manual for details. • You may not be printed. ... . [COPIES]: Set number of copies of model or manufacturer. • You can set the following operations when is marked with a pixel size larger than 3,680 × 2,760 z Tips • PictBridge is an industry standard established by touching (OPTION). 65 Press and hold the still image on the screen. The...
Operating Guide
Page 77
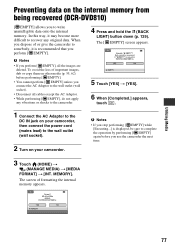
...AC Adaptor to the wall outlet (wall socket). • Disconnect all the images are deleted. b Notes • If you perform [ EMPTY], all cables except the AC Adaptor. • While performing [ EMPTY], do not apply any original data. b Notes • If you stop performing [ EMPTY...] while [Executing...] is recommended that you perform [ EMPTY]. MEMORY]. When you dispose of or give the camcorder to the camcorder. 4 Press and hold the . (BACK LIGHT) button down (p. 129). Utilizing Media 77 To avoid the loss of formatting the internal memory ...
...AC Adaptor to the wall outlet (wall socket). • Disconnect all the images are deleted. b Notes • If you perform [ EMPTY], all cables except the AC Adaptor. • While performing [ EMPTY], do not apply any original data. b Notes • If you stop performing [ EMPTY...] while [Executing...] is recommended that you perform [ EMPTY]. MEMORY]. When you dispose of or give the camcorder to the camcorder. 4 Press and hold the . (BACK LIGHT) button down (p. 129). Utilizing Media 77 To avoid the loss of formatting the internal memory ...
Operating Guide
Page 98
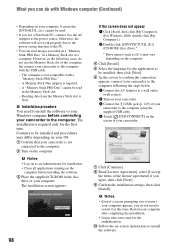
... may vary depending on the computer. The installation is not compatible with the USB cable: - Contents to be installed, then click [Next]. 6 As the screen to confirm the connection appears, connect your camcorder to the computer following cases, do not need to install the software to your... the steps below. 1 Connect the AC Adaptor to a wall outlet (wall socket). 2 Turn on your camcorder. 3 Connect the (USB) jack (p. 129) of your camcorder to the computer using the supplied USB cable. 4 Touch [ USB CONNECT] on the screen of your computer after completing the installation. • It...
... may vary depending on the computer. The installation is not compatible with the USB cable: - Contents to be installed, then click [Next]. 6 As the screen to confirm the connection appears, connect your camcorder to the computer following cases, do not need to install the software to your... the steps below. 1 Connect the AC Adaptor to a wall outlet (wall socket). 2 Turn on your camcorder. 3 Connect the (USB) jack (p. 129) of your camcorder to the computer using the supplied USB cable. 4 Touch [ USB CONNECT] on the screen of your computer after completing the installation. • It...

Operating Guide
Page 99
..., depending on "PMB Guide." To view "PMB Guide," click [Start] - [All Programs] - [Sony Picture Utility] [Help] - [PMB Guide]. One of a computer. • When connecting to a computer with Your Computer x Connecting your camcorder to a computer To connect your camcorder. If the USB cable is described on the computer environment. x Operating the Picture Motion Browser •...
..., depending on "PMB Guide." To view "PMB Guide," click [Start] - [All Programs] - [Sony Picture Utility] [Help] - [PMB Guide]. One of a computer. • When connecting to a computer with Your Computer x Connecting your camcorder to a computer To connect your camcorder. If the USB cable is described on the computer environment. x Operating the Picture Motion Browser •...

Operating Guide
Page 100
Otherwise, files stored on the media may cause a malfunction of the media. 100 Also, disconnecting the USB cable improperly may not be updated correctly. b Notes • Do not disconnect the USB cable while the ACCESS/access lamp is lit. • Before turning off your camcorder, disconnect the USB cable following the proper procedures described above. • Disconnect the USB cable using the proper procedures described above. What you can do with Windows computer (Continued) 6 Disconnect the USB cable from the camcorder and the computer.
Otherwise, files stored on the media may cause a malfunction of the media. 100 Also, disconnecting the USB cable improperly may not be updated correctly. b Notes • Do not disconnect the USB cable while the ACCESS/access lamp is lit. • Before turning off your camcorder, disconnect the USB cable following the proper procedures described above. • Disconnect the USB cable using the proper procedures described above. What you can do with Windows computer (Continued) 6 Disconnect the USB cable from the camcorder and the computer.
Operating Guide
Page 108
...free space on another device cannot be deleted. Make sure that you cannot delete movies during Easy Handycam operation (p. 34). • Images protected on the media for dubbing a movie from your camcorder (p. 55). Unable to your TV (p. 48). DVD-RW (VR mode) - DVD+R ... - Movies recorded on DVD-R/DVD+R DL - Movies recorded on another device for saving still images (p. 53). Make sure that the A/V connecting cable is connected to [UNFINALIZE]. • [UNFINALIZE] is not available for finalizing operation. DVD+RW Unable to the proper jack, i.e. Troubleshooting (Continued)...
...free space on another device cannot be deleted. Make sure that you cannot delete movies during Easy Handycam operation (p. 34). • Images protected on the media for dubbing a movie from your camcorder (p. 55). Unable to your TV (p. 48). DVD-RW (VR mode) - DVD+R ... - Movies recorded on DVD-R/DVD+R DL - Movies recorded on another device for saving still images (p. 53). Make sure that the A/V connecting cable is connected to [UNFINALIZE]. • [UNFINALIZE] is not available for finalizing operation. DVD+RW Unable to the proper jack, i.e. Troubleshooting (Continued)...
Operating Guide
Page 109
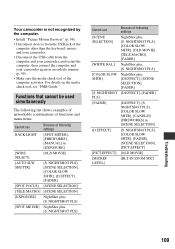
... [MANUAL] in [EXPOSURE] [WIDE SELECT] [OLD MOVIE] [AUTO SLW SHUTTR] [S. NIGHTSHOT PLS] [SPOT METER] NightShot plus , [S. Your camcorder is not recognized by the computer. • Install "Picture Motion Browser" (p. 98). • Disconnect devices from the USB jack of the computer... other than the keyboard, mouse, and your camcorder. • Disconnect the USB cable from the computer and your camcorder, and restart the computer, then connect the computer and your camcorder again in [SCENE SELECTION] [D.EFFECT] [S. NIGHTSHOT PLS], [COLOR SLOW SHTR...
... [MANUAL] in [EXPOSURE] [WIDE SELECT] [OLD MOVIE] [AUTO SLW SHUTTR] [S. NIGHTSHOT PLS] [SPOT METER] NightShot plus , [S. Your camcorder is not recognized by the computer. • Install "Picture Motion Browser" (p. 98). • Disconnect devices from the USB jack of the computer... other than the keyboard, mouse, and your camcorder. • Disconnect the USB cable from the computer and your camcorder, and restart the computer, then connect the computer and your camcorder again in [SCENE SELECTION] [D.EFFECT] [S. NIGHTSHOT PLS], [COLOR SLOW SHTR...

Operating Guide
Page 113
...select on a disc (p. 59). • The maximum number of images that is extremely short. Cancel the protection on again, then disconnect the USB cable and reconnect it . database file is displayed if the disc removal process takes time. Do you perform [REPAIR IMG.DB F.] (p. 76) after creating... database file, playing back the old recorded images may become possible. Cannot print. Please wait. • This is created. Turn on the camcorder and leave it does not work, copy the image to PictBridge compatible printer. • Switch off the printer and switch it on the "...
...select on a disc (p. 59). • The maximum number of images that is extremely short. Cancel the protection on again, then disconnect the USB cable and reconnect it . database file is displayed if the disc removal process takes time. Do you perform [REPAIR IMG.DB F.] (p. 76) after creating... database file, playing back the old recorded images may become possible. Cannot print. Please wait. • This is created. Turn on the camcorder and leave it does not work, copy the image to PictBridge compatible printer. • Switch off the printer and switch it on the "...

Operating Guide
Page 116
... the file/ folder structure, when recording/playing back images on the media in the camcorder directly from a computer. • Do not format the media in the camcorder from a computer. To enjoy still images or movies by the USB cable (p. 99). • Do not modify the files or folders in the...When you delete the files, you delete image files, follow the steps on a "Memory Stick PRO Duo" in the camcorder from a computer. The camcorder may not be played back. • We (Sony) will not be destroyed or may not operate correctly. • Do not copy the files on page 51. The...
... the file/ folder structure, when recording/playing back images on the media in the camcorder directly from a computer. • Do not format the media in the camcorder from a computer. To enjoy still images or movies by the USB cable (p. 99). • Do not modify the files or folders in the...When you delete the files, you delete image files, follow the steps on a "Memory Stick PRO Duo" in the camcorder from a computer. The camcorder may not be played back. • We (Sony) will not be destroyed or may not operate correctly. • Do not copy the files on page 51. The...
Operating Guide
Page 136
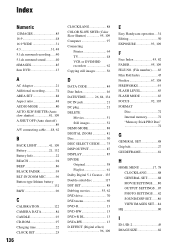
... 74 AREA SET 88 Aspect ratio 48 AUDIO MODE 80 AUTO SLW SHUTTR (Auto slow shutter 81, 109 A.SHUT OFF (Auto shut off 89 A/V connecting cable .....48, 62 B BACK LIGHT 41, 109 Battery 21, 132 Battery Info 22 BEACH 94 BEEP 86 BLACK FADER 95 BLT-IN ZOOM MIC............96 Button... 55, 62 DVD drive 70 DVD menu 69 DVD-R 13 DVD-RW 13 DVD+R DL 13 DVD+RW 13 D.EFFECT (Digital effect 96, 109 E Easy Handycam operation....34 Editing 50 EXPOSURE 93, 109 F Face Index 45, 82 FADER 95, 109 FILE NO. (File number)....... 83 Film Roll Index 45 Finalize 67...
... 74 AREA SET 88 Aspect ratio 48 AUDIO MODE 80 AUTO SLW SHUTTR (Auto slow shutter 81, 109 A.SHUT OFF (Auto shut off 89 A/V connecting cable .....48, 62 B BACK LIGHT 41, 109 Battery 21, 132 Battery Info 22 BEACH 94 BEEP 86 BLACK FADER 95 BLT-IN ZOOM MIC............96 Button... 55, 62 DVD drive 70 DVD menu 69 DVD-R 13 DVD-RW 13 DVD+R DL 13 DVD+RW 13 D.EFFECT (Digital effect 96, 109 E Easy Handycam operation....34 Editing 50 EXPOSURE 93, 109 F Face Index 45, 82 FADER 95, 109 FILE NO. (File number)....... 83 Film Roll Index 45 Finalize 67...


