
Operating Guide
Page 3
... proper ventilation is not likely to insert the plug fully into the power outlet only one way. Continued , 3 For those sets designed to operate from battery power, or other sources, refer to direct sunlight. Do not defeat the safety purpose of electrical power supplied to your home, consult your dealer or...
... proper ventilation is not likely to insert the plug fully into the power outlet only one way. Continued , 3 For those sets designed to operate from battery power, or other sources, refer to direct sunlight. Do not defeat the safety purpose of electrical power supplied to your home, consult your dealer or...

Operating Guide
Page 5
...may not cause harmful interference, and (2) this product will increase eye hazard. Replace the battery with Part 15 of Conformity Trade Name: SONY Model No.: DCR-DVD408 Responsible Party:Sony Electronics Inc. Owner's Record The model and serial numbers are recyclable. For customers in ...batteries. Otherwise, fire or injury may cause undesired operation. For customers in the space provided below is subject to the following two conditions: (1) This device may result in the U.S.A. Refer to the collection and recycling location nearest you call upon your camcorder ...
...may not cause harmful interference, and (2) this product will increase eye hazard. Replace the battery with Part 15 of Conformity Trade Name: SONY Model No.: DCR-DVD408 Responsible Party:Sony Electronics Inc. Owner's Record The model and serial numbers are recyclable. For customers in ...batteries. Otherwise, fire or injury may cause undesired operation. For customers in the space provided below is subject to the following two conditions: (1) This device may result in the U.S.A. Refer to the collection and recycling location nearest you call upon your camcorder ...
Operating Guide
Page 6
... No.: DCR-DVD508 Responsible Party:Sony Electronics Inc. If this device must be used in accordance with the limits for a 6 digital device pursuant to remove the disc from that interference will not occur in your camcorder You can use the following measures: - Reorient or relocate the ...radio/TV technician for details. For the State of operations guides. - See www.dtsc.ca.gov/hazardouswaste/perchlorate Perchlorate Material: Lithium battery contains perchlorate. Notes on the place you may cause undesired operation. However, there is no guarantee that to which the receiver ...
... No.: DCR-DVD508 Responsible Party:Sony Electronics Inc. If this device must be used in accordance with the limits for a 6 digital device pursuant to remove the disc from that interference will not occur in your camcorder You can use the following measures: - Reorient or relocate the ...radio/TV technician for details. For the State of operations guides. - See www.dtsc.ca.gov/hazardouswaste/perchlorate Perchlorate Material: Lithium battery contains perchlorate. Notes on the place you may cause undesired operation. However, there is no guarantee that to which the receiver ...

Operating Guide
Page 7
... (You cannot use it in your camcorder.) • You cannot use any type of memory card except "Memory Stick Duo." • "Memory Stick PRO" and "Memory Stick PRO Duo" can use . to apply mechanical shock or vibration to remove the battery pack or AC Adaptor from being broken ...or recorded images from the camcorder. - Battery • The camcorder is not available under the current recording or playback conditions. • The LCD screen and the ...
... (You cannot use it in your camcorder.) • You cannot use any type of memory card except "Memory Stick Duo." • "Memory Stick PRO" and "Memory Stick PRO Duo" can use . to apply mechanical shock or vibration to remove the battery pack or AC Adaptor from being broken ...or recorded images from the camcorder. - Battery • The camcorder is not available under the current recording or playback conditions. • The LCD screen and the ...

Operating Guide
Page 9
... for recording 27 Step 5: Inserting a disc or a "Memory Stick Duo 28 Recording/Playback Recording and playing back with ease (Easy Handycam 31 Recording 34 Zooming 36 Recording sound with more presence (5.1ch surround recording 36 Using the flash 36 Recording high quality still images during... solutions 11 Enjoying with your camcorder What you can do with your camcorder 12 Choosing a disc 14 Using your camcorder 16 " HOME" and " OPTION" - Taking advantage of two types of menus 18 Getting Started Step 1: Checking supplied items 21 Step 2: Charging the battery pack 22 Step 3: Turning ...
... for recording 27 Step 5: Inserting a disc or a "Memory Stick Duo 28 Recording/Playback Recording and playing back with ease (Easy Handycam 31 Recording 34 Zooming 36 Recording sound with more presence (5.1ch surround recording 36 Using the flash 36 Recording high quality still images during... solutions 11 Enjoying with your camcorder What you can do with your camcorder 12 Choosing a disc 14 Using your camcorder 16 " HOME" and " OPTION" - Taking advantage of two types of menus 18 Getting Started Step 1: Checking supplied items 21 Step 2: Charging the battery pack 22 Step 3: Turning ...
Operating Guide
Page 21
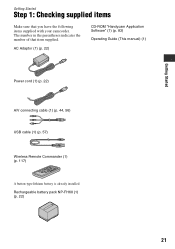
The number in the parentheses indicates the number of that you have the following items supplied with your camcorder. Getting Started Getting Started Step 1: Checking supplied items Make sure that item supplied. AC Adaptor (1) (p. 22) CD-ROM "Handycam Application Software" (1) (p. 83) Operating Guide (This manual) (1) Power cord (1) (p. 22) A/V connecting cable (1) (p. 44, 56) USB cable (1) (p. 57) Wireless Remote Commander (1) (p. 117) A button-type lithium battery is already installed. Rechargeable battery pack NP-FH60 (1) (p. 22) 21
The number in the parentheses indicates the number of that you have the following items supplied with your camcorder. Getting Started Getting Started Step 1: Checking supplied items Make sure that item supplied. AC Adaptor (1) (p. 22) CD-ROM "Handycam Application Software" (1) (p. 83) Operating Guide (This manual) (1) Power cord (1) (p. 22) A/V connecting cable (1) (p. 44, 56) USB cable (1) (p. 57) Wireless Remote Commander (1) (p. 117) A button-type lithium battery is already installed. Rechargeable battery pack NP-FH60 (1) (p. 22) 21

Operating Guide
Page 22
.... Match the v mark on the DC plug with the v mark on your camcorder. b Notes • Disconnect the AC Adaptor from the DC IN jack on your camcorder. Step 2: Charging the battery pack 2 POWER switch 1 Battery DC IN jack 3 DC plug AC Adaptor Jack cover 4 CHG (charge) lamp... Power cord 4 To the wall outlet You can use only "InfoLITHIUM" battery pack H series. 1 Turn the POWER switch...
.... Match the v mark on the DC plug with the v mark on your camcorder. b Notes • Disconnect the AC Adaptor from the DC IN jack on your camcorder. Step 2: Charging the battery pack 2 POWER switch 1 Battery DC IN jack 3 DC plug AC Adaptor Jack cover 4 CHG (charge) lamp... Power cord 4 To the wall outlet You can use only "InfoLITHIUM" battery pack H series. 1 Turn the POWER switch...

Operating Guide
Page 23
... or the AC Adaptor, make sure that the (Movie) lamp/ (Still) lamp (p. 25) is displayed. The battery pack will not lose its charge in this case. DCR-DVD408/DVD808 Battery pack NP-FH50 NP-FH60 (supplied) NP-FH70 NP-FH100 Continuous recording time Typical recording time* 75 35 80 40 80 40 ...100 50 105 50 105 50 160 80 170 85 170 85 375 185 395 195 395 195 Continued , 23 When storing the battery pack ...
... or the AC Adaptor, make sure that the (Movie) lamp/ (Still) lamp (p. 25) is displayed. The battery pack will not lose its charge in this case. DCR-DVD408/DVD808 Battery pack NP-FH50 NP-FH60 (supplied) NP-FH70 NP-FH100 Continuous recording time Typical recording time* 75 35 80 40 80 40 ...100 50 105 50 105 50 160 80 170 85 170 85 375 185 395 195 395 195 Continued , 23 When storing the battery pack ...

Operating Guide
Page 24
... damaged. - On the AC Adaptor • Use the nearby wall outlet when using an NP-FH30, which you use your camcorder, even when the power cord is worn-out (For Battery Info only). • The power will not be shorter depending on . Playing time Approximate time (min.) available when you repeat...the AC Adaptor. b Notes • All times measured with the viewfinder while the LCD panel is closed 120 160 235 255 545 590 24 DCR-DVD508/DVD908 Battery pack NP-FH50 NP-FH60 (supplied) NP-FH70 NP-FH100 LCD panel opened* 110 145 235 545 * When the LCD backlight is recommended). ...
... damaged. - On the AC Adaptor • Use the nearby wall outlet when using an NP-FH30, which you use your camcorder, even when the power cord is worn-out (For Battery Info only). • The power will not be shorter depending on . Playing time Approximate time (min.) available when you repeat...the AC Adaptor. b Notes • All times measured with the viewfinder while the LCD panel is closed 120 160 235 255 545 590 24 DCR-DVD508/DVD908 Battery pack NP-FH50 NP-FH60 (supplied) NP-FH70 NP-FH100 LCD panel opened* 110 145 235 545 * When the LCD backlight is recommended). ...

Operating Guide
Page 25
... button, turn on , and setting the date and time Set the date and time when using your camcorder. • Do not use the AC Adaptor placed in the direction of the AC Adaptor or battery terminal with v/V, then touch [NEXT]. 3 Set [DST SET] or [SUMMERTIME], then touch [NEXT]. If you do not... To record movies (Still): To record still images The [CLOCK SET] screen appears. 2 Select the desired geographical area with any malfunction occurs while using this camcorder for the first time. Continued , 25 wall outlet immediately if any metallic objects. Step 3: Turning the power on your...
... button, turn on , and setting the date and time Set the date and time when using your camcorder. • Do not use the AC Adaptor placed in the direction of the AC Adaptor or battery terminal with v/V, then touch [NEXT]. 3 Set [DST SET] or [SUMMERTIME], then touch [NEXT]. If you do not... To record movies (Still): To record still images The [CLOCK SET] screen appears. 2 Select the desired geographical area with any malfunction occurs while using this camcorder for the first time. Continued , 25 wall outlet immediately if any metallic objects. Step 3: Turning the power on your...

Operating Guide
Page 26
... in the same way, then touch [NEXT]. 7 Make sure that case, charge the rechargeable battery and then set the date and time again (p. 109). • It takes a few seconds for your camcorder to be ready to shoot after the power is turned on. For midnight, set the date and...is selected, or the power is correctly set, then touch . For midday, set any operation attempted for approximately 5 minutes, to save battery power ([A.SHUT OFF], p. 75). You cannot operate your camcorder during playback (see page 71 for [DATA CODE]). • Refer to OFF (CHG). The clock starts. Touch (HOME) t (...
... in the same way, then touch [NEXT]. 7 Make sure that case, charge the rechargeable battery and then set the date and time again (p. 109). • It takes a few seconds for your camcorder to be ready to shoot after the power is turned on. For midnight, set the date and...is selected, or the power is correctly set, then touch . For midday, set any operation attempted for approximately 5 minutes, to save battery power ([A.SHUT OFF], p. 75). You cannot operate your camcorder during playback (see page 71 for [DATA CODE]). • Refer to OFF (CHG). The clock starts. Touch (HOME) t (...

Operating Guide
Page 27
This setting is practical when you use your camcorder in bright conditions or you press DISP BATT/INFO. To turn off the LCD backlight to make the battery last longer Press and hold DISP/ BATT INFO for a few seconds until disappears. Viewfinder lens adjustment lever Move it 180 degrees to the... rotate it to the best angle to record or play (2). 190 degrees to the 290 degrees camcorder (max.) • The information is displayed or hidden (display y no display) each time you want to save battery power. b Notes • Do not press the buttons on the HOME MENU (p. 73). 27 z Tips &#...
This setting is practical when you use your camcorder in bright conditions or you press DISP BATT/INFO. To turn off the LCD backlight to make the battery last longer Press and hold DISP/ BATT INFO for a few seconds until disappears. Viewfinder lens adjustment lever Move it 180 degrees to the... rotate it to the best angle to record or play (2). 190 degrees to the 290 degrees camcorder (max.) • The information is displayed or hidden (display y no display) each time you want to save battery power. b Notes • Do not press the buttons on the HOME MENU (p. 73). 27 z Tips &#...

Operating Guide
Page 30
... reading/writing data. b Notes • When the access lamp is lit or flashing, your camcorder, turn the power off, eject the "Memory Stick Duo," or remove the battery pack. Access lamp ("Memory Stick Duo") To eject a "Memory Stick Duo" Lightly push the "Memory Stick Duo" in the right direction until it clicks...
... reading/writing data. b Notes • When the access lamp is lit or flashing, your camcorder, turn the power off, eject the "Memory Stick Duo," or remove the battery pack. Access lamp ("Memory Stick Duo") To eject a "Memory Stick Duo" Lightly push the "Memory Stick Duo" in the right direction until it clicks...

Operating Guide
Page 34
Recording (HOME) D (HOME) E PHOTO F START/STOP C POWER switch B START/STOP A Adjusting the grip belt Adjust and fasten the grip belt as illustrated, and hold your camcorder, and do not disconnect the battery or AC Adaptor. 34 Do not apply shock or vibration to your camcorder properly. b Notes • If the access lamps (page 28, 30) is on after recording is finished, it means data is still being written onto the disc or "Memory Stick Duo."
Recording (HOME) D (HOME) E PHOTO F START/STOP C POWER switch B START/STOP A Adjusting the grip belt Adjust and fasten the grip belt as illustrated, and hold your camcorder, and do not disconnect the battery or AC Adaptor. 34 Do not apply shock or vibration to your camcorder properly. b Notes • If the access lamps (page 28, 30) is on after recording is finished, it means data is still being written onto the disc or "Memory Stick Duo."

Operating Guide
Page 37
... the lamp. • The flash charge lamp flickers while charging the flash, and remains lit when the battery charge is complete. • If you can prevent the redeye by one, and the images are stored on... Set the POWER switch to (Movie), and press START/STOP to 8 feet). • Remove any dust from your camcorder, the flash light does not emit light. When disappears, the image has been recorded. Continued , 37 Recording high quality...Movie), the size of still images becomes 4.6M (16:9 wide) or 3.4M (4:3) (DCRDVD508/DVD908). • When the POWER switch is set to your movie.
... the lamp. • The flash charge lamp flickers while charging the flash, and remains lit when the battery charge is complete. • If you can prevent the redeye by one, and the images are stored on... Set the POWER switch to (Movie), and press START/STOP to 8 feet). • Remove any dust from your camcorder, the flash light does not emit light. When disappears, the image has been recorded. Continued , 37 Recording high quality...Movie), the size of still images becomes 4.6M (16:9 wide) or 3.4M (4:3) (DCRDVD508/DVD908). • When the POWER switch is set to your movie.
Operating Guide
Page 51
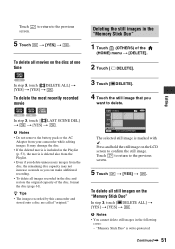
b Notes • Do not remove the battery pack or the AC Adaptor from the disc, the remaining disc ... . Touch to return to confirm the still image. z Tips • The images recorded by this camcorder and stored onto a disc are called "original." 3 Touch [ DELETE]. 4 Touch the still image that you delete unnecessary images from ...your camcorder while editing images. To delete all movies on the "Memory Stick Duo" In step 3, touch [ DELETE ALL] t [YES] ...
b Notes • Do not remove the battery pack or the AC Adaptor from the disc, the remaining disc ... . Touch to return to confirm the still image. z Tips • The images recorded by this camcorder and stored onto a disc are called "original." 3 Touch [ DELETE]. 4 Touch the still image that you delete unnecessary images from ...your camcorder while editing images. To delete all movies on the "Memory Stick Duo" In step 3, touch [ DELETE ALL] t [YES] ...
Operating Guide
Page 53
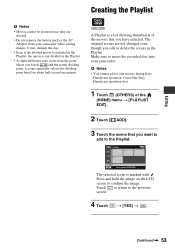
... disc into your camcorder selects the dividing point based on the LCD screen to confirm the image. b Notes • You cannot add or edit movies during Easy Handycam operation. Press and hold the image on about half-second increments. Continued , 53 Cancel the Easy Handycam operation first. 1...to the Playlist. . The original scenes are divided. • Do not remove the battery pack or the AC Adaptor from the point where you touch and the actual dividing point, as your camcorder. Editing Creating the Playlist b Notes • Movies cannot be restored once they are...
... disc into your camcorder selects the dividing point based on the LCD screen to confirm the image. b Notes • You cannot add or edit movies during Easy Handycam operation. Press and hold the image on about half-second increments. Continued , 53 Cancel the Easy Handycam operation first. 1...to the Playlist. . The original scenes are divided. • Do not remove the battery pack or the AC Adaptor from the point where you touch and the actual dividing point, as your camcorder. Editing Creating the Playlist b Notes • Movies cannot be restored once they are...

Operating Guide
Page 54
... to the Playlist. • You can add a maximum of 999 movies to the Playlist are not changed even if you erase the images from your camcorder. 1 Touch (VIEW IMAGES) of the (HOME) menu t [PLAYLIST]. To erase added images from the selected scene to the end, then the screen ...with . to return to the previous 4 Touch t [YES] t . Touch screen. b Notes • Do not remove the battery pack or the AC Adaptor from the Playlist. The Playlist is added into your camcorder while editing the Playlist. Touch screen. It may damage the disc. Playing the Playlist Make sure to insert...
... to the Playlist. • You can add a maximum of 999 movies to the Playlist are not changed even if you erase the images from your camcorder. 1 Touch (VIEW IMAGES) of the (HOME) menu t [PLAYLIST]. To erase added images from the selected scene to the end, then the screen ...with . to return to the previous 4 Touch t [YES] t . Touch screen. b Notes • Do not remove the battery pack or the AC Adaptor from the Playlist. The Playlist is added into your camcorder while editing the Playlist. Touch screen. It may damage the disc. Playing the Playlist Make sure to insert...

Operating Guide
Page 73
... the brightness of the LCD screen with / . BRIGHT Brightens the viewfinder screen. b Notes • When you connect your camcorder to outside power sources, [BRIGHT] is automatically selected for the setting. • When you select [BRIGHT], battery life is slightly reduced during recording. 73 B NORMAL Standard brightness. b Notes • When you select [BRIGHT...
... the brightness of the LCD screen with / . BRIGHT Brightens the viewfinder screen. b Notes • When you connect your camcorder to outside power sources, [BRIGHT] is automatically selected for the setting. • When you select [BRIGHT], battery life is slightly reduced during recording. 73 B NORMAL Standard brightness. b Notes • When you select [BRIGHT...
Operating Guide
Page 81
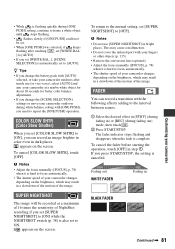
...out WHITE FADER REC Fading in dark places. To cancel [COLOR SLOW SHTR], touch [OFF]. z Tips • If you change the battery pack with [AUTO] selected, or take your camcorder outdoors after touching , set [WHITE BAL. ] to [AUTO]. • If you set [WHITE BAL. ], [SCENE SELECTION] is ... • The shutter speed of the image. FADER You can record an image brighter in color even in BLACK FADER Continued , 81 Customizing your camcorder • While is flashing quickly during [ONE PUSH] setting, continue to frame a white object until stops flashing. • flashes slowly if [...
...out WHITE FADER REC Fading in dark places. To cancel [COLOR SLOW SHTR], touch [OFF]. z Tips • If you change the battery pack with [AUTO] selected, or take your camcorder outdoors after touching , set [WHITE BAL. ] to [AUTO]. • If you set [WHITE BAL. ], [SCENE SELECTION] is ... • The shutter speed of the image. FADER You can record an image brighter in color even in BLACK FADER Continued , 81 Customizing your camcorder • While is flashing quickly during [ONE PUSH] setting, continue to frame a white object until stops flashing. • flashes slowly if [...


