
PIXELA ImageMixer 1.0 Manual
Page 6
...Pentium ® 200MHz or faster. (Pentium ® III 500MHz or faster for capturing a movie via USB or IEEE1394. In Windows ® 98, USB capturing is not supported. for ImageMixer to work correctly, your computer system meets these requirements before installing ImageMixer....Windows Macintosh Setup Installation Uninstalling Basic Operations Starting ImageMixer ImageMixer startup screen Outline of 800x600 at 16bit hi-color (65,000 colors); Please confirm that your computer must be displayed correctly. DirectX must meet the following minimum system requirements. Direct Draw driver...
...Pentium ® 200MHz or faster. (Pentium ® III 500MHz or faster for capturing a movie via USB or IEEE1394. In Windows ® 98, USB capturing is not supported. for ImageMixer to work correctly, your computer system meets these requirements before installing ImageMixer....Windows Macintosh Setup Installation Uninstalling Basic Operations Starting ImageMixer ImageMixer startup screen Outline of 800x600 at 16bit hi-color (65,000 colors); Please confirm that your computer must be displayed correctly. DirectX must meet the following minimum system requirements. Direct Draw driver...
Operating Instructions
Page 186
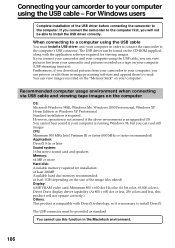
For Windows users Complete installation of the image files edited) Display: 4 MB VRAM video card, Minimum 800 × 600 dot Hi color (16 bit color, 65,000 colors), Direct Draw display driver capability (At 800 × 600 dot or less, 256 colors and less, this function in image processing..., if you download pictures from your camcorder and pictures recorded on a tape on your computer is running Windows 98, but you can read still images. You can view images recorded on the "Memory Stick" on the size of the USB driver before connecting the camcorder to the computer. Recommended computer ...
For Windows users Complete installation of the image files edited) Display: 4 MB VRAM video card, Minimum 800 × 600 dot Hi color (16 bit color, 65,000 colors), Direct Draw display driver capability (At 800 × 600 dot or less, 256 colors and less, this function in image processing..., if you download pictures from your camcorder and pictures recorded on a tape on your computer is running Windows 98, but you can read still images. You can view images recorded on the "Memory Stick" on the size of the USB driver before connecting the camcorder to the computer. Recommended computer ...
Operating Instructions
Page 188
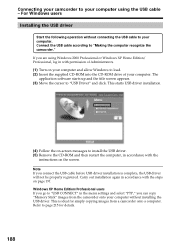
... Administrators. (1) Turn on your computer and allow Windows to load. (2) Insert the supplied CD-ROM into the CD-ROM drive of your computer without installing the USB driver. Connecting your camcorder to your computer. This is complete, the USB driver will not be properly registered. Refer to "USB Driver" and click. The application software starts up and...
... Administrators. (1) Turn on your computer and allow Windows to load. (2) Insert the supplied CD-ROM into the CD-ROM drive of your computer without installing the USB driver. Connecting your camcorder to your computer. This is complete, the USB driver will not be properly registered. Refer to "USB Driver" and click. The application software starts up and...

Operating Instructions
Page 190
...Needed" screen appears. Viewing images recorded on a "Memory Stick" Set USBCONNECT in to NORMAL in the menu settings. (The default setting is not in your camcorder. For Windows users (11) Follow the on the LCD screen of your camcorder before installing the USB driver. 190 Be sure to insert...AC power adaptor and set the POWER switch to MEMORY/ NETWORK (DCR-TRV950 only). (3) Connect the (USB) jack on your camcorder to the USB connector on -screen messages to make the Add Hardware Wizard recognize that the USB drivers have been installed. Be sure to allow the installation to complete...
...Needed" screen appears. Viewing images recorded on a "Memory Stick" Set USBCONNECT in to NORMAL in the menu settings. (The default setting is not in your camcorder. For Windows users (11) Follow the on the LCD screen of your camcorder before installing the USB driver. 190 Be sure to insert...AC power adaptor and set the POWER switch to MEMORY/ NETWORK (DCR-TRV950 only). (3) Connect the (USB) jack on your camcorder to the USB connector on -screen messages to make the Add Hardware Wizard recognize that the USB drivers have been installed. Be sure to allow the installation to complete...

Operating Instructions
Page 191
... Open your computer's "Device Manager." Windows XP Home Edition/Professional: Select "Start" t "Control Panel" t "System" t "Hardware," and click the "Device manager" button. Viewing images recorded on a tape Step 1: Uninstall the incorrect USB driver 1 Turn on your computer and allow Windows to load. 2 Connect the AC power... adaptor, and set the POWER switch to VCR. 3 Connect the USB connector on your computer to the (USB) jack on the ...
... Open your computer's "Device Manager." Windows XP Home Edition/Professional: Select "Start" t "Control Panel" t "System" t "Hardware," and click the "Device manager" button. Viewing images recorded on a tape Step 1: Uninstall the incorrect USB driver 1 Turn on your computer and allow Windows to load. 2 Connect the AC power... adaptor, and set the POWER switch to VCR. 3 Connect the USB connector on your computer to the (USB) jack on the ...

Operating Instructions
Page 193
...recorded on a "Memory Stick" Step1: Uninstall the incorrect USB driver 1 Turn on your computer and allow Windows to load. 2 Insert a "Memory Stick" into your camcorder. 3 Connect the AC power adaptor, and set the POWER switch to MEMORY/ NETWORK (DCR-TRV950 only). 4 Connect the USB connector on your computer to the (USB) jack on your camcorder using the USB... (?)Sony Handycam 7 Turn the POWER switch to OFF (CHG) on page 188. 193 Windows 2000 Professional: Select "My Computer" t "Control Panel" t "System" t "Hardware," and click the "Device Manager" button. Step 2: Install the USB driver on...
...recorded on a "Memory Stick" Step1: Uninstall the incorrect USB driver 1 Turn on your computer and allow Windows to load. 2 Insert a "Memory Stick" into your camcorder. 3 Connect the AC power adaptor, and set the POWER switch to MEMORY/ NETWORK (DCR-TRV950 only). 4 Connect the USB connector on your computer to the (USB) jack on your camcorder using the USB... (?)Sony Handycam 7 Turn the POWER switch to OFF (CHG) on page 188. 193 Windows 2000 Professional: Select "My Computer" t "Control Panel" t "System" t "Hardware," and click the "Device Manager" button. Step 2: Install the USB driver on...

Operating Instructions
Page 194
...USB driver and "PIXELA ImageMixer" to view taped images on your computer. To install and use the software in the menu settings (p. 215). (4) Select "Start" t "Programs" t "PIXELA" t "ImageMixer" t "PIXELA ImageMixer Ver.1.0 for Sony" startup screen appears on your computer (p. 188). The "PIXELA ImageMixer Ver.1.0 for Sony." Viewing images recorded... on a tape on your computer and allow Windows to load. (2) Connect the AC ...
...USB driver and "PIXELA ImageMixer" to view taped images on your computer. To install and use the software in the menu settings (p. 215). (4) Select "Start" t "Programs" t "PIXELA" t "ImageMixer" t "PIXELA ImageMixer Ver.1.0 for Sony" startup screen appears on your computer (p. 188). The "PIXELA ImageMixer Ver.1.0 for Sony." Viewing images recorded... on a tape on your computer and allow Windows to load. (2) Connect the AC ...
Operating Instructions
Page 198
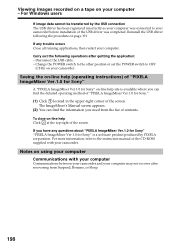
For Windows users If image data cannot be transferred by PIXELA corporation. Reinstall the USB driver following operations after recovering from the list of contents. Disconnect the USB cable. - The ImageMixer's Manual screen appears. (2) You can find the information you have any trouble... of the USB driver was connected to OFF (CHG) on using your computer Communications with your computer - If any questions about "PIXELA ImageMixer Ver.1.0 for Sony" "PIXELA ImageMixer Ver.1.0 for Sony" on page 191. To close on your camcorder. Viewing images recorded on a tape...
For Windows users If image data cannot be transferred by PIXELA corporation. Reinstall the USB driver following operations after recovering from the list of contents. Disconnect the USB cable. - The ImageMixer's Manual screen appears. (2) You can find the information you have any trouble... of the USB driver was connected to OFF (CHG) on using your computer Communications with your computer - If any questions about "PIXELA ImageMixer Ver.1.0 for Sony" "PIXELA ImageMixer Ver.1.0 for Sony" on page 191. To close on your camcorder. Viewing images recorded on a tape...
Operating Instructions
Page 199
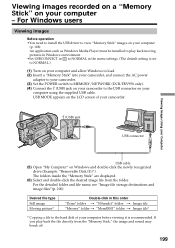
..."Mssony" folder t "Moml0001" folder t Image file* * Copying a file to the USB connector on your computer (p. 188). Viewing images recorded on a "Memory Stick" on your Computer USB cable (5) Open "My Computer" on Windows and double-click the newly recognized drive (Example: "Removable Disk (E:)"). The folders inside the...(3) Set the POWER switch to MEMORY/NETWORK (DCR-TRV950 only). (4) Connect the (USB) jack on your computer using the supplied USB cable. For Windows users Viewing images Before operation •You need to install the USB driver to play back the file directly from the ...
..."Mssony" folder t "Moml0001" folder t Image file* * Copying a file to the USB connector on your computer (p. 188). Viewing images recorded on a "Memory Stick" on your Computer USB cable (5) Open "My Computer" on Windows and double-click the newly recognized drive (Example: "Removable Disk (E:)"). The folders inside the...(3) Set the POWER switch to MEMORY/NETWORK (DCR-TRV950 only). (4) Connect the (USB) jack on your computer using the supplied USB cable. For Windows users Viewing images Before operation •You need to install the USB driver to play back the file directly from the ...

Operating Instructions
Page 224
...Turn the power on . c Press the LCD screen lightly. c Uninstall the incorrect USB driver and re-install the USB driver (p. 188, 191, 202). • USBCONNECT is set the POWER switch to VCR...Remove the cassette and leave your camcorder for five seconds. The indicators appear mirrorreversed in the display window. c Press the DISPLAY/TOUCH PANEL button on the TV screen. If the functions still do ...not work . c Remove the cassette and insert it again, then operate your Sony dealer or local authorized Sony service facility. • Disconnect the power cord of the AC power adaptor or ...
...Turn the power on . c Press the LCD screen lightly. c Uninstall the incorrect USB driver and re-install the USB driver (p. 188, 191, 202). • USBCONNECT is set the POWER switch to VCR...Remove the cassette and leave your camcorder for five seconds. The indicators appear mirrorreversed in the display window. c Press the DISPLAY/TOUCH PANEL button on the TV screen. If the functions still do ...not work . c Remove the cassette and insert it again, then operate your Sony dealer or local authorized Sony service facility. • Disconnect the power cord of the AC power adaptor or ...
Marketing Specifications
Page 2
... with USB Streaming. DCR-TRV950 Digital Handycam® Camcorder ADDITIONAL FEATURES 14 Bit DXP A/D Conversion AE Bracketing Analog-to-Digital Conversion with USB Driver (Pixela ImageMixer Ver. 1.0), TPP-3ST Stylus TM BATTERY LIFE Battery* (Fully charged) Continuous Record Time ... 1,070K Gross Pixels, Advanced HAD™ CCDs Video Actual: 690K per CCD Imager Still Actual: 1,000K per CCD Imager F: 1.6-2.8 Focal Distance: 3.6-43.2mm 35mm Conversion: 49-588mm (Camera Mode) 41-492mm (Memory Mode) Filter Diameter: 37mm Optical Zoom: 12X Digital Zoom: 150X Focusing: Full Range Auto/Manual/Spot...
... with USB Streaming. DCR-TRV950 Digital Handycam® Camcorder ADDITIONAL FEATURES 14 Bit DXP A/D Conversion AE Bracketing Analog-to-Digital Conversion with USB Driver (Pixela ImageMixer Ver. 1.0), TPP-3ST Stylus TM BATTERY LIFE Battery* (Fully charged) Continuous Record Time ... 1,070K Gross Pixels, Advanced HAD™ CCDs Video Actual: 690K per CCD Imager Still Actual: 1,000K per CCD Imager F: 1.6-2.8 Focal Distance: 3.6-43.2mm 35mm Conversion: 49-588mm (Camera Mode) 41-492mm (Memory Mode) Filter Diameter: 37mm Optical Zoom: 12X Digital Zoom: 150X Focusing: Full Range Auto/Manual/Spot...


