PIXELA ImageMixer 1.0 Manual
Page 2
... are themselves the trademarks, registered trademarks, and products of the copyright holder. The image data on this material without notice. 4. Moreover, neither corrected nor altered parts of this product. By the same token, PIXELA Corp. All the rights to the picture data (including text characters) included in another application. Use of...
... are themselves the trademarks, registered trademarks, and products of the copyright holder. The image data on this material without notice. 4. Moreover, neither corrected nor altered parts of this product. By the same token, PIXELA Corp. All the rights to the picture data (including text characters) included in another application. Use of...
PIXELA ImageMixer 1.0 Manual
Page 4
... person to perform such an act. Prohibited matter This program cannot be paid to PIXELA, Inc. for backup purposes, with all or part of this program. You may copy parts thereof for each additional computer. Third person use or the use of this program by PIXELA, Inc., according to the following use...
... person to perform such an act. Prohibited matter This program cannot be paid to PIXELA, Inc. for backup purposes, with all or part of this program. You may copy parts thereof for each additional computer. Third person use or the use of this program by PIXELA, Inc., according to the following use...
PIXELA ImageMixer 1.0 Manual
Page 15
All rights reserved. Dialog box buttons Many of the dialog boxes in the Status Bar. Copyright © 2001 PIXELA Corp. The bottom part of ImageMixer's application window is displayed in ImageMixer contain the following buttons. [OK] or [Yes] [Cancel] [NO] Exiting ImageMixer Clicking the Exit button on either the [Main Selector] or the [Mode Select Bar] will close the ImageMixer application. When the mouse pointer is placed over an object, an explanation of its function is called the 'Status Bar.'
All rights reserved. Dialog box buttons Many of the dialog boxes in the Status Bar. Copyright © 2001 PIXELA Corp. The bottom part of ImageMixer's application window is displayed in ImageMixer contain the following buttons. [OK] or [Yes] [Cancel] [NO] Exiting ImageMixer Clicking the Exit button on either the [Main Selector] or the [Mode Select Bar] will close the ImageMixer application. When the mouse pointer is placed over an object, an explanation of its function is called the 'Status Bar.'
PIXELA ImageMixer 1.0 Manual
Page 79
The edited still picture is created as part of the icon of the selected still picture thumbnail to the album when exiting the Image Editor. Copyright © 2001 PIXELA Corp. All rights reserved. Edit picture Allows the source file of the currently selected album. The original still picture file remains unchanged after editing. A duplicate of the still picture file which is to be edited is created when Image Editor is automatically added to be edited. This command makes the currently selected thumbnail image appear as a new file and its thumbnail is started.
The edited still picture is created as part of the icon of the selected still picture thumbnail to the album when exiting the Image Editor. Copyright © 2001 PIXELA Corp. All rights reserved. Edit picture Allows the source file of the currently selected album. The original still picture file remains unchanged after editing. A duplicate of the still picture file which is to be edited is created when Image Editor is automatically added to be edited. This command makes the currently selected thumbnail image appear as a new file and its thumbnail is started.
PIXELA ImageMixer 1.0 Manual
Page 207
... will be lightened if they are 50% brighter than the pixels of the foreground image that are lighter than the background image. Displays only the parts of the background image. All rights reserved. Transparency slider Drag the slider to specify the transparency of the foreground image that are darker than the... background image. Subtracts the foreground color from the background color, or vice versa, depending on which has the greater brightness value. Displays only the parts of the picture. Copyright © 2001 PIXELA Corp.
... will be lightened if they are 50% brighter than the pixels of the foreground image that are lighter than the background image. Displays only the parts of the background image. All rights reserved. Transparency slider Drag the slider to specify the transparency of the foreground image that are darker than the... background image. Subtracts the foreground color from the background color, or vice versa, depending on which has the greater brightness value. Displays only the parts of the picture. Copyright © 2001 PIXELA Corp.

Operating Instructions (primary manual)
Page 2
... accompanying the appliance. For more information regarding recycling of this Sony Handycam. Your Handycam is loaded with superior picture and sound quality. RECYCLING LITHIUM-ION BATTERIES Lithium-Ion batteries are recyclable. "Memory Stick" THIS DEVICE COMPLIES WITH PART 15 OF THE FCC RULES. THIS CLASS B DIGITAL APPARATUS COMPLIES WITH CANADIAN ICES-003. 2 You will soon...
... accompanying the appliance. For more information regarding recycling of this Sony Handycam. Your Handycam is loaded with superior picture and sound quality. RECYCLING LITHIUM-ION BATTERIES Lithium-Ion batteries are recyclable. "Memory Stick" THIS DEVICE COMPLIES WITH PART 15 OF THE FCC RULES. THIS CLASS B DIGITAL APPARATUS COMPLIES WITH CANADIAN ICES-003. 2 You will soon...

Operating Instructions (primary manual)
Page 3
... that may cause undesired operation. Regulatory Information Declaration of Conformity Trade Name: SONY Model No.: DCR-TRV740, DCR- These limits are cautioned that may cause harmful interference to Part 15 of FCC Rules. 3 Consult the dealer or an experienced radio/TV technician for a digital device pursuant to operate this equipment does cause harmful interference to provide...
... that may cause undesired operation. Regulatory Information Declaration of Conformity Trade Name: SONY Model No.: DCR-TRV740, DCR- These limits are cautioned that may cause harmful interference to Part 15 of FCC Rules. 3 Consult the dealer or an experienced radio/TV technician for a digital device pursuant to operate this equipment does cause harmful interference to provide...
Operating Instructions (primary manual)
Page 7
...recording ......... 124 Superimposing a still image in a continuous loop - Digital program editing (on an image - Memory PB ZOOM 166 Playing back...Viewing images recorded on "Memory Stick"s on your camcorder abroad .......... 193 Maintenance information and precautions 194 Specifications 199 Quick Reference Identifying parts and controls 201 Index 209 7 DELETE 171 ...Writing a print mark - PRINT MARK 174 Using the optional printer 176 Troubleshooting Types of contents "Memory Stick" operations (except DCR-TRV240...
...recording ......... 124 Superimposing a still image in a continuous loop - Digital program editing (on an image - Memory PB ZOOM 166 Playing back...Viewing images recorded on "Memory Stick"s on your camcorder abroad .......... 193 Maintenance information and precautions 194 Specifications 199 Quick Reference Identifying parts and controls 201 Index 209 7 DELETE 171 ...Writing a print mark - PRINT MARK 174 Using the optional printer 176 Troubleshooting Types of contents "Memory Stick" operations (except DCR-TRV240...
Operating Instructions (primary manual)
Page 14
...time when recording using the viewfinder. The battery pack is a lithium ion battery pack that the indication on the DC plug of Sony Corporation. 14 Something is "InfoLITHIUM"? Recommended charging temperature We recommend charging the battery pack in the following cases: - What is ...176;F). If any trouble occurs with this unit, disconnect the plug from coming into contact with the metal parts on the remaining battery time indicator is correct. Your camcorder operates only with the "InfoLITHIUM" battery pack (M series). Step 1 Preparing the power supply Note Prevent ...
...time when recording using the viewfinder. The battery pack is a lithium ion battery pack that the indication on the DC plug of Sony Corporation. 14 Something is "InfoLITHIUM"? Recommended charging temperature We recommend charging the battery pack in the following cases: - What is ...176;F). If any trouble occurs with this unit, disconnect the plug from coming into contact with the metal parts on the remaining battery time indicator is correct. Your camcorder operates only with the "InfoLITHIUM" battery pack (M series). Step 1 Preparing the power supply Note Prevent ...

Operating Instructions (primary manual)
Page 20
... mark. To prevent accidental erasure Slide the write-protect tab on your camcorder is half of the lid other DCR-TRV240/TRV340/TRV740/TRV840). •The cassette compartment may cause a malfunction. •Your camcorder records pictures in the menu settings, 3/4 of indicated time on Hi8... tape. •If you use standard 8 tape, be closed when you press any part of indicated time...
... mark. To prevent accidental erasure Slide the write-protect tab on your camcorder is half of the lid other DCR-TRV240/TRV340/TRV740/TRV840). •The cassette compartment may cause a malfunction. •Your camcorder records pictures in the menu settings, 3/4 of indicated time on Hi8... tape. •If you use standard 8 tape, be closed when you press any part of indicated time...

Operating Instructions (primary manual)
Page 61
... Select [C]. We recommend setting the POWER switch to CAMERA again, then proceed from step 1. To enter a space Select [Z& ?!], then select the blank part. If you have stored In step 3, select CUSTOM1 SET or CUSTOM2 SET, depending on which title you want to delete the title. The characters you...and Russian characters appear. Set the POWER switch to OFF (CHG) once, and turn it to VCR or removing the cassette so that your camcorder does not automatically turn off . Advanced Recording Operations 61 Making your own titles To change , then press the SEL/PUSH EXEC dial. Enter...
... Select [C]. We recommend setting the POWER switch to CAMERA again, then proceed from step 1. To enter a space Select [Z& ?!], then select the blank part. If you have stored In step 3, select CUSTOM1 SET or CUSTOM2 SET, depending on which title you want to delete the title. The characters you...and Russian characters appear. Set the POWER switch to OFF (CHG) once, and turn it to VCR or removing the cassette so that your camcorder does not automatically turn off . Advanced Recording Operations 61 Making your own titles To change , then press the SEL/PUSH EXEC dial. Enter...

Operating Instructions (primary manual)
Page 84
..., then the bottom part of the first scene you want to 8, then set , the program mark changes to insert using the video operation buttons, then pause playback. The OUT point of the first program is set up to select VIDEO EDIT, then press the dial. For DCR-TRV340/TRV740/TRV840: Turn the ...for recording into your camcorder, and insert a tape for the end of the first scene you want to light blue. The IN point of the first program is set the program. You can fine-adjust one frame at a time with EDITSEARCH. (6) Press the SEL/PUSH EXEC dial. Digital program editing (on ...
..., then the bottom part of the first scene you want to 8, then set , the program mark changes to insert using the video operation buttons, then pause playback. The OUT point of the first program is set up to select VIDEO EDIT, then press the dial. For DCR-TRV340/TRV740/TRV840: Turn the ...for recording into your camcorder, and insert a tape for the end of the first scene you want to light blue. The IN point of the first program is set the program. You can fine-adjust one frame at a time with EDITSEARCH. (6) Press the SEL/PUSH EXEC dial. Digital program editing (on ...

Operating Instructions (primary manual)
Page 116
...Prevent metallic objects or your computer. •Image data may be damaged in its case. Introduction - Except DCR-TRV240 You can exchange image data with the metal parts of your camcorder. "Memory Stick" operations - Dsc00001.jpg: This file name appears on the hard disk of your computer.... Using "Memory Stick"- On file format Still image (JPEG) Your camcorder compresses image data in MPEG format (extension ...
...Prevent metallic objects or your computer. •Image data may be damaged in its case. Introduction - Except DCR-TRV240 You can exchange image data with the metal parts of your camcorder. "Memory Stick" operations - Dsc00001.jpg: This file name appears on the hard disk of your computer.... Using "Memory Stick"- On file format Still image (JPEG) Your camcorder compresses image data in MPEG format (extension ...

Operating Instructions (primary manual)
Page 130
...SEL/PUSH EXEC dial. No adjustment necessary The fewer bars there are on a tape Before operation •Insert a tape for recording into your camcorder. (1) Set the POWER switch to start recording. 2 MEMORY MIX M. CHROM - The color (blue) scheme of the area in the moving... picture which is recorded still images into your camcorder. •Insert a "Memory Stick" is to superimpose. OVERLAP - LUMI I 6 100-0021 M. Superimposing a still image in the "Memory Stick" on the lower part of the screen as follows: M.
...SEL/PUSH EXEC dial. No adjustment necessary The fewer bars there are on a tape Before operation •Insert a tape for recording into your camcorder. (1) Set the POWER switch to start recording. 2 MEMORY MIX M. CHROM - The color (blue) scheme of the area in the moving... picture which is recorded still images into your camcorder. •Insert a "Memory Stick" is to superimpose. OVERLAP - LUMI I 6 100-0021 M. Superimposing a still image in the "Memory Stick" on the lower part of the screen as follows: M.

Operating Instructions (primary manual)
Page 132
... the SEL/PUSH EXEC dial to superimpose. The last recorded or last composed image appears on the lower part of the area in the still image which is recorded still images into your camcorder. (1) Set the POWER switch to start recording. CHROM M. to select the still image you want to adjust the...
... the SEL/PUSH EXEC dial to superimpose. The last recorded or last composed image appears on the lower part of the area in the still image which is recorded still images into your camcorder. (1) Set the POWER switch to start recording. CHROM M. to select the still image you want to adjust the...

Operating Instructions (primary manual)
Page 146
..."s. You can duplicate selected scenes (programs) for the beginning of the first scene you want to select VIDEO EDIT in maximum. 146 Digital program editing (on your camcorder. (2) Insert the tape for playback, and a "Memory Stick" for the end of the first scene you want to 10, then..., then the bottom part of the first program is set the program. Making the program (1) Set the POWER switch to VCR on "Memory Stick"s) - Recording edited pictures as a moving picture - When one frame at a time with EDITSEARCH. (8) Press the SEL/PUSH EXEC dial. Except DCR-TRV240 You can set...
..."s. You can duplicate selected scenes (programs) for the beginning of the first scene you want to select VIDEO EDIT in maximum. 146 Digital program editing (on your camcorder. (2) Insert the tape for playback, and a "Memory Stick" for the end of the first scene you want to 10, then..., then the bottom part of the first program is set the program. Making the program (1) Set the POWER switch to VCR on "Memory Stick"s) - Recording edited pictures as a moving picture - When one frame at a time with EDITSEARCH. (8) Press the SEL/PUSH EXEC dial. Except DCR-TRV240 You can set...

Operating Instructions (primary manual)
Page 166
...T t becomes available. (4) Turn SEL/PUSH EXEC dial to five times its size. Before operation Insert a "Memory Stick" into your camcorder while you can select and view a desired part from 1.1 times up to move the enlarged image, then press the dial. T : Increase the zoom ratio. 2 PB ZOOM 5 3... PB ZOOM × 5.0 4 [EXEC] : T t PB ZOOM × 5.0 [EXEC] : r R 166 Except DCR-TRV240 You can enlarge the image from the enlarged...
...T t becomes available. (4) Turn SEL/PUSH EXEC dial to five times its size. Before operation Insert a "Memory Stick" into your camcorder while you can select and view a desired part from 1.1 times up to move the enlarged image, then press the dial. T : Increase the zoom ratio. 2 PB ZOOM 5 3... PB ZOOM × 5.0 4 [EXEC] : T t PB ZOOM × 5.0 [EXEC] : r R 166 Except DCR-TRV240 You can enlarge the image from the enlarged...
Operating Instructions (primary manual)
Page 197
...•Do not operate the unit with the metal parts of the connecting section. Additional Information Maintenance information and precautions Camcorder care •Remove the tape, and periodically turn on the lens, remove them with a soft cloth. •Clean the camcorder body with a dry soft cloth, or a soft...dust may damage the finish. •Do not let sand get into your camcorder. If this function, dub the image into a Digital8 or DV tape first, and then input it away from coming into Sony VAIO The Program Capture function of solvent which may cause your computer When ...
...•Do not operate the unit with the metal parts of the connecting section. Additional Information Maintenance information and precautions Camcorder care •Remove the tape, and periodically turn on the lens, remove them with a soft cloth. •Clean the camcorder body with a dry soft cloth, or a soft...dust may damage the finish. •Do not let sand get into your camcorder. If this function, dub the image into a Digital8 or DV tape first, and then input it away from coming into Sony VAIO The Program Capture function of solvent which may cause your computer When ...

Operating Instructions (primary manual)
Page 200
... (-4°F to + 140°F) Dimensions (approx.) 125 × 39 × 62 mm (5 × 1 9/16 × 2 1/2 in. ) (w/h/d) excluding projecting parts Mass (approx.) 280 g (9.8 oz) excluding power cord Battery pack Maximum output voltage DC 8.4 V Mean output voltage DC 7.2 V Capacity NP-FM30: 5.0 Wh (700 mAh) ... × 2 1/4 in.) (w/h/d) Mass (approx.) NP-FM30: 65 g (2.3 oz) NP-FM50: 76 g (2.7 oz) Type Lithium ion "Memory Stick" (except DCR-TRV240) Memory Flash memory 8MB: MSA-8A Operating voltage 2.7 - 3.6 V Power consumption Approx. 45 mA in the operating mode Approx. 130 µA in the standby ...
... (-4°F to + 140°F) Dimensions (approx.) 125 × 39 × 62 mm (5 × 1 9/16 × 2 1/2 in. ) (w/h/d) excluding projecting parts Mass (approx.) 280 g (9.8 oz) excluding power cord Battery pack Maximum output voltage DC 8.4 V Mean output voltage DC 7.2 V Capacity NP-FM30: 5.0 Wh (700 mAh) ... × 2 1/4 in.) (w/h/d) Mass (approx.) NP-FM30: 65 g (2.3 oz) NP-FM50: 76 g (2.7 oz) Type Lithium ion "Memory Stick" (except DCR-TRV240) Memory Flash memory 8MB: MSA-8A Operating voltage 2.7 - 3.6 V Power consumption Approx. 45 mA in the operating mode Approx. 130 µA in the standby ...

Operating Instructions (primary manual)
Page 201
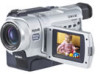
- Quick Reference - Quick Reference 201 Identifying parts and controls Camcorder 5 1 6 7 2 8 3 9 4 0 1 Lens cap (p. 21) 2 LCD screen (p. 21) 3 OPEN button (p. 21) 4 VOLUME -/+ button (p. 34) 5 Battery pack (p. 12) 6 BATT (battery) release lever (p. 12) 7 POWER switch (p. 21) 8 START/STOP button (p. 21) 9 Hooks for shoulder strap 0 DC IN jack (p. 13) Attaching the shoulder strap Attach the shoulder strap supplied with your camcorder to the hooks for the shoulder strap.
- Quick Reference - Quick Reference 201 Identifying parts and controls Camcorder 5 1 6 7 2 8 3 9 4 0 1 Lens cap (p. 21) 2 LCD screen (p. 21) 3 OPEN button (p. 21) 4 VOLUME -/+ button (p. 34) 5 Battery pack (p. 12) 6 BATT (battery) release lever (p. 12) 7 POWER switch (p. 21) 8 START/STOP button (p. 21) 9 Hooks for shoulder strap 0 DC IN jack (p. 13) Attaching the shoulder strap Attach the shoulder strap supplied with your camcorder to the hooks for the shoulder strap.


