PIXELA ImageMixer 1.0 Manual
Page 42
... below) to playback recorded sounds. 2-5-1 Sound Recording Mode ImageMixer enables you to record sounds using a microphone or other sound output devices (such as a TV, cassette tape player, etc.) connected to an audio input jack on your computer. Preview window Displays a preview of the selected thumbnail. Control panel From the control panel...
... below) to playback recorded sounds. 2-5-1 Sound Recording Mode ImageMixer enables you to record sounds using a microphone or other sound output devices (such as a TV, cassette tape player, etc.) connected to an audio input jack on your computer. Preview window Displays a preview of the selected thumbnail. Control panel From the control panel...
PIXELA ImageMixer 1.0 Manual
Page 44
... list window into which you wish to stop recording. Click the [Record] button. 4. In Mac, AIFF files are , of CD audio. 1. The audio format of digitally recorded files is PCM, the sampling rate is 44.1KHz, and the bit rate is approximately 10MB per minute of course, added directly to the... at which you wish to save location designated in the thumbnail list window. Connect the microphone or other sound output device, such as a TV, cassette tape player, etc. To confirm successful recording of recorded files is WAVE. Recording sound files while previewing movie images
... list window into which you wish to stop recording. Click the [Record] button. 4. In Mac, AIFF files are , of CD audio. 1. The audio format of digitally recorded files is PCM, the sampling rate is 44.1KHz, and the bit rate is approximately 10MB per minute of course, added directly to the... at which you wish to save location designated in the thumbnail list window. Connect the microphone or other sound output device, such as a TV, cassette tape player, etc. To confirm successful recording of recorded files is WAVE. Recording sound files while previewing movie images
PIXELA ImageMixer 1.0 Manual
Page 56
... camera, this icon becomes active (glows). That is not set to play mode. If the digital video camera is not properly connected to a problem with the connection between the PC & the digital video camera, try clicking the [refresh connection] button. If the connection between the PC and the... still picture.' When a cassette is not present, the icon is ... Depending on your PC and set in the machine, the message on the tape inside the machine. Copyright © 2001 PIXELA Corp. of free space in the destination directory,' (for capturing movie scenes) or 'Ready to view...
... camera, this icon becomes active (glows). That is not set to play mode. If the digital video camera is not properly connected to a problem with the connection between the PC & the digital video camera, try clicking the [refresh connection] button. If the connection between the PC and the... still picture.' When a cassette is not present, the icon is ... Depending on your PC and set in the machine, the message on the tape inside the machine. Copyright © 2001 PIXELA Corp. of free space in the destination directory,' (for capturing movie scenes) or 'Ready to view...
PIXELA ImageMixer 1.0 Manual
Page 140
... and pasting objects Deleting objects Transforming 3-D appearance of text objects (Win) Arranging and Editing Text Creating new text and arranging it as labels for video tapes, disks, etc. Print button Click to the layout window. This button is not displayed when working with titles. The display will be inserted into your...
... and pasting objects Deleting objects Transforming 3-D appearance of text objects (Win) Arranging and Editing Text Creating new text and arranging it as labels for video tapes, disks, etc. Print button Click to the layout window. This button is not displayed when working with titles. The display will be inserted into your...
PIXELA ImageMixer 1.0 Manual
Page 145
... Type button A4 button Letter button Click to display the list of printer paper types. In Windows, click to display the layout types for VHS tape, 8mm tape, floppy disk, MD, DV cassette and CD labels.
... Type button A4 button Letter button Click to display the list of printer paper types. In Windows, click to display the layout types for VHS tape, 8mm tape, floppy disk, MD, DV cassette and CD labels.
PIXELA ImageMixer 1.0 Manual
Page 146
... paper settings dialog box for the currently selected printer. All rights reserved. Others HAGAKI Title Create a 3.9 X 5.8 inch (100 X 148 mm) postcard layout. Create an 8mm tape label. Create a digital video camera cassette label. Labels VHS 8mm FD MD DV cassette CD Create a VHS...
... paper settings dialog box for the currently selected printer. All rights reserved. Others HAGAKI Title Create a 3.9 X 5.8 inch (100 X 148 mm) postcard layout. Create an 8mm tape label. Create a digital video camera cassette label. Labels VHS 8mm FD MD DV cassette CD Create a VHS...

Operating Instructions (primary manual)
Page 4
...Viewing images recorded on "Memory Stick"s using the USB cable (except DCR-TRV240) (p. 155) •Viewing images recorded on a tape using the USB cable (p. 94) •Viewing images live on your computer from your camcorder using the USB cable (p. 103) •Capturing images from an ...8226;Adjusting the exposure manually (p. 53) Functions for giving images more impact •Digital zoom [MENU] (p. 24) The default setting is OFF. (To zoom greater than 25×, (DCR-TRV240/TRV340)/15× (DCR-TRV740/TRV840), select the digital zoom power in D ZOOM in the menu settings.) •Fader (p. 44)...
...Viewing images recorded on "Memory Stick"s using the USB cable (except DCR-TRV240) (p. 155) •Viewing images recorded on a tape using the USB cable (p. 94) •Viewing images live on your computer from your camcorder using the USB cable (p. 103) •Capturing images from an ...8226;Adjusting the exposure manually (p. 53) Functions for giving images more impact •Digital zoom [MENU] (p. 24) The default setting is OFF. (To zoom greater than 25×, (DCR-TRV240/TRV340)/15× (DCR-TRV740/TRV840), select the digital zoom power in D ZOOM in the menu settings.) •Fader (p. 44)...
Operating Instructions (primary manual)
Page 6
...from an analog video unit on a tape - BACK LIGHT 28 Shooting in the dark - Picture effect 47 Using special effects - NightShot/Super NightShot/ Color Slow Shutter 29 Self-timer recording (except DCR-TRV240 31 Checking recordings - Digital effect 48 Using the PROGRAM AE ... Playing back tapes with picture effects 63 Playing back tapes with digital effects 64 Enlarging recorded images - Frame recording 57 Superimposing a title 58 Making your computer (Windows users only 94 Customizing Your Camcorder Changing the menu settings 105 6 Basics Playing back a tape 34 To ...
...from an analog video unit on a tape - BACK LIGHT 28 Shooting in the dark - Picture effect 47 Using special effects - NightShot/Super NightShot/ Color Slow Shutter 29 Self-timer recording (except DCR-TRV240 31 Checking recordings - Digital effect 48 Using the PROGRAM AE ... Playing back tapes with picture effects 63 Playing back tapes with digital effects 64 Enlarging recorded images - Frame recording 57 Superimposing a title 58 Making your computer (Windows users only 94 Customizing Your Camcorder Changing the menu settings 105 6 Basics Playing back a tape 34 To ...
Operating Instructions (primary manual)
Page 7
... Information Digital8 system, recording and playback 187 About the "InfoLITHIUM" battery pack 189 About i.LINK 191 Using your camcorder abroad .......... 193 Maintenance information and precautions 194 Specifications 199 Quick Reference Identifying parts and controls 201 Index 209 7 ... 176 Troubleshooting Types of contents "Memory Stick" operations (except DCR-TRV240) Using "Memory Stick" - Getting Started Table of trouble and how to tape 164 Enlarging still images recorded on "Memory Stick"s - Digital program editing (on an image - Memory Photo playback .......... ...
... Information Digital8 system, recording and playback 187 About the "InfoLITHIUM" battery pack 189 About i.LINK 191 Using your camcorder abroad .......... 193 Maintenance information and precautions 194 Specifications 199 Quick Reference Identifying parts and controls 201 Index 209 7 ... 176 Troubleshooting Types of contents "Memory Stick" operations (except DCR-TRV240) Using "Memory Stick" - Getting Started Table of trouble and how to tape 164 Enlarging still images recorded on "Memory Stick"s - Digital program editing (on an image - Memory Photo playback .......... ...
Operating Instructions (primary manual)
Page 9
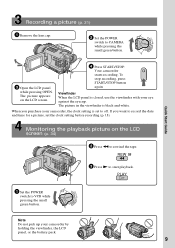
...record the date and time for a picture, set to off. If you purchase your camcorder, the clock setting is closed, use the viewfinder with your camcorder by holding the viewfinder, the LCD panel, or the battery pack. 9 Monitoring the ...CAMERA while pressing the small green button. The picture appears on the LCD screen (p. 34) 2 Press m to start playback. Your camcorder starts recording. The picture in the viewfinder is black and white. To stop recording, press START/STOP button again. E ERMAORY E ... M 3 Open the LCD panel while pressing OPEN. REW 3 Press N to rewind the tape.
...record the date and time for a picture, set to off. If you purchase your camcorder, the clock setting is closed, use the viewfinder with your camcorder by holding the viewfinder, the LCD panel, or the battery pack. 9 Monitoring the ...CAMERA while pressing the small green button. The picture appears on the LCD screen (p. 34) 2 Press m to start playback. Your camcorder starts recording. The picture in the viewfinder is black and white. To stop recording, press START/STOP button again. E ERMAORY E ... M 3 Open the LCD panel while pressing OPEN. REW 3 Press N to rewind the tape.
Operating Instructions (primary manual)
Page 10
The DCR-TRV740 is provided with the Digital8 system on the POWER switch) - Before using your camcorder With your digital camcorder, you can hear a beep to indicate that you can use the functions in "Advanced Playback Operations" on TV color systems ... may be copyrighted. Any differences in operation are clearly indicated in the table below. Set the POWER switch to the provision of your camcorder plays back tapes recorded in the illustrations. To enable smooth transition, we recommend that the operation is indicated in the Hi8 /standard 8 (analog) system...
The DCR-TRV740 is provided with the Digital8 system on the POWER switch) - Before using your camcorder With your digital camcorder, you can hear a beep to indicate that you can use the functions in "Advanced Playback Operations" on TV color systems ... may be copyrighted. Any differences in operation are clearly indicated in the table below. Set the POWER switch to the provision of your camcorder plays back tapes recorded in the illustrations. To enable smooth transition, we recommend that the operation is indicated in the Hi8 /standard 8 (analog) system...
Operating Instructions (primary manual)
Page 16
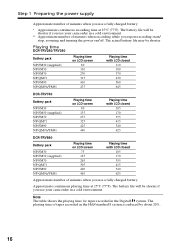
... NP-QM91/FM91 Playing time on LCD screen 80 130 270 315 410 475 Playing time with LCD closed 110 180 370 430 560 645 DCR-TRV740 Battery pack NP-FM30 NP-FM50 (supplied) NP-FM70 NP-QM71 NP-FM90 NP-QM91/FM91 Playing time on LCD screen 80 135 275 325... when you use your camcorder in a cold environment. ** Approximate number of minutes when recording while you repeat recording start/ stop, zooming and turning the power on LCD screen 75 125 265 305 400 465 Playing time with LCD closed 105 170 355 415 540 625 Approximate number of tapes recorded in the...
... NP-QM91/FM91 Playing time on LCD screen 80 130 270 315 410 475 Playing time with LCD closed 110 180 370 430 560 645 DCR-TRV740 Battery pack NP-FM30 NP-FM50 (supplied) NP-FM70 NP-QM71 NP-FM90 NP-QM91/FM91 Playing time on LCD screen 80 135 275 325... when you use your camcorder in a cold environment. ** Approximate number of minutes when recording while you repeat recording start/ stop, zooming and turning the power on LCD screen 75 125 265 305 400 465 Playing time with LCD closed 105 170 355 415 540 625 Approximate number of tapes recorded in the...

Operating Instructions (primary manual)
Page 19
Getting Started Step 2 Setting the date and time The year changes as follows: 1995 T t 2002 T t 2079 If you do not set the date and time is recorded on the tape and the "Memory Stick". (except DCR-TRV240) Note on the time indicator The internal clock of your camcorder operates on a 12-hour cycle. •12:00 AM stands for midnight. •12:00 PM stands for noon. 19
Getting Started Step 2 Setting the date and time The year changes as follows: 1995 T t 2002 T t 2079 If you do not set the date and time is recorded on the tape and the "Memory Stick". (except DCR-TRV240) Note on the time indicator The internal clock of your camcorder operates on a 12-hour cycle. •12:00 AM stands for midnight. •12:00 PM stands for noon. 19

Operating Instructions (primary manual)
Page 20
...the cassette back to insert. (4) Close the cassette compartment by pressing on the cassette to play back standard 8 tape on other camcorders (including other DCR-TRV240/TRV340/TRV740/TRV840). •The cassette compartment may not be sure to expose the red mark. 20 Notes •Do... eject a cassette Follow the procedure above, and take out the cassette in the menu settings, 3/4 of indicated time on Hi8 tape. •If you use your camcorder. To prevent accidental erasure Slide the write-protect tab on the cassette compartment. If you select the LP mode in step 3. ...
...the cassette back to insert. (4) Close the cassette compartment by pressing on the cassette to play back standard 8 tape on other camcorders (including other DCR-TRV240/TRV340/TRV740/TRV840). •The cassette compartment may not be sure to expose the red mark. 20 Notes •Do... eject a cassette Follow the procedure above, and take out the cassette in the menu settings, 3/4 of indicated time on Hi8 tape. •If you use your camcorder. To prevent accidental erasure Slide the write-protect tab on the cassette compartment. If you select the LP mode in step 3. ...
Operating Instructions (primary manual)
Page 22
...DCR-TRV240) When you slide the LOCK switch to the right, the POWER switch can record 1.5 times as long as in the SP mode. To enable smooth transition Transition between scenes. If you leave your camcorder...off . However, they are not displayed while recording. However, check the following: - However, your camcorder in the standby mode for three minutes while the cassette is to save battery power and to MEMORY ...in the SP mode and in the LP mode on one tape or you record some scenes in the LP mode on your camcorder, we recommend that you record in the menu settings (p. 105...
...DCR-TRV240) When you slide the LOCK switch to the right, the POWER switch can record 1.5 times as long as in the SP mode. To enable smooth transition Transition between scenes. If you leave your camcorder...off . However, they are not displayed while recording. However, check the following: - However, your camcorder in the standby mode for three minutes while the cassette is to save battery power and to MEMORY ...in the SP mode and in the LP mode on one tape or you record some scenes in the LP mode on your camcorder, we recommend that you record in the menu settings (p. 105...
Operating Instructions (primary manual)
Page 27
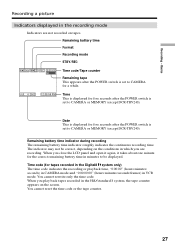
...to be correct, depending on the conditions in minutes to CAMERA or MEMORY (except DCR-TRV240). When you play back tapes recorded in the recording mode Indicators are recording. You cannot reset the time code or the tape counter. 27 When you close the LCD panel and open it again, it ...takes about one minute for five seconds after the POWER switch is set to CAMERA or MEMORY (except DCR-TRV240). Remaining battery time indicator during recording The ...
...to be correct, depending on the conditions in minutes to CAMERA or MEMORY (except DCR-TRV240). When you play back tapes recorded in the recording mode Indicators are recording. You cannot reset the time code or the tape counter. 27 When you close the LCD panel and open it again, it ...takes about one minute for five seconds after the POWER switch is set to CAMERA or MEMORY (except DCR-TRV240). Remaining battery time indicator during recording The ...

Operating Instructions (primary manual)
Page 33
END SEARCH/EDITSEARCH/Rec Review Notes •END SEARCH, EDITSEARCH and Rec Review work only for tapes recorded in the Digital8 system. •If you start recording after you have recorded on the tape, the end search function does not work correctly. 33 Recording - If a tape has a blank portion between the last scene you recorded and the next scene may not be smooth. •Once you eject the cassette after using the end search function, occasionally, the transition between recorded portions The end search function may not work . Basics Checking recordings -
END SEARCH/EDITSEARCH/Rec Review Notes •END SEARCH, EDITSEARCH and Rec Review work only for tapes recorded in the Digital8 system. •If you start recording after you have recorded on the tape, the end search function does not work correctly. 33 Recording - If a tape has a blank portion between the last scene you recorded and the next scene may not be smooth. •Once you eject the cassette after using the end search function, occasionally, the transition between recorded portions The end search function may not work . Basics Checking recordings -

Operating Instructions (primary manual)
Page 34
...M 6 3 VOLUME 1 To stop playback Press x. When monitoring on VOLUME. - You can control playback using the Remote Commander supplied with your camcorder. (1) Install the power source and insert the recorded tape. (2) Set the POWER switch to VCR while pressing the small green button. (3) Open the LCD panel while pressing OPEN. (4) Press m to..., press either of the two buttons on the LCD screen You can turn the LCD panel over and move it back to the camcorder body with the LCD screen facing out. 34 Playback - Playing back a tape You can monitor the playback picture in the viewfinder.
...M 6 3 VOLUME 1 To stop playback Press x. When monitoring on VOLUME. - You can control playback using the Remote Commander supplied with your camcorder. (1) Install the power source and insert the recorded tape. (2) Set the POWER switch to VCR while pressing the small green button. (3) Open the LCD panel while pressing OPEN. (4) Press m to..., press either of the two buttons on the LCD screen You can turn the LCD panel over and move it back to the camcorder body with the LCD screen facing out. 34 Playback - Playing back a tape You can monitor the playback picture in the viewfinder.

Operating Instructions (primary manual)
Page 35
... Use the Remote Commander for this operation. 1 Set the POWER switch to VCR, then playback a tape. 2 Press DATA CODE on your camcorder or the Remote Commander supplied with your camcorder. Display function Press DISPLAY on the Remote Commander. DATA CODE DISPLAY Playback - Basics DISPLAY About date/...time and various settings Your camcorder automatically records not only pictures on the screen. The indicators appear on the tape but also the recording data (date/time or various settings when recorded) (Data code...
... Use the Remote Commander for this operation. 1 Set the POWER switch to VCR, then playback a tape. 2 Press DATA CODE on your camcorder or the Remote Commander supplied with your camcorder. Display function Press DISPLAY on the Remote Commander. DATA CODE DISPLAY Playback - Basics DISPLAY About date/...time and various settings Your camcorder automatically records not only pictures on the screen. The indicators appear on the tape but also the recording data (date/time or various settings when recorded) (Data code...

Operating Instructions (primary manual)
Page 36
... the approximate continuous playback time. To resume normal playback, release the button. 36 The indicator may not be correct, depending on "Memory Stick"s (except DCR-TRV240). To playback pause (view a still image) Press X during playback to be displayed. When you close the LCD panel and open it again, ...to reverse the playback direction. In the recording mode, the recording data will not be displayed. The tape is unreadable due to DATE in the stop mode. The tape was recorded by a camcorder without the date and time set the POWER switch to the TV, the data code appears on the...
... the approximate continuous playback time. To resume normal playback, release the button. 36 The indicator may not be correct, depending on "Memory Stick"s (except DCR-TRV240). To playback pause (view a still image) Press X during playback to be displayed. When you close the LCD panel and open it again, ...to reverse the playback direction. In the recording mode, the recording data will not be displayed. The tape is unreadable due to DATE in the stop mode. The tape was recorded by a camcorder without the date and time set the POWER switch to the TV, the data code appears on the...


