Operating Instructions
Page 5
... 10 Step 1 Preparing the power supply 11 Installing the battery pack 11 Charging the battery pack 12 Connecting to tapes 114 Enlarging still images recorded on an image - Insert Editing 77 Customizing Your Camcorder Changing the menu settings 79 "Memory Stick" operations (DCR-TRV330/TRV530 only) Using "Memory Stick"-introduction .......... 88 Recording still images on a tape...
... 10 Step 1 Preparing the power supply 11 Installing the battery pack 11 Charging the battery pack 12 Connecting to tapes 114 Enlarging still images recorded on an image - Insert Editing 77 Customizing Your Camcorder Changing the menu settings 79 "Memory Stick" operations (DCR-TRV330/TRV530 only) Using "Memory Stick"-introduction .......... 88 Recording still images on a tape...
Operating Instructions
Page 6
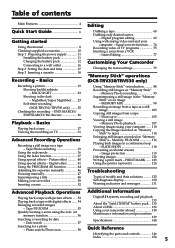
... cassette compartment by pressing the mark on the cassette compartment. Open the DC IN jack cover. AC power adaptor (supplied) Inserting a cassette (p. 18) 1 Slide OPEN/EJECT in the direction of your camcorder outdoors (p. 11). Connecting the power cord (p. 16) Use the battery pack when using your camcorder. After the cassette compartment goes down...
... cassette compartment by pressing the mark on the cassette compartment. Open the DC IN jack cover. AC power adaptor (supplied) Inserting a cassette (p. 18) 1 Slide OPEN/EJECT in the direction of your camcorder outdoors (p. 11). Connecting the power cord (p. 16) Use the battery pack when using your camcorder. After the cassette compartment goes down...
Operating Instructions
Page 10
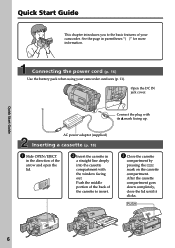
... AC power adaptor (1), Power cord (1) (p. 12) 3 NP-FM30 battery pack (1) (p. 11, 12) 4 Size AA (R6) battery for Remote Commander (2) (p. 152) 5 A/V connecting cable (1) (p. 31) 6 Shoulder strap (1) (p. 146) 7 Lens cap (1) (p. 19) 8 USB cable (1) (p. 111) DCR-TRV330/TRV530 only 9 "Memory Stick" (1) (p. 88) DCR-TRV330/TRV530 only 0 CD-ROM (SPVD-004 USB Driver) (1) (p. 111) DCR-TRV330/TRV530 only Contents of the recording cannot...
... AC power adaptor (1), Power cord (1) (p. 12) 3 NP-FM30 battery pack (1) (p. 11, 12) 4 Size AA (R6) battery for Remote Commander (2) (p. 152) 5 A/V connecting cable (1) (p. 31) 6 Shoulder strap (1) (p. 146) 7 Lens cap (1) (p. 19) 8 USB cable (1) (p. 111) DCR-TRV330/TRV530 only 9 "Memory Stick" (1) (p. 88) DCR-TRV330/TRV530 only 0 CD-ROM (SPVD-004 USB Driver) (1) (p. 111) DCR-TRV330/TRV530 only Contents of the recording cannot...
Operating Instructions
Page 11
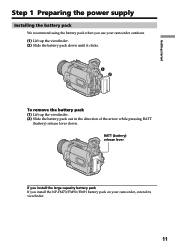
Getting started Step 1 Preparing the power supply Installing the battery pack We recommend using the battery pack when you install the NP-FM70/FM90/FM91 battery pack on your camcorder outdoors. (1) Lift up the viewfinder. (2) Slide the battery pack down until it clicks. 1 2 To remove the battery pack (1) Lift up the viewfinder. (2) Slide the battery pack out in the direction of the arrow while pressing BATT (battery) release lever down. BATT (battery) release lever If you install the large capacity battery pack If you use your camcorder, extend its viewfinder. 11
Getting started Step 1 Preparing the power supply Installing the battery pack We recommend using the battery pack when you install the NP-FM70/FM90/FM91 battery pack on your camcorder outdoors. (1) Lift up the viewfinder. (2) Slide the battery pack down until it clicks. 1 2 To remove the battery pack (1) Lift up the viewfinder. (2) Slide the battery pack out in the direction of the arrow while pressing BATT (battery) release lever down. BATT (battery) release lever If you install the large capacity battery pack If you use your camcorder, extend its viewfinder. 11
Operating Instructions
Page 12
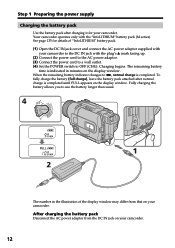
...camcorder to the DC IN jack with the plug's v mark facing up. (2) Connect the power cord to the AC power adaptor. (3) Connect the power cord to a wall outlet. (4) Set the POWER switch to u, normal charge is completed until FULL appears on the display window. When the ...pack. (1) Open the DC IN jack cover and connect the AC power adaptor supplied with the "InfoLITHIUM" battery pack (M series). Your camcorder operates only with your camcorder. OFCFR(CHG) E ERMAORY CAM M Step 1 Preparing the power supply Charging the battery pack Use the battery pack after normal charge is ...
...camcorder to the DC IN jack with the plug's v mark facing up. (2) Connect the power cord to the AC power adaptor. (3) Connect the power cord to a wall outlet. (4) Set the POWER switch to u, normal charge is completed until FULL appears on the display window. When the ...pack. (1) Open the DC IN jack cover and connect the AC power adaptor supplied with the "InfoLITHIUM" battery pack (M series). Your camcorder operates only with your camcorder. OFCFR(CHG) E ERMAORY CAM M Step 1 Preparing the power supply Charging the battery pack Use the battery pack after normal charge is ...

Operating Instructions
Page 13
...of the display window is turned off the power. The battery pack is a trademark of Sony Corporation. This unit is wrong with the "...the battery pack has enough power to cut off . Getting started Step 1 Preparing the power supply Notes •Prevent metallic objects...power adaptor near a wall outlet. Do this unit, disconnect the plug from coming into contact with compatible electronic equipment. min" appears in a cool place. While charging the battery pack, no indicator appears or the indicator flashes in the display window in the display window roughly indicates the recording...
...of the display window is turned off the power. The battery pack is a trademark of Sony Corporation. This unit is wrong with the "...the battery pack has enough power to cut off . Getting started Step 1 Preparing the power supply Notes •Prevent metallic objects...power adaptor near a wall outlet. Do this unit, disconnect the plug from coming into contact with compatible electronic equipment. min" appears in a cool place. While charging the battery pack, no indicator appears or the indicator flashes in the display window in the display window roughly indicates the recording...

Operating Instructions
Page 14
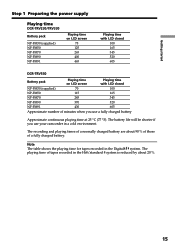
... life will be shorter. 14 The actual battery life may be shorter if you repeat recording start/ stop, zooming and turning the power on/off. Step 1 Preparing the power supply Charging time Battery pack NP-FM30 (supplied) NP-FM50 NP-FM70 NP-FM90 NP-FM91 Full charge (Normal charge) 145 (85... LCD screen Continuous* Typical** 75 40 125 70 265 150 400 230 465 265 DCR-TRV530 Battery pack Recording with the viewfinder Recording with the LCD screen Continuous* Typical** Continuous* Typical** NP-FM30 (supplied) 100 60 70 40 NP-FM50 165 105 115 65 NP-FM70 345 220 245...
... life will be shorter. 14 The actual battery life may be shorter if you repeat recording start/ stop, zooming and turning the power on/off. Step 1 Preparing the power supply Charging time Battery pack NP-FM30 (supplied) NP-FM50 NP-FM70 NP-FM90 NP-FM91 Full charge (Normal charge) 145 (85... LCD screen Continuous* Typical** 75 40 125 70 265 150 400 230 465 265 DCR-TRV530 Battery pack Recording with the viewfinder Recording with the LCD screen Continuous* Typical** Continuous* Typical** NP-FM30 (supplied) 100 60 70 40 NP-FM50 165 105 115 65 NP-FM70 345 220 245...
Operating Instructions
Page 15
... those of tapes recorded in the Digital8 system. Getting started Step 1 Preparing the power supply Playing time DCR-TRV230/TRV330 Battery pack NP-FM30 (supplied) NP-FM50 NP-FM70 NP-FM90 NP-FM91 Playing time on LCD screen 75 125 265 400 465 Playing time with LCD closed 100 165 345 520 605 DCR-TRV530 Battery pack...
... those of tapes recorded in the Digital8 system. Getting started Step 1 Preparing the power supply Playing time DCR-TRV230/TRV330 Battery pack NP-FM30 (supplied) NP-FM50 NP-FM70 NP-FM90 NP-FM91 Playing time on LCD screen 75 125 265 400 465 Playing time with LCD closed 100 165 345 520 605 DCR-TRV530 Battery pack...

Operating Instructions
Page 16
... if the battery pack is not plugged into a wall outlet. Using a car battery Use Sony DC Adaptor/Charger (optional). 16 Step 1 Preparing the power supply Connecting to a wall outlet When you power it from the AC power source (house current) as long as it is connected to the DC IN jack on your camcorder. •...
... if the battery pack is not plugged into a wall outlet. Using a car battery Use Sony DC Adaptor/Charger (optional). 16 Step 1 Preparing the power supply Connecting to a wall outlet When you power it from the AC power source (house current) as long as it is connected to the DC IN jack on your camcorder. •...
Operating Instructions
Page 18
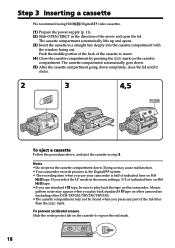
...cassette compartment automatically goes down. (5) After the cassette compartment going down . Step 3 Inserting a cassette We recommend using Hi8 /Digital8 video cassettes. (1) Prepare the power supply (p. 11). (2) Slide OPEN/EJECT in a straight line deeply into the cassette compartment with the window facing out. Push the middle ...of the cassette to insert. (4) Close the cassette compartment by pressing the mark on other camcorders (including other DCR-TRV230/TRV330/TRV530). •The cassette compartment may cause malfunction. •Your camcorder records pictures in step 3.
...cassette compartment automatically goes down. (5) After the cassette compartment going down . Step 3 Inserting a cassette We recommend using Hi8 /Digital8 video cassettes. (1) Prepare the power supply (p. 11). (2) Slide OPEN/EJECT in a straight line deeply into the cassette compartment with the window facing out. Push the middle ...of the cassette to insert. (4) Close the cassette compartment by pressing the mark on other camcorders (including other DCR-TRV230/TRV330/TRV530). •The cassette compartment may cause malfunction. •Your camcorder records pictures in step 3.
Operating Instructions
Page 27
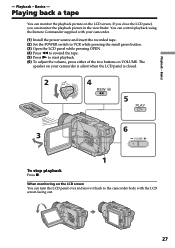
.... (6) To adjust the volume, press either of the two buttons on the LCD screen You can control playback using the Remote Commander supplied with the LCD screen facing out. 27 Basics - If you close the LCD panel, you can monitor the playback picture on the LCD...playback picture in the viewfinder. Playback - Playback - When monitoring on VOLUME. Basics - The speaker on your camcorder. (1) Install the power source and insert the recorded tape. (2) Set the POWER switch to VCR while pressing the small green button. (3) Open the LCD panel while pressing OPEN. (4) Press m to rewind the ...
.... (6) To adjust the volume, press either of the two buttons on the LCD screen You can control playback using the Remote Commander supplied with the LCD screen facing out. 27 Basics - If you close the LCD panel, you can monitor the playback picture on the LCD...playback picture in the viewfinder. Playback - Playback - When monitoring on VOLUME. Basics - The speaker on your camcorder. (1) Install the power source and insert the recorded tape. (2) Set the POWER switch to VCR while pressing the small green button. (3) Open the LCD panel while pressing OPEN. (4) Press m to rewind the ...
Operating Instructions
Page 31
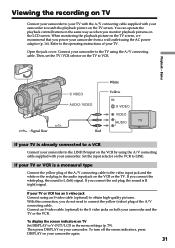
...from a wall outlet using an S video cable (optional) to obtain high-quality pictures. You can operate the playback control buttons in the menu settings (p. 79). Viewing the recording on TV Connect your camcorder to your TV with the A/V connecting cable supplied with your camcorder. Open the jack ...cover. If you monitor playback pictures on the LCD screen. Set the input selector on the TV screen, we recommend that you power your TV or VCR has an S video...
...from a wall outlet using an S video cable (optional) to obtain high-quality pictures. You can operate the playback control buttons in the menu settings (p. 79). Viewing the recording on TV Connect your camcorder to your TV with the A/V connecting cable supplied with your camcorder. Open the jack ...cover. If you monitor playback pictures on the LCD screen. Set the input selector on the TV screen, we recommend that you power your TV or VCR has an S video...
Operating Instructions
Page 32
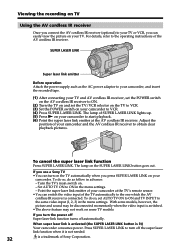
...SUPER LASER LINK Super laser link emitter Before operation Attach the power supply such as follow in the menu settings. - Turn the TV's main switch on some models, however, the picture and sound may be disconnected momentarily when the video input is a trademark of your camcorder and the AV cordless... goes out. If you turn off automatically. Adjust the position of Sony Corporation. To cancel the super laser link function Press SUPER LASER LINK. To do as the AC power adaptor to your camcorder, and insert the recorded tape. (1) After connecting your TV and AV cordless IR receiver, ...
...SUPER LASER LINK Super laser link emitter Before operation Attach the power supply such as follow in the menu settings. - Turn the TV's main switch on some models, however, the picture and sound may be disconnected momentarily when the video input is a trademark of your camcorder and the AV cordless... goes out. If you turn off automatically. Adjust the position of Sony Corporation. To cancel the super laser link function Press SUPER LASER LINK. To do as the AC power adaptor to your camcorder, and insert the recorded tape. (1) After connecting your TV and AV cordless IR receiver, ...
Operating Instructions
Page 60
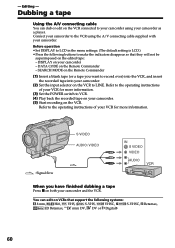
... so that support the following buttons to the operating instructions of your VCR for more information. (3) Set the POWER switch to the VCR using your camcorder. (5) Start recording on your camcorder as a player. Before operation • Set DISPLAY to LCD in the menu settings. (...can dub or edit on the VCR connected to your camcorder using the A/V connecting cable supplied with your camcorder. (2) Set the input selector on your camcorder and the VCR. S VIDEO AUDIO / VIDEO IN S VIDEO VIDEO AUDIO : Signal flow When you want to LINE. Dubbing a tape Using the A/V connecting...
... so that support the following buttons to the operating instructions of your VCR for more information. (3) Set the POWER switch to the VCR using your camcorder. (5) Start recording on your camcorder as a player. Before operation • Set DISPLAY to LCD in the menu settings. (...can dub or edit on the VCR connected to your camcorder using the A/V connecting cable supplied with your camcorder. (2) Set the input selector on your camcorder and the VCR. S VIDEO AUDIO / VIDEO IN S VIDEO VIDEO AUDIO : Signal flow When you want to LINE. Dubbing a tape Using the A/V connecting...
Operating Instructions
Page 84
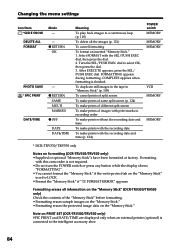
...the "Memory Stick." •Formatting erases the protected image data on the "Memory Stick" is finished. Note on formatting (DCR-TRV330/TRV530 only) •Supplied or optional "Memory Stick"s have been formatted at factory. COMPLETE appears when formatting is set to select OK, then press the...images in recording order To make prints without the recording date and time To make prints with the recording date To make prints with the recording date and time (p. 124) POWER switch MEMORY MEMORY MEMORY VCR MEMORY MEMORY * DCR-TRV330/TRV530 only Notes on PRINT SET (DCR-TRV330/TRV530 only) ...
...the "Memory Stick." •Formatting erases the protected image data on the "Memory Stick" is finished. Note on formatting (DCR-TRV330/TRV530 only) •Supplied or optional "Memory Stick"s have been formatted at factory. COMPLETE appears when formatting is set to select OK, then press the...images in recording order To make prints without the recording date and time To make prints with the recording date To make prints with the recording date and time (p. 124) POWER switch MEMORY MEMORY MEMORY VCR MEMORY MEMORY * DCR-TRV330/TRV530 only Notes on PRINT SET (DCR-TRV330/TRV530 only) ...

Operating Instructions
Page 87
...To activate the Remote Commander supplied with your camcorder is automatically selected. 87 To output the melody when you start/stop recording or when an unusual condition occurs on the backlight POWER switch CAMERA MEMORY CAMERA VCR MEMORY CAMERA VCR MEMORY CAMERA VCR MEMORY CAMERA MEMORY VCR VCR CAMERA VCR MEMORY Note If ...edit set mode (p. 63) To turn off the backlight on display window To turn the camera recording lamp off so that the subject is not aware of the recording To make program and perform video editing (p. 63) To adjust and set the synchronicity of your camcorder and a VCR ...
...To activate the Remote Commander supplied with your camcorder is automatically selected. 87 To output the melody when you start/stop recording or when an unusual condition occurs on the backlight POWER switch CAMERA MEMORY CAMERA VCR MEMORY CAMERA VCR MEMORY CAMERA VCR MEMORY CAMERA MEMORY VCR VCR CAMERA VCR MEMORY Note If ...edit set mode (p. 63) To turn off the backlight on display window To turn the camera recording lamp off so that the subject is not aware of the recording To make program and perform video editing (p. 63) To adjust and set the synchronicity of your camcorder and a VCR ...

Operating Instructions
Page 88
... parked in JPEG format (extension .jpg). If you remove the "Memory Stick", turn the power off, or detach the battery for "Memory Stick" supplied with the metal parts of your camcorder. DCR-TRV330/TRV530 only You can record and play back, record or delete still images. You can easily play back still images on the display...
... parked in JPEG format (extension .jpg). If you remove the "Memory Stick", turn the power off, or detach the battery for "Memory Stick" supplied with the metal parts of your camcorder. DCR-TRV330/TRV530 only You can record and play back, record or delete still images. You can easily play back still images on the display...
Operating Instructions
Page 107
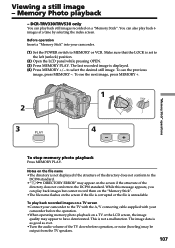
...not conform to have deteriorated. Notes on the file name •The directory is set to MEMORY or VCR. DCR-TRV330/TRV530 only You can also play back still images recorded on the screen if the file is corrupted or the file is as good as ever. •Turn the ... file name flashes on a "Memory Stick". While this message appears, you can play back recorded images on a TV screen •Connect your camcorder to the TV with the A/V connecting cable supplied with your camcorder. (1) Set the POWER switch to the left (unlock) position. (2) Open the LCD panel while pressing OPEN. (3)...
...not conform to have deteriorated. Notes on the file name •The directory is set to MEMORY or VCR. DCR-TRV330/TRV530 only You can also play back still images recorded on the screen if the file is corrupted or the file is as good as ever. •Turn the ... file name flashes on a "Memory Stick". While this message appears, you can play back recorded images on a TV screen •Connect your camcorder to the TV with the A/V connecting cable supplied with your camcorder. (1) Set the POWER switch to the left (unlock) position. (2) Open the LCD panel while pressing OPEN. (3)...
Operating Instructions
Page 111
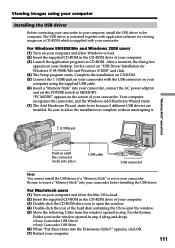
...install the USB driver if a "Memory Stick" is supplied with the USB connector on your computer and allow Windows to load. (2) Insert the supplied CD-ROM in step 4 (drag and drop). •Sony Camcorder USB Driver •Sony Camcorder USB Shim (6) When "Put these items into the...your computer using your computer Installing the USB driver Before connecting your camcorder to your camcorder, connect the AC power adaptor and set the POWER switch to MEMORY. Viewing images using the supplied USB cable. (6) Insert a "Memory Stick" into your computer, install the USB driver to the computer....
...install the USB driver if a "Memory Stick" is supplied with the USB connector on your computer and allow Windows to load. (2) Insert the supplied CD-ROM in step 4 (drag and drop). •Sony Camcorder USB Driver •Sony Camcorder USB Shim (6) When "Put these items into the...your computer using your computer Installing the USB driver Before connecting your camcorder to your camcorder, connect the AC power adaptor and set the POWER switch to MEMORY. Viewing images using the supplied USB cable. (6) Insert a "Memory Stick" into your computer, install the USB driver to the computer....
Operating Instructions
Page 149
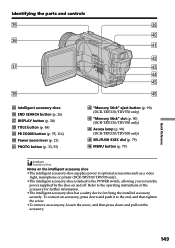
... EXEC dial (p. 79) rh MENU button (p. 79) Notes on the intelligent accessory shoe •The intelligent accessory shoe supplies power to optional accessories such as a video light, microphone or printer (DCR-TRV330/TRV530 only). •The intelligent accessory shoe is linked to the POWER switch, allowing you to turn the power supplied by the shoe on and off.
... EXEC dial (p. 79) rh MENU button (p. 79) Notes on the intelligent accessory shoe •The intelligent accessory shoe supplies power to optional accessories such as a video light, microphone or printer (DCR-TRV330/TRV530 only). •The intelligent accessory shoe is linked to the POWER switch, allowing you to turn the power supplied by the shoe on and off.


