
Operating Instructions
Page 2
... device complies with Part15 of Conformity Trade Name: SONY Model No.: DCR-TRV525 Responsible Party: Sony Electronics lnc. You will soon be prohibited. For...video that you have any changes or modifications not expressly approved in this device must accept any interference received, including interference that may cause undesired operation. Never expose the battery pack to your nearest Sony...interference, and (2) this Sony Digital Handycam camcorder. With your purchase of lithium ion batteries in the U.S.A. DISPOSAL OF LITHIUM ION BATTERY. Note: In some ...
... device complies with Part15 of Conformity Trade Name: SONY Model No.: DCR-TRV525 Responsible Party: Sony Electronics lnc. You will soon be prohibited. For...video that you have any changes or modifications not expressly approved in this device must accept any interference received, including interference that may cause undesired operation. Never expose the battery pack to your nearest Sony...interference, and (2) this Sony Digital Handycam camcorder. With your purchase of lithium ion batteries in the U.S.A. DISPOSAL OF LITHIUM ION BATTERY. Note: In some ...
Operating Instructions
Page 4
...OS are either registered trademarks or trademarks of their Recording video or TV programs 60 respective companies. Table of Apple Computer, Inc. • All other countries. Photo save 87 Shooting in a continuous loop - Digital effect 37 Using the PROGRAM AE function 40 Adjusting... Information Digital8 system, recording and playback 102 About i.LINK 104 Changing the lithium battery in this manual 8 Step 1 Preparing the power supply 10 Installing the battery pack 10 Charging the battery pack 11 Connecting to tapes 92 Enlarging still images recorded on a moving image...
...OS are either registered trademarks or trademarks of their Recording video or TV programs 60 respective companies. Table of Apple Computer, Inc. • All other countries. Photo save 87 Shooting in a continuous loop - Digital effect 37 Using the PROGRAM AE function 40 Adjusting... Information Digital8 system, recording and playback 102 About i.LINK 104 Changing the lithium battery in this manual 8 Step 1 Preparing the power supply 10 Installing the battery pack 10 Charging the battery pack 11 Connecting to tapes 92 Enlarging still images recorded on a moving image...
Operating Instructions
Page 5
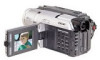
... AA (R6) battery for Remote Commander (2) (p. 128) 6 A/V connecting cable (1) (p. 27) 7 Shoulder strap (1) (p. 125) 8 Lens cap (1) (p. 16) 9 PC serial cable (1) (p. 91) 0 "Memory Stick" (1) (p. 72) qa Application software: PictureGear 4.1 Lite (CD-ROM) (1) (p. 91) Contents of the recording cannot be compensated if recording or playback is not made due to a malfunction of the camcorder, video tape, etc...
... AA (R6) battery for Remote Commander (2) (p. 128) 6 A/V connecting cable (1) (p. 27) 7 Shoulder strap (1) (p. 125) 8 Lens cap (1) (p. 16) 9 PC serial cable (1) (p. 91) 0 "Memory Stick" (1) (p. 72) qa Application software: PictureGear 4.1 Lite (CD-ROM) (1) (p. 91) Contents of the recording cannot be compensated if recording or playback is not made due to a malfunction of the camcorder, video tape, etc...

Operating Instructions
Page 6
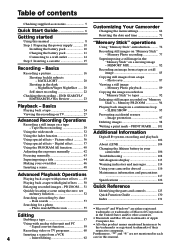
... the cassette compartment. Quick Start Guide 6 See the page in parentheses "( )" for more information. The compartment opens automatically. Connecting the power cord (p. 14) Use the battery pack when using your camcorder. AC power adaptor (supplied) Inserting a cassette (p. 15) 1 Open the lid of the cassette compartment. Quick Start Guide This chapter introduces...
... the cassette compartment. Quick Start Guide 6 See the page in parentheses "( )" for more information. The compartment opens automatically. Connecting the power cord (p. 14) Use the battery pack when using your camcorder. AC power adaptor (supplied) Inserting a cassette (p. 15) 1 Open the lid of the cassette compartment. Quick Start Guide This chapter introduces...
Operating Instructions
Page 7
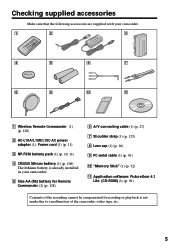
..., the LCD panel, or the battery pack. 7 Your camcorder starts recording. PLAY MEMORY CAMERA Note Do not pick up your eye against its eyecup. VTR OFF (CHARGE) MEMORY CAMERA Quick Start Guide VTR OFF (CHARGE) MEMORY CAMERA 3 Open the LCD panel while pressing... OPEN. Monitoring the playback picture on the LCD screen. 4 Press the red button. Viewfinder When the LCD panel is black and white (DCR...
..., the LCD panel, or the battery pack. 7 Your camcorder starts recording. PLAY MEMORY CAMERA Note Do not pick up your eye against its eyecup. VTR OFF (CHARGE) MEMORY CAMERA Quick Start Guide VTR OFF (CHARGE) MEMORY CAMERA 3 Open the LCD panel while pressing... OPEN. Monitoring the playback picture on the LCD screen. 4 Press the red button. Viewfinder When the LCD panel is black and white (DCR...

Operating Instructions
Page 10
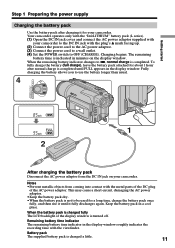
BATT BATT RELEASE After installing the battery pack Do not carry your camcorder outdoors. Step 1 Preparing the power supply Installing the battery pack Install the battery pack to use your camcorder by holding the battery pack. If you do so, the battery pack may slide off your camcorder unintentionally, damaging your camcorder. 10 To remove the battery pack Slide the battery pack out in the direction of the arrow while pressing RELEASE down until it clicks. Slide the battery pack down .
BATT BATT RELEASE After installing the battery pack Do not carry your camcorder outdoors. Step 1 Preparing the power supply Installing the battery pack Install the battery pack to use your camcorder by holding the battery pack. If you do so, the battery pack may slide off your camcorder unintentionally, damaging your camcorder. 10 To remove the battery pack Slide the battery pack out in the direction of the arrow while pressing RELEASE down until it clicks. Slide the battery pack down .
Operating Instructions
Page 11
...recording time with the metal parts of the DC plug of the display window is turned off. When the battery pack is charged fully The LCD backlight of the AC power adaptor. Battery pack The supplied battery pack is completed. To fully charge the battery (full charge), leave the battery... for about 1 hour after charging it for a long time, charge the battery pack once fully, and then use the battery longer than usual. 4 VTR OFF (CHARGE) MEMORY CAMERA 1 2 After charging the battery pack Disconnect the AC power adaptor from coming into contact with the viewfinder. This...
...recording time with the metal parts of the DC plug of the display window is turned off. When the battery pack is charged fully The LCD backlight of the AC power adaptor. Battery pack The supplied battery pack is completed. To fully charge the battery (full charge), leave the battery... for about 1 hour after charging it for a long time, charge the battery pack once fully, and then use the battery longer than usual. 4 VTR OFF (CHARGE) MEMORY CAMERA 1 2 After charging the battery pack Disconnect the AC power adaptor from coming into contact with the viewfinder. This...
Operating Instructions
Page 12
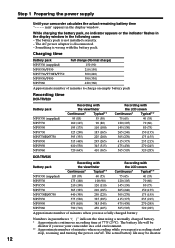
.../F750 300 (240) NP-F930/F950 390 (330) NP-F960 420 (360) Approximate number of minutes to charge an empty battery pack Recording time DCR-TRV520 Battery pack NP-F330 (supplied) NP-F530 NP-F550 NP-F730 NP-F730H/F750 NP-F930 NP-F950 NP-F960...150 (135) 305 (270) 175 (155) 415 (375) 235 (215) 475 (430) 270 (245) 565 (505) 320 (285) DCR-TRV525 Battery pack Recording with the viewfinder Recording with the battery pack. The battery life will be shorter. 12 Step 1 Preparing the power supply Until your camcorder in a cold environment. ** Approximate number of minutes when...
.../F750 300 (240) NP-F930/F950 390 (330) NP-F960 420 (360) Approximate number of minutes to charge an empty battery pack Recording time DCR-TRV520 Battery pack NP-F330 (supplied) NP-F530 NP-F550 NP-F730 NP-F730H/F750 NP-F930 NP-F950 NP-F960...150 (135) 305 (270) 175 (155) 415 (375) 235 (215) 475 (430) 270 (245) 565 (505) 320 (285) DCR-TRV525 Battery pack Recording with the viewfinder Recording with the battery pack. The battery life will be shorter. 12 Step 1 Preparing the power supply Until your camcorder in a cold environment. ** Approximate number of minutes when...

Operating Instructions
Page 13
...) Playing time with LCD closed 95 (85) 155 (140) 190 (170) 315 (285) 385 (345) 495 (450) 590 (530) 700 (630) DCR-TRV525 Battery pack Playing time on LCD screen Playing time with LCD closed NP-F330 (supplied) 70 (65) 100 (90) NP-F530 115 (105) 170 (155) NP...550 (495) 765 (685) Approximate number of Sony Corporation. 13 The remaining battery time indicator The indicator may not be correct, depending on the battery remaining indicator is correct. When you are recording. This unit is "InfoLITHIUM"? "InfoLITHIUM" is a lithium ion battery pack which you close the LCD panel and ...
...) Playing time with LCD closed 95 (85) 155 (140) 190 (170) 315 (285) 385 (345) 495 (450) 590 (530) 700 (630) DCR-TRV525 Battery pack Playing time on LCD screen Playing time with LCD closed NP-F330 (supplied) 70 (65) 100 (90) NP-F530 115 (105) 170 (155) NP...550 (495) 765 (685) Approximate number of Sony Corporation. 13 The remaining battery time indicator The indicator may not be correct, depending on the battery remaining indicator is correct. When you are recording. This unit is "InfoLITHIUM"? "InfoLITHIUM" is a lithium ion battery pack which you close the LCD panel and ...

Operating Instructions
Page 14
...supply Connecting to a wall outlet When you use your camcorder for a long time, we recommend that the battery pack cannot supply any power if the power cord is not plugged into a wall outlet. This means ... your camcorder. • The DC IN jack has "source priority". Using a car battery Use Sony DC Adaptor/Charger (not supplied). 14 Notes • The AC power adaptor can supply power even if the... battery pack is attached to your camcorder with the plug's v mark facing up. (2) Connect ...
...supply Connecting to a wall outlet When you use your camcorder for a long time, we recommend that the battery pack cannot supply any power if the power cord is not plugged into a wall outlet. This means ... your camcorder. • The DC IN jack has "source priority". Using a car battery Use Sony DC Adaptor/Charger (not supplied). 14 Notes • The AC power adaptor can supply power even if the... battery pack is attached to your camcorder with the plug's v mark facing up. (2) Connect ...
Operating Instructions
Page 17
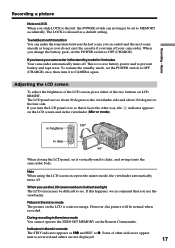
To enable smooth transition You can no longer be set the POWER switch to see. During recording in the mirror mode You cannot operate the ZERO SET MEMORY on LCD BRIGHT. This is to save battery power and to the lens side. To resume the standby mode, set it vertically until it ...to OFF (CHARGE) once, then turn the LCD panel over so that you change the battery pack, set to CAMERA again. Note When using the LCD screen except in direct sunlight The LCD screen may be normal when recorded. If this happens, we recommend that it to MEMORY accidentally. Picture in the mirror...
To enable smooth transition You can no longer be set the POWER switch to see. During recording in the mirror mode You cannot operate the ZERO SET MEMORY on LCD BRIGHT. This is to save battery power and to the lens side. To resume the standby mode, set it vertically until it ...to OFF (CHARGE) once, then turn the LCD panel over so that you change the battery pack, set to CAMERA again. Note When using the LCD screen except in direct sunlight The LCD screen may be normal when recorded. If this happens, we recommend that it to MEMORY accidentally. Picture in the mirror...
Operating Instructions
Page 19
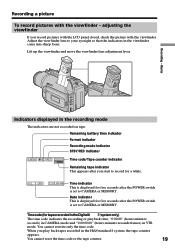
...battery time indicator Format indicator Recording mode indicator STBY/REC indicator 40min SP REC 0:00:01 Time code/Tape counter indicator Remaining tape indicator This appears after you play back tapes recorded in VTR mode. Date indicator This is displayed for five seconds after the POWER switch is set to CAMERA... the POWER switch is set to CAMERA or MEMORY. Recording - Adjust the viewfinder lens to record for tapes recorded in the Digital8 system only) The time code indicates the recording or playback time, "0:00:00" (hours:minutes: seconds) in CAMERA mode and "0:00:00:00"...
...battery time indicator Format indicator Recording mode indicator STBY/REC indicator 40min SP REC 0:00:01 Time code/Tape counter indicator Remaining tape indicator This appears after you play back tapes recorded in VTR mode. Date indicator This is displayed for five seconds after the POWER switch is set to CAMERA... the POWER switch is set to CAMERA or MEMORY. Recording - Adjust the viewfinder lens to record for tapes recorded in the Digital8 system only) The time code indicates the recording or playback time, "0:00:00" (hours:minutes: seconds) in CAMERA mode and "0:00:00:00"...

Operating Instructions
Page 66
...battery pack or power source. - DNR* z ON To reduce picture noise OFF To reduce a conspicuous afterimage when the picture has a lot of a TV game or similar machine. To convert analog video signals into analog video signals via your camcorder. Notes on AUDIO MIX •When playing back a tape recorded...tape that was recorded in the Hi8/standard 8 system when your camcorder does not automatically distinguish the recording system To convert digital video signals into digital video siginals via your camcorder "A/V t DV" appears on which you play back tapes recorded in the ...
...battery pack or power source. - DNR* z ON To reduce picture noise OFF To reduce a conspicuous afterimage when the picture has a lot of a TV game or similar machine. To convert analog video signals into analog video signals via your camcorder. Notes on AUDIO MIX •When playing back a tape recorded...tape that was recorded in the Hi8/standard 8 system when your camcorder does not automatically distinguish the recording system To convert digital video signals into digital video siginals via your camcorder "A/V t DV" appears on which you play back tapes recorded in the ...
Operating Instructions
Page 67
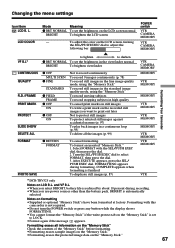
...; Format again if the message appears. To duplicate still images (p. 87) VTR CAMERA MEMORY MEMORY VTR MEMORY MEMORY VTR MEMORY VTR MEMORY MEMORY VTR MEMORY VTR MEMORY VTR * DCR-TRV525 only Notes on formatting • Supplied or optional "Memory Stick"s have been formatted... at factory. Notes on LCD B.L. L. To adjust the color on the "Memory Stick." 67 To format an inserted "Memory Stick." 1. FORMATTING appears during recording. • When you use power sources other than the battery...
...; Format again if the message appears. To duplicate still images (p. 87) VTR CAMERA MEMORY MEMORY VTR MEMORY MEMORY VTR MEMORY VTR MEMORY MEMORY VTR MEMORY VTR MEMORY VTR * DCR-TRV525 only Notes on formatting • Supplied or optional "Memory Stick"s have been formatted... at factory. Notes on LCD B.L. L. To adjust the color on the "Memory Stick." 67 To format an inserted "Memory Stick." 1. FORMATTING appears during recording. • When you use power sources other than the battery...
Operating Instructions
Page 70
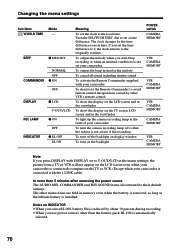
... more than the battery pack, BL ON is installed. Changing the menu settings Icon/item Mode WORLD TIME - The clock changes by other than 5 minutes after removing the power source The AUDIO MIX, COMMANDER and HiFi SOUND items are held in the viewfinder To light up the camera recording lamp at the ...front of your camcorder To turn the camera recording lamp off so that the subject is not aware of the melody To cancel all sound including shutter sound To...
... more than the battery pack, BL ON is installed. Changing the menu settings Icon/item Mode WORLD TIME - The clock changes by other than 5 minutes after removing the power source The AUDIO MIX, COMMANDER and HiFi SOUND items are held in the viewfinder To light up the camera recording lamp at the ...front of your camcorder To turn the camera recording lamp off so that the subject is not aware of the melody To cancel all sound including shutter sound To...
Operating Instructions
Page 71
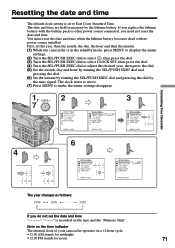
... the dial. (6) Set the minute by turning the SEL/PUSH EXEC dial and pressing the dial by the lithium battery. Customizing Your Camcorder Resetting the date and time The default clock setting is recorded on a 12-hour cycle. •12:00 AM stands for midnight. •12:00 PM stands for noon.... 71 Note on the time indicator The internal clock of your camcorder operates on the tape and the "Memory Stick". If you replace the lithium battery with no power...
... the dial. (6) Set the minute by turning the SEL/PUSH EXEC dial and pressing the dial by the lithium battery. Customizing Your Camcorder Resetting the date and time The default clock setting is recorded on a 12-hour cycle. •12:00 AM stands for midnight. •12:00 PM stands for noon.... 71 Note on the time indicator The internal clock of your camcorder operates on the tape and the "Memory Stick". If you replace the lithium battery with no power...
Operating Instructions
Page 72
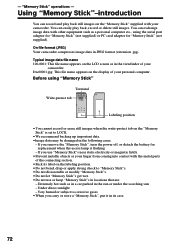
... (extension .jpg). Very humid or subject to corrosive gases •When you remove the "Memory Stick", turn the power off, or detach the battery for "Memory Stick" (not supplied). Using "Memory Stick"-introduction You can easily play back still images on the "Memory Stick" is flashing -... Extremely hot such as a personal computer etc., using "Memory Stick" Terminal Write-protect tab Labeling position •You cannot record or erase still images when the write-protect tab on the "Memory Stick" supplied with the metal parts of the connecting section. •Stick...
... (extension .jpg). Very humid or subject to corrosive gases •When you remove the "Memory Stick", turn the power off, or detach the battery for "Memory Stick" (not supplied). Using "Memory Stick"-introduction You can easily play back still images on the "Memory Stick" is flashing -... Extremely hot such as a personal computer etc., using "Memory Stick" Terminal Write-protect tab Labeling position •You cannot record or erase still images when the write-protect tab on the "Memory Stick" supplied with the metal parts of the connecting section. •Stick...

Operating Instructions
Page 74
Do not turn the power off , eject the "Memory Stick" or remove the battery pack. Using "Memory Stick"-introduction Inserting "Memory Stick" (1) Open the lid of the cassette compartment. (2) Insert the "Memory Stick" with the v mark facing toward the "...
Do not turn the power off , eject the "Memory Stick" or remove the battery pack. Using "Memory Stick"-introduction Inserting "Memory Stick" (1) Open the lid of the cassette compartment. (2) Insert the "Memory Stick" with the v mark facing toward the "...
Operating Instructions
Page 85
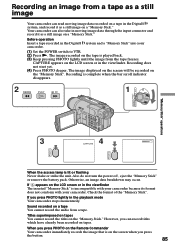
...the tape freezes. Also do not turn the power off , eject the "Memory Stick" or remove the battery pack. If you press the button. 85 Sound recorded on the "Memory Stick." Recording is lit or flashing Never shake or strike the unit. VTR 2 REW PLAY FF 1 OFF (CHARGE...) "Memory Stick" operations MEMORY CAMERA 3 4 CAPTURE PHOTO PHOTO When the acccess lamp is complete when the bar scroll indicator disappears. Titles superimposed on tapes You cannot record the titles on a tape You cannot record the audio from a tape. Otherwise, an image data breakdown ...
...the tape freezes. Also do not turn the power off , eject the "Memory Stick" or remove the battery pack. If you press the button. 85 Sound recorded on the "Memory Stick." Recording is lit or flashing Never shake or strike the unit. VTR 2 REW PLAY FF 1 OFF (CHARGE...) "Memory Stick" operations MEMORY CAMERA 3 4 CAPTURE PHOTO PHOTO When the acccess lamp is complete when the bar scroll indicator disappears. Titles superimposed on tapes You cannot record the titles on a tape You cannot record the audio from a tape. Otherwise, an image data breakdown ...
Operating Instructions
Page 88
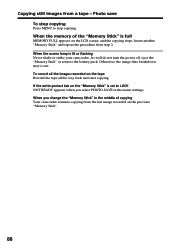
Otherwise, the image data breakdown may occur. To record all the images recorded on the LCD screen, and the copying stops. If the write-protect tab on the previous "Memory Stick". 88 Photo save To stop copying Press ... all the way back and start copying. As well do not turn the power off, eject the "Memory Stick" or remove the battery pack. When the memory of copying Your camcorder resumes copying from the last image recorded on the "Memory Stick" is set to stop copying. Copying still images from step 2.
Otherwise, the image data breakdown may occur. To record all the images recorded on the LCD screen, and the copying stops. If the write-protect tab on the previous "Memory Stick". 88 Photo save To stop copying Press ... all the way back and start copying. As well do not turn the power off, eject the "Memory Stick" or remove the battery pack. When the memory of copying Your camcorder resumes copying from the last image recorded on the "Memory Stick" is set to stop copying. Copying still images from step 2.


