Computer Applications Guide
Page 4
... images for MEMORY MIX to a "Memory Stick" (only the models with a Memory Stick slot 26 Connecting to a Macintosh computer Connecting your camcorder to a computer 28 Copying pictures recorded on a "Memory Stick" (only the models with a Memory Stick slot 29 Installing software on a ... an original slide show - Picture Package Auto Slide 21 Saving the images on CD-R - Picture Package Viewer 17 Creating an original video - Digital convert function 33 4 Table of Contents Read this first 2 Connecting to a Windows computer Introduction to editing pictures on a computer 6 Features ...6...
... images for MEMORY MIX to a "Memory Stick" (only the models with a Memory Stick slot 26 Connecting to a Macintosh computer Connecting your camcorder to a computer 28 Copying pictures recorded on a "Memory Stick" (only the models with a Memory Stick slot 29 Installing software on a ... an original slide show - Picture Package Auto Slide 21 Saving the images on CD-R - Picture Package Viewer 17 Creating an original video - Digital convert function 33 4 Table of Contents Read this first 2 Connecting to a Windows computer Introduction to editing pictures on a computer 6 Features ...6...
Computer Applications Guide
Page 6
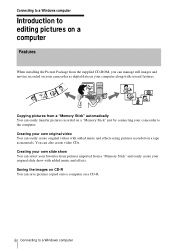
... from the supplied CD-ROM, you can manage still images and movies recorded on your camcorder as materials. Creating your own original video You can save pictures copied onto a computer on a tape as digital data on your camcorder to a Windows computer Saving the images on CD-R You can easily create original videos with...
... from the supplied CD-ROM, you can manage still images and movies recorded on your camcorder as materials. Creating your own original video You can save pictures copied onto a computer on a tape as digital data on your camcorder to a Windows computer Saving the images on CD-R You can easily create original videos with...
Computer Applications Guide
Page 11
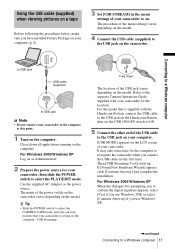
... appears, click [Continue Anyway] and complete the installation. For Windows 2000/Windows XP When the dialogue box prompting you to confirm the digital signature appears, select [Yes] if you use Windows 2000 or select [Continue Anyway] if you connect the USB cable for the first ...3 Set [USB STREAM] in the menu settings of your camcorder for the location. The procedure of your camcorder. Close down all applications running on the camcorder. USB Streaming. Refer to the separate Camera Operations Guide supplied with the Handycam Station, connect the USB cable to the USB jack on the...
... appears, click [Continue Anyway] and complete the installation. For Windows 2000/Windows XP When the dialogue box prompting you to confirm the digital signature appears, select [Yes] if you use Windows 2000 or select [Continue Anyway] if you connect the USB cable for the first ...3 Set [USB STREAM] in the menu settings of your camcorder for the location. The procedure of your camcorder. Close down all applications running on the camcorder. USB Streaming. Refer to the separate Camera Operations Guide supplied with the Handycam Station, connect the USB cable to the USB jack on the...

Computer Applications Guide
Page 32
... started up to the computer. • The DVD is created even if you disconnect the i.LINK cable (optional) or turn off the power of your camcorder while [WRITING] or [CONVERTING] is displayed. • When any of the following situations: - While recording images onto a "Memory Stick" - When there is ...an 8mm tape if it contains pictures recorded in a format other than Digital 8 format. 32 Other functions A DVD containing the data up from the computer • You may not be able to on the LCD screen of your camcorder. To cancel the operation For touch panel models Select [CANCEL] on ...
... started up to the computer. • The DVD is created even if you disconnect the i.LINK cable (optional) or turn off the power of your camcorder while [WRITING] or [CONVERTING] is displayed. • When any of the following situations: - While recording images onto a "Memory Stick" - When there is ...an 8mm tape if it contains pictures recorded in a format other than Digital 8 format. 32 Other functions A DVD containing the data up from the computer • You may not be able to on the LCD screen of your camcorder. To cancel the operation For touch panel models Select [CANCEL] on ...
Computer Applications Guide
Page 33
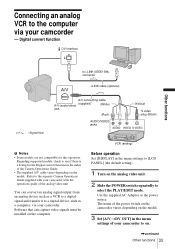
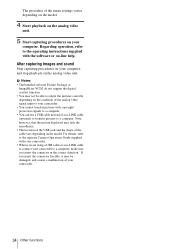
... analog video unit You can capture video signals must be installed on the computer. Digital convert function DV Interface Other functions to select the PLAY/EDIT mode. The name of the power switch on the camcorder varies depending on the model. 3 Set [A/VtDV OUT] in the index of...output from an analog device such as a VCR to a digital signal and transfer it to a digital device, such as the power source. Use the supplied AC Adaptor as a computer, via your camcorder - Connecting an analog VCR to the computer via your camcorder. VCR (analog) Before operation Set [DISPLAY] in the ...
... analog video unit You can capture video signals must be installed on the computer. Digital convert function DV Interface Other functions to select the PLAY/EDIT mode. The name of the power switch on the camcorder varies depending on the model. 3 Set [A/VtDV OUT] in the index of...output from an analog device such as a VCR to a digital signal and transfer it to a digital device, such as the power source. Use the supplied AC Adaptor as a computer, via your camcorder - Connecting an analog VCR to the computer via your camcorder. VCR (analog) Before operation Set [DISPLAY] in the ...
Computer Applications Guide
Page 34
b Notes • The bundled software Picture Package or ImageMixer VCD2 do not support the digital convert function. • You may not be damaged, and causes a malfunction of your camcorder. 34 Other functions If you insert the connector forcibly, it may lack the smoothness. • The location... the condition of the analog video signal input to your computer. For details, refer to the separate Camera Operations Guide supplied with your camcorder to the operating instructions supplied with copyright protection signals to a computer. • You can use a USB cable instead of an i....
b Notes • The bundled software Picture Package or ImageMixer VCD2 do not support the digital convert function. • You may not be damaged, and causes a malfunction of your camcorder. 34 Other functions If you insert the connector forcibly, it may lack the smoothness. • The location... the condition of the analog video signal input to your computer. For details, refer to the separate Camera Operations Guide supplied with your camcorder to the operating instructions supplied with copyright protection signals to a computer. • You can use a USB cable instead of an i....
Camera Operations Guide
Page 3
... have any changes or modifications not expressly approved in the space provided below is encouraged to try to a malfunction of the camcorder, storage media, etc. • TV color systems differ depending on the LCD screen and the viewfinder. Refer to radio ...Conformity Trade Name: SONY Model No.: DCR-TRV460 Responsible Party: Sony Electronics Inc. Reorient or relocate the receiving antenna. - Increase the separation between the equipment and receiver. - Model No. ACSerial No. Owner's Record The model and serial numbers are operational for a digital device pursuant to ...
... have any changes or modifications not expressly approved in the space provided below is encouraged to try to a malfunction of the camcorder, storage media, etc. • TV color systems differ depending on the LCD screen and the viewfinder. Refer to radio ...Conformity Trade Name: SONY Model No.: DCR-TRV460 Responsible Party: Sony Electronics Inc. Reorient or relocate the receiving antenna. - Increase the separation between the equipment and receiver. - Model No. ACSerial No. Owner's Record The model and serial numbers are operational for a digital device pursuant to ...
Camera Operations Guide
Page 4
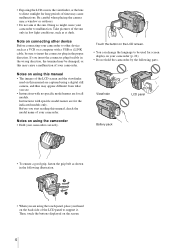
...side of the LCD panel to support it. Doing so might cause your camcorder correctly. Note on this manual, check the model name of your camcorder. Before you start reading this manual are captured using a digital still camera, and thus may cause malfunctions. Instructions with a USB or... i.LINK cable, be used on connecting other device Before connecting your camcorder to insert the connector plug in...
...side of the LCD panel to support it. Doing so might cause your camcorder correctly. Note on this manual, check the model name of your camcorder. Before you start reading this manual are captured using a digital still camera, and thus may cause malfunctions. Instructions with a USB or... i.LINK cable, be used on connecting other device Before connecting your camcorder to insert the connector plug in...
Camera Operations Guide
Page 7
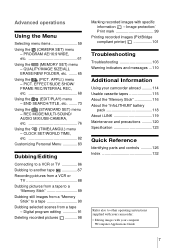
... 99 Printing recorded images (PictBridge compliant printer 101 Troubleshooting Troubleshooting 103 Warning indicators and messages ...110 Additional Information Using your camcorder abroad ..........114 Usable cassette tapes 115 About the "Memory Stick 116 About the "InfoLITHIUM" battery pack 118 About i.LINK...126 Index 132 Refer also to a tape 90 Dubbing selected scenes from a tape - Digital program editing 91 Deleting recorded pictures 98 Marking recorded images with your camcorder: • Editing images with specific information - CLOCK SET/WORLD TIME, etc 82 Customizing...
... 99 Printing recorded images (PictBridge compliant printer 101 Troubleshooting Troubleshooting 103 Warning indicators and messages ...110 Additional Information Using your camcorder abroad ..........114 Usable cassette tapes 115 About the "Memory Stick 116 About the "InfoLITHIUM" battery pack 118 About i.LINK...126 Index 132 Refer also to a tape 90 Dubbing selected scenes from a tape - Digital program editing 91 Deleting recorded pictures 98 Marking recorded images with your camcorder: • Editing images with specific information - CLOCK SET/WORLD TIME, etc 82 Customizing...
Camera Operations Guide
Page 26
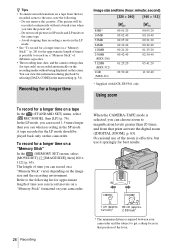
...cm (approx. 80 cm (approx. 1/2 inch)* 2 5/8 feet)* * The minimum distance required between your camcorder. Do not remove the cassette. (The picture will be played back only on the image size and the recording... in the menu setting (p. 54). Avoid stopping then recording a movie in that point activate the digital zoom ([DIGITAL ZOOM], p. 63). Occasional use of the lever. Refer to get a sharp focus in the LP...:20 00:42:40 01:25:20 02:50:40 05:41:20 11:22:40 * Supplied with DCR-TRV361 only. z Tips • To ensure smooth transition on a "Memory Stick" In the (MEMORY ...
...cm (approx. 80 cm (approx. 1/2 inch)* 2 5/8 feet)* * The minimum distance required between your camcorder. Do not remove the cassette. (The picture will be played back only on the image size and the recording... in the menu setting (p. 54). Avoid stopping then recording a movie in that point activate the digital zoom ([DIGITAL ZOOM], p. 63). Occasional use of the lever. Refer to get a sharp focus in the LP...:20 00:42:40 01:25:20 02:50:40 05:41:20 11:22:40 * Supplied with DCR-TRV361 only. z Tips • To ensure smooth transition on a "Memory Stick" In the (MEMORY ...
Camera Operations Guide
Page 41
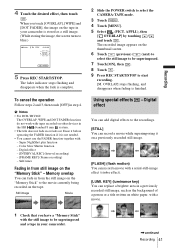
APPLI.), then [ OVERLAP] by touching / and touch . Digital effect You can add digital effects to start recording. [M. OVRLAP] stops flashing, and disappears when fading is complete. b Notes • For DCR-TRV460: The OVERLAP, WIPE and DOT FADER functions do not work with : - Memory overlap You can record a .... 7 Touch [ON], then . 8 Touch . 9 Press REC START/STOP to the recordings. [STILL] You can fade in your camcorder is not needed. • You cannot use the FADER function together with tapes recorded on the "Memory Stick" - Self-timer Fading in your...
APPLI.), then [ OVERLAP] by touching / and touch . Digital effect You can add digital effects to start recording. [M. OVRLAP] stops flashing, and disappears when fading is complete. b Notes • For DCR-TRV460: The OVERLAP, WIPE and DOT FADER functions do not work with : - Memory overlap You can record a .... 7 Touch [ON], then . 8 Touch . 9 Press REC START/STOP to the recordings. [STILL] You can fade in your camcorder is not needed. • You cannot use the FADER function together with tapes recorded on the "Memory Stick" - Self-timer Fading in your...
Camera Operations Guide
Page 42
... in step 4. MEMORY MIX function • You cannot use [SLOW SHUTTR]/[OLD MOVIE] together with [PROGRAM AE] (except [AUTO]). • You cannot use Digital effect together with a movie. EFFECT]) z Tip • You can create a picture with : - [16:9 WIDE] mode - The interval of the incidental ...image. FADER function - appears. For details, refer to adjust the focus automatically when you want to steady the camcorder. 5 Touch . This mode is left. [SLOW SHUTTR] (slow shutter) You can slow down the shutter speed. [TRAIL] You can record ...
... in step 4. MEMORY MIX function • You cannot use [SLOW SHUTTR]/[OLD MOVIE] together with [PROGRAM AE] (except [AUTO]). • You cannot use Digital effect together with a movie. EFFECT]) z Tip • You can create a picture with : - [16:9 WIDE] mode - The interval of the incidental ...image. FADER function - appears. For details, refer to adjust the focus automatically when you want to steady the camcorder. 5 Touch . This mode is left. [SLOW SHUTTR] (slow shutter) You can slow down the shutter speed. [TRAIL] You can record ...
Camera Operations Guide
Page 48
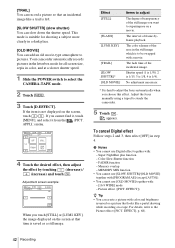
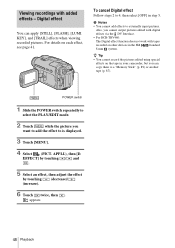
z Tip • You cannot record the pictures edited using special effects on the tape in your camcorder, but you can apply [STILL], [FLASH], [LUMI. Viewing recordings with tapes recorded on other devices in the Hi8 /standard 8 mm system. b Notes • You...1 Slide the POWER switch repeatedly to select the PLAY/EDIT mode. 2 Touch while the picture you cannot output pictures edited with digital effects via the DV Interface. • For DCR-TRV460: The Digital effect function does not work with added effects - Also, you want to add the effect to 4, then select [OFF] in...
z Tip • You cannot record the pictures edited using special effects on the tape in your camcorder, but you can apply [STILL], [FLASH], [LUMI. Viewing recordings with tapes recorded on other devices in the Hi8 /standard 8 mm system. b Notes • You...1 Slide the POWER switch repeatedly to select the PLAY/EDIT mode. 2 Touch while the picture you cannot output pictures edited with digital effects via the DV Interface. • For DCR-TRV460: The Digital effect function does not work with added effects - Also, you want to add the effect to 4, then select [OFF] in...
Camera Operations Guide
Page 63
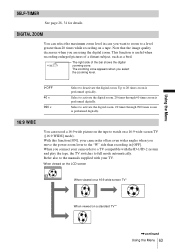
...The zooming zone appears when you connect your camcorder to 20 times zoom is useful when recording enlarged pictures of the bar shows the digital zooming zone. Up to a TV compatible with your camcorder offers even wider angles when you are using the digital zoom. Select to a level greater than... recording in [OFF]. Select to activate the digital zoom. 20 times through 40 times zoom...
...The zooming zone appears when you connect your camcorder to 20 times zoom is useful when recording enlarged pictures of the bar shows the digital zooming zone. Up to a TV compatible with your camcorder offers even wider angles when you are using the digital zoom. Select to a level greater than... recording in [OFF]. Select to activate the digital zoom. 20 times through 40 times zoom...
Camera Operations Guide
Page 79
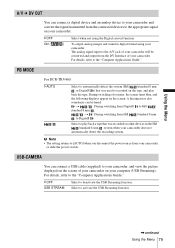
..., and play back a tape that was recorded on other devices in digital format using the Digital convert function. ) To output analog images and sound in the Hi8 /standard 8 mm system when your camcorder does not automatically detect the recording system. PB MODE For DCR-TRV460: GAUTO / Select to automatically detect the system (Hi8 /standard 8 mm...
..., and play back a tape that was recorded on other devices in digital format using the Digital convert function. ) To output analog images and sound in the Hi8 /standard 8 mm system when your camcorder does not automatically detect the recording system. PB MODE For DCR-TRV460: GAUTO / Select to automatically detect the system (Hi8 /standard 8 mm...
Camera Operations Guide
Page 86
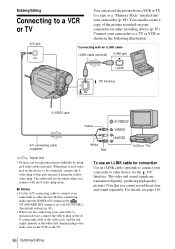
... A/V connecting cable (supplied) Signal flow * Pictures can record the picture from a VCR or TV to a tape or a "Memory Stick" inserted into your camcorder to monaural device, connect the yellow plug of the A/ V connecting cable to the video jack, and the red (right channel) or the white (left channel...on other device via the DV Interface. For details, see page 119. 86 Dubbing/Editing The audio will not be output when you are transmitted digitally, producing high quality pictures. You can also create a copy of using an S video cable (optional). Before connecting, make sure the [DISPLAY]...
... A/V connecting cable (supplied) Signal flow * Pictures can record the picture from a VCR or TV to a tape or a "Memory Stick" inserted into your camcorder to monaural device, connect the yellow plug of the A/ V connecting cable to the video jack, and the red (right channel) or the white (left channel...on other device via the DV Interface. For details, see page 119. 86 Dubbing/Editing The audio will not be output when you are transmitted digitally, producing high quality pictures. You can also create a copy of using an S video cable (optional). Before connecting, make sure the [DISPLAY]...

Camera Operations Guide
Page 87
.../EDIT mode. 4 Start the playback on your camcorder and the VCR. • When connected using the A/V connecting cable, press DSPL/BATT INFO to a VCR. • For DCR-TRV460: When you cannot record the title, indicators and words entered on the VCR. Digital signals are output as time code (p. 54). ...b Notes • When your camcorder is connected to the VCR via the DV Interface, you dub the...
.../EDIT mode. 4 Start the playback on your camcorder and the VCR. • When connected using the A/V connecting cable, press DSPL/BATT INFO to a VCR. • For DCR-TRV460: When you cannot record the title, indicators and words entered on the VCR. Digital signals are output as time code (p. 54). ...b Notes • When your camcorder is connected to the VCR via the DV Interface, you dub the...

Camera Operations Guide
Page 91
... dub the index screen. • You may not be able to a tape in the Hi8 / standard 8 mm system. b Note • For DCR-TRV460: The Digital program editing does not work with other camcorders on your computer or recorded with tapes recorded on a VCR that does not support [IR SETUP] codes. ,continued Dubbing/Editing 91
... dub the index screen. • You may not be able to a tape in the Hi8 / standard 8 mm system. b Note • For DCR-TRV460: The Digital program editing does not work with other camcorders on your computer or recorded with tapes recorded on a VCR that does not support [IR SETUP] codes. ,continued Dubbing/Editing 91
Camera Operations Guide
Page 94
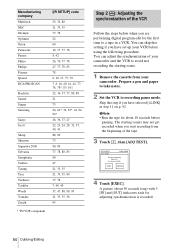
..., 35 21, 33, 35, 80 77, 78 7, 40, 49 37, 47, 88, 89, 95 21, 33, 35, 36 95 Step 2 : Adjusting the synchronization of your camcorder and the VCR to avoid not recording the starting scenes may not get recorded when you have selected [i.LINK] in rec. EDIT ADJ TEST 0:00... long) with 5 [IN] and [OUT] indicators each for about 10 seconds before using the following procedure. You can skip this step if you are performing digital program edit for the first time to recording pause mode. Skip this setting if you start recording from your VCR before pausing. PROG. pause mode...
..., 35 21, 33, 35, 80 77, 78 7, 40, 49 37, 47, 88, 89, 95 21, 33, 35, 36 95 Step 2 : Adjusting the synchronization of your camcorder and the VCR to avoid not recording the starting scenes may not get recorded when you have selected [i.LINK] in rec. EDIT ADJ TEST 0:00... long) with 5 [IN] and [OUT] indicators each for about 10 seconds before using the following procedure. You can skip this step if you are performing digital program edit for the first time to recording pause mode. Skip this setting if you start recording from your VCR before pausing. PROG. pause mode...

Camera Operations Guide
Page 95
... of each [CUT-IN] and the closing number value of each [CUT-IN] and [CUTOUT]. 7 Touch [CUT-IN]. PROG. When you are performing a digital program edit for [CUT-OUT], then touch . b Note • You cannot dub the title or display indicators. EDIT CUT-OUT 0:00:00:00 0 ...value for the first time to be played back into your VCR. However, you are recording on a "Memory Stick," insert a "Memory Stick" into the camcorder. Recording the selected scenes as programs When you are recording on a tape, insert a cassette for [CUT-IN], then touch . Dubbing/Editing [Completed.] appears...
... of each [CUT-IN] and the closing number value of each [CUT-IN] and [CUTOUT]. 7 Touch [CUT-IN]. PROG. When you are performing a digital program edit for [CUT-OUT], then touch . b Note • You cannot dub the title or display indicators. EDIT CUT-OUT 0:00:00:00 0 ...value for the first time to be played back into your VCR. However, you are recording on a "Memory Stick," insert a "Memory Stick" into the camcorder. Recording the selected scenes as programs When you are recording on a tape, insert a cassette for [CUT-IN], then touch . Dubbing/Editing [Completed.] appears...


