Computer Applications Guide
Page 2
... Applications: QuickTime 3.0 or later (this must be provided as standard), disc drive For Macintosh users b Note • When you connect your camcorder. The supplied CD-ROM includes the following software. For Windows computer : Picture Package For Macintosh computer : ImageMixer VCD2 System requirement For Windows users... the separate Camera Operations Guide supplied with an i.LINK cable and use the standard software in the OS. Operation is not assured if the above OS has been upgraded. When using a USB cable, you need a CD-R drive to the computer with your camcorder to a ...
... Applications: QuickTime 3.0 or later (this must be provided as standard), disc drive For Macintosh users b Note • When you connect your camcorder. The supplied CD-ROM includes the following software. For Windows computer : Picture Package For Macintosh computer : ImageMixer VCD2 System requirement For Windows users... the separate Camera Operations Guide supplied with an i.LINK cable and use the standard software in the OS. Operation is not assured if the above OS has been upgraded. When using a USB cable, you need a CD-R drive to the computer with your camcorder to a ...
Computer Applications Guide
Page 3
...construed as conferring to you by copyright laws and other countries. • Pentium is a trademark of Sony Corporation. • "Memory Stick" and are registered trademarks of Sony Corporation. • Microsoft and Windows are trademarks or registered trademarks of their respective companies. All other...the public, transferring, distributing, lending, licensing, selling and publishing) any license or right to the separate Camera Operations Guide supplied with your camcorder for details. • The screens shown in the United States and/or other product names mentioned herein ...
...construed as conferring to you by copyright laws and other countries. • Pentium is a trademark of Sony Corporation. • "Memory Stick" and are registered trademarks of Sony Corporation. • Microsoft and Windows are trademarks or registered trademarks of their respective companies. All other...the public, transferring, distributing, lending, licensing, selling and publishing) any license or right to the separate Camera Operations Guide supplied with your camcorder for details. • The screens shown in the United States and/or other product names mentioned herein ...
Computer Applications Guide
Page 11
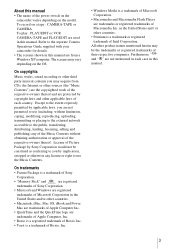
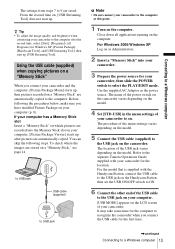
... Fully insert. For Windows 2000/Windows XP When the dialogue box prompting you to confirm the digital signature appears, select [Yes] if you use Windows XP. ,continued Connecting to the USB jack on the camcorder. Close down all applications running on the computer. The name of the USB jack varies depending...computer 11 For Windows 2000/Windows XP Log on as the power source. Refer to the separate Camera Operations Guide supplied with the Handycam Station, connect the USB cable to the USB jack on the Handycam Station, then set the USB ON/OFF switch to ON. 5 Connect the other end of ...
... Fully insert. For Windows 2000/Windows XP When the dialogue box prompting you to confirm the digital signature appears, select [Yes] if you use Windows XP. ,continued Connecting to the USB jack on the camcorder. Close down all applications running on the computer. The name of the USB jack varies depending...computer 11 For Windows 2000/Windows XP Log on as the power source. Refer to the separate Camera Operations Guide supplied with the Handycam Station, connect the USB cable to the USB jack on the Handycam Station, then set the USB ON/OFF switch to ON. 5 Connect the other end of ...
Computer Applications Guide
Page 13
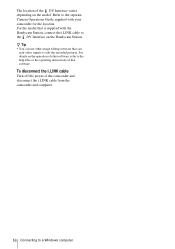
...supplied) to 9 are automatically copied to select the PLAY/EDIT mode. Refer to the separate Camera Operations Guide supplied with the Handycam Station, connect the USB cable to the USB jack on the Handycam Station, then set the USB ON/OFF switch to ON. 6 Connect the other end of ... of the USB jack varies depending on the computer. z Tip • To adjust the image quality and brightness when connecting your camcorder for Windows XP, [Picture Package], [Handycam Tools], and [USB Streaming Tool], then start up [USB Streaming Tool]. For the model that is supplied with your...
...supplied) to 9 are automatically copied to select the PLAY/EDIT mode. Refer to the separate Camera Operations Guide supplied with the Handycam Station, connect the USB cable to the USB jack on the Handycam Station, then set the USB ON/OFF switch to ON. 6 Connect the other end of ... of the USB jack varies depending on the computer. z Tip • To adjust the image quality and brightness when connecting your camcorder for Windows XP, [Picture Package], [Handycam Tools], and [USB Streaming Tool], then start up [USB Streaming Tool]. For the model that is supplied with your...
Computer Applications Guide
Page 16
Refer to the separate Camera Operations Guide supplied with the Handycam Station, connect the i.LINK cable to the DV Interface on the Handycam Station. For the model that is supplied with your camcorder for the location. For details on the model. z Tip • You can use other software, refer to the help files or the...
Refer to the separate Camera Operations Guide supplied with the Handycam Station, connect the i.LINK cable to the DV Interface on the Handycam Station. For the model that is supplied with your camcorder for the location. For details on the model. z Tip • You can use other software, refer to the help files or the...
Computer Applications Guide
Page 17
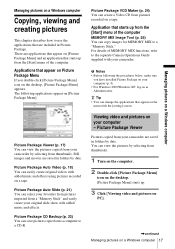
... Picture Package Menu If you have installed Picture Package on your computer (p. 8). • For Windows 2000/Windows XP, log on your camcorder. Viewing video and pictures on as Administrators. Picture Package Viewer Pictures copied from thumbnails. b Notes • Before following applications appear on ...a Windows computer z Tip • You can copy images for MEMORY MIX to the separate Camera Operations Guide supplied with added music and effects using pictures recorded on a tape. Still images and movies are saved in folders by ...
... Picture Package Menu If you have installed Picture Package on your computer (p. 8). • For Windows 2000/Windows XP, log on your camcorder. Viewing video and pictures on as Administrators. Picture Package Viewer Pictures copied from thumbnails. b Notes • Before following applications appear on ...a Windows computer z Tip • You can copy images for MEMORY MIX to the separate Camera Operations Guide supplied with added music and effects using pictures recorded on a tape. Still images and movies are saved in folders by ...
Computer Applications Guide
Page 24
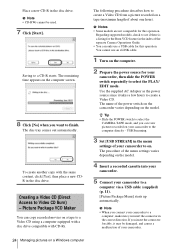
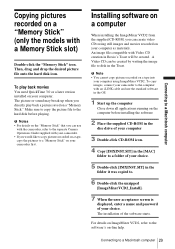
...Access to a CD-R starts. z Tip • Slide the POWER switch to select the CAMERA-TAPE mode, and you insert the connector in the disc drive. Place a new CD-R in the index of your camcorder to create a Video CD from a picture recorded on a tape (maximum length of the power...VCD feature in the disc drive. b Note • CD-RWs cannot be damaged, and causes a malfunction of the separate Camera Operations Guide. • You can view pictures recorded on your camcorder to a Video CD using a computer equipped with a disc drive compatible with the same content, click [Yes], then place...
...Access to a CD-R starts. z Tip • Slide the POWER switch to select the CAMERA-TAPE mode, and you insert the connector in the disc drive. Place a new CD-R in the index of your camcorder to create a Video CD from a picture recorded on a tape (maximum length of the power...VCD feature in the disc drive. b Note • CD-RWs cannot be damaged, and causes a malfunction of the separate Camera Operations Guide. • You can view pictures recorded on your camcorder to a Video CD using a computer equipped with a disc drive compatible with the same content, click [Yes], then place...
Computer Applications Guide
Page 26
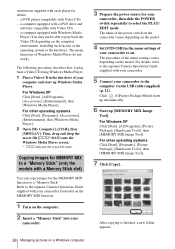
.... 1 Turn on the computer environment, including such factors as the operating system or the hardware. Refer to the separate Camera Operations Guide supplied with your camcorder for MEMORY MIX to a "Memory Stick" (only the models with Video CDs - a DVD player compatible with a Memory...computer equipped with each player for the MEMORY MIX function to a "Memory Stick." For other operating systems Click [Start], [Programs], [Picture Package], [Handycam Tools], then [MEMORY MIX Image Tool]. 7 Click [Copy]. . Click if [Picture Package Menu] starts up automatically. 6 Start up Windows Media ...
.... 1 Turn on the computer environment, including such factors as the operating system or the hardware. Refer to the separate Camera Operations Guide supplied with your camcorder for MEMORY MIX to a "Memory Stick" (only the models with Video CDs - a DVD player compatible with a Memory...computer equipped with each player for the MEMORY MIX function to a "Memory Stick." For other operating systems Click [Start], [Programs], [Picture Package], [Handycam Tools], then [MEMORY MIX Image Tool]. 7 Click [Copy]. . Click if [Picture Package Menu] starts up automatically. 6 Start up Windows Media ...

Computer Applications Guide
Page 28
...] appears on the LCD screen of the power switch on the camcorder varies depending on your camcorder, then slide the POWER switch repeatedly to ON. The name of your camcorder, and a "Memory Stick" icon appears on the Handycam Station, then set the USB ON/OFF switch to select the PLAY.... b Note • If you insert the connector forcibly, it may be damaged, and causes a malfunction of your camcorder. 5 Connect the other end of the USB cable to the separate Camera Operations Guide supplied with the Handycam Station, connect the USB cable to the USB jack on the desktop.
...] appears on the LCD screen of the power switch on the camcorder varies depending on your camcorder, then slide the POWER switch repeatedly to ON. The name of your camcorder, and a "Memory Stick" icon appears on the Handycam Station, then set the USB ON/OFF switch to select the PLAY.... b Note • If you insert the connector forcibly, it may be damaged, and causes a malfunction of your camcorder. 5 Connect the other end of the USB cable to the separate Camera Operations Guide supplied with the Handycam Station, connect the USB cable to the USB jack on the desktop.
Computer Applications Guide
Page 29
...details on the "Memory Stick" that you can create video CDs using ImageMixer VCD2. For details on ImageMixer VCD2, refer to the software's on your camcorder. • If you would like to copy pictures recorded on a tape, copy the pictures to a folder of your choice. Installing software on ...the [MAC] folder to a "Memory Stick" on -line help. To copy images, connect your camcorder to the computer with an i.LINK cable and use with the camcorder, refer to the separate Camera Operations Guide supplied with Video CD creation in Roxio's Toast will be created by writing the image file...
...details on the "Memory Stick" that you can create video CDs using ImageMixer VCD2. For details on ImageMixer VCD2, refer to the software's on your camcorder. • If you would like to copy pictures recorded on a tape, copy the pictures to a folder of your choice. Installing software on ...the [MAC] folder to a "Memory Stick" on -line help. To copy images, connect your camcorder to the computer with an i.LINK cable and use with the camcorder, refer to the separate Camera Operations Guide supplied with Video CD creation in Roxio's Toast will be created by writing the image file...

Computer Applications Guide
Page 30
...a tape to a DVD easily if your camcorder, then slide the POWER switch repeatedly to select the PLAY/ EDIT mode. USA http://www.ita.sel.sony.com/support/ dvimag/ - Thailand http://www.sony.co.th/vaio/index.html - Latin America http://vaio-online.sony.com/ Using the Direct Access to "Click...supported models, check to see if there is set up . Europe http://www.vaio-link.com/ - You also need a Sony VAIO computer equipped with a compatible version of the Camera Operations Guide. • You can be used to write DVDs. China http://www.sonystyle.com.cn/vaio/ - Quit all ...
...a tape to a DVD easily if your camcorder, then slide the POWER switch repeatedly to select the PLAY/ EDIT mode. USA http://www.ita.sel.sony.com/support/ dvimag/ - Thailand http://www.sony.co.th/vaio/index.html - Latin America http://vaio-online.sony.com/ Using the Direct Access to "Click...supported models, check to see if there is set up . Europe http://www.vaio-link.com/ - You also need a Sony VAIO computer equipped with a compatible version of the Camera Operations Guide. • You can be used to write DVDs. China http://www.sonystyle.com.cn/vaio/ - Quit all ...
Computer Applications Guide
Page 33
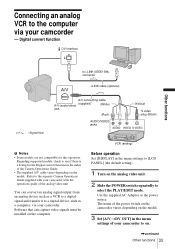
...Yellow) S video plug (Black) b Notes • Some models are not compatible for the Digital convert function in the menu settings of your camcorder with the operations guide of the Camera Operations Guide. • The supplied A/V cable varies depending on . ,continued Other functions 33 ...Connecting an analog VCR to a digital device, such as the power source. Regarding supported models, check to the separate Camera Operations Guide supplied with your camcorder to [LCD PANEL] (the default setting). 1 Turn on the computer. Refer...
...Yellow) S video plug (Black) b Notes • Some models are not compatible for the Digital convert function in the menu settings of your camcorder with the operations guide of the Camera Operations Guide. • The supplied A/V cable varies depending on . ,continued Other functions 33 ...Connecting an analog VCR to a digital device, such as the power source. Regarding supported models, check to the separate Camera Operations Guide supplied with your camcorder to [LCD PANEL] (the default setting). 1 Turn on the computer. Refer...
Computer Applications Guide
Page 34
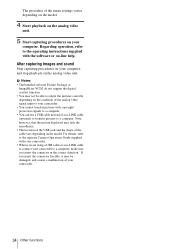
... b Notes • The bundled software Picture Package or ImageMixer VCD2 do not support the digital convert function. • You may lack the smoothness. • The location of the USB...computer. After capturing images and sound Stop capturing procedures on your camcorder to connect your computer, and stop playback on the model. Regarding operation, refer to the operating instructions...the pictures correctly depending on the condition of the analog video signal input to the separate Camera Operations Guide supplied with the software or on your computer. The procedure of the menu ...
... b Notes • The bundled software Picture Package or ImageMixer VCD2 do not support the digital convert function. • You may lack the smoothness. • The location of the USB...computer. After capturing images and sound Stop capturing procedures on your camcorder to connect your computer, and stop playback on the model. Regarding operation, refer to the operating instructions...the pictures correctly depending on the condition of the analog video signal input to the separate Camera Operations Guide supplied with the software or on your computer. The procedure of the menu ...
Camera Operations Guide
Page 1
Camera Operations Guide [US] 3-087-921-12(1) Camera Operations Guide Read this first Digital Video Camera Recorder DCR-TRV361/TRV460 TM SERIES © 2004 Sony Corporation
Camera Operations Guide [US] 3-087-921-12(1) Camera Operations Guide Read this first Digital Video Camera Recorder DCR-TRV361/TRV460 TM SERIES © 2004 Sony Corporation
Camera Operations Guide
Page 4
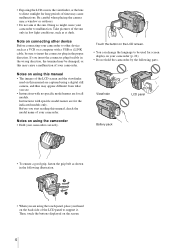
... in the proper direction. Notes on this may cause a malfunction of your camcorder. Be careful when placing the camera near a window or outdoors. • Do not aim at dusk. Doing so might cause your camcorder correctly. Then, touch the buttons displayed on the LCD screen. • ... to be damaged, or this manual are captured using the camcorder • Hold your camcorder to malfunction. Take pictures of the sun only in the wrong direction, the terminal may be used on using a digital still camera, and thus may cause malfunctions. Instructions with specific model names...
... in the proper direction. Notes on this may cause a malfunction of your camcorder. Be careful when placing the camera near a window or outdoors. • Do not aim at dusk. Doing so might cause your camcorder correctly. Then, touch the buttons displayed on the LCD screen. • ... to be damaged, or this manual are captured using the camcorder • Hold your camcorder to malfunction. Take pictures of the sun only in the wrong direction, the terminal may be used on using a digital still camera, and thus may cause malfunctions. Instructions with specific model names...
Camera Operations Guide
Page 6
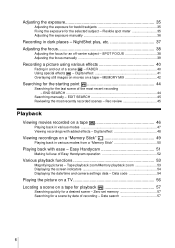
... on a tape - END SEARCH 44 Searching manually - Easy Handycam 51 Making full use of a scene - SPOT FOCUS 38 Adjusting the focus manually 39 Recording a picture using various effects 40 Fading in dark places - Digital effect 41 Overlaying still images on movies on a "Memory Stick... 49 Playing back in various modes 47 Viewing recordings with ease - Tape playback zoom/Memory playback zoom 53 Displaying the screen indicators 54 Displaying the date/time and camera settings data -...
... on a tape - END SEARCH 44 Searching manually - Easy Handycam 51 Making full use of a scene - SPOT FOCUS 38 Adjusting the focus manually 39 Recording a picture using various effects 40 Fading in dark places - Digital effect 41 Overlaying still images on movies on a "Memory Stick... 49 Playing back in various modes 47 Viewing recordings with ease - Tape playback zoom/Memory playback zoom 53 Displaying the screen indicators 54 Displaying the date/time and camera settings data -...
Camera Operations Guide
Page 7
... instructions supplied with your computer cComputer Applications Guide 7 Advanced operations Using the Menu Selecting menu items 59 Using the (CAMERA SET) menu - REC MODE/MULTI-SOUND/ AUDIO MIX/USB-CAMERA, etc 76 Using the (TIME/LANGU.) menu - END SEARCH/TITLE, etc. ........73 Using the (STANDARD SET)... still images from a tape - EFFECT/SLIDE SHOW/ FRAME REC/INTERVAL REC, etc 68 Using the (EDIT/PLAY) menu - APPLI.) menu - Digital program editing 91 Deleting recorded pictures 98 Marking recorded images with your camcorder: • Editing images with specific information -
... instructions supplied with your computer cComputer Applications Guide 7 Advanced operations Using the Menu Selecting menu items 59 Using the (CAMERA SET) menu - REC MODE/MULTI-SOUND/ AUDIO MIX/USB-CAMERA, etc 76 Using the (TIME/LANGU.) menu - END SEARCH/TITLE, etc. ........73 Using the (STANDARD SET)... still images from a tape - EFFECT/SLIDE SHOW/ FRAME REC/INTERVAL REC, etc 68 Using the (EDIT/PLAY) menu - APPLI.) menu - Digital program editing 91 Deleting recorded pictures 98 Marking recorded images with your camcorder: • Editing images with specific information -
Camera Operations Guide
Page 9
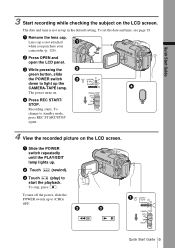
To set up the CAMERA-TAPE lamp. c While pressing the green button, slide the POWER switch down to start the playback. d Press REC START/ STOP. a Slide the POWER switch repeatedly ... up to standby mode, press REC START/STOP again. 4 View the recorded picture on . The date and time is not attached when you purchase your camcorder (p. 126). c Touch (play) to light up in the default setting. a Remove the lens cap. The power turns on the LCD screen. Lens cap is not...
To set up the CAMERA-TAPE lamp. c While pressing the green button, slide the POWER switch down to start the playback. d Press REC START/ STOP. a Slide the POWER switch repeatedly ... up to standby mode, press REC START/STOP again. 4 View the recorded picture on . The date and time is not attached when you purchase your camcorder (p. 126). c Touch (play) to light up in the default setting. a Remove the lens cap. The power turns on the LCD screen. Lens cap is not...
Camera Operations Guide
Page 11
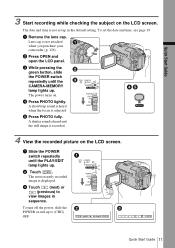
...repeatedly until the PLAY/EDIT lamp lights up in sequence. A short beep sound is heard when the focus is not attached when you purchase your camcorder (p. 126). b Touch . Quick Start Guide 3 Start recording while checking the subject on . Lens cap is adjusted. The most recently recorded ...PHOTO lightly. a Remove the lens cap. Quick Start Guide 11 The power turns on the LCD screen. a Slide the POWER switch repeatedly until the CAMERA-MEMORY lamp lights up to view images in the default setting. c Touch (next) or (previous) to (CHG) OFF. A shutter sound is ...
...repeatedly until the PLAY/EDIT lamp lights up in sequence. A short beep sound is heard when the focus is not attached when you purchase your camcorder (p. 126). b Touch . Quick Start Guide 3 Start recording while checking the subject on . Lens cap is adjusted. The most recently recorded ...PHOTO lightly. a Remove the lens cap. Quick Start Guide 11 The power turns on the LCD screen. a Slide the POWER switch repeatedly until the CAMERA-MEMORY lamp lights up to view images in the default setting. c Touch (next) or (previous) to (CHG) OFF. A shutter sound is ...

Camera Operations Guide
Page 13
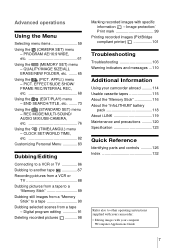
..." media supplied with DCR-TRV460. There is already installed. Getting started Step 1: Checking supplied items Make sure you have following items supplied with DCR-TRV361. Getting started Getting started 13 A/V connecting cable (1) USB cable (1) AC Adaptor (1) Power cord (1) Rechargeable battery pack NP-FM30 (1) CD-ROM "SPVD-012 USB Driver" (1) Cleaning cloth (1) Camera Operations Guide...
..." media supplied with DCR-TRV460. There is already installed. Getting started Step 1: Checking supplied items Make sure you have following items supplied with DCR-TRV361. Getting started Getting started 13 A/V connecting cable (1) USB cable (1) AC Adaptor (1) Power cord (1) Rechargeable battery pack NP-FM30 (1) CD-ROM "SPVD-012 USB Driver" (1) Cleaning cloth (1) Camera Operations Guide...


