Computer Applications Guide
Page 4
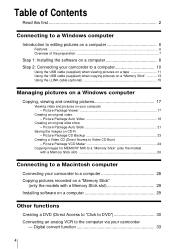
... 18 Creating an original slide show - Digital convert function 33 4 Picture Package Auto Slide 21 Saving the images on your computer - Picture Package CD Backup 23 Creating a Video CD (Direct Access to the computer via your camcorder - Table of Contents Read this first ... to editing pictures on a computer 6 Features ...6 Overview of the preparation 7 Step 1: Installing the software on a computer 8 Step 2: Connecting your camcorder to a computer 10 Using the USB cable (supplied) when viewing pictures on a tape 11 Using the USB cable (supplied) when copying pictures on ...
... 18 Creating an original slide show - Digital convert function 33 4 Picture Package Auto Slide 21 Saving the images on your computer - Picture Package CD Backup 23 Creating a Video CD (Direct Access to the computer via your camcorder - Table of Contents Read this first ... to editing pictures on a computer 6 Features ...6 Overview of the preparation 7 Step 1: Installing the software on a computer 8 Step 2: Connecting your camcorder to a computer 10 Using the USB cable (supplied) when viewing pictures on a tape 11 Using the USB cable (supplied) when copying pictures on ...
Computer Applications Guide
Page 6
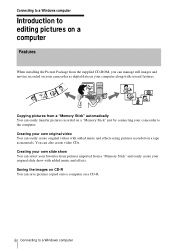
...with added music and effects. Creating your own slide show with several features. You can manage still images and movies recorded on your camcorder as materials. Saving the images on CD-R You can save pictures copied onto a computer on your original slide show You can select... your favorites from pictures imported from the supplied CD-ROM, you can also create video CDs. Creating your camcorder to a Windows computer Copying pictures from a "Memory Stick" automatically You can easily transfer pictures recorded on a "Memory Stick" just by ...
...with added music and effects. Creating your own slide show with several features. You can manage still images and movies recorded on your camcorder as materials. Saving the images on CD-R You can save pictures copied onto a computer on your original slide show You can select... your favorites from pictures imported from the supplied CD-ROM, you can also create video CDs. Creating your camcorder to a Windows computer Copying pictures from a "Memory Stick" automatically You can easily transfer pictures recorded on a "Memory Stick" just by ...
Computer Applications Guide
Page 11
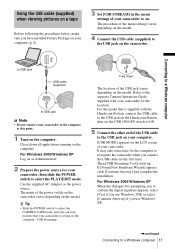
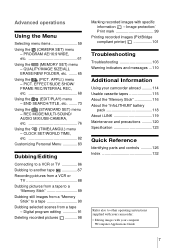
... supplied AC Adaptor as Administrators. 2 Prepare the power source for your camcorder is supplied with your camcorder to the computer at this point. 1 Turn on the model. z Tip • Slide the POWER switch to confirm the digital signature appears, select [Yes] if you use Windows 2000 or select ...Note • Do not connect your camcorder for the first time. Close down all applications running on the model. Refer to the separate Camera Operations Guide supplied with the Handycam Station, connect the USB cable to the USB jack on the Handycam Station, then set the USB ON/OFF...
... supplied AC Adaptor as Administrators. 2 Prepare the power source for your camcorder is supplied with your camcorder to the computer at this point. 1 Turn on the model. z Tip • Slide the POWER switch to confirm the digital signature appears, select [Yes] if you use Windows 2000 or select ...Note • Do not connect your camcorder for the first time. Close down all applications running on the model. Refer to the separate Camera Operations Guide supplied with the Handycam Station, connect the USB cable to the USB jack on the Handycam Station, then set the USB ON/OFF...

Computer Applications Guide
Page 32
... disconnect the i.LINK cable (optional) or turn off the power of your camcorder while [WRITING] or [CONVERTING] is displayed. • When any of the following situations: - When [A/V t DV OUT] in a format other than Digital 8 format. 32 Other functions For SEL/PUSH EXEC dial models Press BURN... DVD/VCD of your camcorder. b Notes • You cannot cancel the operation after [Finalizing DVD.] is displayed on the LCD screen ...
... disconnect the i.LINK cable (optional) or turn off the power of your camcorder while [WRITING] or [CONVERTING] is displayed. • When any of the following situations: - When [A/V t DV OUT] in a format other than Digital 8 format. 32 Other functions For SEL/PUSH EXEC dial models Press BURN... DVD/VCD of your camcorder. b Notes • You cannot cancel the operation after [Finalizing DVD.] is displayed on the LCD screen ...
Computer Applications Guide
Page 33
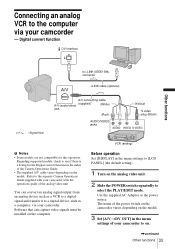
... [A/VtDV OUT] in the menu settings to select the PLAY/EDIT mode. Digital convert function DV Interface Other functions to the computer via your camcorder - Use the supplied AC Adaptor as a computer, via your camcorder. Connecting an analog VCR to i.LINK (IEEE1394) connector i.LINK cable (optional...) AUDIO/VIDEO jacks (Yellow) S video plug (Black) b Notes • Some models are not compatible for the Digital convert function in the index of your camcorder with the operations guide of the analog video unit You can capture video signals must be installed on . ,continued Other ...
... [A/VtDV OUT] in the menu settings to select the PLAY/EDIT mode. Digital convert function DV Interface Other functions to the computer via your camcorder - Use the supplied AC Adaptor as a computer, via your camcorder. Connecting an analog VCR to i.LINK (IEEE1394) connector i.LINK cable (optional...) AUDIO/VIDEO jacks (Yellow) S video plug (Black) b Notes • Some models are not compatible for the Digital convert function in the index of your camcorder with the operations guide of the analog video unit You can capture video signals must be installed on . ,continued Other ...
Computer Applications Guide
Page 34
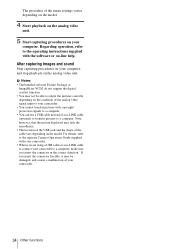
...of the analog video signal input to your computer. b Notes • The bundled software Picture Package or ImageMixer VCD2 do not support the digital convert function. • You may lack the smoothness. • The location of the USB jack and the shape of the cable vary ... help. The procedure of the menu settings varies depending on the model. 4 Start playback on the analog video unit. 5 Start capturing procedures on your camcorder. • You cannot transfer pictures with copyright protection signals to a computer. • You can use a USB cable instead of an i.LINK cable ...
...of the analog video signal input to your computer. b Notes • The bundled software Picture Package or ImageMixer VCD2 do not support the digital convert function. • You may lack the smoothness. • The location of the USB jack and the shape of the cable vary ... help. The procedure of the menu settings varies depending on the model. 4 Start playback on the analog video unit. 5 Start capturing procedures on your camcorder. • You cannot transfer pictures with copyright protection signals to a computer. • You can use a USB cable instead of an i.LINK cable ...
Camera Operations Guide
Page 3
...the viewfinder are manufactured using extremely high-precision technology, so over 99.99% of the camcorder, storage media, etc. • TV color systems differ depending on the country/ ... to provide reasonable protection against harmful interference in accordance with the limits for a Class B digital device, pursuant to the copyright laws. Record the serial number in the U.S.A. If you ... and found to Subpart B of Part 15 of Conformity Trade Name: SONY Model No.: DCR-TRV460 Responsible Party: Sony Electronics Inc. This equipment generates, uses, and can radiate radio frequency ...
...the viewfinder are manufactured using extremely high-precision technology, so over 99.99% of the camcorder, storage media, etc. • TV color systems differ depending on the country/ ... to provide reasonable protection against harmful interference in accordance with the limits for a Class B digital device, pursuant to the copyright laws. Record the serial number in the U.S.A. If you ... and found to Subpart B of Part 15 of Conformity Trade Name: SONY Model No.: DCR-TRV460 Responsible Party: Sony Electronics Inc. This equipment generates, uses, and can radiate radio frequency ...
Camera Operations Guide
Page 4
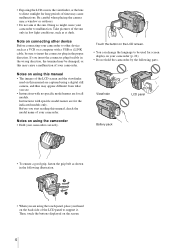
Notes on using the touch panel, place your camcorder to support it. Then, touch the buttons displayed on using a digital still camera, and thus may cause malfunctions. Take pictures of the sun only in low light conditions, such as a VCR or a computer with a USB ...or i.LINK cable, be sure to direct sunlight for screen display on connecting other device Before connecting your camcorder. Touch the button ...
Notes on using the touch panel, place your camcorder to support it. Then, touch the buttons displayed on using a digital still camera, and thus may cause malfunctions. Take pictures of the sun only in low light conditions, such as a VCR or a computer with a USB ...or i.LINK cable, be sure to direct sunlight for screen display on connecting other device Before connecting your camcorder. Touch the button ...
Camera Operations Guide
Page 7
... to a "Memory Stick 89 Dubbing still images from a "Memory Stick" to other operating instructions supplied with your camcorder: • Editing images with specific information - END SEARCH/TITLE, etc. ........73 Using the (STANDARD SET) menu - Digital program editing 91 Deleting recorded pictures 98 Marking recorded images with your computer cComputer Applications Guide 7 Image...
... to a "Memory Stick 89 Dubbing still images from a "Memory Stick" to other operating instructions supplied with your camcorder: • Editing images with specific information - END SEARCH/TITLE, etc. ........73 Using the (STANDARD SET) menu - Digital program editing 91 Deleting recorded pictures 98 Marking recorded images with your computer cComputer Applications Guide 7 Image...
Camera Operations Guide
Page 26
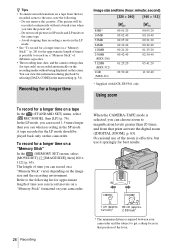
... 00:21:20 00:42:40 01:25:20 02:50:40 05:41:20 11:22:40 * Supplied with DCR-TRV361 only. A tape recorded in that point activate the digital zoom ([DIGITAL ZOOM], p. 63). To record for a longer time on a tape In the (STANDARD SET) menu, select [ REC MODE], ... camera settings data (for best results. 26 Recording 1 cm (approx. 80 cm (approx. 1/2 inch)* 2 5/8 feet)* * The minimum distance required between your camcorder. Refer to get a sharp focus in the LP mode should be recorded continuously without being displayed on the same tape. - Avoid stopping then recording a movie...
... 00:21:20 00:42:40 01:25:20 02:50:40 05:41:20 11:22:40 * Supplied with DCR-TRV361 only. A tape recorded in that point activate the digital zoom ([DIGITAL ZOOM], p. 63). To record for a longer time on a tape In the (STANDARD SET) menu, select [ REC MODE], ... camera settings data (for best results. 26 Recording 1 cm (approx. 80 cm (approx. 1/2 inch)* 2 5/8 feet)* * The minimum distance required between your camcorder. Refer to get a sharp focus in the LP mode should be recorded continuously without being displayed on the same tape. - Avoid stopping then recording a movie...
Camera Operations Guide
Page 41
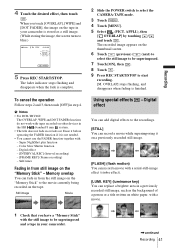
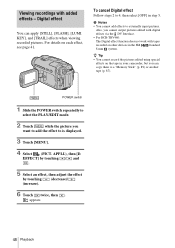
... 5 Select (PICT. Memory overlap You can fade in your camcorder. ,continued Recording 41 Digital effect You can add digital effects to start recording. [M. b Notes • For DCR-TRV460: The OVERLAP, WIPE and DOT FADER functions do not work with : - Digital effect - [INTERVAL REC] (Interval recording) - [FRAME REC... 4 Touch the desired effect, then touch . To cancel the operation Follow steps 2 and 3, then touch [OFF] in your camcorder is not needed. • You cannot use the FADER function together with tapes recorded on other devices in the Hi8 /standard 8...
... 5 Select (PICT. Memory overlap You can fade in your camcorder. ,continued Recording 41 Digital effect You can add digital effects to start recording. [M. b Notes • For DCR-TRV460: The OVERLAP, WIPE and DOT FADER functions do not work with : - Digital effect - [INTERVAL REC] (Interval recording) - [FRAME REC... 4 Touch the desired effect, then touch . To cancel the operation Follow steps 2 and 3, then touch [OFF] in your camcorder is not needed. • You cannot use the FADER function together with tapes recorded on other devices in the Hi8 /standard 8...
Camera Operations Guide
Page 42
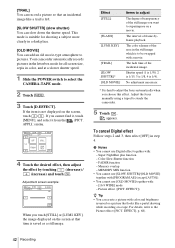
...with : - MEMORY MIX function • You cannot use [SLOW SHUTTR]/[OLD MOVIE] together with [PROGRAM AE] (except [AUTO]). • You cannot use Digital effect together with : - [16:9 WIDE] mode - EFFECT], p. 68). 42 Recording [TRAIL] You can record a picture so that an incidental image ... 4 Touch the desired effect, then adjust the effect by touching (decrease) / (increase) and touch . Super NightShot plus function - Your camcorder automatically records pictures in the letterbox mode for shooting a subject more clearly in the still image which is saved as a still image. KEY],...
...with : - MEMORY MIX function • You cannot use [SLOW SHUTTR]/[OLD MOVIE] together with [PROGRAM AE] (except [AUTO]). • You cannot use Digital effect together with : - [16:9 WIDE] mode - EFFECT], p. 68). 42 Recording [TRAIL] You can record a picture so that an incidental image ... 4 Touch the desired effect, then adjust the effect by touching (decrease) / (increase) and touch . Super NightShot plus function - Your camcorder automatically records pictures in the letterbox mode for shooting a subject more clearly in the still image which is saved as a still image. KEY],...
Camera Operations Guide
Page 48
... details on the tape in your camcorder, but you can apply [STILL], [FLASH], [LUMI. Also, you want to add the effect to select the PLAY/EDIT mode. 2 Touch while the picture you cannot output pictures edited with digital effects via the DV Interface. • For DCR-TRV460: The Digital effect function does not work with...
... details on the tape in your camcorder, but you can apply [STILL], [FLASH], [LUMI. Also, you want to add the effect to select the PLAY/EDIT mode. 2 Touch while the picture you cannot output pictures edited with digital effects via the DV Interface. • For DCR-TRV460: The Digital effect function does not work with...
Camera Operations Guide
Page 63
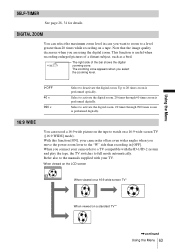
... tape. GOFF 40 × 990 × Select to a level greater than recording in case you move the power zoom lever to full mode automatically. DIGITAL ZOOM You can record a 16:9 wide picture on a standard TV** ,continued Using the Menu 63 The right side of a distant subject, such as ...). Using the Menu SELF-TIMER See page 28, 31 for details. This function is performed digitally. 16:9 WIDE You can select the maximum zoom level in [OFF]. When you connect your camcorder to a TV compatible with your camcorder offers even wider angles when you want to zoom to deactivate the...
... tape. GOFF 40 × 990 × Select to a level greater than recording in case you move the power zoom lever to full mode automatically. DIGITAL ZOOM You can record a 16:9 wide picture on a standard TV** ,continued Using the Menu 63 The right side of a distant subject, such as ...). Using the Menu SELF-TIMER See page 28, 31 for details. This function is performed digitally. 16:9 WIDE You can select the maximum zoom level in [OFF]. When you connect your camcorder to a TV compatible with your camcorder offers even wider angles when you want to zoom to deactivate the...
Camera Operations Guide
Page 79
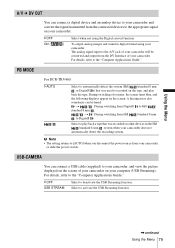
... slide the power switch. Select to play back a tape that was recorded on other devices in digital format using your camcorder does not automatically detect the recording system. t / : During switching from Digital8 to Hi8 / standard 8 mm . / t : During switching from Hi8 /standard ... from your computer (USB Streaming). A hissing noise also sometimes can be converted and output from the DV Interface of your camcorder will be heard. PB MODE For DCR-TRV460: GAUTO / Select to automatically detect the system (Hi8 /standard 8 mm or Digital8 ) that was used to recorded on...
... slide the power switch. Select to play back a tape that was recorded on other devices in digital format using your camcorder does not automatically detect the recording system. t / : During switching from Digital8 to Hi8 / standard 8 mm . / t : During switching from Hi8 /standard ... from your computer (USB Streaming). A hissing noise also sometimes can be converted and output from the DV Interface of your camcorder will be heard. PB MODE For DCR-TRV460: GAUTO / Select to automatically detect the system (Hi8 /standard 8 mm or Digital8 ) that was used to recorded on...
Camera Operations Guide
Page 86
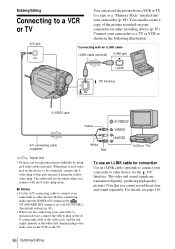
... (STANDARD SET) menu is an S video jack on the VCR or the TV. For details, see page 119. 86 Dubbing/Editing Connect your camcorder to monaural device, connect the yellow plug of using an S video cable (optional). Before connecting, make sure the [DISPLAY] setting in the following...with the S video plug alone. When there is set to [LCD PANEL] (the default setting) (p. 81). • When you are transmitted digitally, producing high quality pictures. The audio will not be output when you cannot record the picture and sound separately. Dubbing/Editing Connecting to a VCR ...
... (STANDARD SET) menu is an S video jack on the VCR or the TV. For details, see page 119. 86 Dubbing/Editing Connect your camcorder to monaural device, connect the yellow plug of using an S video cable (optional). Before connecting, make sure the [DISPLAY] setting in the following...with the S video plug alone. When there is set to [LCD PANEL] (the default setting) (p. 81). • When you are transmitted digitally, producing high quality pictures. The audio will not be output when you cannot record the picture and sound separately. Dubbing/Editing Connecting to a VCR ...

Camera Operations Guide
Page 87
... Stick." • When dubbing using the i.LINK cable, the recorded picture becomes rough when a picture is paused on your camcorder while recording to a VCR. • For DCR-TRV460: When you dub the tape recorded on screen (p. 54). • Pictures edited with your VCR for details. 5 When the... dubbing is finished, stop your camcorder and the VCR. • When connected using the A/V connecting cable, press DSPL/BATT INFO to the VCR via the DV Interface. Digital ...
... Stick." • When dubbing using the i.LINK cable, the recorded picture becomes rough when a picture is paused on your camcorder while recording to a VCR. • For DCR-TRV460: When you dub the tape recorded on screen (p. 54). • Pictures edited with your VCR for details. 5 When the... dubbing is finished, stop your camcorder and the VCR. • When connected using the A/V connecting cable, press DSPL/BATT INFO to the VCR via the DV Interface. Digital ...

Camera Operations Guide
Page 91
...; For DCR-TRV460: The Digital program editing does not work with other devices in the desired order to other recording device such as programs" (p. 95). Delete unwanted scene Change the order Results of editing Step 1 : Preparing your camcorder. b Note • You cannot perform the Digital program editing on other camcorders on your camcorder. •...Memory Stick" inserted in a VCR. b Notes • You cannot dub the index screen. • You may not be able to a tape in your camcorder and VCR for operation Follow the steps below when you are recording on the tape.
...; For DCR-TRV460: The Digital program editing does not work with other devices in the desired order to other recording device such as programs" (p. 95). Delete unwanted scene Change the order Results of editing Step 1 : Preparing your camcorder. b Note • You cannot perform the Digital program editing on other camcorders on your camcorder. •...Memory Stick" inserted in a VCR. b Notes • You cannot dub the index screen. • You may not be able to a tape in your camcorder and VCR for operation Follow the steps below when you are recording on the tape.

Marketing Specifications
Page 1
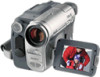
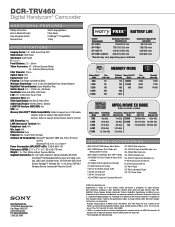
... to 10 hours on 1GB Memory Stick PRO™ Media. Images are not subjected to PCs for easy PC editing of Sony's NightShot® Infrared system that uses motion sensory to the capacity of non-stop MPEG1 video, or over previous recorded videos...record up to the last 5 seconds of your home videos quickly and easily. ® DCR-TRV460 Digital Handycam® Camcorder The DCR-TRV460 is prefect for camera "shake" without the blurring common with other digital stabilization systems. USB Streaming Stay connected with family and friends by adding professional looking fader effects...
... to 10 hours on 1GB Memory Stick PRO™ Media. Images are not subjected to PCs for easy PC editing of Sony's NightShot® Infrared system that uses motion sensory to the capacity of non-stop MPEG1 video, or over previous recorded videos...record up to the last 5 seconds of your home videos quickly and easily. ® DCR-TRV460 Digital Handycam® Camcorder The DCR-TRV460 is prefect for camera "shake" without the blurring common with other digital stabilization systems. USB Streaming Stay connected with family and friends by adding professional looking fader effects...
Marketing Specifications
Page 2
... used only to 1GB media capacity; A portion of the memory is a trademark of CIPA. Microsoft and Windows are property of Sony. DCR-TRV460 Digital Handycam® Camcorder ADDITIONAL FEATURES Battery Information Built-In White LED Light Easy Handycam Button Manual Focus Multi-Language Menu Photo Mode PictBridge™ Compatibility Titling S P E C I F I C AT I O N S Imaging Device: 1/6" 460K Gross Pixel CCD...
... used only to 1GB media capacity; A portion of the memory is a trademark of CIPA. Microsoft and Windows are property of Sony. DCR-TRV460 Digital Handycam® Camcorder ADDITIONAL FEATURES Battery Information Built-In White LED Light Easy Handycam Button Manual Focus Multi-Language Menu Photo Mode PictBridge™ Compatibility Titling S P E C I F I C AT I O N S Imaging Device: 1/6" 460K Gross Pixel CCD...


