
Operating Instructions
Page 5
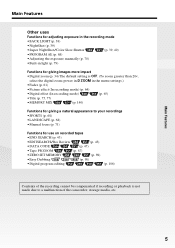
...(p. 79) Functions for giving images more impact •Digital zoom (p. 34) The default setting is OFF. (To zoom greater than 20×, select the digital zoom power in D ZOOM in the menu settings.) ...•Fader (p. 61) •Picture effect (In recording mode) (p. 64) •Digital effect (In recording mode) (p. 65) •Title (p. 75, 77) •MEMORY MIX ... 43) •EDITSEARCH/Rec Review (p. 43) •DATA CODE (p. 47) •Tape PB ZOOM (p. 87) •ZERO SET MEMORY (p. 89) •Easy Dubbing (p. 98) •Digital program editing (p. 106) Contents...
...(p. 79) Functions for giving images more impact •Digital zoom (p. 34) The default setting is OFF. (To zoom greater than 20×, select the digital zoom power in D ZOOM in the menu settings.) ...•Fader (p. 61) •Picture effect (In recording mode) (p. 64) •Digital effect (In recording mode) (p. 65) •Title (p. 75, 77) •MEMORY MIX ... 43) •EDITSEARCH/Rec Review (p. 43) •DATA CODE (p. 47) •Tape PB ZOOM (p. 87) •ZERO SET MEMORY (p. 89) •Easy Dubbing (p. 98) •Digital program editing (p. 106) Contents...
Operating Instructions
Page 6
... 19 Connecting to a wall outlet 24 Step 2 Setting the date and time ........ 26 Step 3 Inserting a cassette 28 Recording - Digital effect ........... 65 Using the PROGRAM AE function .... 68 Adjusting the exposure manually ...... 70 Focusing manually 71 Interval recording 72 Frame by...Tape PB ZOOM ...... 87 Quickly locating a scene - Recording on a tape - NightShot - Picture effect 64 Using special effects - Rec Review 43 Playback - Tape Photo recording 56 Using the wide mode 58 Using the fader function 61 Using special effects - Display function 47 ...
... 19 Connecting to a wall outlet 24 Step 2 Setting the date and time ........ 26 Step 3 Inserting a cassette 28 Recording - Digital effect ........... 65 Using the PROGRAM AE function .... 68 Adjusting the exposure manually ...... 70 Focusing manually 71 Interval recording 72 Frame by...Tape PB ZOOM ...... 87 Quickly locating a scene - Recording on a tape - NightShot - Picture effect 64 Using special effects - Rec Review 43 Playback - Tape Photo recording 56 Using the wide mode 58 Using the fader function 61 Using special effects - Display function 47 ...
Operating Instructions
Page 43
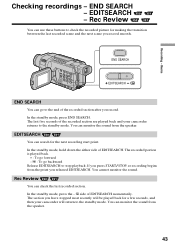
... the transition between the last recorded scene and the next scene you released EDITSEARCH. You can use these buttons to the standby mode. Rec Review You can monitor the sound from the speaker. The last five seconds of the recorded section after you record. You can go backward Release ...played back. + : To go forward - 7 : To go to the end of the recorded section are played back and your camcorder will be played back for a few seconds, and then your camcorder returns to check the recorded picture for the next recording start point. In the standby mode, press the - 7 side of...
... the transition between the last recorded scene and the next scene you released EDITSEARCH. You can use these buttons to the standby mode. Rec Review You can monitor the sound from the speaker. The last five seconds of the recorded section after you record. You can go backward Release ...played back. + : To go forward - 7 : To go to the end of the recorded section are played back and your camcorder will be played back for a few seconds, and then your camcorder returns to check the recorded picture for the next recording start point. In the standby mode, press the - 7 side of...

Operating Instructions
Page 44
Rec Review Notes •The end search, edit search and Rec Review functions do not work with tapes recorded in the Hi8 /standard 8 mm system. •If you have recorded on the tape, the end search function does not work correctly. 44 If a tape has a blank portion between the last scene you recorded and the next scene may not be smooth. •Once you eject the cassette after you start recording after using the end search function, occasionally, the transition between recorded portions The end search function may not work . END SEARCH - EDITSEARCH - Checking recordings -
Rec Review Notes •The end search, edit search and Rec Review functions do not work with tapes recorded in the Hi8 /standard 8 mm system. •If you have recorded on the tape, the end search function does not work correctly. 44 If a tape has a blank portion between the last scene you recorded and the next scene may not be smooth. •Once you eject the cassette after you start recording after using the end search function, occasionally, the transition between recorded portions The end search function may not work . END SEARCH - EDITSEARCH - Checking recordings -

Operating Instructions
Page 267
...249 Cleaning cassette indicator 248 Clock set 26 Color Slow Shutter 40 Data code 47 Date search 90 DEMO 221 DIGITAL EFFECT 65, 85 Digital8 system 237 Digital program editing 106, 156 DISPLAY 47 DNR 214 DOT 61 Dual sound track tape 238 E Easy Dubbing 98 ...MPEG movie recording ........ 146 New folder 160 NIGHTSHOT 39 NTSC system 246 R Recording folder 162 Recording time 22 Recording/Playback system 237 Rec Review 43 Remaining battery time indicator 36, 48 Remaining tape indicator ....... 36 Remote Commander 264 Remote sensor 257 RESET 230 S Self-diagnosis display...
...249 Cleaning cassette indicator 248 Clock set 26 Color Slow Shutter 40 Data code 47 Date search 90 DEMO 221 DIGITAL EFFECT 65, 85 Digital8 system 237 Digital program editing 106, 156 DISPLAY 47 DNR 214 DOT 61 Dual sound track tape 238 E Easy Dubbing 98 ...MPEG movie recording ........ 146 New folder 160 NIGHTSHOT 39 NTSC system 246 R Recording folder 162 Recording time 22 Recording/Playback system 237 Rec Review 43 Remaining battery time indicator 36, 48 Remaining tape indicator ....... 36 Remote Commander 264 Remote sensor 257 RESET 230 S Self-diagnosis display...


