
Operating Instructions
Page 2
... B DIGITAL APPARATUS COMPLIES WITH CANADIAN ICES-003. 2 Welcome! This symbol is very easy to the collection and recycling location nearest you can capture life's precious moments with advanced features, but at the same time it is intended to alert the user to temperatures above 60°C (140...TO PREVENT ELECTRIC SHOCK, MATCH WIDE BLADE OF PLUG TO WIDE SLOT, FULLY INSERT. Never expose the battery pack to the presence of this Sony Handycam. With your purchase of uninsulated "dangerous voltage" within the product's enclosure that may be producing home video that you . WARNING To...
... B DIGITAL APPARATUS COMPLIES WITH CANADIAN ICES-003. 2 Welcome! This symbol is very easy to the collection and recycling location nearest you can capture life's precious moments with advanced features, but at the same time it is intended to alert the user to temperatures above 60°C (140...TO PREVENT ELECTRIC SHOCK, MATCH WIDE BLADE OF PLUG TO WIDE SLOT, FULLY INSERT. Never expose the battery pack to the presence of this Sony Handycam. With your purchase of uninsulated "dangerous voltage" within the product's enclosure that may be producing home video that you . WARNING To...
Operating Instructions
Page 4
... images recorded on "Memory Stick"s using the USB cable (except DCR-TRV240) (p. 155) •Viewing images recorded on a tape using the USB cable (p. 94) •Viewing images live on your computer from your camcorder using the USB cable (p. 103) •Capturing images from an analog video unit on your ...for giving images more impact •Digital zoom [MENU] (p. 24) The default setting is OFF. (To zoom greater than 25×, (DCR-TRV240/TRV340)/15× (DCR-TRV740/TRV840), select the digital zoom power in D ZOOM in the menu settings.) •Fader (p. 44) •Picture effects (p. 47)...
... images recorded on "Memory Stick"s using the USB cable (except DCR-TRV240) (p. 155) •Viewing images recorded on a tape using the USB cable (p. 94) •Viewing images live on your computer from your camcorder using the USB cable (p. 103) •Capturing images from an analog video unit on your ...for giving images more impact •Digital zoom [MENU] (p. 24) The default setting is OFF. (To zoom greater than 25×, (DCR-TRV240/TRV340)/15× (DCR-TRV740/TRV840), select the digital zoom power in D ZOOM in the menu settings.) •Fader (p. 44) •Picture effects (p. 47)...
Operating Instructions
Page 6
... date - DATE SEARCH 68 Searching for a photo - Digital program editing (on tapes 74 Capturing images from a VCR - Signal convert function 88 Recording video or TV programs ....... 89 Inserting... recording 57 Superimposing a title 58 Making your computer (Windows users only 94 Customizing Your Camcorder Changing the menu settings 105 6 BACK LIGHT 28 Shooting in the dark - Basics Recording... frame recording - NightShot/Super NightShot/ Color Slow Shutter 29 Self-timer recording (except DCR-TRV240 31 Checking recordings - Insert Editing 92 Viewing images recorded on a tape on ...
... date - DATE SEARCH 68 Searching for a photo - Digital program editing (on tapes 74 Capturing images from a VCR - Signal convert function 88 Recording video or TV programs ....... 89 Inserting... recording 57 Superimposing a title 58 Making your computer (Windows users only 94 Customizing Your Camcorder Changing the menu settings 105 6 BACK LIGHT 28 Shooting in the dark - Basics Recording... frame recording - NightShot/Super NightShot/ Color Slow Shutter 29 Self-timer recording (except DCR-TRV240 31 Checking recordings - Insert Editing 92 Viewing images recorded on a tape on ...
Operating Instructions
Page 39
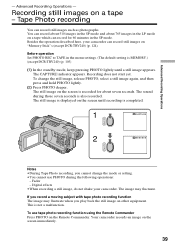
...- Before operation Set PHOTO REC to TAPE in the SP mode. Tape Photo recording You can record still images on "Memory Stick"s (except DCR-TRV240) (p. 124). The sound during the following operations: - The image may fluctuate when you cannot change the still image, release PHOTO, select...Your camcorder records an image on a tape - To change the mode or setting. •You cannot use tape photo recording function using the Remote Commander Press PHOTO on a tape which can record about 510 images in the SP mode and about seven seconds. This is completed. 1 CAPTURE PHOTO...
...- Before operation Set PHOTO REC to TAPE in the SP mode. Tape Photo recording You can record still images on "Memory Stick"s (except DCR-TRV240) (p. 124). The sound during the following operations: - The image may fluctuate when you cannot change the still image, release PHOTO, select...Your camcorder records an image on a tape - To change the mode or setting. •You cannot use tape photo recording function using the Remote Commander Press PHOTO on a tape which can record about 510 images in the SP mode and about seven seconds. This is completed. 1 CAPTURE PHOTO...
Operating Instructions
Page 64
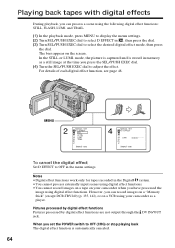
mode, the picture is captured and is automatically canceled. 64 The bars appear on your camcorder as a still image at the time you... digital effect functions: STILL, FLASH, LUMI. When you set the POWER switch to select D EFFECT in the Digital8 system. •You cannot process externally input scenes using digital effect functions. •You cannot record images on ... effects During playback, you can record images on a "Memory Stick" (except DCR-TRV240) (p. 135, 142), or on a VCR using your camcorder when you have processed the image using digital effect functions. In the STILL or...
mode, the picture is captured and is automatically canceled. 64 The bars appear on your camcorder as a still image at the time you... digital effect functions: STILL, FLASH, LUMI. When you set the POWER switch to select D EFFECT in the Digital8 system. •You cannot process externally input scenes using digital effect functions. •You cannot record images on ... effects During playback, you can record images on a "Memory Stick" (except DCR-TRV240) (p. 135, 142), or on a VCR using your camcorder when you have processed the image using digital effect functions. In the STILL or...
Operating Instructions
Page 88
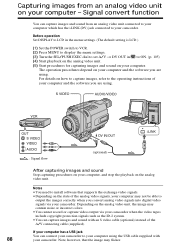
... your computer. If your computer has a USB jack You can capture images and sound with 88 your camcorder. Depending on your computer - Capturing images from an analog video unit connected to your computer which has the i.LINK (DV) jack connected to your camcorder. Before operation Set DISPLAY to LCD in the menu settings. (The default setting...
... your computer. If your computer has a USB jack You can capture images and sound with 88 your camcorder. Depending on your computer - Capturing images from an analog video unit connected to your computer which has the i.LINK (DV) jack connected to your camcorder. Before operation Set DISPLAY to LCD in the menu settings. (The default setting...
Operating Instructions
Page 94
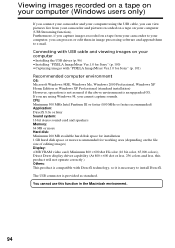
...64 MB or more Hard disk: Minimum 200 MB available hard disk space for installation 1 GB hard disk space or more recommended for Sony" (p. 101) Recommended computer environment OS: Microsoft Windows 98SE, Windows Me, Windows 2000 Professional, Windows XP Home Edition or Windows XP ...environment. 94 Viewing images recorded on a tape on your computer (Windows users only) If you connect your camcorder and your computer using Windows 98, you cannot capture sounds. Furthermore, if you capture images recorded on your computer (USB Streaming function). The USB connector is an upgraded OS.
...64 MB or more Hard disk: Minimum 200 MB available hard disk space for installation 1 GB hard disk space or more recommended for Sony" (p. 101) Recommended computer environment OS: Microsoft Windows 98SE, Windows Me, Windows 2000 Professional, Windows XP Home Edition or Windows XP ...environment. 94 Viewing images recorded on a tape on your computer (Windows users only) If you connect your camcorder and your computer using Windows 98, you cannot capture sounds. Furthermore, if you capture images recorded on your computer (USB Streaming function). The USB connector is an upgraded OS.

Operating Instructions
Page 101
... of the USB cable to the (USB) jack on your camcorder and the other end to the USB connector on your computer. (USB) jack USB connector USB cable (3) Connect the AC power adaptor to your camcorder and then to a wall outlet, and insert a cassette into your computer (Windows users only) Capturing images with "PIXELA ImageMixer Ver.1.0 for Sony" To use...
... of the USB cable to the (USB) jack on your camcorder and the other end to the USB connector on your computer. (USB) jack USB connector USB cable (3) Connect the AC power adaptor to your camcorder and then to a wall outlet, and insert a cassette into your computer (Windows users only) Capturing images with "PIXELA ImageMixer Ver.1.0 for Sony" To use...
Operating Instructions
Page 103
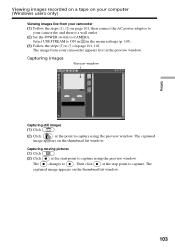
... (1) Click . (2) Click at the start point to capture using the preview window. Select USB STREAM to ON in in the preview window. The changes to capture. The captured image appears on the thumbnail list window. Then click at the point to capture using the preview window. The image from your camcorder (1) Follow the steps (1), (2) on page 101...
... (1) Click . (2) Click at the start point to capture using the preview window. Select USB STREAM to ON in in the preview window. The changes to capture. The captured image appears on the thumbnail list window. Then click at the point to capture using the preview window. The image from your camcorder (1) Follow the steps (1), (2) on page 101...
Operating Instructions
Page 104
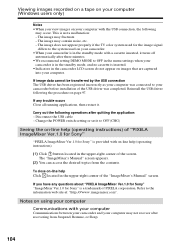
..."PIXELA ImageMixer Ver.1.0 for Sony" "ImageMixer Ver.1.0 for Sony" is a trademark of "PIXELA ImageMixer Ver.1.0 for Sony" "PIXELA ImageMixer Ver.1.0 for the image signal differs to the system used for Sony" is in the camcorder LCD screen do not appear on images that are captured into your computer. Change ...site at: "http://www.imagemixer.com". To close on page 97. This is inserted. •Indicators in the standby mode with the USB connection, the following the procedure on -line help (operating instructions). (1) Click button located in the upper-right corner of the screen. ...
..."PIXELA ImageMixer Ver.1.0 for Sony" "ImageMixer Ver.1.0 for Sony" is a trademark of "PIXELA ImageMixer Ver.1.0 for Sony" "PIXELA ImageMixer Ver.1.0 for the image signal differs to the system used for Sony" is in the camcorder LCD screen do not appear on images that are captured into your computer. Change ...site at: "http://www.imagemixer.com". To close on page 97. This is inserted. •Indicators in the standby mode with the USB connection, the following the procedure on -line help (operating instructions). (1) Click button located in the upper-right corner of the screen. ...
Operating Instructions
Page 113
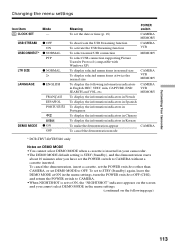
...inserted. To set the POWER switch to ON, the "NIGHTSHOT" indicator appears on the screen and you cannot select DEMO MODE in your camcorder. •The DEMO MODE default setting is inserted in the menu settings. (continued on DEMO MODE •You cannot select DEMO MODE ...mode POWER switch CAMERA MEMORY CAMERA VCR MEMORY CAMERA VCR MEMORY CAMERA VCR MEMORY CAMERA * DCR-TRV740/TRV840 only Notes on the following information indicators in English: REC, STBY, min, CAPTURE, END SEARCH and VOL, etc. USB STREAM z OFF ON USBCONNECT* z NORMAL PTP LTR SIZE LANGUAGE z NORMAL 2× z...
...inserted. To set the POWER switch to ON, the "NIGHTSHOT" indicator appears on the screen and you cannot select DEMO MODE in your camcorder. •The DEMO MODE default setting is inserted in the menu settings. (continued on DEMO MODE •You cannot select DEMO MODE ...mode POWER switch CAMERA MEMORY CAMERA VCR MEMORY CAMERA VCR MEMORY CAMERA VCR MEMORY CAMERA * DCR-TRV740/TRV840 only Notes on the following information indicators in English: REC, STBY, min, CAPTURE, END SEARCH and VOL, etc. USB STREAM z OFF ON USBCONNECT* z NORMAL PTP LTR SIZE LANGUAGE z NORMAL 2× z...
Operating Instructions
Page 135
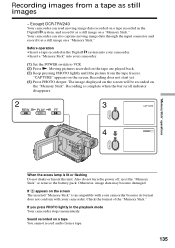
...The image displayed on the screen will be recorded on the screen. If you press PHOTO lightly in the Digital8 system into your camcorder. •Insert a "Memory Stick" into your camcorder. "CAPTURE" appears on the "Memory Stick". Recording is complete when the bar scroll indicator disappears. 2 REW PLAY FF... the "Memory Stick" or remove the battery pack. Recording images from a tape. 135 Except DCR-TRV240 Your camcorder can also capture moving image data recorded on a tape recorded in the Digital8 system, and record it as a still image on the tape are played back. (3) Keep pressing...
...The image displayed on the screen will be recorded on the screen. If you press PHOTO lightly in the Digital8 system into your camcorder. •Insert a "Memory Stick" into your camcorder. "CAPTURE" appears on the "Memory Stick". Recording is complete when the bar scroll indicator disappears. 2 REW PLAY FF... the "Memory Stick" or remove the battery pack. Recording images from a tape. 135 Except DCR-TRV240 Your camcorder can also capture moving image data recorded on a tape recorded in the Digital8 system, and record it as a still image on the tape are played back. (3) Keep pressing...

Operating Instructions
Page 138
... your camcorder. (1) Set the POWER switch to VCR. (2) Press MENU to display the menu settings. (3) Turn the SEL/PUSH EXEC dial to select PHOTO SAVE in , then press the dial. END is displayed. Except DCR-TRV240 Using the search function, you can automatically capture only still images from tapes recorded in the Digital8 system...
... your camcorder. (1) Set the POWER switch to VCR. (2) Press MENU to display the menu settings. (3) Turn the SEL/PUSH EXEC dial to select PHOTO SAVE in , then press the dial. END is displayed. Except DCR-TRV240 Using the search function, you can automatically capture only still images from tapes recorded in the Digital8 system...
Operating Instructions
Page 142
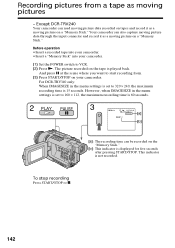
...:43 320REC0:03 [15sec] BBB [a] [b] [a]: The recording time can also capture moving picture data through the input connector and record it as moving picture on a "Memory Stick." Your camcorder can be recorded on the "Memory Stick." [b]: This indicator is 15 seconds. For DCR-TRV340 only: When IMAGESIZE in the menu settings is set to...
...:43 320REC0:03 [15sec] BBB [a] [b] [a]: The recording time can also capture moving picture data through the input connector and record it as moving picture on a "Memory Stick." Your camcorder can be recorded on the "Memory Stick." [b]: This indicator is 15 seconds. For DCR-TRV340 only: When IMAGESIZE in the menu settings is set to...

Operating Instructions
Page 197
... the power cord, pull it away from the wall outlet when you use this function, dub the image into a Digital8 or DV tape first, and then input it into your camcorder to remove dust. This is not a malfunction. •Do not place the unit in locations that are not using...;Do not let sand get into your computer When inputting the image recorded by the plug. To use your camcorder is in a dusty place, protect it from coming into Sony VAIO The Program Capture function of the connecting section. Vibrating 197 If there are fingerprints on a sandy beach or in use . ...
... the power cord, pull it away from the wall outlet when you use this function, dub the image into a Digital8 or DV tape first, and then input it into your camcorder to remove dust. This is not a malfunction. •Do not place the unit in locations that are not using...;Do not let sand get into your computer When inputting the image recorded by the plug. To use your camcorder is in a dusty place, protect it from coming into Sony VAIO The Program Capture function of the connecting section. Vibrating 197 If there are fingerprints on a sandy beach or in use . ...


