Operating Instructions
Page 3
...if not installed and used with this equipment in a particular installation. Consult the dealer or an experienced radio/TV technician for a digital device pursuant to correct the interference by turning the equipment off and on a circuit different from that interference will not occur in order...the limits for a Class B digital device, pursuant to Part 15 of the FCC Rules. Note: This equipment has been tested and found to comply with Canadian ICES-003. 3 Increase the separation between the equipment and receiver. - The shielded interface cable supplied with this equipment does ...
...if not installed and used with this equipment in a particular installation. Consult the dealer or an experienced radio/TV technician for a digital device pursuant to correct the interference by turning the equipment off and on a circuit different from that interference will not occur in order...the limits for a Class B digital device, pursuant to Part 15 of the FCC Rules. Note: This equipment has been tested and found to comply with Canadian ICES-003. 3 Increase the separation between the equipment and receiver. - The shielded interface cable supplied with this equipment does ...

Operating Instructions
Page 4
... Capturing images on your computer •Using with an analog video unit and your computer (p. 81) •Viewing images recorded on "Memory Stick"s using the USB cable (p. 139) Other uses Functions to adjust exposure in the recording mode •Back light (p. 25) •NightShot/Super ...settings.) •Fader (p. 43) •Picture effect (p. 46) •Digital effect (p. 47) •Digital program editing (p. 70) •Title (p. 91, 94) •MEMORY MIX (p. 129) Functions to give a natural appearance to your recordings •Sports lesson mode (p. 50) •Landscape mode (p. 50) ...
... Capturing images on your computer •Using with an analog video unit and your computer (p. 81) •Viewing images recorded on "Memory Stick"s using the USB cable (p. 139) Other uses Functions to adjust exposure in the recording mode •Back light (p. 25) •NightShot/Super ...settings.) •Fader (p. 43) •Picture effect (p. 46) •Digital effect (p. 47) •Digital program editing (p. 70) •Title (p. 91, 94) •MEMORY MIX (p. 129) Functions to give a natural appearance to your recordings •Sports lesson mode (p. 50) •Landscape mode (p. 50) ...

Operating Instructions
Page 5
...Commander (2) (p. 184) 4 NP-FM50 battery pack (1) (p. 12, 13) 5 A/V connecting cable (1) (p. 33, 68) 6 Shoulder strap (1) (p. 179) 7 Lens cap (1) (p. 19) 8 USB cable (1) (p. 140) 9 "Memory Stick" (1) (p. 106) q; Getting started Checking supplied accessories... Make sure that the following accessories are supplied with your camcorder. 1 2 3 4 5 6 7 8 9 q; CD-ROM (SPVD-004 USB Driver) (1) (p. 140) qa Lens hood (1) (p. 22) Contents of the recording cannot be compensated if recording...
...Commander (2) (p. 184) 4 NP-FM50 battery pack (1) (p. 12, 13) 5 A/V connecting cable (1) (p. 33, 68) 6 Shoulder strap (1) (p. 179) 7 Lens cap (1) (p. 19) 8 USB cable (1) (p. 140) 9 "Memory Stick" (1) (p. 106) q; Getting started Checking supplied accessories... Make sure that the following accessories are supplied with your camcorder. 1 2 3 4 5 6 7 8 9 q; CD-ROM (SPVD-004 USB Driver) (1) (p. 140) qa Lens hood (1) (p. 22) Contents of the recording cannot be compensated if recording...
Operating Instructions
Page 33
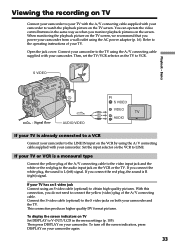
...A/V connecting cable to the video input jack and the white or the red plug to the audio input jack on the VCR or the TV. Basics : Signal flow AUDIO/VIDEO IN S VIDEO VIDEO TV AUDIO If your camcorder. Set the input selector on the TV to VCR. Viewing the recording on TV... Connect your camcorder to your TV with the A/V connecting cable supplied with your camcorder. With this connection, you connect...
...A/V connecting cable to the video input jack and the white or the red plug to the audio input jack on the VCR or the TV. Basics : Signal flow AUDIO/VIDEO IN S VIDEO VIDEO TV AUDIO If your camcorder. Set the input selector on the TV to VCR. Viewing the recording on TV... Connect your camcorder to your TV with the A/V connecting cable supplied with your camcorder. With this connection, you connect...

Operating Instructions
Page 40
... Photo recording Printing the still image You can print a still image by using the A/V connecting cable supplied with S video input Use the S video connecting cable (optional) to the video input of the video printer. Connect it to the AUDIO/VIDEO jack and connect the yellow plug of the cable to obtain high-quality output. S VIDEO Video printer LINE IN VIDEO S VIDEO AUDIO/VIDEO : Signal...
... Photo recording Printing the still image You can print a still image by using the A/V connecting cable supplied with S video input Use the S video connecting cable (optional) to the video input of the video printer. Connect it to the AUDIO/VIDEO jack and connect the yellow plug of the cable to obtain high-quality output. S VIDEO Video printer LINE IN VIDEO S VIDEO AUDIO/VIDEO : Signal...

Operating Instructions
Page 42
...wide-screen TV [c] is compatible with video signals. BOUNCE During recording You cannot select or cancel the wide mode. In the wide mode You cannot select the following functions: - When you connect your camcorder to other equipment using an A/V 42 connecting cable. Using the wide mode You can ...9WIDE). If you set the screen mode of the wide-screen TV to the full mode, you connect your camcorder to the S video jack on the TV. you can record a 16:9 wide picture to watch pictures of normal images [d]. [a] [b] 16:9WIDE [c] [d] In the standby mode, set ...
...wide-screen TV [c] is compatible with video signals. BOUNCE During recording You cannot select or cancel the wide mode. In the wide mode You cannot select the following functions: - When you connect your camcorder to other equipment using an A/V 42 connecting cable. Using the wide mode You can ...9WIDE). If you set the screen mode of the wide-screen TV to the full mode, you connect your camcorder to the S video jack on the TV. you can record a 16:9 wide picture to watch pictures of normal images [d]. [a] [b] 16:9WIDE [c] [d] In the standby mode, set ...
Operating Instructions
Page 68
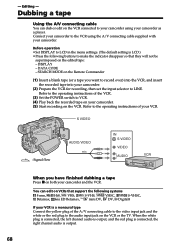
... 8 mm, Hi8, VHS, S-VHS, VHSC, S-VHSC, Betamax, ED Betamax, mini DV, DV, Digital8 If your camcorder. (5) Start recording on the edited tape: - You can dub or edit on the VCR or the TV. Before operation • Set DISPLAY to LCD in... the operating instructions of your camcorder as a player. Refer to your camcorder using the A/V connecting cable supplied with your camcorder and the VCR. Editing - - DISPLAY - S VIDEO : Signal flow AUDIO/VIDEO IN S VIDEO VIDEO AUDIO When you have finished dubbing a tape Press x on the Remote Commander (1) Insert a blank...
... 8 mm, Hi8, VHS, S-VHS, VHSC, S-VHSC, Betamax, ED Betamax, mini DV, DV, Digital8 If your camcorder. (5) Start recording on the edited tape: - You can dub or edit on the VCR or the TV. Before operation • Set DISPLAY to LCD in... the operating instructions of your camcorder as a player. Refer to your camcorder using the A/V connecting cable supplied with your camcorder and the VCR. Editing - - DISPLAY - S VIDEO : Signal flow AUDIO/VIDEO IN S VIDEO VIDEO AUDIO When you have finished dubbing a tape Press x on the Remote Commander (1) Insert a blank...

Operating Instructions
Page 69
... i.LINK cable (DV connecting cable) Simply connect the i.LINK cable (DV connecting cable) (optional) to DV IN/OUT and to the DV input position if the VCR is equipped with the DV IN/OUT jack The recorded picture becomes rough. Set the input selector to -digital connection, video and audio... signals are transmitted in digital form for high-quality editing. You cannot dub the titles, display indicators or the contents of the A/V connecting cable. The following functions do not...
... i.LINK cable (DV connecting cable) Simply connect the i.LINK cable (DV connecting cable) (optional) to DV IN/OUT and to the DV input position if the VCR is equipped with the DV IN/OUT jack The recorded picture becomes rough. Set the input selector to -digital connection, video and audio... signals are transmitted in digital form for high-quality editing. You cannot dub the titles, display indicators or the contents of the A/V connecting cable. The following functions do not...

Operating Instructions
Page 70
... without operating the VCR. When you dub using an i.LINK cable (DV connecting cable) With digital-to IR in digital form for operation (p. 71, 75). Set CONTROL to -digital connection, video and audio signals are transmitted in the menu settings of your camcorder . • When editing digital video, the operation signals cannot be selected by frame. Step 2 Setting...
... without operating the VCR. When you dub using an i.LINK cable (DV connecting cable) With digital-to IR in digital form for operation (p. 71, 75). Set CONTROL to -digital connection, video and audio signals are transmitted in the menu settings of your camcorder . • When editing digital video, the operation signals cannot be selected by frame. Step 2 Setting...
Operating Instructions
Page 71
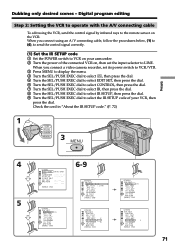
...video camera recorder, set the input selector to LINE. I N " " CUT-OUT " I R SETUP P AUS EMODE I TSET CONTROL ADJ TEST " CUT- I N " " CUT-OUT " I R SETUP P AUS EMODE I R TEST RETURN [ MENU ] : END OTHERS ED I R TEST RETURN [ MENU ] : END IR i . I N " " CUT-OUT " I R SETUP 3 P AUS EMODE I R TEST RETURN [ MENU ] : END OTHERS ED I TSET CONTROL I TSET CONTROL ADJ TEST " CUT- Digital... program editing Step 2: Setting the VCR to operate with the A/V connecting cable To edit using an A/V connecting cable, follow the procedures below, (1) to...
...video camera recorder, set the input selector to LINE. I N " " CUT-OUT " I R SETUP P AUS EMODE I TSET CONTROL ADJ TEST " CUT- I N " " CUT-OUT " I R SETUP P AUS EMODE I R TEST RETURN [ MENU ] : END OTHERS ED I R TEST RETURN [ MENU ] : END IR i . I N " " CUT-OUT " I R SETUP 3 P AUS EMODE I R TEST RETURN [ MENU ] : END OTHERS ED I TSET CONTROL I TSET CONTROL ADJ TEST " CUT- Digital... program editing Step 2: Setting the VCR to operate with the A/V connecting cable To edit using an A/V connecting cable, follow the procedures below, (1) to...

Operating Instructions
Page 73
...REC RETURN PB [ MENU ] : END OTHERS ED I TSET CONTROL ADJ TEST " CUT- To cancel recording pause: - Infrared rays emitter Remote sensor A/V connecting cable 73 Digital program editing (2) Setting the modes to cancel the recording pause on the VCR 1 Turn the SEL/PUSH EXEC dial to select PAUSEMODE, then press the dial.... 2 Turn the SEL/PUSH EXEC dial to select the mode to cancel recording pause on your ...
...REC RETURN PB [ MENU ] : END OTHERS ED I TSET CONTROL ADJ TEST " CUT- To cancel recording pause: - Infrared rays emitter Remote sensor A/V connecting cable 73 Digital program editing (2) Setting the modes to cancel the recording pause on the VCR 1 Turn the SEL/PUSH EXEC dial to select PAUSEMODE, then press the dial.... 2 Turn the SEL/PUSH EXEC dial to select the mode to cancel recording pause on your ...

Operating Instructions
Page 75
...: END OTHERS ED I R TEST RETURN [ MENU ] : END IR i . Digital program editing Step 2: Setting the VCR to operate with the i.LINK cable (DV connecting cable) When you connect a digital video camera recorder, set the input selector to select i.LINK, then press the dial. 1 POWER VCR... OFF(CHG) CAMERA MEMORY 3 MENU 5 6,7 OTHERS DATA CODE BEEP COMMA ND E R D I SPLAY V I DEO ...
...: END OTHERS ED I R TEST RETURN [ MENU ] : END IR i . Digital program editing Step 2: Setting the VCR to operate with the i.LINK cable (DV connecting cable) When you connect a digital video camera recorder, set the input selector to select i.LINK, then press the dial. 1 POWER VCR... OFF(CHG) CAMERA MEMORY 3 MENU 5 6,7 OTHERS DATA CODE BEEP COMMA ND E R D I SPLAY V I DEO ...

Operating Instructions
Page 79
... press the dial. The PROGRAM indicator changes to select EXECUTE, then press the dial. Digital program editing Erasing the program you use a digital video camera recorder, set program mark flashes, then the setting is complete. The program mark flashes. When...Digital program editing. Erasing all programs Select RETURN in memory until the tape is a blank portion between IN and OUT on a blank portion of the first program, then start dubbing. To cancel erasing all programs (1) Select VIDEO EDIT in step 2. To cancel a program you use an i.LINK cable (DV connecting cable...
... press the dial. The PROGRAM indicator changes to select EXECUTE, then press the dial. Digital program editing Erasing the program you use a digital video camera recorder, set program mark flashes, then the setting is complete. The program mark flashes. When...Digital program editing. Erasing all programs Select RETURN in memory until the tape is a blank portion between IN and OUT on a blank portion of the first program, then start dubbing. To cancel erasing all programs (1) Select VIDEO EDIT in step 2. To cancel a program you use an i.LINK cable (DV connecting cable...

Operating Instructions
Page 80
... camcorder stops when the dubbing is set i.LINK.) 80 The program to VIDEO EDIT in the menu settings. Then the display returns to operate the Digital program editing has not been made. - Press MENU to cancel recording pause is not correct. (When IR is not turned on the VCR .... - i.LINK is selected but an i.LINK cable (DV connecting cable) is selected.) - The power of the connected VCR is selected.) NOT READY appears on the cassette is complete. Digital program editing To stop dubbing during editing Press x using the video operation buttons. The button to end the program ...
... camcorder stops when the dubbing is set i.LINK.) 80 The program to VIDEO EDIT in the menu settings. Then the display returns to operate the Digital program editing has not been made. - Press MENU to cancel recording pause is not correct. (When IR is not turned on the VCR .... - i.LINK is selected but an i.LINK cable (DV connecting cable) is selected.) - The power of the connected VCR is selected.) NOT READY appears on the cassette is complete. Digital program editing To stop dubbing during editing Press x using the video operation buttons. The button to end the program ...

Operating Instructions
Page 81
...record or capture the video output via your camcorder when the video tapes includes copyright protection signals such as ID-2 system. •You can exchange video signals. •Depending on your computer. Depending on the analog video unit, the image may not be able to install software which you convert analog video signals into digital video... signals via your camcorder. Notes •You need to output the images correctly when you use. Editing Using with an S video cable (optional) instead of the A/V connecting cable (supplied...
...record or capture the video output via your camcorder when the video tapes includes copyright protection signals such as ID-2 system. •You can exchange video signals. •Depending on your computer. Depending on the analog video unit, the image may not be able to install software which you convert analog video signals into digital video... signals via your camcorder. Notes •You need to output the images correctly when you use. Editing Using with an S video cable (optional) instead of the A/V connecting cable (supplied...

Operating Instructions
Page 82
...press X at the scene where you record a tape from other Sony VCRs to start recording from a TV. Select a TV program if you want to record over) into the VCR. (2) Set the POWER switch to start recording from a TV that has video/ audio outputs. Use your camcorder....then immediately press X on your camcorder and the VCR. Recording video or TV programs Using the A/V connecting cable You can record a tape from another Sony VCR in the commander mode VTR 2. S VIDEO 3 REC PAUSE OUT S VIDEO VIDEO AUDIO AUDIO/ VIDEO : Signal flow When you have finished dubbing a tape Press...
...press X at the scene where you record a tape from other Sony VCRs to start recording from a TV. Select a TV program if you want to record over) into the VCR. (2) Set the POWER switch to start recording from a TV that has video/ audio outputs. Use your camcorder....then immediately press X on your camcorder and the VCR. Recording video or TV programs Using the A/V connecting cable You can record a tape from another Sony VCR in the commander mode VTR 2. S VIDEO 3 REC PAUSE OUT S VIDEO VIDEO AUDIO AUDIO/ VIDEO : Signal flow When you have finished dubbing a tape Press...

Operating Instructions
Page 83
... the yellow (video) plug of the DV products. Using the i.LINK cable (DV connecting cable) Simply connect the i.LINK cable (DV connecting cable) (optional) to DV IN/OUT and to DV OUT of the A/V connecting cable. Before operation Set DISPLAY to LCD in digital form for high-quality editing. With this connection, you want to record over) into...
... the yellow (video) plug of the DV products. Using the i.LINK cable (DV connecting cable) Simply connect the i.LINK cable (DV connecting cable) (optional) to DV IN/OUT and to DV OUT of the A/V connecting cable. Before operation Set DISPLAY to LCD in digital form for high-quality editing. With this connection, you want to record over) into...

Operating Instructions
Page 84
... paper. And when you have finished dubbing a tape Press x on both your camcorder and the VCR. If you want to start recording from other Sony VCRs to distinguish your camcorder from . And in the commander mode VTR 2, we recommend changing the commander mode or covering the sensor ... 1, 2 and 3 are used to avoid remote control misoperation. Note on the screen. The DV IN indicator may be uneven. Recording video or TV programs When you play back the picture using the i.LINK cable (DV connecting cable) During digital editing The color of the VCR with the DV IN/OUT jack The...
... paper. And when you have finished dubbing a tape Press x on both your camcorder and the VCR. If you want to start recording from other Sony VCRs to distinguish your camcorder from . And in the commander mode VTR 2, we recommend changing the commander mode or covering the sensor ... 1, 2 and 3 are used to avoid remote control misoperation. Note on the screen. The DV IN indicator may be uneven. Recording video or TV programs When you play back the picture using the i.LINK cable (DV connecting cable) During digital editing The color of the VCR with the DV IN/OUT jack The...

Operating Instructions
Page 88
... you make all the connections The audio input to the AUDIO/VIDEO jack Audio equipment LINE OUT L R AUDIO L AUDIO R Do not connect the video (yellow) plug. Audio dubbing Connecting the A/V connecting cable to be recorded will take precedence over others in the following order. •MIC... (PLUG IN POWER) jack •Intelligent accessory shoe •AUDIO/VIDEO jack •Built-in microphone 88 Note...
... you make all the connections The audio input to the AUDIO/VIDEO jack Audio equipment LINE OUT L R AUDIO L AUDIO R Do not connect the video (yellow) plug. Audio dubbing Connecting the A/V connecting cable to be recorded will take precedence over others in the following order. •MIC... (PLUG IN POWER) jack •Intelligent accessory shoe •AUDIO/VIDEO jack •Built-in microphone 88 Note...

Operating Instructions
Page 90
...where you set the write-protect tab of the tape. If an i.LINK cable (DV connecting cable) (optional) is connected to your camcorder If you add new sound on a tape recorded with another camcorder (including other DCR-TRV30), the sound quality may become worse. If you want to 5. Slide ...the write-protect tab to a recorded tape. To add new sound more precisely Press ...
...where you set the write-protect tab of the tape. If an i.LINK cable (DV connecting cable) (optional) is connected to your camcorder If you add new sound on a tape recorded with another camcorder (including other DCR-TRV30), the sound quality may become worse. If you want to 5. Slide ...the write-protect tab to a recorded tape. To add new sound more precisely Press ...


