Operating Instructions
Page 2
...symbol is intended to alert the user to the presence of rechargeable batteries, call : Sony Customer Information Center 1-800-222-SONY (7669) The number below is very easy to come. For... more information regarding recycling of uninsulated "dangerous voltage" within the product's enclosure that may be producing home video ... questions about this Sony Handycam. Telephone No.: 201-930-6972 This device complies with Part 15 of Conformity Trade Name: SONY Model No.: DCR-TRV18 Responsible Party:Sony Electronics Inc. Operation...
...symbol is intended to alert the user to the presence of rechargeable batteries, call : Sony Customer Information Center 1-800-222-SONY (7669) The number below is very easy to come. For... more information regarding recycling of uninsulated "dangerous voltage" within the product's enclosure that may be producing home video ... questions about this Sony Handycam. Telephone No.: 201-930-6972 This device complies with Part 15 of Conformity Trade Name: SONY Model No.: DCR-TRV18 Responsible Party:Sony Electronics Inc. Operation...
Operating Instructions
Page 6
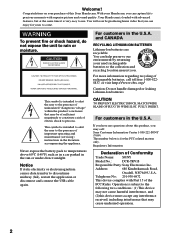
...battery pack 16 Charging the battery pack 17 Connecting to a wall outlet 22 Step 2 Setting the date and time ........ 23 Step 3 Inserting a cassette 25 Recording - Recording on a "Memory Stick" - Basics Playing back a tape 38 To display the screen indicators - Digital... SEARCH ..... 70 Searching a recording by frame recording - Memory Photo recording ......... 112 Recording an image from a VCR - NightShot/Super NightShot/ Color Slow Shutter 34 Self-timer recording (except DCR-TRV16 36 Checking recordings - Recording on tapes 78 Recording video or TV programs ....... 89 ...
...battery pack 16 Charging the battery pack 17 Connecting to a wall outlet 22 Step 2 Setting the date and time ........ 23 Step 3 Inserting a cassette 25 Recording - Recording on a "Memory Stick" - Basics Playing back a tape 38 To display the screen indicators - Digital... SEARCH ..... 70 Searching a recording by frame recording - Memory Photo recording ......... 112 Recording an image from a VCR - NightShot/Super NightShot/ Color Slow Shutter 34 Self-timer recording (except DCR-TRV16 36 Checking recordings - Recording on tapes 78 Recording video or TV programs ....... 89 ...
Operating Instructions
Page 7
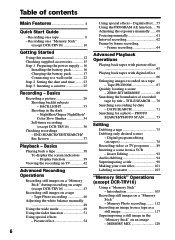
... About the "InfoLITHIUM" battery pack 197 About i.LINK 199 Using your computer - MPEG movie recording 125 Recording pictures from a tape as a moving pictures - Memory Photo playback .......... 137 Viewing moving picture - For Windows users 157 Viewing images recorded on a "Memory Stick... images recorded on "Memory Stick"s to your computer - Digital program editing (on your computer - SLIDE SHOW 147 Preventing accidental erasure - Image protection 148 Deleting images - For Macintosh users (except DCR-TRV16 173 Capturing images from an analog video unit ...
... About the "InfoLITHIUM" battery pack 197 About i.LINK 199 Using your computer - MPEG movie recording 125 Recording pictures from a tape as a moving pictures - Memory Photo playback .......... 137 Viewing moving picture - For Windows users 157 Viewing images recorded on a "Memory Stick... images recorded on "Memory Stick"s to your computer - Digital program editing (on your computer - SLIDE SHOW 147 Preventing accidental erasure - Image protection 148 Deleting images - For Macintosh users (except DCR-TRV16 173 Capturing images from an analog video unit ...
Operating Instructions
Page 8
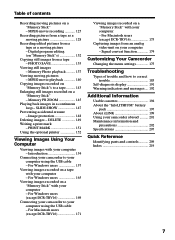
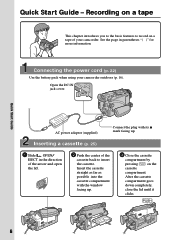
Recording on a tape This chapter introduces you to the basic features to insert the cassette. Inserting a cassette (p. 25) 1 Slide OPEN/ EJECT in parentheses "( )" for more information. ... compartment with its v mark facing up . 3 Close the cassette compartment by pressing on a tape of the cassette back to record on the cassette compartment. Connecting the power cord (p. 22) Use the battery pack when using your camcorder. See the page in the direction of the arrow and open the lid. 2 Push the...
Recording on a tape This chapter introduces you to the basic features to insert the cassette. Inserting a cassette (p. 25) 1 Slide OPEN/ EJECT in parentheses "( )" for more information. ... compartment with its v mark facing up . 3 Close the cassette compartment by pressing on a tape of the cassette back to record on the cassette compartment. Connecting the power cord (p. 22) Use the battery pack when using your camcorder. See the page in the direction of the arrow and open the lid. 2 Push the...

Operating Instructions
Page 9
...lens to off. POWER VCR OFF(CHG) CAMERA MEMORY Viewfinder When the LCD panel is closed, use the viewfinder with your camcorder, the clock setting is set the clock before recording (p. 23). Your camcorder starts recording. When you want to record the date and time for a picture, set... to your camcorder by holding the viewfinder, the LCD panel, or the battery pack. 9 Quick Start Guide Recording a picture (p. 26) 1 Remove the lens ...
...lens to off. POWER VCR OFF(CHG) CAMERA MEMORY Viewfinder When the LCD panel is closed, use the viewfinder with your camcorder, the clock setting is set the clock before recording (p. 23). Your camcorder starts recording. When you want to record the date and time for a picture, set... to your camcorder by holding the viewfinder, the LCD panel, or the battery pack. 9 Quick Start Guide Recording a picture (p. 26) 1 Remove the lens ...
Operating Instructions
Page 10
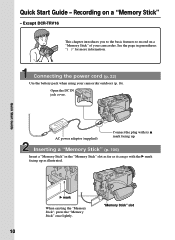
... the B mark facing up . Recording on a "Memory Stick" of your camcorder outdoors (p. 16). Connecting the power cord (p. 22) Use the battery pack when using your camcorder. B mark When ejecting the "Memory Stick", press the "Memory Stick" once lightly. Except DCR-TRV16 This chapter introduces you to ...the basic features to record on a "Memory Stick" - See the page in the ...
... the B mark facing up . Recording on a "Memory Stick" of your camcorder outdoors (p. 16). Connecting the power cord (p. 22) Use the battery pack when using your camcorder. B mark When ejecting the "Memory Stick", press the "Memory Stick" once lightly. Except DCR-TRV16 This chapter introduces you to ...the basic features to record on a "Memory Stick" - See the page in the ...

Operating Instructions
Page 11
... on the screen. 2 Set the POWER switch to off. If you purchase your camcorder by holding the viewfinder, the LCD panel or the battery pack. 11 NOTE Do not pick up your camcorder, the clock setting is set to select the desired image. Make sure that the LOCK ...switch is set the clock before recording (p. 23). PLAY Press MEMORY -/+ to the left (unlock) position. LOCK switch POWER VCR OFF(CHG) CAMERA MEMORY Quick Start Guide Viewfinder When the LCD panel is displayed. The picture appears on a "Memory...
... on the screen. 2 Set the POWER switch to off. If you purchase your camcorder by holding the viewfinder, the LCD panel or the battery pack. 11 NOTE Do not pick up your camcorder, the clock setting is set to select the desired image. Make sure that the LOCK ...switch is set the clock before recording (p. 23). PLAY Press MEMORY -/+ to the left (unlock) position. LOCK switch POWER VCR OFF(CHG) CAMERA MEMORY Quick Start Guide Viewfinder When the LCD panel is displayed. The picture appears on a "Memory...
Operating Instructions
Page 15
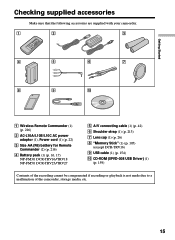
... AA (R6) battery for Remote Commander (2) (p. 216) 4 Battery pack (1) (p. 16, 17) NP-FM30: DCR-TRV16/TRV18 NP-FM50: DCR-TRV25/TRV27 5 A/V connecting cable (1) (p. 42) 6 Shoulder strap (1) (p. 213) 7 Lens cap (1) (p. 26) 8 "Memory Stick" (1) (p. 105) (except DCR-TRV16) 9 USB cable (1) (p. 154) 0 CD-ROM (SPVD-008 USB Driver) (1) (p. 159) Contents of the recording cannot be compensated if recording or playback is...
... AA (R6) battery for Remote Commander (2) (p. 216) 4 Battery pack (1) (p. 16, 17) NP-FM30: DCR-TRV16/TRV18 NP-FM50: DCR-TRV25/TRV27 5 A/V connecting cable (1) (p. 42) 6 Shoulder strap (1) (p. 213) 7 Lens cap (1) (p. 26) 8 "Memory Stick" (1) (p. 105) (except DCR-TRV16) 9 USB cable (1) (p. 154) 0 CD-ROM (SPVD-008 USB Driver) (1) (p. 159) Contents of the recording cannot be compensated if recording or playback is...
Operating Instructions
Page 16
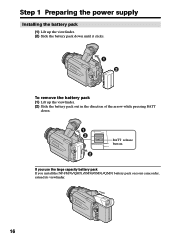
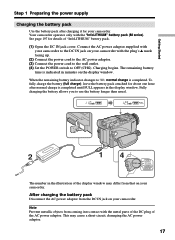
Step 1 Preparing the power supply Installing the battery pack (1) Lift up the viewfinder. (2) Slide the battery pack down until it clicks. 1 2 To remove the battery pack (1) Lift up the viewfinder. (2) Slide the battery pack out in the direction of the arrow while pressing BATT down. 1 2 2 BATT release button If you use the large capacity battery pack If you install the NP-FM70/QM71/FM90/FM91/QM91 battery pack on your camcorder, extend its viewfinder. 16
Step 1 Preparing the power supply Installing the battery pack (1) Lift up the viewfinder. (2) Slide the battery pack down until it clicks. 1 2 To remove the battery pack (1) Lift up the viewfinder. (2) Slide the battery pack out in the direction of the arrow while pressing BATT down. 1 2 2 BATT release button If you use the large capacity battery pack If you install the NP-FM70/QM71/FM90/FM91/QM91 battery pack on your camcorder, extend its viewfinder. 16
Operating Instructions
Page 17
... power cord to the wall outlet. (4) Set the POWER switch to use the battery longer than usual. 2 14 VCR POWER OFF(CHG) CAMERA MEMORY The number in the display window. To fully charge the battery (full charge), leave the battery pack attached for about one hour after charging it for details of the AC...
... power cord to the wall outlet. (4) Set the POWER switch to use the battery longer than usual. 2 14 VCR POWER OFF(CHG) CAMERA MEMORY The number in the display window. To fully charge the battery (full charge), leave the battery pack attached for about one hour after charging it for details of the AC...

Operating Instructions
Page 18
... recording using the AC power adaptor, if any trouble occurs with this unit, disconnect the plug from the wall outlet as soon as possible to charge an empty battery pack. The charging time may increase if the battery's temperature is extremely high or low because of the ambient temperature. *1) DCR-TRV16/TRV18 supplied *2) DCR-TRV25/TRV27...
... recording using the AC power adaptor, if any trouble occurs with this unit, disconnect the plug from the wall outlet as soon as possible to charge an empty battery pack. The charging time may increase if the battery's temperature is extremely high or low because of the ambient temperature. *1) DCR-TRV16/TRV18 supplied *2) DCR-TRV25/TRV27...
Operating Instructions
Page 19
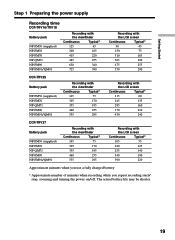
... 75 305 170 355 195 460 255 535 295 Recording with the LCD screen Continuous Typical* 115 60 245 135 285 160 370 210 430 240 DCR-TRV27 Battery pack NP-FM50 (supplied) NP-FM70 NP-QM71 NP-FM90 NP-FM91/QM91 Recording with the viewfinder Continuous Typical* 145 75 305 170... 355 195 460 255 535 295 Recording with the LCD screen Continuous Typical* 105 55 220 125...
... 75 305 170 355 195 460 255 535 295 Recording with the LCD screen Continuous Typical* 115 60 245 135 285 160 370 210 430 240 DCR-TRV27 Battery pack NP-FM50 (supplied) NP-FM70 NP-QM71 NP-FM90 NP-FM91/QM91 Recording with the viewfinder Continuous Typical* 145 75 305 170... 355 195 460 255 535 295 Recording with the LCD screen Continuous Typical* 105 55 220 125...
Operating Instructions
Page 20
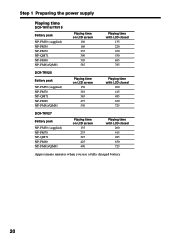
... NP-FM90 NP-FM91/QM91 Playing time on LCD screen 150 310 365 475 550 Playing time with LCD closed 200 415 485 630 725 DCR-TRV27 Battery pack NP-FM50 (supplied) NP-FM70 NP-QM71 NP-FM90 NP-FM91/QM91 Playing time on LCD screen 135 275 325 425 490 Playing time...
... NP-FM90 NP-FM91/QM91 Playing time on LCD screen 150 310 365 475 550 Playing time with LCD closed 200 415 485 630 725 DCR-TRV27 Battery pack NP-FM50 (supplied) NP-FM70 NP-QM71 NP-FM90 NP-FM91/QM91 Playing time on LCD screen 135 275 325 425 490 Playing time...

Operating Instructions
Page 21
... shorter if you use your camcorder in an ambient temperature of Sony Corporation. 21 TM SERIES "InfoLITHIUM" is a lithium ion battery pack that the indication on the remaining battery time indicator is correct. Getting Started Step 1 Preparing the power supply Note Approximate recording time and continuous playing time at 25 °C (77 °F). The...
... shorter if you use your camcorder in an ambient temperature of Sony Corporation. 21 TM SERIES "InfoLITHIUM" is a lithium ion battery pack that the indication on the remaining battery time indicator is correct. Getting Started Step 1 Preparing the power supply Note Approximate recording time and continuous playing time at 25 °C (77 °F). The...
Operating Instructions
Page 22
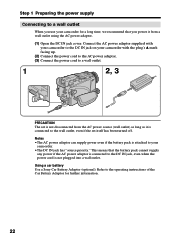
Notes •The AC power adaptor can supply power even if the battery pack is not plugged into a wall outlet. Step 1 Preparing the power supply ... outlet) as long as it is connected to the operating instructions of the Car Battery Adaptor for a long time, we recommend that the battery pack cannot supply any power if the AC power adaptor is connected to the wall... outlet, even if the set itself has been turned off. Using a car battery Use a Sony Car Battery Adaptor (optional). Refer to the DC IN jack, even when the power cord is attached to your camcorder...
Notes •The AC power adaptor can supply power even if the battery pack is not plugged into a wall outlet. Step 1 Preparing the power supply ... outlet) as long as it is connected to the operating instructions of the Car Battery Adaptor for a long time, we recommend that the battery pack cannot supply any power if the AC power adaptor is connected to the wall... outlet, even if the set itself has been turned off. Using a car battery Use a Sony Car Battery Adaptor (optional). Refer to the DC IN jack, even when the power cord is attached to your camcorder...

Operating Instructions
Page 23
... use your camcorder for about four months, the date and time settings may be displayed each time that order. (1) Set the POWER switch to CAMERA or MEMORY (except DCR-TRV16), then press MENU to display the menu settings. (2) Turn the SEL/PUSH EXEC dial to select , then press the dial. (3) Turn the... month, the day, the hour and then the minute, in your camcorder will be cleared from memory (bars may appear) because the built-in rechargeable battery in that you set the date and time. The clock starts to move. (7) Press MENU to adjust the desired year, then press the dial. (5) Set...
... use your camcorder for about four months, the date and time settings may be displayed each time that order. (1) Set the POWER switch to CAMERA or MEMORY (except DCR-TRV16), then press MENU to display the menu settings. (2) Turn the SEL/PUSH EXEC dial to select , then press the dial. (3) Turn the... month, the day, the hour and then the minute, in your camcorder will be cleared from memory (bars may appear) because the built-in rechargeable battery in that you set the date and time. The clock starts to move. (7) Press MENU to adjust the desired year, then press the dial. (5) Set...
Operating Instructions
Page 27
...Remove the battery pack. 27 This is set the POWER switch to prevent battery and tape wear. When you recorded and the...record in the SP and LP modes on one tape. - The battery use the END SEARCH function (p. 37). LOCK switch is to save battery... Recording - Basics Recording a picture Note on one tape or you record using the viewfinder. To start recording, ...recordings in the SP mode and in the LP mode on the LOCK switch (except DCR...record in the standby mode for five minutes while the cassette is slightly shorter than the shooting time using the LCD screen The battery...
...Remove the battery pack. 27 This is set the POWER switch to prevent battery and tape wear. When you recorded and the...record in the SP and LP modes on one tape. - The battery use the END SEARCH function (p. 37). LOCK switch is to save battery... Recording - Basics Recording a picture Note on one tape or you record using the viewfinder. To start recording, ...recordings in the SP mode and in the LP mode on the LOCK switch (except DCR...record in the standby mode for five minutes while the cassette is slightly shorter than the shooting time using the LCD screen The battery...

Operating Instructions
Page 29
... to your eyesight so that the image in the menu settings when using the battery pack (p. 178). Basics Recording a picture Adjusting the brightness of the LCD screen with the viewfinder. Adjusting the viewfinder If you record pictures with the LCD panel closed, check the picture with LCD BRIGHT, then ... using the battery pack (p. 178). 29 Turn the SEL/PUSH EXEC dial to make the menu settings disappear. 2 LCD/VF SET LCD BRIGHT MENU [MENU] : END LCD screen backlight You can change the brightness of the backlight. Set the POWER switch to CAMERA, VCR or MEMORY (except DCR-TRV16). in...
... to your eyesight so that the image in the menu settings when using the battery pack (p. 178). Basics Recording a picture Adjusting the brightness of the LCD screen with the viewfinder. Adjusting the viewfinder If you record pictures with the LCD panel closed, check the picture with LCD BRIGHT, then ... using the battery pack (p. 178). 29 Turn the SEL/PUSH EXEC dial to make the menu settings disappear. 2 LCD/VF SET LCD BRIGHT MENU [MENU] : END LCD screen backlight You can change the brightness of the backlight. Set the POWER switch to CAMERA, VCR or MEMORY (except DCR-TRV16). in...

Operating Instructions
Page 32
...not be displayed accurately depending on the Remote Commander during recording The indicator shows the approximate continuous recording time. You cannot rewrite only the time code. Remaining battery time Cassette memory This appears when using a cassette with...CAMERA and "0:00:00:00" (hours : minutes : seconds : frames) in VCR. When you are not recorded on . Remaining tape indicator The indicator may not be displayed. Remaining battery time indicator during playback (p. 39). 32 Recording a picture Indicators displayed in the recording mode Indicators are recording. Recording...
...not be displayed accurately depending on the Remote Commander during recording The indicator shows the approximate continuous recording time. You cannot rewrite only the time code. Remaining battery time Cassette memory This appears when using a cassette with...CAMERA and "0:00:00:00" (hours : minutes : seconds : frames) in VCR. When you are not recorded on . Remaining tape indicator The indicator may not be displayed. Remaining battery time indicator during playback (p. 39). 32 Recording a picture Indicators displayed in the recording mode Indicators are recording. Recording...

Operating Instructions
Page 40
...in which you are your camcorder's information when you connect your camcorder to be displayed. To resume normal playback, press N. 40 The tape was recorded by a camcorder without the date and time set the POWER switch to reverse the playback direction. The indicator may not be correct, depending on ...noise. - When you close the LCD panel and open it again, it takes about one minute for the correct remaining battery time to the TV. Various playback modes To operate video control buttons, set . To view the picture at slow speed (slow playback) Press y on the TV screen if ...
...in which you are your camcorder's information when you connect your camcorder to be displayed. To resume normal playback, press N. 40 The tape was recorded by a camcorder without the date and time set the POWER switch to reverse the playback direction. The indicator may not be correct, depending on ...noise. - When you close the LCD panel and open it again, it takes about one minute for the correct remaining battery time to the TV. Various playback modes To operate video control buttons, set . To view the picture at slow speed (slow playback) Press y on the TV screen if ...


