Camera Operations Guide
Page 7
...Connecting to a VCR 61 Dubbing to other operating instructions supplied with your camcorder: • Editing images with your computer cComputer Applications Guide 7 Digital program editing ( TRV260/265 69 For TRV260/265: Refer also to another tape 63 Dubbing a tape easily -...TRV260/265 68 Dubbing selected scenes from a tape - PROGRAM AE/P EFFECT, etc 44 Using the (CAMERA SET) menu - 16:9 WIDE/STEADYSHOT, etc 47 Using the (PLAYER SET)/ (VCR SET) menu - Advanced operations Customizing Your Camcorder Changing the menu settings 43 Using the (MANUAL SET) menu - CLOCK SET/USB STREAM...
...Connecting to a VCR 61 Dubbing to other operating instructions supplied with your camcorder: • Editing images with your computer cComputer Applications Guide 7 Digital program editing ( TRV260/265 69 For TRV260/265: Refer also to another tape 63 Dubbing a tape easily -...TRV260/265 68 Dubbing selected scenes from a tape - PROGRAM AE/P EFFECT, etc 44 Using the (CAMERA SET) menu - 16:9 WIDE/STEADYSHOT, etc 47 Using the (PLAYER SET)/ (VCR SET) menu - Advanced operations Customizing Your Camcorder Changing the menu settings 43 Using the (MANUAL SET) menu - CLOCK SET/USB STREAM...
Camera Operations Guide
Page 17
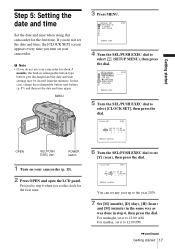
Proceed to step 6 when you do not set [Y] (year), then press the dial. SETUP MENU CLOCK SET USB STREAM LTR SIZE LANGUAGE DEMO MODE RETURN STBY --:--:-- [MENU] : END 5 Turn the SEL/PUSH EXEC dial to select (SETUP MENU), then press the dial. For midday, ...) and then set it to 12:00 PM. ,continued Getting started Step 5: Setting the date and time Set the date and time when using this camcorder for the first time. CLOCK SET STBY Y MD HM 2004 JAN 1 12 : 0 0 AM [MENU] : CANCEL You can set it to 12:00 AM. MANUAL SET...
Proceed to step 6 when you do not set [Y] (year), then press the dial. SETUP MENU CLOCK SET USB STREAM LTR SIZE LANGUAGE DEMO MODE RETURN STBY --:--:-- [MENU] : END 5 Turn the SEL/PUSH EXEC dial to select (SETUP MENU), then press the dial. For midday, ...) and then set it to 12:00 PM. ,continued Getting started Step 5: Setting the date and time Set the date and time when using this camcorder for the first time. CLOCK SET STBY Y MD HM 2004 JAN 1 12 : 0 0 AM [MENU] : CANCEL You can set it to 12:00 AM. MANUAL SET...
Camera Operations Guide
Page 19
... cassette compartment automatically slides back in . 3 Close the lid. The cassette compartment automatically comes out. 2 Take out the cassette, then press . SETUP MENU CLOCK SET USB STREAM LTR SIZE LANGUAGE DEMO MODE RETURN STBY --:--:-- [MENU] : END ,continued Getting started Push the center of the back of the arrow and open the LCD... the cassette lightly. 3 Press . MANUAL SET PROGRAM AE P EFFECT AUTO SHTR STBY [MENU] : END 4 Turn the SEL/PUSH EXEC dial to be used on your camcorder. 2 Press OPEN to open the lid. MENU Getting started 19
... cassette compartment automatically slides back in . 3 Close the lid. The cassette compartment automatically comes out. 2 Take out the cassette, then press . SETUP MENU CLOCK SET USB STREAM LTR SIZE LANGUAGE DEMO MODE RETURN STBY --:--:-- [MENU] : END ,continued Getting started Push the center of the back of the arrow and open the LCD... the cassette lightly. 3 Press . MANUAL SET PROGRAM AE P EFFECT AUTO SHTR STBY [MENU] : END 4 Turn the SEL/PUSH EXEC dial to be used on your camcorder. 2 Press OPEN to open the lid. MENU Getting started 19

Camera Operations Guide
Page 20
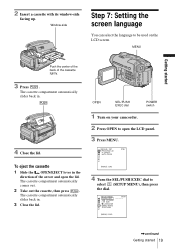
z Tip • Your camcorder offers [ENG [SIMP]] (simplified English) for when you cannot find your native tongue among the options. 20 Getting started SETUP MENU CLOCK SET STBY USB STREAM LTR SIZE ENGLISH LANGUAGE ENG[SIMP] DEMO MODE FRANÇAIS ESPAÑOL PORTUGUÊS [MENU] : END 6 Turn the SEL/PUSH EXEC dial to select [ LANGUAGE], then press the dial. 5 Turn the SEL/PUSH EXEC dial to select the desired language, then press the dial. 7 Press MENU.
z Tip • Your camcorder offers [ENG [SIMP]] (simplified English) for when you cannot find your native tongue among the options. 20 Getting started SETUP MENU CLOCK SET STBY USB STREAM LTR SIZE ENGLISH LANGUAGE ENG[SIMP] DEMO MODE FRANÇAIS ESPAÑOL PORTUGUÊS [MENU] : END 6 Turn the SEL/PUSH EXEC dial to select [ LANGUAGE], then press the dial. 5 Turn the SEL/PUSH EXEC dial to select the desired language, then press the dial. 7 Press MENU.
Camera Operations Guide
Page 27
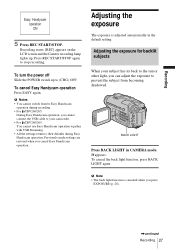
... the exposure for backlit subjects When your camcorder. • For TRV260/265: You cannot use Easy Handycam operation together with USB Streaming. • All the settings return to prevent the subject from /to Easy Handycam operation during recording. • For TRV260/265: During Easy Handycam operation, you cannot connect the USB cable to your subject has its back to...
... the exposure for backlit subjects When your camcorder. • For TRV260/265: You cannot use Easy Handycam operation together with USB Streaming. • All the settings return to prevent the subject from /to Easy Handycam operation during recording. • For TRV260/265: During Easy Handycam operation, you cannot connect the USB cable to your subject has its back to...

Camera Operations Guide
Page 36
Also screen font size increases for playback. EASY lights up in blue. Easy Handycam operation ON 36 Playback b Notes For TRV260/265: • During Easy Handycam operation, you have a dot beside them on the Remote Commander. EASY 4 Play back a ...camcorder. Easy Handycam Easy Handycam operation allows easy playback for even first time users by providing only the basic functions for easy viewing. Make sure you cannot connect the USB cable to select the PLAY/EDIT mode. 3 Press EASY. To cancel Easy Handycam operation Press EASY again. Playing back with USB Streaming...
Also screen font size increases for playback. EASY lights up in blue. Easy Handycam operation ON 36 Playback b Notes For TRV260/265: • During Easy Handycam operation, you have a dot beside them on the Remote Commander. EASY 4 Play back a ...camcorder. Easy Handycam Easy Handycam operation allows easy playback for even first time users by providing only the basic functions for easy viewing. Make sure you cannot connect the USB cable to select the PLAY/EDIT mode. 3 Press EASY. To cancel Easy Handycam operation Press EASY again. Playing back with USB Streaming...
Camera Operations Guide
Page 57
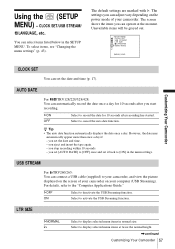
... the tape again. - The default settings are marked with G. USB STREAM For TRV260/265: You can adjust vary depending on your camcorder. For details, refer to your camcorder, and view the picture displayed on the screen of your camcorder on the power mode of your computer (USB Streaming). Select to display selected menu items at the moment. Select...
... the tape again. - The default settings are marked with G. USB STREAM For TRV260/265: You can adjust vary depending on your camcorder. For details, refer to your camcorder, and view the picture displayed on the screen of your camcorder on the power mode of your computer (USB Streaming). Select to display selected menu items at the moment. Select...
Camera Operations Guide
Page 99
... See HiFi SOUND T Tape counter 22 Tape photo recording .........25 TBC 52 Telephoto See Zoom Time code 22 Title 31 TV color systems 81 U USB jack 92 USB Streaming (USB STREAM)......... 57 Using abroad 81 V Video head 86 Viewfinder 16 Volume 34 W Warning indicators 79 Warning messages 80 WHITE FADER 30 Wide angle See Zoom...
... See HiFi SOUND T Tape counter 22 Tape photo recording .........25 TBC 52 Telephoto See Zoom Time code 22 Title 31 TV color systems 81 U USB jack 92 USB Streaming (USB STREAM)......... 57 Using abroad 81 V Video head 86 Viewfinder 16 Volume 34 W Warning indicators 79 Warning messages 80 WHITE FADER 30 Wide angle See Zoom...
Computer Applications Guide
Page 11
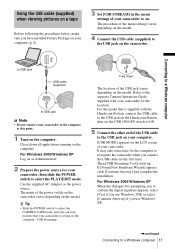
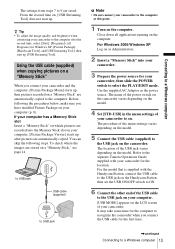
... supplied with the Handycam Station, connect the USB cable to the USB jack on the Handycam Station, then set the USB ON/OFF switch to ON. 5 Connect the other end of the USB cable to the USB jack on your computer. [USB MODE] appears on the LCD screen of your camcorder, then slide the... digital signature appears, select [Yes] if you use Windows 2000 or select [Continue Anyway] if you connect the USB cable for the computer to recognize the camcorder when you use Windows XP. ,continued Connecting to a Windows computer 11 It may take some time for the first time. Then [USB Streaming Tool...
... supplied with the Handycam Station, connect the USB cable to the USB jack on the Handycam Station, then set the USB ON/OFF switch to ON. 5 Connect the other end of the USB cable to the USB jack on your computer. [USB MODE] appears on the LCD screen of your camcorder, then slide the... digital signature appears, select [Yes] if you use Windows 2000 or select [Continue Anyway] if you connect the USB cable for the computer to recognize the camcorder when you use Windows XP. ,continued Connecting to a Windows computer 11 It may take some time for the first time. Then [USB Streaming Tool...
Computer Applications Guide
Page 13
... to on a "Memory Stick" When you have installed Picture Package on the model. z Tip • To adjust the image quality and brightness when connecting your camcorder for Windows XP, [Picture Package], [Handycam Tools], and [USB Streaming Tool], then start up after the second time, select [Start], [Programs] (All Programs) for the location. to...
... to on a "Memory Stick" When you have installed Picture Package on the model. z Tip • To adjust the image quality and brightness when connecting your camcorder for Windows XP, [Picture Package], [Handycam Tools], and [USB Streaming Tool], then start up after the second time, select [Start], [Programs] (All Programs) for the location. to...

Computer Applications Guide
Page 18
...date of a folder, the folder sequence changes. Creating an original video - The name of the power switch on the camcorder varies depending on the model. 3 Set [USB STREAM] in the newest folder appears. 4 Double-click a picture you have selected. [Picture Package Viewer] starts up, ...then the pictures in the menu settings of your camcorder to on. Folder functions With [Picture Package Viewer], pictures copied from...
...date of a folder, the folder sequence changes. Creating an original video - The name of the power switch on the camcorder varies depending on the model. 3 Set [USB STREAM] in the newest folder appears. 4 Double-click a picture you have selected. [Picture Package Viewer] starts up, ...then the pictures in the menu settings of your camcorder to on. Folder functions With [Picture Package Viewer], pictures copied from...
Computer Applications Guide
Page 24
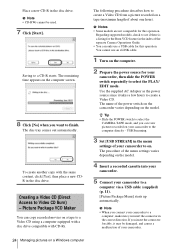
...). [Picture Package Menu] starts up automatically. USB Streaming. 3 Set [USB STREAM] in the correct direction. The disc tray comes out automatically. . The procedure of about one hour). z Tip • Slide the POWER switch to select the CAMERA-TAPE mode, and you connect your camcorder. 24 Managing pictures on your camcorder to a Video CD using a computer equipped...
...). [Picture Package Menu] starts up automatically. USB Streaming. 3 Set [USB STREAM] in the correct direction. The disc tray comes out automatically. . The procedure of about one hour). z Tip • Slide the POWER switch to select the CAMERA-TAPE mode, and you connect your camcorder. 24 Managing pictures on your camcorder to a Video CD using a computer equipped...
Computer Applications Guide
Page 35
.... cFor the model that is supplied with the Handycam Station, set [USB STREAM] in your camcorder first, then copy the pictures recorded on the "Memory Stick" to your camcorder to the computer. You cannot view the pictures the camcorder is supplied with the Handycam Station, connect the Handycam Station to ON. Connect the camcorder and the computer using the...
.... cFor the model that is supplied with the Handycam Station, set [USB STREAM] in your camcorder first, then copy the pictures recorded on the "Memory Stick" to your camcorder to the computer. You cannot view the pictures the camcorder is supplied with the Handycam Station, connect the Handycam Station to ON. Connect the camcorder and the computer using the...
Computer Applications Guide
Page 36
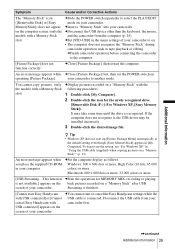
...Device Manager] tab. 4 If devices below to install the [Picture Package] correctly. Symptom The image does not appear on [USB Streaming Tool] when using a computer, the operation is connected to a computer. 2 Right-click [My Computer], then click [...malfunction of your camcorder is not guaranteed on Windows 98. 1 Check that your computer. 36 Additional information Sony Handycam] or [? Sony DSC] with a Memory Stick slot) • [? b Note • Deleting anything other than [USB Audio Device], [USB Device], [USB Composite Device], [? Sony Handycam] and [? Sony DSC] may ...
...Device Manager] tab. 4 If devices below to install the [Picture Package] correctly. Symptom The image does not appear on [USB Streaming Tool] when using a computer, the operation is connected to a computer. 2 Right-click [My Computer], then click [...malfunction of your camcorder is not guaranteed on Windows 98. 1 Check that your computer. 36 Additional information Sony Handycam] or [? Sony DSC] with a Memory Stick slot) • [? b Note • Deleting anything other than [USB Audio Device], [USB Device], [USB Composite Device], [? Sony Handycam] and [? Sony DSC] may ...
Computer Applications Guide
Page 37
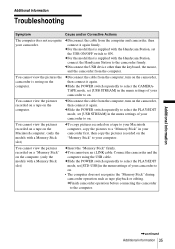
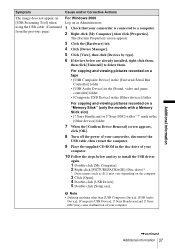
Sony Handycam] and [? Additional information Symptom Cause and/or Corrective Actions The image does not appear on [USB Streaming Tool] when using the USB cable. (Continued from the previous page) For Windows 2000 Log on as Administrators. 1 Check that your camcorder is connected to install the USB driver again. 1 Double-click [My Computer]. 2 Right-click [PICTUREPACKAGE] (Disc drive...
Sony Handycam] and [? Additional information Symptom Cause and/or Corrective Actions The image does not appear on [USB Streaming Tool] when using the USB cable. (Continued from the previous page) For Windows 2000 Log on as Administrators. 1 Check that your camcorder is connected to install the USB driver again. 1 Double-click [My Computer]. 2 Right-click [PICTUREPACKAGE] (Disc drive...
Computer Applications Guide
Page 38
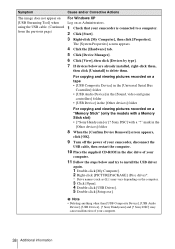
... devices] folder 8 When the [Confirm Device Removal] screen appears, click [OK]. 9 Turn off the power of your camcorder, disconnect the USB cable, then restart the computer. 10 Place the supplied CD-ROM in the [Other devices] folder For copying and viewing ...], then click [Properties]. b Note • Deleting anything other than [USB Composite Device], [USB Audio Device], [USB Device], [? Sony Handycam] or [? Symptom Cause and/or Corrective Actions The image does not appear on [USB Streaming Tool] when using the USB cable. (Continued from the previous page) For Windows XP Log on as...
... devices] folder 8 When the [Confirm Device Removal] screen appears, click [OK]. 9 Turn off the power of your camcorder, disconnect the USB cable, then restart the computer. 10 Place the supplied CD-ROM in the [Other devices] folder For copying and viewing ...], then click [Properties]. b Note • Deleting anything other than [USB Composite Device], [USB Audio Device], [USB Device], [? Sony Handycam] or [? Symptom Cause and/or Corrective Actions The image does not appear on [USB Streaming Tool] when using the USB cable. (Continued from the previous page) For Windows XP Log on as...
Computer Applications Guide
Page 39
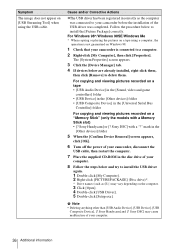
...camcorder operation such as follows: Windows: 800 × 600 dots or more, High Color (16 bits, 65 000 colors) or more Macintosh: 800 × 600 dots or more, 32 000 colors or more [USB Streaming... This function cStart the operations for the newly recognized drive [Removable Disk (F:)] (For Windows XP, [Sony... available.] appears on the back pictures recorded on a "Memory Stick" after USB screen of your camcorder. Streaming is finished. [Cannot start or cancel the Easy Handycam settings while the USB cable is recognized. An error message appears when you place the supplied CD-...
...camcorder operation such as follows: Windows: 800 × 600 dots or more, High Color (16 bits, 65 000 colors) or more Macintosh: 800 × 600 dots or more, 32 000 colors or more [USB Streaming... This function cStart the operations for the newly recognized drive [Removable Disk (F:)] (For Windows XP, [Sony... available.] appears on the back pictures recorded on a "Memory Stick" after USB screen of your camcorder. Streaming is finished. [Cannot start or cancel the Easy Handycam settings while the USB cable is recognized. An error message appears when you place the supplied CD-...

Computer Applications Guide
Page 40
...Programs] for Windows XP), [Picture Package], [Handycam Tools], and [USB Streaming Tool] then, start up [USB Streaming Tool]. 2 Adjust the slider in the following procedures: 1 Select [Start], [Programs]( [All Programs] for Windows XP), [Picture Package], [Handycam Tools], and [USB Streaming Tool], then start up [USB Streaming Tool]. 2 Select another device on the [...] , then click [Done]. 40 Additional information b Note • Sound is connected to the computer via a USB cable. Symptom There is no sound when the camcorder is not supported on Windows 98. The movie is not smooth.
...Programs] for Windows XP), [Picture Package], [Handycam Tools], and [USB Streaming Tool] then, start up [USB Streaming Tool]. 2 Adjust the slider in the following procedures: 1 Select [Start], [Programs]( [All Programs] for Windows XP), [Picture Package], [Handycam Tools], and [USB Streaming Tool], then start up [USB Streaming Tool]. 2 Select another device on the [...] , then click [Done]. 40 Additional information b Note • Sound is connected to the computer via a USB cable. Symptom There is no sound when the camcorder is not supported on Windows 98. The movie is not smooth.
Computer Applications Guide
Page 41
...20, 22, 24, 25 Click to DVD 30 Copying pictures on a "Memory Stick" .... 13, 29 D Digital convert function......33 Direct Access to "Click to DVD 30 Direct Access to Video CD Burn 24 DirectX 9.0b 9... DV Interface 15, 30, 33 DVD 30 H Handycam Station 7, 11, 13, 16, 28 I i.LINK cable 10, 15, 18, 30, 33 ImageMixer VCD2 29 Install...SEL/PUSH EXEC dial models 25, 31 STD-USB 13, 26 T Touch panel models ..... 25, 31 U USB cable ......... 10, 11, 13, 14 USB STREAM....... 11, 18, 24 USB Streaming 11, 24 W Windows 17 Windows Media Player ...
...20, 22, 24, 25 Click to DVD 30 Copying pictures on a "Memory Stick" .... 13, 29 D Digital convert function......33 Direct Access to "Click to DVD 30 Direct Access to Video CD Burn 24 DirectX 9.0b 9... DV Interface 15, 30, 33 DVD 30 H Handycam Station 7, 11, 13, 16, 28 I i.LINK cable 10, 15, 18, 30, 33 ImageMixer VCD2 29 Install...SEL/PUSH EXEC dial models 25, 31 STD-USB 13, 26 T Touch panel models ..... 25, 31 U USB cable ......... 10, 11, 13, 14 USB STREAM....... 11, 18, 24 USB Streaming 11, 24 W Windows 17 Windows Media Player ...

Marketing Specifications
Page 1
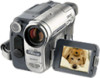
® DCR-TRV260 Digital Handycam® Camcorder The DCR-TRV260 is clearer, with less distortion than previous types of digital zooms. 2.5" SwivelScreen™ LCD Display (123K Pixels) Provides excellent viewing clarity with improved resolution. F E AT U R E S ➤Digital8® Video Recording Digital8 recording format delivers 3X the color bandwidth of the recorded scene. NightShot® Plus Infrared System With Sony's NightShot...
® DCR-TRV260 Digital Handycam® Camcorder The DCR-TRV260 is clearer, with less distortion than previous types of digital zooms. 2.5" SwivelScreen™ LCD Display (123K Pixels) Provides excellent viewing clarity with improved resolution. F E AT U R E S ➤Digital8® Video Recording Digital8 recording format delivers 3X the color bandwidth of the recorded scene. NightShot® Plus Infrared System With Sony's NightShot...


