
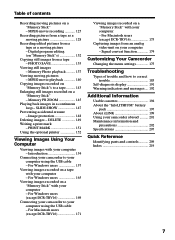
Operating Instructions
Page 3
... different from that to Part 15 of Conformity Trade Name: SONY Model No.: DCR-TRV25, DCR- Getting Started "Memory Stick" This device complies with Canadian ICES-003. Reorient or relocate the receiving antenna. - Consult the dealer or an experienced radio/ TV technician for a Class B digital device, pursuant to which can radiate radio frequency energy and, if...
... different from that to Part 15 of Conformity Trade Name: SONY Model No.: DCR-TRV25, DCR- Getting Started "Memory Stick" This device complies with Canadian ICES-003. Reorient or relocate the receiving antenna. - Consult the dealer or an experienced radio/ TV technician for a Class B digital device, pursuant to which can radiate radio frequency energy and, if...
Operating Instructions
Page 4
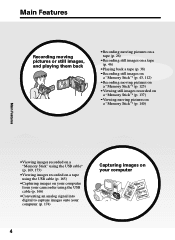
... Features •Viewing images recorded on a "Memory Stick" using the USB cable* (p. 169, 173) •Viewing images recorded on a tape using the USB cable (p. 165) •Capturing images on your computer from your camcorder using the USB cable (p. 166) •Converting an analog signal into digital to capture images onto your computer (p. 174...
... Features •Viewing images recorded on a "Memory Stick" using the USB cable* (p. 169, 173) •Viewing images recorded on a tape using the USB cable (p. 165) •Capturing images on your computer from your camcorder using the USB cable (p. 166) •Converting an analog signal into digital to capture images onto your computer (p. 174...
Operating Instructions
Page 5
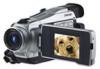
...The default setting is OFF. (To zoom greater than 10×, select the digital zoom power in D ZOOM in the menu settings.) •Fader (p. 51) •Picture effect (p. 54) •Digital effect (p. 55) •Titles (p. 98) •MEMORY MIX* (p. 120) Functions for giving a natural appearance to your recordings •... for using after recording •END SEARCH/EDITSEARCH/Rec Review (p. 37) •DATA CODE (p. 39) •Tape PB ZOOM (p. 67)/Memory PB ZOOM* (p. 145) •ZERO SET MEMORY (p. 69) •TITLE SEARCH (p. 70) •Digital program editing (p. 78, 132*) * Except DCR-TRV16 5
...The default setting is OFF. (To zoom greater than 10×, select the digital zoom power in D ZOOM in the menu settings.) •Fader (p. 51) •Picture effect (p. 54) •Digital effect (p. 55) •Titles (p. 98) •MEMORY MIX* (p. 120) Functions for giving a natural appearance to your recordings •... for using after recording •END SEARCH/EDITSEARCH/Rec Review (p. 37) •DATA CODE (p. 39) •Tape PB ZOOM (p. 67)/Memory PB ZOOM* (p. 145) •ZERO SET MEMORY (p. 69) •TITLE SEARCH (p. 70) •Digital program editing (p. 78, 132*) * Except DCR-TRV16 5
Operating Instructions
Page 6
... 66 Enlarging images recorded on a "Memory Stick" - DATE SEARCH 71 Searching for a photo - Memory Photo recording ......... 112 Recording an image from a VCR - Recording on a tape - NightShot/Super NightShot/ Color Slow Shutter 34 Self-timer recording (except DCR-TRV16 36 Checking recordings - Digital effect ... 55 Using the PROGRAM AE function .... 58 Adjusting the exposure manually...
... 66 Enlarging images recorded on a "Memory Stick" - DATE SEARCH 71 Searching for a photo - Memory Photo recording ......... 112 Recording an image from a VCR - Recording on a tape - NightShot/Super NightShot/ Color Slow Shutter 34 Self-timer recording (except DCR-TRV16 36 Checking recordings - Digital effect ... 55 Using the PROGRAM AE function .... 58 Adjusting the exposure manually...
Operating Instructions
Page 7
...a print mark - MPEG movie playback 140 Copying images recorded on a "Memory Stick" - For Windows users (except DCR-TRV16 169 Connecting your camcorder to your computer using the USB cable - Memory PB ZOOM 145 Playing back images in a continuous loop - Introduction 154 ...Connecting your camcorder to a tape .......... 143 Enlarging still images recorded on "Memory Stick"s to your computer using the USB cable - For Windows users 165 Viewing images recorded on a tape with your computer - Digital program editing (on your computer -...
...a print mark - MPEG movie playback 140 Copying images recorded on a "Memory Stick" - For Windows users (except DCR-TRV16 169 Connecting your camcorder to your computer using the USB cable - Memory PB ZOOM 145 Playing back images in a continuous loop - Introduction 154 ...Connecting your camcorder to a tape .......... 143 Enlarging still images recorded on "Memory Stick"s to your computer using the USB cable - For Windows users 165 Viewing images recorded on a tape with your computer - Digital program editing (on your computer -...

Operating Instructions
Page 9
...recording (p. 23). To stop recording, press START/STOP again. PLAY NOTE Do not pick up your eye against the eyecup. Your camcorder starts recording. POWER VCR OFF(CHG) CAMERA MEMORY 2 Press m to start playback. The picture appears on the LCD screen (p. 38) 1 Set the POWER switch to CAMERA while... Adjust the viewfinder lens to off. When you want to record the date and time for a picture, set to your camcorder, the clock setting is closed, use the viewfinder with your camcorder by holding the viewfinder, the LCD panel, or the battery pack. 9 REW 3 Press N to rewind the tape....
...recording (p. 23). To stop recording, press START/STOP again. PLAY NOTE Do not pick up your eye against the eyecup. Your camcorder starts recording. POWER VCR OFF(CHG) CAMERA MEMORY 2 Press m to start playback. The picture appears on the LCD screen (p. 38) 1 Set the POWER switch to CAMERA while... Adjust the viewfinder lens to off. When you want to record the date and time for a picture, set to your camcorder, the clock setting is closed, use the viewfinder with your camcorder by holding the viewfinder, the LCD panel, or the battery pack. 9 REW 3 Press N to rewind the tape....
Operating Instructions
Page 10
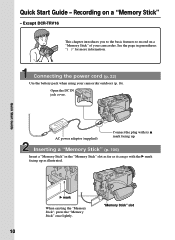
...B mark When ejecting the "Memory Stick", press the "Memory Stick" once lightly. Recording on a "Memory Stick" of your camcorder outdoors (p. 16). Connecting the power cord (p. 22) Use the battery pack when using your camcorder. Open the DC IN jack cover. Except DCR-TRV16 This chapter introduces you to... the basic features to record on a "Memory Stick" - Quick Start Guide - Quick Start Guide AC power adaptor (...
...B mark When ejecting the "Memory Stick", press the "Memory Stick" once lightly. Recording on a "Memory Stick" of your camcorder outdoors (p. 16). Connecting the power cord (p. 22) Use the battery pack when using your camcorder. Open the DC IN jack cover. Except DCR-TRV16 This chapter introduces you to... the basic features to record on a "Memory Stick" - Quick Start Guide - Quick Start Guide AC power adaptor (...

Operating Instructions
Page 11
... panel is set to select the desired image. Monitoring the playback still images on a "Memory Stick" (p. 112) 1 Remove the lens cap. 3 Open the LCD panel while pressing OPEN. If you purchase your camcorder by holding the viewfinder, the LCD panel or the battery pack. 11 PLAY Press... MEMORY -/+ to the left (unlock) position. Recording a still image on the LCD screen (p. 137) 1 Set the POWER switch to MEMORY or VCR while pressing the small green...
... panel is set to select the desired image. Monitoring the playback still images on a "Memory Stick" (p. 112) 1 Remove the lens cap. 3 Open the LCD panel while pressing OPEN. If you purchase your camcorder by holding the viewfinder, the LCD panel or the battery pack. 11 PLAY Press... MEMORY -/+ to the left (unlock) position. Recording a still image on the LCD screen (p. 137) 1 Set the POWER switch to MEMORY or VCR while pressing the small green...
Operating Instructions
Page 12
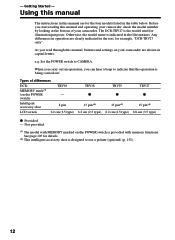
...reading this manual, buttons and settings on your camcorder. As you can hear a beep to indicate that the operation is indicated in capital letters. switch) Intelligent accessory shoe 8 pin LCD screen 6.2 cm (2.5 type) TRV18 z 15 pin*2) 6.2 cm (2.5 type) TRV25 z 15 pin*2) 6.2 cm (2.5 type) ...you read through this manual and operating your camcorder, check the model number by looking at the bottom of differences DCR- Types of your camcorder are for illustration purposes. Not provided *1) The model with memory functions. Using this manual The instructions in the...
...reading this manual, buttons and settings on your camcorder. As you can hear a beep to indicate that the operation is indicated in capital letters. switch) Intelligent accessory shoe 8 pin LCD screen 6.2 cm (2.5 type) TRV18 z 15 pin*2) 6.2 cm (2.5 type) TRV25 z 15 pin*2) 6.2 cm (2.5 type) ...you read through this manual and operating your camcorder, check the model number by looking at the bottom of differences DCR- Types of your camcorder are for illustration purposes. Not provided *1) The model with memory functions. Using this manual The instructions in the...

Operating Instructions
Page 13
Functions that you use only mini DV cassettes with cassette memory are : - To view your camcorder. Note on TV color systems TV color systems differ depending on the DV format. We recommend that require different operations ...tape has a cassette memory are: - Superimposing a title (p. 98) - You can operate only with cassette memory. END SEARCH (p. 37) - Copyright precautions Television programs, films, video tapes, and other materials may be copyrighted. Unauthorized recording of cassette types, see this manual Note on Cassette Memory Your camcorder is based on ...
Functions that you use only mini DV cassettes with cassette memory are : - To view your camcorder. Note on TV color systems TV color systems differ depending on the DV format. We recommend that require different operations ...tape has a cassette memory are: - Superimposing a title (p. 98) - You can operate only with cassette memory. END SEARCH (p. 37) - Copyright precautions Television programs, films, video tapes, and other materials may be copyrighted. Unauthorized recording of cassette types, see this manual Note on Cassette Memory Your camcorder is based on ...
Operating Instructions
Page 15
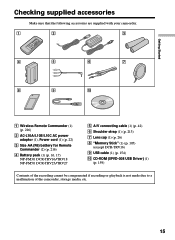
... supplied with your camcorder. 1 2 3 4 5 6 7 8 9 0 1 Wireless Remote Commander (1) (p. 216) 2 AC-L10A/L10B/L10C AC power adaptor (1), Power cord (1) (p. 22) 3 Size AA (R6) battery for Remote Commander (2) (p. 216) 4 Battery pack (1) (p. 16, 17) NP-FM30: DCR-TRV16/TRV18 NP-FM50: DCR-TRV25/TRV27 5 A/V connecting cable (1) (p. 42) 6 Shoulder strap (1) (p. 213) 7 Lens cap (1) (p. 26) 8 "Memory Stick" (1) (p. 105) (except DCR-TRV16) 9 USB...
... supplied with your camcorder. 1 2 3 4 5 6 7 8 9 0 1 Wireless Remote Commander (1) (p. 216) 2 AC-L10A/L10B/L10C AC power adaptor (1), Power cord (1) (p. 22) 3 Size AA (R6) battery for Remote Commander (2) (p. 216) 4 Battery pack (1) (p. 16, 17) NP-FM30: DCR-TRV16/TRV18 NP-FM50: DCR-TRV25/TRV27 5 A/V connecting cable (1) (p. 42) 6 Shoulder strap (1) (p. 213) 7 Lens cap (1) (p. 26) 8 "Memory Stick" (1) (p. 105) (except DCR-TRV16) 9 USB...
Operating Instructions
Page 17
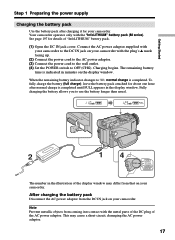
... charge is indicated in minutes on the display window. Connect the AC power adaptor supplied with your camcorder to use the battery longer than usual. 2 14 VCR POWER OFF(CHG) CAMERA MEMORY The number in the display window. Charging begins. Fully charging the battery allows you to the DC... IN jack on your camcorder. To fully charge the battery (full charge), leave the battery pack attached for ...
... charge is indicated in minutes on the display window. Connect the AC power adaptor supplied with your camcorder to use the battery longer than usual. 2 14 VCR POWER OFF(CHG) CAMERA MEMORY The number in the display window. Charging begins. Fully charging the battery allows you to the DC... IN jack on your camcorder. To fully charge the battery (full charge), leave the battery pack attached for ...

Operating Instructions
Page 23
...have been discharged (p. 203). The clock starts to move. (7) Press MENU to CAMERA or MEMORY (except DCR-TRV16) unless you set the POWER switch to make the menu settings disappear. 1, 7 ... hour and then the minute, in your camcorder will be cleared from memory (bars may be displayed each time that order. (1) Set the POWER switch to CAMERA or MEMORY (except DCR-TRV16), then press MENU to display the ...Started Step 2 Setting the date and time Set the date and time when you use your camcorder for about four months, the date and time settings may appear) because the built-in rechargeable...
...have been discharged (p. 203). The clock starts to move. (7) Press MENU to CAMERA or MEMORY (except DCR-TRV16) unless you set the POWER switch to make the menu settings disappear. 1, 7 ... hour and then the minute, in your camcorder will be cleared from memory (bars may be displayed each time that order. (1) Set the POWER switch to CAMERA or MEMORY (except DCR-TRV16), then press MENU to display the ...Started Step 2 Setting the date and time Set the date and time when you use your camcorder for about four months, the date and time settings may appear) because the built-in rechargeable...

Operating Instructions
Page 24
Step 2 Setting the date and time The year changes as follows: 1995 T t 2002 T t 2079 If you do not set the date and time and are recorded on the data code of your camcorder operates on the time indicator The internal clock of the tape and the "Memory Stick" (except DCR-TRV16). Note on a 12-hour cycle. •12:00 AM stands for midnight. •12:00 PM stands for noon. 24
Step 2 Setting the date and time The year changes as follows: 1995 T t 2002 T t 2079 If you do not set the date and time and are recorded on the data code of your camcorder operates on the time indicator The internal clock of the tape and the "Memory Stick" (except DCR-TRV16). Note on a 12-hour cycle. •12:00 AM stands for midnight. •12:00 PM stands for noon. 24
Operating Instructions
Page 25
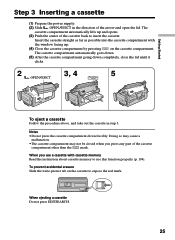
Insert the cassette straight as far as possible into the cassette compartment with cassette memory Read the instruction about cassette memory to use a cassette with the window facing up and opens. (3) Push the center of the cassette back to expose the red mark. Doing so may ...
Insert the cassette straight as far as possible into the cassette compartment with cassette memory Read the instruction about cassette memory to use a cassette with the window facing up and opens. (3) Push the center of the cassette back to expose the red mark. Doing so may ...
Operating Instructions
Page 26
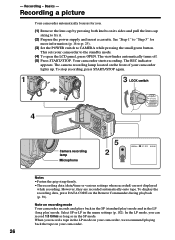
... power supply and insert a cassette. The viewfinder automatically turns off. (5) Press START/STOP. Basics - This sets your camcorder lights up. To stop recording, press START/STOP again. 1 3 LOCK switch 4 POWER VCR OFF(CHG) CAMERA MEMORY Camera recording lamp Microphone 5 2 50min REC 0:00:01 Notes •Fasten the grip strap firmly. •The...
... power supply and insert a cassette. The viewfinder automatically turns off. (5) Press START/STOP. Basics - This sets your camcorder lights up. To stop recording, press START/STOP again. 1 3 LOCK switch 4 POWER VCR OFF(CHG) CAMERA MEMORY Camera recording lamp Microphone 5 2 50min REC 0:00:01 Notes •Fasten the grip strap firmly. •The...
Operating Instructions
Page 27
... between scenes. When you recorded and the next scene is set to CAMERA. Basics Recording a picture Note on the LOCK switch (except DCR-TRV16) When you slide the LOCK switch to the left as you do not eject the cassette even if you record using the viewfinder.... When you use a cassette with cassette memory, however, you use time when you turn off . If you leave your camcorder. This is inserted Your camcorder automatically turns off automatically while the cassette is slightly shorter than the shooting time using the...
... between scenes. When you recorded and the next scene is set to CAMERA. Basics Recording a picture Note on the LOCK switch (except DCR-TRV16) When you slide the LOCK switch to the left as you do not eject the cassette even if you record using the viewfinder.... When you use a cassette with cassette memory, however, you use time when you turn off . If you leave your camcorder. This is inserted Your camcorder automatically turns off automatically while the cassette is slightly shorter than the shooting time using the...

Operating Instructions
Page 29
in the viewfinder come into sharp focus. Adjust the viewfinder lens to CAMERA, VCR or MEMORY (except DCR-TRV16). The viewfinder lens adjustment lever Viewfinder backlight You can change the brightness of the LCD screen (1) Set the POWER switch to your eyesight so ... If you record pictures with the LCD panel closed, check the picture with LCD BRIGHT, then press the dial. (3) Press MENU to CAMERA, VCR or MEMORY (except DCR-TRV16).
in the viewfinder come into sharp focus. Adjust the viewfinder lens to CAMERA, VCR or MEMORY (except DCR-TRV16). The viewfinder lens adjustment lever Viewfinder backlight You can change the brightness of the LCD screen (1) Set the POWER switch to your eyesight so ... If you record pictures with the LCD panel closed, check the picture with LCD BRIGHT, then press the dial. (3) Press MENU to CAMERA, VCR or MEMORY (except DCR-TRV16).

Operating Instructions
Page 30
... appears farther away) T : For telephoto (subject appears closer) W T W W T T To use the digital zoom. 30 Digital zoom can shoot a subject that is set to a subject If you move the power zoom lever to MEMORY (except DCR-TRV16) You cannot use zoom greater than 10× Zoom greater than 10× is... sharp. To activate digital zoom, select the digital zoom power in D ZOOM in better-looking recordings. The right side ...
... appears farther away) T : For telephoto (subject appears closer) W T W W T T To use the digital zoom. 30 Digital zoom can shoot a subject that is set to a subject If you move the power zoom lever to MEMORY (except DCR-TRV16) You cannot use zoom greater than 10× Zoom greater than 10× is... sharp. To activate digital zoom, select the digital zoom power in D ZOOM in better-looking recordings. The right side ...

Operating Instructions
Page 31
... a mirror-image. Picture in the recording mode. Basics Recording a picture Shooting with the Mirror Mode This feature allows the camera subject to CAMERA or MEMORY (except DCR-TRV16). Xz appears in the standby mode, and z appears in the mirror mode The picture on the LCD screen. Some of other indicators appear mirror... not work. 31 The indicator appears in the viewfinder. However, the picture will be normal when recorded. During recording in the mirror mode ZERO SET MEMORY on the LCD screen. Rotate the LCD screen 180 degrees.
... a mirror-image. Picture in the recording mode. Basics Recording a picture Shooting with the Mirror Mode This feature allows the camera subject to CAMERA or MEMORY (except DCR-TRV16). Xz appears in the standby mode, and z appears in the mirror mode The picture on the LCD screen. Some of other indicators appear mirror... not work. 31 The indicator appears in the viewfinder. However, the picture will be normal when recorded. During recording in the mirror mode ZERO SET MEMORY on the LCD screen. Rotate the LCD screen 180 degrees.


