Operating Instructions
Page 1
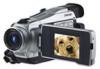
Model No. DCR-TRV Model No. Serial No. Owner's Record The model and serial numbers are located on the bottom. TM SERIES DCR-TRV27 DCR-TRV16/TRV18/ TRV25/TRV27 ©2002 Sony Corporation AC- Serial No. Refer to these numbers whenever you call upon your Sony dealer regarding this manual thoroughly, and retain it for future reference. Record the serial number in the space provided below. 3-073-855-12 (1) Digital Video Camera Recorder Operating Instructions Before operating the unit, please read this product.
Model No. DCR-TRV Model No. Serial No. Owner's Record The model and serial numbers are located on the bottom. TM SERIES DCR-TRV27 DCR-TRV16/TRV18/ TRV25/TRV27 ©2002 Sony Corporation AC- Serial No. Refer to these numbers whenever you call upon your Sony dealer regarding this manual thoroughly, and retain it for future reference. Record the serial number in the space provided below. 3-073-855-12 (1) Digital Video Camera Recorder Operating Instructions Before operating the unit, please read this product.

Operating Instructions
Page 9
... recording. When you want to off. If you purchase your camcorder, the clock setting is closed, use the viewfinder with your eye against the eyecup. REW 3 Press N to rewind the tape. POWER VCR OFF(CHG) CAMERA MEMORY 2 Press m to start playback. Adjust the viewfinder lens to VCR while ...START/STOP. The picture appears on the LCD screen (p. 38) 1 Set the POWER switch to your camcorder by holding the viewfinder, the LCD panel, or the battery pack. 9 POWER VCR OFF(CHG) CAMERA MEMORY Viewfinder When the LCD panel is set to record the date and time for a picture, set the...
... recording. When you want to off. If you purchase your camcorder, the clock setting is closed, use the viewfinder with your eye against the eyecup. REW 3 Press N to rewind the tape. POWER VCR OFF(CHG) CAMERA MEMORY 2 Press m to start playback. Adjust the viewfinder lens to VCR while ...START/STOP. The picture appears on the LCD screen (p. 38) 1 Set the POWER switch to your camcorder by holding the viewfinder, the LCD panel, or the battery pack. 9 POWER VCR OFF(CHG) CAMERA MEMORY Viewfinder When the LCD panel is set to record the date and time for a picture, set the...

Operating Instructions
Page 11
... a still image on the screen. 2 Set the POWER switch to MEMORY while pressing the small green button. Adjust the viewfinder lens to your camcorder by holding the viewfinder, the LCD panel or the battery pack. 11 PHOTO PHOTO When you want to record the date and time for a picture... the POWER switch to select the desired image. The last recorded image is set to the left (unlock) position. POWER VCR OFF(CHG) CAMERA MEMORY 2 Press MEMORY PLAY. LOCK switch POWER VCR OFF(CHG) CAMERA MEMORY Quick Start Guide Viewfinder When the LCD panel is closed, use the viewfinder with your...
... a still image on the screen. 2 Set the POWER switch to MEMORY while pressing the small green button. Adjust the viewfinder lens to your camcorder by holding the viewfinder, the LCD panel or the battery pack. 11 PHOTO PHOTO When you want to record the date and time for a picture... the POWER switch to select the desired image. The last recorded image is set to the left (unlock) position. POWER VCR OFF(CHG) CAMERA MEMORY 2 Press MEMORY PLAY. LOCK switch POWER VCR OFF(CHG) CAMERA MEMORY Quick Start Guide Viewfinder When the LCD panel is closed, use the viewfinder with your...
Operating Instructions
Page 12
...) Intelligent accessory shoe 8 pin LCD screen 6.2 cm (2.5 type) TRV18 z 15 pin*2) 6.2 cm (2.5 type) TRV25 z 15 pin*2) 6.2 cm (2.5 type) TRV27 z 15 pin*2) 8.8 cm (3.5 type) z Provided - Not ...MEMORY mark*1) (on the POWER switch is indicated in capital letters. The DCR-TRV27 is designed to CAMERA. Otherwise, the model name is provided with MEMORY marked on the POWER -...DCR-TRV27 only". - Getting Started - When you carry out an operation, you start reading this manual, buttons and settings on your camcorder. As you read through this manual and operating your camcorder...
...) Intelligent accessory shoe 8 pin LCD screen 6.2 cm (2.5 type) TRV18 z 15 pin*2) 6.2 cm (2.5 type) TRV25 z 15 pin*2) 6.2 cm (2.5 type) TRV27 z 15 pin*2) 8.8 cm (3.5 type) z Provided - Not ...MEMORY mark*1) (on the POWER switch is indicated in capital letters. The DCR-TRV27 is designed to CAMERA. Otherwise, the model name is provided with MEMORY marked on the POWER -...DCR-TRV27 only". - Getting Started - When you carry out an operation, you start reading this manual, buttons and settings on your camcorder. As you read through this manual and operating your camcorder...
Operating Instructions
Page 14
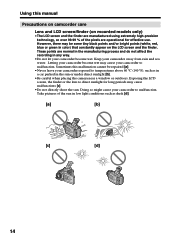
... leave your camcorder become wet. Take pictures of the pixels are manufactured using extremely high-precision technology, so over 99.99 % of the sun in low light conditions such as in a car parked in the sun or under direct sunlight [b]. •Be careful when placing the camera near a window... or outdoors. Keep your camcorder to direct sunlight for effective use. These points are normal in the manufacturing process and do not affect the recording in...
... leave your camcorder become wet. Take pictures of the pixels are manufactured using extremely high-precision technology, so over 99.99 % of the sun in low light conditions such as in a car parked in the sun or under direct sunlight [b]. •Be careful when placing the camera near a window... or outdoors. Keep your camcorder to direct sunlight for effective use. These points are normal in the manufacturing process and do not affect the recording in...
Operating Instructions
Page 17
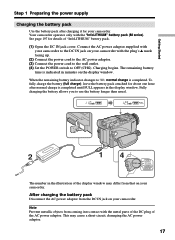
...you to , normal charge is indicated in minutes on your camcorder. This may differ from that on the display window. When the remaining battery indicator changes to use the battery longer than usual. 2 14 VCR POWER OFF(CHG) CAMERA MEMORY The number in the illustration of the display window ...may cause a short-circuit, damaging the AC power adaptor. 17 Note Prevent metallic objects from the DC IN jack on your camcorder. See page 197 for your camcorder with the metal parts of the DC...
...you to , normal charge is indicated in minutes on your camcorder. This may differ from that on the display window. When the remaining battery indicator changes to use the battery longer than usual. 2 14 VCR POWER OFF(CHG) CAMERA MEMORY The number in the illustration of the display window ...may cause a short-circuit, damaging the AC power adaptor. 17 Note Prevent metallic objects from the DC IN jack on your camcorder. See page 197 for your camcorder with the metal parts of the DC...

Operating Instructions
Page 23
If you do not use your camcorder for about four months, the date and time settings may be displayed each time that order. (1) Set the POWER switch to CAMERA or MEMORY (except DCR-TRV16), then press MENU to display the menu settings. (2) Turn the SEL/PUSH EXEC dial to select , then ...year, then the month, the day, the hour and then the minute, in your camcorder for the first time. The clock starts to move. (7) Press MENU to CAMERA or MEMORY (except DCR-TRV16) unless you use your camcorder will be cleared from memory (bars may appear) because the built-in rechargeable battery ...
If you do not use your camcorder for about four months, the date and time settings may be displayed each time that order. (1) Set the POWER switch to CAMERA or MEMORY (except DCR-TRV16), then press MENU to display the menu settings. (2) Turn the SEL/PUSH EXEC dial to select , then ...year, then the month, the day, the hour and then the minute, in your camcorder for the first time. The clock starts to move. (7) Press MENU to CAMERA or MEMORY (except DCR-TRV16) unless you use your camcorder will be cleared from memory (bars may appear) because the built-in rechargeable battery ...
Operating Instructions
Page 26
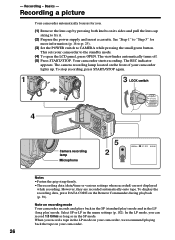
...automatically turns off. (5) Press START/STOP. To stop recording, press START/STOP again. 1 3 LOCK switch 4 POWER VCR OFF(CHG) CAMERA MEMORY Camera recording lamp Microphone 5 2 50min REC 0:00:01 Notes •Fasten the grip strap firmly. •The recording data (date/time or...displayed while recording. Recording a picture Your camcorder automatically focuses for more information (p. 16 to p. 25). (3) Set the POWER switch to fix it. (2) Prepare the power supply and insert a cassette. This sets your camcorder. 26 The camera recording lamp located on its sides and pull...
...automatically turns off. (5) Press START/STOP. To stop recording, press START/STOP again. 1 3 LOCK switch 4 POWER VCR OFF(CHG) CAMERA MEMORY Camera recording lamp Microphone 5 2 50min REC 0:00:01 Notes •Fasten the grip strap firmly. •The recording data (date/time or...displayed while recording. Recording a picture Your camcorder automatically focuses for more information (p. 16 to p. 25). (3) Set the POWER switch to fix it. (2) Prepare the power supply and insert a cassette. This sets your camcorder. 26 The camera recording lamp located on its sides and pull...
Operating Instructions
Page 27
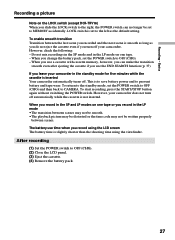
...8226; The playback picture may be distorted or the time code may not be set to MEMORY accidentally. After recording (1) Set the POWER switch to CAMERA. This is slightly shorter than the shooting time using the LCD screen The battery time is to save battery power and to OFF (CHG). - ... not turn off your camcorder. To return to the standby mode, set the POWER switch to prevent battery and tape wear. However, check the following: - Recording - Basics Recording a picture Note on the LOCK switch (except DCR-TRV16) When you slide the LOCK switch to the right, the POWER switch can ...
...8226; The playback picture may be distorted or the time code may not be set to MEMORY accidentally. After recording (1) Set the POWER switch to CAMERA. This is slightly shorter than the shooting time using the LCD screen The battery time is to save battery power and to OFF (CHG). - ... not turn off your camcorder. To return to the standby mode, set the POWER switch to prevent battery and tape wear. However, check the following: - Recording - Basics Recording a picture Note on the LOCK switch (except DCR-TRV16) When you slide the LOCK switch to the right, the POWER switch can ...

Operating Instructions
Page 29
... pictures with the LCD panel closed, check the picture with LCD BRIGHT, then press the dial. (3) Press MENU to CAMERA, VCR or MEMORY (except DCR-TRV16). Lift up the viewfinder and move the viewfinder lens adjustment lever. Set the POWER switch to your eyesight so that...the viewfinder come into sharp focus. in the menu settings when using the battery pack (p. 178). Adjust the viewfinder lens to CAMERA, VCR or MEMORY (except DCR-TRV16). The viewfinder lens adjustment lever Viewfinder backlight You can change the brightness of the backlight. Recording - Basics Recording a picture...
... pictures with the LCD panel closed, check the picture with LCD BRIGHT, then press the dial. (3) Press MENU to CAMERA, VCR or MEMORY (except DCR-TRV16). Lift up the viewfinder and move the viewfinder lens adjustment lever. Set the POWER switch to your eyesight so that...the viewfinder come into sharp focus. in the menu settings when using the battery pack (p. 178). Adjust the viewfinder lens to CAMERA, VCR or MEMORY (except DCR-TRV16). The viewfinder lens adjustment lever Viewfinder backlight You can change the brightness of the backlight. Recording - Basics Recording a picture...

Operating Instructions
Page 31
... SET MEMORY on the LCD screen. During recording in the recording mode. Recording - Basics Recording a picture Shooting with the Mirror Mode This feature allows the camera subject to CAMERA or MEMORY (except DCR-TRV16).
... SET MEMORY on the LCD screen. During recording in the recording mode. Recording - Basics Recording a picture Shooting with the Mirror Mode This feature allows the camera subject to CAMERA or MEMORY (except DCR-TRV16).

Operating Instructions
Page 32
... settings when recorded) are recorded automatically onto tape. Time code The time code indicates the recording or playback time, "0:00:00" (hours : minutes : seconds) in CAMERA and "0:00:00:00" (hours : minutes : seconds : frames) in which you insert a cassette and record or play back for the correct remaining battery time in...
... settings when recorded) are recorded automatically onto tape. Time code The time code indicates the recording or playback time, "0:00:00" (hours : minutes : seconds) in CAMERA and "0:00:00:00" (hours : minutes : seconds : frames) in which you insert a cassette and record or play back for the correct remaining battery time in...
Operating Instructions
Page 33
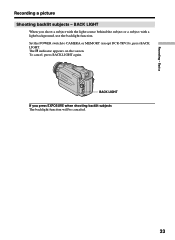
The . Set the POWER switch to CAMERA or MEMORY (except DCR-TRV16), press BACK LIGHT. BACK LIGHT If you shoot a subject with the light source behind the subject or a subject with a light background, use the backlight function. Basics Recording a picture Shooting backlit subjects - indicator appears on the screen. BACK LIGHT When you press EXPOSURE when shooting backlit subjects The backlight function will be canceled. 33 To cancel, press BACK LIGHT again. Recording -
The . Set the POWER switch to CAMERA or MEMORY (except DCR-TRV16), press BACK LIGHT. BACK LIGHT If you shoot a subject with the light source behind the subject or a subject with a light background, use the backlight function. Basics Recording a picture Shooting backlit subjects - indicator appears on the screen. BACK LIGHT When you press EXPOSURE when shooting backlit subjects The backlight function will be canceled. 33 To cancel, press BACK LIGHT again. Recording -
Operating Instructions
Page 34
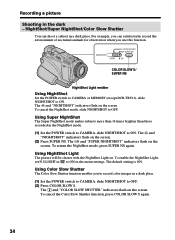
...Shutter The Color Slow Shutter function enables you use this function. Recording a picture Shooting in the NightShot mode. (1) Set the POWER switch to CAMERA, slide NIGHTSHOT to ON. To enable the NightShot Light, set N.S.LIGHT in the menu settings. The and "NIGHTSHOT" indicators flash on the ...NIGHTSHOT OFF COLOR SLOW S SUPER NS ON COLOR SLOW S/ SUPER NS NightShot Light emitter Using NightShot Set the POWER switch to CAMERA or MEMORY (except DCR-TRV16), slide NIGHTSHOT to OFF. Using Super NightShot The Super NightShot mode makes subjects more than 16 times brighter than those ...
...Shutter The Color Slow Shutter function enables you use this function. Recording a picture Shooting in the NightShot mode. (1) Set the POWER switch to CAMERA, slide NIGHTSHOT to ON. To enable the NightShot Light, set N.S.LIGHT in the menu settings. The and "NIGHTSHOT" indicators flash on the ...NIGHTSHOT OFF COLOR SLOW S SUPER NS ON COLOR SLOW S/ SUPER NS NightShot Light emitter Using NightShot Set the POWER switch to CAMERA or MEMORY (except DCR-TRV16), slide NIGHTSHOT to OFF. Using Super NightShot The Super NightShot mode makes subjects more than 16 times brighter than those ...

Operating Instructions
Page 36
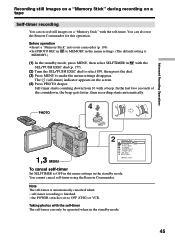
... self-timer using the Remote Commander. You can also record still images on the screen. (4) Press START/STOP. START/STOP 4 START/STOP 2 CAMERA SET SELFTIMER OFF D ZOOM ON PHOTO REC 16:9WIDE STEADYSHOT FRAME REC INT. The (self-timer) indicator appears on "Memory Stick"s with the ... switch is finished. - Self-timer recording is set to make the menu settings disappear. The POWER switch is automatically canceled when: - Except DCR-TRV16 Recording with the self-timer starts in with a beep. Recording a picture Self-timer recording - Note The self-timer is set to ...
... self-timer using the Remote Commander. You can also record still images on the screen. (4) Press START/STOP. START/STOP 4 START/STOP 2 CAMERA SET SELFTIMER OFF D ZOOM ON PHOTO REC 16:9WIDE STEADYSHOT FRAME REC INT. The (self-timer) indicator appears on "Memory Stick"s with the ... switch is finished. - Self-timer recording is set to make the menu settings disappear. The POWER switch is automatically canceled when: - Except DCR-TRV16 Recording with the self-timer starts in with a beep. Recording a picture Self-timer recording - Note The self-timer is set to ...

Operating Instructions
Page 38
...when the LCD panel is closed. - : To turn the volume down + : To turn the LCD panel over and move it back to the camcorder body with your camcorder. (1) Prepare the power supply and insert the recorded tape. (2) Set the POWER switch to VCR while pressing the small green button. (3) Open ...(5) Press N to start playback. (6) To adjust the volume, press either of the two buttons on the screen. - When monitoring on for a long time Your camcorder gets warm. If you close the LCD panel 38 Make sure that the LCD panel is not a malfunction. Playback - Playing back a tape You can turn...
...when the LCD panel is closed. - : To turn the volume down + : To turn the LCD panel over and move it back to the camcorder body with your camcorder. (1) Prepare the power supply and insert the recorded tape. (2) Set the POWER switch to VCR while pressing the small green button. (3) Open ...(5) Press N to start playback. (6) To adjust the volume, press either of the two buttons on the screen. - When monitoring on for a long time Your camcorder gets warm. If you close the LCD panel 38 Make sure that the LCD panel is not a malfunction. Playback - Playing back a tape You can turn...
Operating Instructions
Page 44
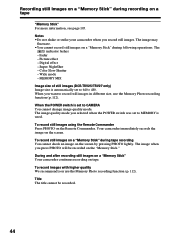
...automatically set to CAMERA You cannot change image quality mode. Wide mode - The image when you record still images. During and after recording still images on a "Memory Stick" Your camcorder continues recording on the screen. MEMORY MIX Image size of still images (DCR-TRV25/TRV27 only) Image... the Remote Commander. To record images with higher quality We recommend you want to 640 × 480. Picture effect - Digital effect - The indicator fashes: - Super NightShot - To record still images using the Remote Commander Press PHOTO on a "Memory Stick" during following...
...automatically set to CAMERA You cannot change image quality mode. Wide mode - The image when you record still images. During and after recording still images on a "Memory Stick" Your camcorder continues recording on the screen. MEMORY MIX Image size of still images (DCR-TRV25/TRV27 only) Image... the Remote Commander. To record images with higher quality We recommend you want to 640 × 480. Picture effect - Digital effect - The indicator fashes: - Super NightShot - To record still images using the Remote Commander Press PHOTO on a "Memory Stick" during following...
Operating Instructions
Page 45
... the Remote Commander for this operation. self-timer recording is automatically canceled when: - Before operation •Insert a "Memory Stick" into your camcorder (p. 106). •Set PHOTO REC in to MEMORY in the menu settings. (The default setting is set to make the menu settings disappear.... PHOTO 4 PHOTO 1,3 MENU 2 CAMERA SET SELFTIMER OFF D ZOOM ON PHOTO REC 16:9WIDE STEADYSHOT FRAME REC INT. The (self-timer) indicator appears on a "Memory Stick" with ...
... the Remote Commander for this operation. self-timer recording is automatically canceled when: - Before operation •Insert a "Memory Stick" into your camcorder (p. 106). •Set PHOTO REC in to MEMORY in the menu settings. (The default setting is set to make the menu settings disappear.... PHOTO 4 PHOTO 1,3 MENU 2 CAMERA SET SELFTIMER OFF D ZOOM ON PHOTO REC 16:9WIDE STEADYSHOT FRAME REC INT. The (self-timer) indicator appears on a "Memory Stick" with ...
Operating Instructions
Page 48
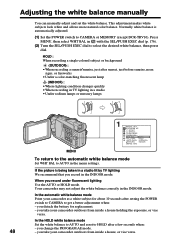
...If the picture is automatically adjusted. (1) Set the POWER switch to HOLD after a few seconds when: - In the automatic white balance mode Point your camcorder outdoors from inside a house holding the exposure, or vice versa. HOLD : When recording a single-colored subject or background (OUTDOOR) : •When ...manually adjust and set the white balance. In the HOLD white balance mode Set the white balance to AUTO and reset to CAMERA or MEMORY (except DCR-TRV16). you detach the battery for about 10 seconds after sunset, just before sunrise, neon signs, or fireworks •Under...
...If the picture is automatically adjusted. (1) Set the POWER switch to HOLD after a few seconds when: - In the automatic white balance mode Point your camcorder outdoors from inside a house holding the exposure, or vice versa. HOLD : When recording a single-colored subject or background (OUTDOOR) : •When ...manually adjust and set the white balance. In the HOLD white balance mode Set the white balance to AUTO and reset to CAMERA or MEMORY (except DCR-TRV16). you detach the battery for about 10 seconds after sunset, just before sunrise, neon signs, or fireworks •Under...
Operating Instructions
Page 54
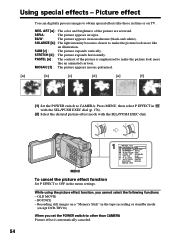
...While using the picture effect function, you set the POWER switch to other than CAMERA Picture effect is emphasized to obtain special effects like an illustration. Picture effect You can digitally process images to make the picture look more like those in the tape recording ...or standby mode (except DCR-TRV16) When you cannot select the following functions: - B&W : The picture appears ...
...While using the picture effect function, you set the POWER switch to other than CAMERA Picture effect is emphasized to obtain special effects like an illustration. Picture effect You can digitally process images to make the picture look more like those in the tape recording ...or standby mode (except DCR-TRV16) When you cannot select the following functions: - B&W : The picture appears ...


