Operating Instructions
Page 2
... sunlight. Congratulations on your purchase of Conformity Trade Name: SONY Model No.: DCR-TRV18 Responsible Party:Sony Electronics Inc. For customers in the U.S.A. Address: 680 Kinderkamack Road, Oradell, NJ07649 U.S.A. Your Handycam is loaded with advanced features, but at the same time... may cause undesired operation. 2 With your used rechargeable batteries to the following two conditions.: (1) This device may not cause harmful interference, and (2)this device must accept any questions about this Sony Handycam. Notice If static electricity or electromagnetism causes ...
... sunlight. Congratulations on your purchase of Conformity Trade Name: SONY Model No.: DCR-TRV18 Responsible Party:Sony Electronics Inc. For customers in the U.S.A. Address: 680 Kinderkamack Road, Oradell, NJ07649 U.S.A. Your Handycam is loaded with advanced features, but at the same time... may cause undesired operation. 2 With your used rechargeable batteries to the following two conditions.: (1) This device may not cause harmful interference, and (2)this device must accept any questions about this Sony Handycam. Notice If static electricity or electromagnetism causes ...

Operating Instructions
Page 3
...circuit different from that to which can radiate radio frequency energy and, if not installed and used in this device must accept any changes or modifications not expressly approved in accordance with the...between the equipment and receiver. - Consult the dealer or an experienced radio/ TV technician for a Class B digital device, pursuant to the following measures: - Telephone No.: 201-930-6972 This device complies with Part 15... 15 of Conformity Trade Name: SONY Model No.: DCR-TRV25, DCR- If this equipment. Address: 680 Kinderkamack Road, Oradell, NJ07649 U.S.A.
...circuit different from that to which can radiate radio frequency energy and, if not installed and used in this device must accept any changes or modifications not expressly approved in accordance with the...between the equipment and receiver. - Consult the dealer or an experienced radio/ TV technician for a Class B digital device, pursuant to the following measures: - Telephone No.: 201-930-6972 This device complies with Part 15... 15 of Conformity Trade Name: SONY Model No.: DCR-TRV25, DCR- If this equipment. Address: 680 Kinderkamack Road, Oradell, NJ07649 U.S.A.
Operating Instructions
Page 4
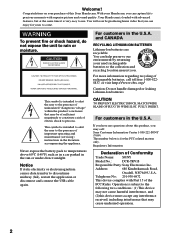
... Features •Viewing images recorded on a "Memory Stick" using the USB cable* (p. 169, 173) •Viewing images recorded on a tape using the USB cable (p. 165) •Capturing images on your computer from your camcorder using the USB cable (p. 166) •Converting an analog signal into digital to capture images onto your computer (p. 174) Capturing images...
... Features •Viewing images recorded on a "Memory Stick" using the USB cable* (p. 169, 173) •Viewing images recorded on a tape using the USB cable (p. 165) •Capturing images on your computer from your camcorder using the USB cable (p. 166) •Converting an analog signal into digital to capture images onto your computer (p. 174) Capturing images...
Operating Instructions
Page 5
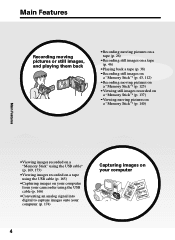
...;Picture effect (p. 54) •Digital effect (p. 55) •Titles (p. 98) •MEMORY MIX* (p. 120) Functions for giving a natural appearance to your recordings •Landscape (p. 58) •Sports lesson (p. 58) •Manual focus (p. 61) Functions for using after recording •END SEARCH/EDITSEARCH.../Rec Review (p. 37) •DATA CODE (p. 39) •Tape PB ZOOM (p. 67)/Memory PB ZOOM* (p. 145) •ZERO SET MEMORY (p. 69) •TITLE SEARCH (p. 70) •Digital program editing (p. 78, 132*) * Except DCR-TRV16 5
...;Picture effect (p. 54) •Digital effect (p. 55) •Titles (p. 98) •MEMORY MIX* (p. 120) Functions for giving a natural appearance to your recordings •Landscape (p. 58) •Sports lesson (p. 58) •Manual focus (p. 61) Functions for using after recording •END SEARCH/EDITSEARCH.../Rec Review (p. 37) •DATA CODE (p. 39) •Tape PB ZOOM (p. 67)/Memory PB ZOOM* (p. 145) •ZERO SET MEMORY (p. 69) •TITLE SEARCH (p. 70) •Digital program editing (p. 78, 132*) * Except DCR-TRV16 5
Operating Instructions
Page 6
...Digital program editing (on a "Memory Stick" - Memory Photo recording ......... 112 Recording an image from a VCR - Display function 39 Viewing the recording on TV 42 Advanced Recording Operations Recording still images on a "Memory Stick" during recording on a tape (except DCR-TRV16 43 Recording still images on a "Memory Stick" (except DCR-TRV16 10 Getting Started Using... a title 98 Making your own titles 101 Labeling a cassette 103 "Memory Stick" Operations (except DCR-TRV16) Using a "Memory Stick" - Recording on a tape - END SEARCH/EDITSEARCH/ Rec Review 37 Playback ...
...Digital program editing (on a "Memory Stick" - Memory Photo recording ......... 112 Recording an image from a VCR - Display function 39 Viewing the recording on TV 42 Advanced Recording Operations Recording still images on a "Memory Stick" during recording on a tape (except DCR-TRV16 43 Recording still images on a "Memory Stick" (except DCR-TRV16 10 Getting Started Using... a title 98 Making your own titles 101 Labeling a cassette 103 "Memory Stick" Operations (except DCR-TRV16) Using a "Memory Stick" - Recording on a tape - END SEARCH/EDITSEARCH/ Rec Review 37 Playback ...
Operating Instructions
Page 7
... Digital program editing (on a "Memory Stick" with your computer using the USB cable - PRINT MARK 151 Using the optional printer 152 Viewing Images Using Your Computer Viewing images with your computer - For Windows users (except DCR-TRV16 169 Connecting your camcorder to your computer using ... 192 Additional Information Usable cassettes 194 About the "InfoLITHIUM" battery pack 197 About i.LINK 199 Using your camcorder abroad .......... 201 Maintenance information and precautions 202 Specifications 207 Quick Reference Identifying parts and controls 209 Index 219 7...
... Digital program editing (on a "Memory Stick" with your computer using the USB cable - PRINT MARK 151 Using the optional printer 152 Viewing Images Using Your Computer Viewing images with your computer - For Windows users (except DCR-TRV16 169 Connecting your camcorder to your computer using ... 192 Additional Information Usable cassettes 194 About the "InfoLITHIUM" battery pack 197 About i.LINK 199 Using your camcorder abroad .......... 201 Maintenance information and precautions 202 Specifications 207 Quick Reference Identifying parts and controls 209 Index 219 7...
Operating Instructions
Page 8
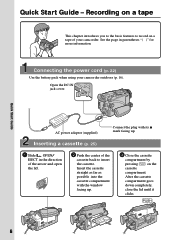
See the page in the direction of the arrow and open the lid. 2 Push the center of your camcorder outdoors (p. 16). Open the DC IN jack cover. Insert the cassette straight as far as possible into the cassette compartment with its v.... After the cassette compartment goes down completely, close the lid until it clicks. 8 Quick Start Guide - Connecting the power cord (p. 22) Use the battery pack when using your camcorder. Inserting a cassette (p. 25) 1 Slide OPEN/ EJECT in parentheses "( )" for more information. Recording on a tape This chapter introduces you ...
See the page in the direction of the arrow and open the lid. 2 Push the center of your camcorder outdoors (p. 16). Open the DC IN jack cover. Insert the cassette straight as far as possible into the cassette compartment with its v.... After the cassette compartment goes down completely, close the lid until it clicks. 8 Quick Start Guide - Connecting the power cord (p. 22) Use the battery pack when using your camcorder. Inserting a cassette (p. 25) 1 Slide OPEN/ EJECT in parentheses "( )" for more information. Recording on a tape This chapter introduces you ...

Operating Instructions
Page 9
... time for a picture, set to your eye against the eyecup. Your camcorder starts recording. PLAY NOTE Do not pick up your camcorder, the clock setting is closed, use the viewfinder with your eyesight (p. 29). 4 Press START/STOP. If you purchase your camcorder by holding the viewfinder, the LCD panel, or the battery pack. 9 POWER...
... time for a picture, set to your eye against the eyecup. Your camcorder starts recording. PLAY NOTE Do not pick up your camcorder, the clock setting is closed, use the viewfinder with your eyesight (p. 29). 4 Press START/STOP. If you purchase your camcorder by holding the viewfinder, the LCD panel, or the battery pack. 9 POWER...
Operating Instructions
Page 10
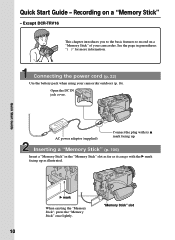
...as illustrated. Open the DC IN jack cover. Except DCR-TRV16 This chapter introduces you to the basic features to record on a "Memory Stick" - Connecting the power cord (p. 22) Use the battery pack when using your camcorder. "Memory Stick" slot 10 Quick Start Guide AC ...power adaptor (supplied) Connect the plug with the B mark facing up . Recording on a "Memory Stick" of your camcorder outdoors (p. 16). Quick Start Guide -
...as illustrated. Open the DC IN jack cover. Except DCR-TRV16 This chapter introduces you to the basic features to record on a "Memory Stick" - Connecting the power cord (p. 22) Use the battery pack when using your camcorder. "Memory Stick" slot 10 Quick Start Guide AC ...power adaptor (supplied) Connect the plug with the B mark facing up . Recording on a "Memory Stick" of your camcorder outdoors (p. 16). Quick Start Guide -

Operating Instructions
Page 11
If you purchase your eye against the eyecup. Make sure that the LOCK switch is closed, use the viewfinder with your camcorder, the clock setting is displayed. LOCK switch POWER VCR OFF(CHG) CAMERA MEMORY Quick Start Guide Viewfinder When the LCD panel is set to the ... your eyesight (p. 29). 4 Press PHOTO lightly. 5 Press PHOTO deeper. PHOTO PHOTO When you want to record the date and time for a picture, set to your camcorder by holding the viewfinder, the LCD panel or the battery pack. 11 Monitoring the playback still images on the LCD screen (p. 137) 1 Set the POWER...
If you purchase your eye against the eyecup. Make sure that the LOCK switch is closed, use the viewfinder with your camcorder, the clock setting is displayed. LOCK switch POWER VCR OFF(CHG) CAMERA MEMORY Quick Start Guide Viewfinder When the LCD panel is set to the ... your eyesight (p. 29). 4 Press PHOTO lightly. 5 Press PHOTO deeper. PHOTO PHOTO When you want to record the date and time for a picture, set to your camcorder by holding the viewfinder, the LCD panel or the battery pack. 11 Monitoring the playback still images on the LCD screen (p. 137) 1 Set the POWER...
Operating Instructions
Page 12
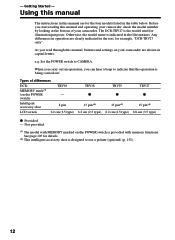
...TRV16 MEMORY mark*1) (on your camcorder. Set the POWER switch to indicate that the operation is designed to use a printer (optional) (p. 152). 12 Any differences in operation are for example, "DCR-TRV27 only". Types of your camcorder are shown in the text, for...switch is indicated in the table below. See page 105 for illustration purposes. Using this manual The instructions in this manual, buttons and settings on the POWER - switch) Intelligent accessory shoe 8 pin LCD screen 6.2 cm (2.5 type) TRV18 z 15 pin*2) 6.2 cm (2.5 type) TRV25 z 15 pin*2) 6.2 ...
...TRV16 MEMORY mark*1) (on your camcorder. Set the POWER switch to indicate that the operation is designed to use a printer (optional) (p. 152). 12 Any differences in operation are for example, "DCR-TRV27 only". Types of your camcorder are shown in the text, for...switch is indicated in the table below. See page 105 for illustration purposes. Using this manual The instructions in this manual, buttons and settings on the POWER - switch) Intelligent accessory shoe 8 pin LCD screen 6.2 cm (2.5 type) TRV18 z 15 pin*2) 6.2 cm (2.5 type) TRV25 z 15 pin*2) 6.2 ...

Operating Instructions
Page 13
... cassettes with the cassette memory are marked by (Cassette Memory). Superimposing a title (p. 98) - Getting Started Using this mark in the introduction of cassette types, see this manual Note on Cassette Memory Your camcorder is based on the country or region. Functions that you can use a tape with cassette memory are : - TITLE SEARCH (p. 70) -
... cassettes with the cassette memory are marked by (Cassette Memory). Superimposing a title (p. 98) - Getting Started Using this mark in the introduction of cassette types, see this manual Note on Cassette Memory Your camcorder is based on the country or region. Functions that you can use a tape with cassette memory are : - TITLE SEARCH (p. 70) -
Operating Instructions
Page 14
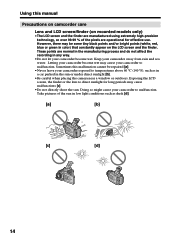
... Letting your camcorder become wet. Keep your camcorder become wet may be repaired [a]. •Never leave your camcorder exposed to malfunction. Doing so might cause your camcorder to temperatures ...above 60 °C (140 °F), such as dusk [d]. [a] [b] [c] [d] 14 Exposing the LCD screen, the finder or the lens to malfunction. However, there may cause your camcorder to direct sunlight for effective use...
... Letting your camcorder become wet. Keep your camcorder become wet may be repaired [a]. •Never leave your camcorder exposed to malfunction. Doing so might cause your camcorder to temperatures ...above 60 °C (140 °F), such as dusk [d]. [a] [b] [c] [d] 14 Exposing the LCD screen, the finder or the lens to malfunction. However, there may cause your camcorder to direct sunlight for effective use...
Operating Instructions
Page 16
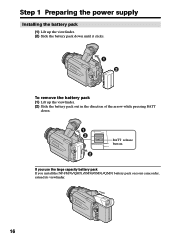
Step 1 Preparing the power supply Installing the battery pack (1) Lift up the viewfinder. (2) Slide the battery pack down until it clicks. 1 2 To remove the battery pack (1) Lift up the viewfinder. (2) Slide the battery pack out in the direction of the arrow while pressing BATT down. 1 2 2 BATT release button If you use the large capacity battery pack If you install the NP-FM70/QM71/FM90/FM91/QM91 battery pack on your camcorder, extend its viewfinder. 16
Step 1 Preparing the power supply Installing the battery pack (1) Lift up the viewfinder. (2) Slide the battery pack down until it clicks. 1 2 To remove the battery pack (1) Lift up the viewfinder. (2) Slide the battery pack out in the direction of the arrow while pressing BATT down. 1 2 2 BATT release button If you use the large capacity battery pack If you install the NP-FM70/QM71/FM90/FM91/QM91 battery pack on your camcorder, extend its viewfinder. 16
Operating Instructions
Page 17
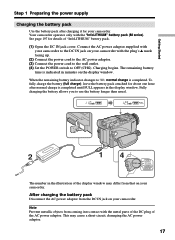
...The remaining battery time is indicated in minutes on your camcorder with the plug's v mark facing up. (2) Connect the power cord to the AC power adaptor. (3) Connect the power cord to the wall outlet. (4) Set the POWER switch to use the battery longer than usual. 2 14 VCR POWER OFF... cause a short-circuit, damaging the AC power adaptor. 17 Getting Started Step 1 Preparing the power supply Charging the battery pack Use the battery pack after normal charge is completed until FULL appears in the display window. Connect the AC power adaptor supplied with your camcorder.
...The remaining battery time is indicated in minutes on your camcorder with the plug's v mark facing up. (2) Connect the power cord to the AC power adaptor. (3) Connect the power cord to the wall outlet. (4) Set the POWER switch to use the battery longer than usual. 2 14 VCR POWER OFF... cause a short-circuit, damaging the AC power adaptor. 17 Getting Started Step 1 Preparing the power supply Charging the battery pack Use the battery pack after normal charge is completed until FULL appears in the display window. Connect the AC power adaptor supplied with your camcorder.

Operating Instructions
Page 18
... the AC power adaptor near a wall outlet. min" appears in the display window indicates the approximate recording time when recording using the AC power adaptor, if any trouble occurs with this unit, disconnect the plug from the wall outlet as soon as possible... charging time may increase if the battery's temperature is extremely high or low because of the ambient temperature. *1) DCR-TRV16/TRV18 supplied *2) DCR-TRV25/TRV27 supplied 18 While using the viewfinder. Step 1 Preparing the power supply Remaining battery time indicator The remaining battery time indicator in the display...
... the AC power adaptor near a wall outlet. min" appears in the display window indicates the approximate recording time when recording using the AC power adaptor, if any trouble occurs with this unit, disconnect the plug from the wall outlet as soon as possible... charging time may increase if the battery's temperature is extremely high or low because of the ambient temperature. *1) DCR-TRV16/TRV18 supplied *2) DCR-TRV25/TRV27 supplied 18 While using the viewfinder. Step 1 Preparing the power supply Remaining battery time indicator The remaining battery time indicator in the display...
Operating Instructions
Page 19
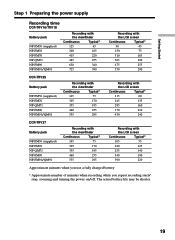
...life may be shorter. 19 Getting Started Step 1 Preparing the power supply Recording time DCR-TRV16/TRV18 Battery pack NP-FM30 (supplied) NP-FM50 NP-FM70 NP-QM71 NP-FM90 NP...295 Recording with the LCD screen Continuous Typical* 115 60 245 135 285 160 370 210 430 240 DCR-TRV27 Battery pack NP-FM50 (supplied) NP-FM70 NP-QM71 NP-FM90 NP-FM91/QM91 Recording with ... Continuous Typical* 105 55 220 125 255 140 340 190 390 220 Approximate minutes when you use a fully charged battery * Approximate number of minutes when recording while you repeat recording start/ stop, zooming and...
...life may be shorter. 19 Getting Started Step 1 Preparing the power supply Recording time DCR-TRV16/TRV18 Battery pack NP-FM30 (supplied) NP-FM50 NP-FM70 NP-QM71 NP-FM90 NP...295 Recording with the LCD screen Continuous Typical* 115 60 245 135 285 160 370 210 430 240 DCR-TRV27 Battery pack NP-FM50 (supplied) NP-FM70 NP-QM71 NP-FM90 NP-FM91/QM91 Recording with ... Continuous Typical* 105 55 220 125 255 140 340 190 390 220 Approximate minutes when you use a fully charged battery * Approximate number of minutes when recording while you repeat recording start/ stop, zooming and...
Operating Instructions
Page 20
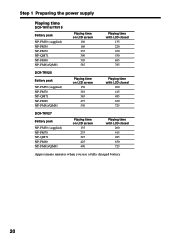
... the power supply Playing time DCR-TRV16/TRV18 Battery pack NP-FM30 (supplied) NP-FM50 NP-FM70 NP-QM71 NP-FM90 NP-FM91/QM91 Playing time on LCD screen 100 160 335 390 505 585 Playing time with LCD closed 135 220 450 530 685 785 DCR-TRV25 Battery pack NP-FM50 (supplied... NP-FM90 NP-FM91/QM91 Playing time on LCD screen 150 310 365 475 550 Playing time with LCD closed 200 415 485 630 725 DCR-TRV27 Battery pack NP-FM50 (supplied) NP-FM70 NP-QM71 NP-FM90 NP-FM91/QM91 Playing time on LCD screen 135 275 325 425 490...
... the power supply Playing time DCR-TRV16/TRV18 Battery pack NP-FM30 (supplied) NP-FM50 NP-FM70 NP-QM71 NP-FM90 NP-FM91/QM91 Playing time on LCD screen 100 160 335 390 505 585 Playing time with LCD closed 135 220 450 530 685 785 DCR-TRV25 Battery pack NP-FM50 (supplied... NP-FM90 NP-FM91/QM91 Playing time on LCD screen 150 310 365 475 550 Playing time with LCD closed 200 415 485 630 725 DCR-TRV27 Battery pack NP-FM50 (supplied) NP-FM70 NP-QM71 NP-FM90 NP-FM91/QM91 Playing time on LCD screen 135 275 325 425 490...

Operating Instructions
Page 21
Recommended charging temperature We recommend charging the battery pack in a cold environment. Your camcorder operates only with compatible electronic equipment. What is compatible with the "InfoLITHIUM" battery pack (M series). If the power goes off although ...Note Approximate recording time and continuous playing time at 25 °C (77 °F). The battery life will be shorter if you use your camcorder in an ambient temperature of Sony Corporation. 21 The "InfoLITHIUM" is a lithium ion battery pack that the indication on the remaining battery time indicator is a trademark...
Recommended charging temperature We recommend charging the battery pack in a cold environment. Your camcorder operates only with compatible electronic equipment. What is compatible with the "InfoLITHIUM" battery pack (M series). If the power goes off although ...Note Approximate recording time and continuous playing time at 25 °C (77 °F). The battery life will be shorter if you use your camcorder in an ambient temperature of Sony Corporation. 21 The "InfoLITHIUM" is a lithium ion battery pack that the indication on the remaining battery time indicator is a trademark...
Operating Instructions
Page 22
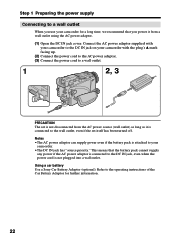
Connect the AC power adaptor supplied with your camcorder to the DC IN jack on your camcorder. •The DC IN jack has "source priority." Refer to the DC IN jack, even when...it from a wall outlet using the AC power adaptor. (1) Open the DC IN jack cover. Using a car battery Use a Sony Car Battery Adaptor (optional). Notes •The AC power adaptor can supply power even if the battery pack is attached to your camcorder with the plug's v mark...has been turned off. Step 1 Preparing the power supply Connecting to a wall outlet When you use your camcorder for further information. 22
Connect the AC power adaptor supplied with your camcorder to the DC IN jack on your camcorder. •The DC IN jack has "source priority." Refer to the DC IN jack, even when...it from a wall outlet using the AC power adaptor. (1) Open the DC IN jack cover. Using a car battery Use a Sony Car Battery Adaptor (optional). Notes •The AC power adaptor can supply power even if the battery pack is attached to your camcorder with the plug's v mark...has been turned off. Step 1 Preparing the power supply Connecting to a wall outlet When you use your camcorder for further information. 22


