
Operating Instructions
Page 2
LITHIUM ION BATTERY. Regulatory Information Declaration of this Sony Digital Handycam camcorder. You will soon be producing home video that you may cause undesired operation. Note: In some areas the disposal of lithium ion batteries in the... Digital Handycam is loaded with superior picture and sound quality. DISPOSE OF PROPERLY. WARNING To prevent fire or shock hazard, do not expose the unit to temperatures above 60°C (140°F) such as in a car parked in this manual could void your purchase of Conformity Trade Name: SONY Model No.: DCR-TRV130 Responsible...
LITHIUM ION BATTERY. Regulatory Information Declaration of this Sony Digital Handycam camcorder. You will soon be producing home video that you may cause undesired operation. Note: In some areas the disposal of lithium ion batteries in the... Digital Handycam is loaded with superior picture and sound quality. DISPOSE OF PROPERLY. WARNING To prevent fire or shock hazard, do not expose the unit to temperatures above 60°C (140°F) such as in a car parked in this manual could void your purchase of Conformity Trade Name: SONY Model No.: DCR-TRV130 Responsible...
Operating Instructions
Page 5
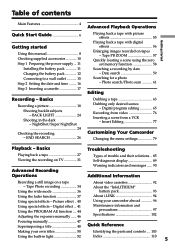
... a scene from a VCR - Picture effect .. 40 Using special effects - Digital effect ... 41 Using the PROGRAM AE function .... 44 Adjusting the exposure manually ...... 46 Using your camcorder abroad 96 Maintenance information and precautions 97 Specifications 102 Focusing manually 47 Superimposing a ... 103 Using the built-in the dark - Basics Recording a picture 18 Shooting backlit subjects - Insert Editing 77 Customizing Your Camcorder Changing the menu settings 79 Playback - Table of trouble and their solutions .. 85 Self-diagnosis display 89 Warning indicators and ...
... a scene from a VCR - Picture effect .. 40 Using special effects - Digital effect ... 41 Using the PROGRAM AE function .... 44 Adjusting the exposure manually ...... 46 Using your camcorder abroad 96 Maintenance information and precautions 97 Specifications 102 Focusing manually 47 Superimposing a ... 103 Using the built-in the dark - Basics Recording a picture 18 Shooting backlit subjects - Insert Editing 77 Customizing Your Camcorder Changing the menu settings 79 Playback - Table of trouble and their solutions .. 85 Self-diagnosis display 89 Warning indicators and ...
Operating Instructions
Page 8
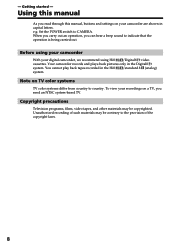
... back tapes recorded in capital letters. When you carry out an operation, you need an NTSC system-based TV. Note on your digital camcorder, we recommend using Hi8 /Digital8 video cassettes. - e.g. Before using your camcorder With your camcorder are shown in the Hi8 /standard 8 (analog) system. Your camcorder records and plays back pictures only in the...
... back tapes recorded in capital letters. When you carry out an operation, you need an NTSC system-based TV. Note on your digital camcorder, we recommend using Hi8 /Digital8 video cassettes. - e.g. Before using your camcorder With your camcorder are shown in the Hi8 /standard 8 (analog) system. Your camcorder records and plays back pictures only in the...
Operating Instructions
Page 41
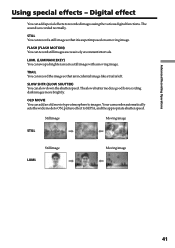
... the image so that it is good for recording dark images more brightly. Still image Moving image STILL Still image LUMI. Moving image 41 Your camcorder automatically sets the wide mode to ON, picture effect to images. The sound is left. TRAIL You can add an old movie type atmosphere to... SEPIA, and the appropriate shutter speed. Digital effect You can slow down the shutter speed. SLOW SHTR (SLOW SHUTTER) You can add special effects to recorded images using the various...
... the image so that it is good for recording dark images more brightly. Still image Moving image STILL Still image LUMI. Moving image 41 Your camcorder automatically sets the wide mode to ON, picture effect to images. The sound is left. TRAIL You can add an old movie type atmosphere to... SEPIA, and the appropriate shutter speed. Digital effect You can slow down the shutter speed. SLOW SHTR (SLOW SHUTTER) You can add special effects to recorded images using the various...

Operating Instructions
Page 45
... L OW L UX [ MENU ] : END MENU To cancel the PROGRAM AE function Set PROGRAM AE to AUTO in the PROGRAM AE mode: - This is because your camcorder is set to focus only on subjects in the middle to far distance. •In the sunset & moon and landscape modes, your... camcorder is set to ON, the PROGRAM AE function does not work. (The indicator flashes.) Even if the PROGRAM AE function is selected You can adjust the exposure manually. Digital effect - Overlap - Old movie - Dot •While setting NIGHTSHOT to focus...
... L OW L UX [ MENU ] : END MENU To cancel the PROGRAM AE function Set PROGRAM AE to AUTO in the PROGRAM AE mode: - This is because your camcorder is set to focus only on subjects in the middle to far distance. •In the sunset & moon and landscape modes, your... camcorder is set to ON, the PROGRAM AE function does not work. (The indicator flashes.) Even if the PROGRAM AE function is selected You can adjust the exposure manually. Digital effect - Overlap - Old movie - Dot •While setting NIGHTSHOT to focus...

Operating Instructions
Page 56
... L UM I . To record images that you have processed using the digital effect function with digital effects During playback, you have processed using the digital effect function, record the images on the VCR using the digital effect functions: STILL, FLASH, LUMI. Playing back a tape with this camcorder. or TRAIL) in the menu settings (p. 80). (2) Select the...
... L UM I . To record images that you have processed using the digital effect function with digital effects During playback, you have processed using the digital effect function, record the images on the VCR using the digital effect functions: STILL, FLASH, LUMI. Playing back a tape with this camcorder. or TRAIL) in the menu settings (p. 80). (2) Select the...
Operating Instructions
Page 64
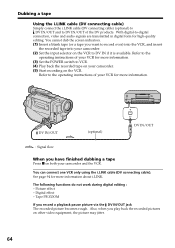
...DV S VIDEO DV IN/OUT : Signal flow When you want to record over) into the VCR, and insert the recorded tape into your camcorder. (5) Start recording on both your VCR for more information about i.LINK. You can connect one VCR only using the i.LINK cable (DV... effect - The following functions do not work during digital editing : - With digital-to-digital connection, video and audio signals are transmitted in digital form for more information. (3) Set the POWER switch to VCR. (4) Play back the recorded tape on your camcorder. (2) Set the input selector on other video equipment...
...DV S VIDEO DV IN/OUT : Signal flow When you want to record over) into the VCR, and insert the recorded tape into your camcorder. (5) Start recording on both your VCR for more information about i.LINK. You can connect one VCR only using the i.LINK cable (DV... effect - The following functions do not work during digital editing : - With digital-to-digital connection, video and audio signals are transmitted in digital form for more information. (3) Set the POWER switch to VCR. (4) Play back the recorded tape on your camcorder. (2) Set the input selector on other video equipment...
Operating Instructions
Page 66
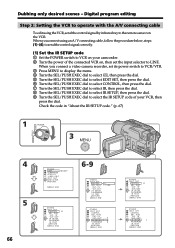
L I NK OTHERS ED I R ADJ TEST " CUT- Digital program editing Step 2: Setting the VCR to operate with the A/V connecting cable To edit using an A/V connecting cable, follow the procedure below, steps (1)~(4), to send ..., then press the dial. When you connect using the VCR, send the control signal by infrared ray to select the IR SETUP code of your camcorder. 2 Turn the power of the connected VCR on the VCR. Dubbing only desired scenes - Check the code in "About the IR SETUP code." (p. 67) OFF...
L I NK OTHERS ED I R ADJ TEST " CUT- Digital program editing Step 2: Setting the VCR to operate with the A/V connecting cable To edit using an A/V connecting cable, follow the procedure below, steps (1)~(4), to send ..., then press the dial. When you connect using the VCR, send the control signal by infrared ray to select the IR SETUP code of your camcorder. 2 Turn the power of the connected VCR on the VCR. Dubbing only desired scenes - Check the code in "About the IR SETUP code." (p. 67) OFF...
Operating Instructions
Page 67
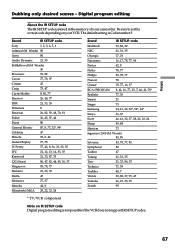
Digital program editing About the IR SETUP code The IR SETUP code is Code number 3. The default setting is... Toshiba 40, 7 Wards 89, 88, 37, 95, 47 Yamaha 36, 21, 33, 35 Zenith 95 * TV/VCR component Note on your camcorder. Wards) 89 Aiwa 80 Audio Dynamic 21, 35 Bell&Howell (M. Wards) 36 Brocsonic 70, 82 Canon 77, 78, 97 Citizen 47 Craig 73..., 24 Sharp 89, 88 Shintom 73 Signature 2000 (M. Be sure to set the correct code depending on IR SETUP code Digital program editing is not possible if the VCR does not support IR SETUP codes. 67 Brand IR SETUP code...
Digital program editing About the IR SETUP code The IR SETUP code is Code number 3. The default setting is... Toshiba 40, 7 Wards 89, 88, 37, 95, 47 Yamaha 36, 21, 33, 35 Zenith 95 * TV/VCR component Note on your camcorder. Wards) 89 Aiwa 80 Audio Dynamic 21, 35 Bell&Howell (M. Wards) 36 Brocsonic 70, 82 Canon 77, 78, 97 Citizen 47 Craig 73..., 24 Sharp 89, 88 Shintom 73 Signature 2000 (M. Be sure to set the correct code depending on IR SETUP code Digital program editing is not possible if the VCR does not support IR SETUP codes. 67 Brand IR SETUP code...

Operating Instructions
Page 68
... canceling recording pause on the VCR The buttons vary depending on your camcorder and face it towards the remote sensor of the VCR. Infrared rays emitter Remote sensor A/V connecting cable (optional) 68 Digital program editing (2) Setting the modes to cancel recording pause on the...R SETUP P AUS EMODE P AUS E I T SET CONTROL ADJ TEST " CUT- Dubbing only desired scenes - Select PB if the button to cancel recording pause is N. (3) Setting your camcorder and the VCR to cancel recording pause is X. - I N " " CUT-OUT " I R SETUP P AUS EMODE P AUS E I R TEST REC RETURN PB [ MENU ] :...
... canceling recording pause on the VCR The buttons vary depending on your camcorder and face it towards the remote sensor of the VCR. Infrared rays emitter Remote sensor A/V connecting cable (optional) 68 Digital program editing (2) Setting the modes to cancel recording pause on the...R SETUP P AUS EMODE P AUS E I T SET CONTROL ADJ TEST " CUT- Dubbing only desired scenes - Select PB if the button to cancel recording pause is N. (3) Setting your camcorder and the VCR to cancel recording pause is X. - I N " " CUT-OUT " I R SETUP P AUS EMODE P AUS E I R TEST REC RETURN PB [ MENU ] :...
Operating Instructions
Page 69
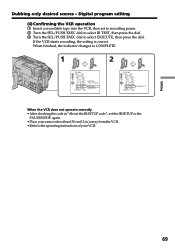
... I R TEST RETURN RETURN EXECUTE [ MENU ] : END OTHERS ED I T SET CONTROL ADJ TEST " CUT- Digital program editing (4) Confirming the VCR operation 1 Insert a recordable tape into the VCR, then set the IR SETUP or the PAUSEMODE again. •Place your camcorder at least 30 cm (12 in.) away from the VCR. • Refer to...
... I R TEST RETURN RETURN EXECUTE [ MENU ] : END OTHERS ED I T SET CONTROL ADJ TEST " CUT- Digital program editing (4) Confirming the VCR operation 1 Insert a recordable tape into the VCR, then set the IR SETUP or the PAUSEMODE again. •Place your camcorder at least 30 cm (12 in.) away from the VCR. • Refer to...
Operating Instructions
Page 70
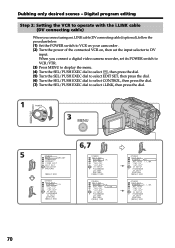
... editing Step 2: Setting the VCR to operate with the i.LINK cable (DV connecting cable) When you connect a digital video camera recorder, set the input selector to select i.LINK, then press the dial. OFF (CHARGE) 1 POWER VCR 3 MENU CAMERA 5 OTHERS BEEP ME LODY COMMA ... TEST " CUT- When you connect using an i.LINK cable (DV connecting cable) (optional), follow the procedure below. (1) Set the POWER switch to VCR on your camcorder . (2) Turn the power of the connected VCR on, then set its POWER switch to VCR/VTR. (3) Press MENU to display the menu. (4) Turn the SEL...
... editing Step 2: Setting the VCR to operate with the i.LINK cable (DV connecting cable) When you connect a digital video camera recorder, set the input selector to select i.LINK, then press the dial. OFF (CHARGE) 1 POWER VCR 3 MENU CAMERA 5 OTHERS BEEP ME LODY COMMA ... TEST " CUT- When you connect using an i.LINK cable (DV connecting cable) (optional), follow the procedure below. (1) Set the POWER switch to VCR on your camcorder . (2) Turn the power of the connected VCR on, then set its POWER switch to VCR/VTR. (3) Press MENU to display the menu. (4) Turn the SEL...
Operating Instructions
Page 71
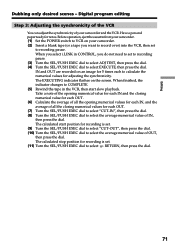
.../PUSH EXEC dial to select "CUT-IN", then press the dial. (8) Turn the SEL/PUSH EXEC dial to select the average numerical value of your camcorder. (2) Insert a blank tape (or a tape you do not need to set . (9) Turn the SEL/PUSH EXEC dial to select "CUT-OUT", then press the dial... recording is set to select RETURN, then press the dial. 71 Have a pen and paper ready for each to select EXECUTE, then press the dial. Digital program editing Step 3: Adjusting the synchronicity of the VCR You can adjust the synchronicity of IN, then press the dial. Take a note of the opening...
.../PUSH EXEC dial to select "CUT-IN", then press the dial. (8) Turn the SEL/PUSH EXEC dial to select the average numerical value of your camcorder. (2) Insert a blank tape (or a tape you do not need to set . (9) Turn the SEL/PUSH EXEC dial to select "CUT-OUT", then press the dial... recording is set to select RETURN, then press the dial. 71 Have a pen and paper ready for each to select EXECUTE, then press the dial. Digital program editing Step 3: Adjusting the synchronicity of the VCR You can adjust the synchronicity of IN, then press the dial. Take a note of the opening...

Operating Instructions
Page 72
... CONTROL ADJ TEST " CUT- I N " EXECUTE " CUT-OUT " I R SETUP P AUS EMODE I R TEST [ ME OTHERS ED I T SET CONTROL AD J TEST EXECUT I T SET CONTROL ADJ TEST RETURN " CUT- Digital program editing 7 3,4 OTHERS ED I NG " CUT- Be sure to adjust the syncronicity is recorded for high-quality editing. 72 I N " " CU T -OU T " N.o 2 I R SETUP I N P AUS EMODE +215... 3, the image to allow about 50 seconds. • If you start recording from the very beginning of the tape, the first few seconds of your camcorder . • When you may not record properly.
... CONTROL ADJ TEST " CUT- I N " EXECUTE " CUT-OUT " I R SETUP P AUS EMODE I R TEST [ ME OTHERS ED I T SET CONTROL AD J TEST EXECUT I T SET CONTROL ADJ TEST RETURN " CUT- Digital program editing 7 3,4 OTHERS ED I NG " CUT- Be sure to adjust the syncronicity is recorded for high-quality editing. 72 I N " " CU T -OU T " N.o 2 I R SETUP I N P AUS EMODE +215... 3, the image to allow about 50 seconds. • If you start recording from the very beginning of the tape, the first few seconds of your camcorder . • When you may not record properly.
Operating Instructions
Page 73
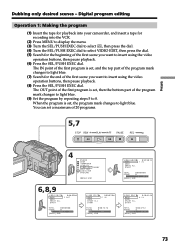
Digital program editing Operation 1: Making the program (1) Insert the tape for playback into your camcorder, and insert a tape for recording into the VCR. (2) Press MENU to display the menu. (3) Turn the SEL/PUSH EXEC dial to select , then press the ...
Digital program editing Operation 1: Making the program (1) Insert the tape for playback into your camcorder, and insert a tape for recording into the VCR. (2) Press MENU to display the menu. (3) Turn the SEL/PUSH EXEC dial to select , then press the ...
Operating Instructions
Page 74
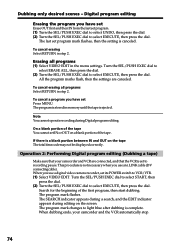
...step 2. Search for the beginning of the tape. The program mark changes to select EXECUTE, then press the dial. When dubbing ends, your camcorder and VCR are canceled. On a blank portion of the tape You cannot set its POWER switch to recording pause. The SEARCH indicator appears ... portion of the first program, then start dubbing. All the program marks flash, then the settings are connected, and that your camcorder and the VCR automatically stop. 74 Digital program editing Erasing the program you use a digital video camera recorder, set IN or OUT on the screen.
...step 2. Search for the beginning of the tape. The program mark changes to select EXECUTE, then press the dial. When dubbing ends, your camcorder and VCR are canceled. On a blank portion of the tape You cannot set its POWER switch to recording pause. The SEARCH indicator appears ... portion of the first program, then start dubbing. All the program marks flash, then the settings are connected, and that your camcorder and the VCR automatically stop. 74 Digital program editing Erasing the program you use a digital video camera recorder, set IN or OUT on the screen.
Operating Instructions
Page 75
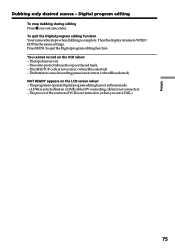
... the menu settings. You cannot record on the LCD screen when: - Thebuttontocancelrecordingpauseisnotcorrect.(whenIRisselected) NOT READY appears on the VCR when: - To quit the Digital program editing function Your camcorder stops when dubbing is not connected. - Thetapehasrunout. - i.LINK is selected but an i.LINK cable (DV connecting cable) is complete. Editing Dubbing only desired...
... the menu settings. You cannot record on the LCD screen when: - Thebuttontocancelrecordingpauseisnotcorrect.(whenIRisselected) NOT READY appears on the VCR when: - To quit the Digital program editing function Your camcorder stops when dubbing is not connected. - Thetapehasrunout. - i.LINK is selected but an i.LINK cable (DV connecting cable) is complete. Editing Dubbing only desired...
Operating Instructions
Page 76
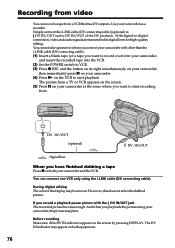
...on its right simultaneously on your camcorder, then immediately press X on your camcorder, the picture may jitter. Before recording Make sure if the DV IN indicator appears on both your camcorder at the scene where you want to start playback. During digital editing The color of the DV ... DV IN indicator may be uneven. You cannot take a picture in digital form for high-quality editing. And when you connect your camcorder as a recorder. Recording from video You can connect one VCR only using your camcorder. (4) Press N on the VCR to start recording from a VCR that...
...on its right simultaneously on your camcorder, then immediately press X on your camcorder, the picture may jitter. Before recording Make sure if the DV IN indicator appears on both your camcorder at the scene where you want to start playback. During digital editing The color of the DV ... DV IN indicator may be uneven. You cannot take a picture in digital form for high-quality editing. And when you connect your camcorder as a recorder. Recording from video You can connect one VCR only using your camcorder. (4) Press N on the VCR to start recording from a VCR that...
Operating Instructions
Page 80
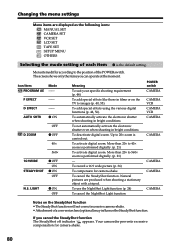
... add special effects using the various digital functions (p. 42, 56). To activate digital zoom. More than 20× to 40× zoom is performed digitally. (p. 21) - More than 20× to 20× zoom is the default setting. Your camcorder prevents excessive compensation for camera-shake To... items you cancel the SteadyShot function The SteadyShot off indicator appears. D EFFECT -- Up to 560× zoom is performed digitally. (p. 21) To activate digital zoom. Icon/item Mode PROGRAM AE -- To use the NightShot Light function (p. 24) To cancel the NightShot Light function...
... add special effects using the various digital functions (p. 42, 56). To activate digital zoom. More than 20× to 40× zoom is performed digitally. (p. 21) - More than 20× to 20× zoom is the default setting. Your camcorder prevents excessive compensation for camera-shake To... items you cancel the SteadyShot function The SteadyShot off indicator appears. D EFFECT -- Up to 560× zoom is performed digitally. (p. 21) To activate digital zoom. Icon/item Mode PROGRAM AE -- To use the NightShot Light function (p. 24) To cancel the NightShot Light function...
Operating Instructions
Page 82
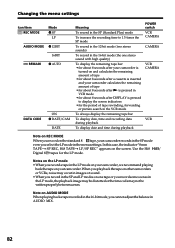
... menu settings. Note on AUDIO MODE When playing back a tape recorded in the 16-bit mode, you record a tape in the LP mode on your camcorder, we recommend playing back the tape on the LP mode •When you cannot adjust the balance in AUDIO MIX. 82 In this case, the... "8 mm TAPEt SP REC, Hi8 TAPEt LP/SP REC" appears on the standard 8 tape, your camcorder. When you play back the tape on other camcorders or VCRs, noise may not be written properly between scenes. Use the Hi8 / Digital 8 tapes for the period of tape • for about 8 seconds after N is pressed in...
... menu settings. Note on AUDIO MODE When playing back a tape recorded in the 16-bit mode, you record a tape in the LP mode on your camcorder, we recommend playing back the tape on the LP mode •When you cannot adjust the balance in AUDIO MIX. 82 In this case, the... "8 mm TAPEt SP REC, Hi8 TAPEt LP/SP REC" appears on the standard 8 tape, your camcorder. When you play back the tape on other camcorders or VCRs, noise may not be written properly between scenes. Use the Hi8 / Digital 8 tapes for the period of tape • for about 8 seconds after N is pressed in...


