
Operating Instructions
Page 1
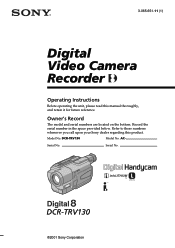
Serial No. Model No. Record the serial number in the space provided below. Serial No. AC- 3-065-651-11 (1) Digital Video Camera Recorder Operating Instructions Before operating the unit, please read this product. DCR-TRV130 Model No. Owner's Record The model and serial numbers are located on the bottom. DCR-TRV130 ©2001 Sony Corporation Refer to these numbers whenever you call upon your Sony dealer regarding this manual thoroughly, and retain it for future reference.
Serial No. Model No. Record the serial number in the space provided below. Serial No. AC- 3-065-651-11 (1) Digital Video Camera Recorder Operating Instructions Before operating the unit, please read this product. DCR-TRV130 Model No. Owner's Record The model and serial numbers are located on the bottom. DCR-TRV130 ©2001 Sony Corporation Refer to these numbers whenever you call upon your Sony dealer regarding this manual thoroughly, and retain it for future reference.
Operating Instructions
Page 2
... ion batteries in household or business trash may not cause harmful interference, and (2) this device must accept any questions about this Sony Digital Handycam camcorder. Address: 1 Sony Drive, Park Ridge, NJ, 07656 USA Telephone No.: 201-930-6972 This device complies with superior picture and sound quality. ... to rain or moisture. This symbol is intended to alert the user to your purchase of Conformity Trade Name: SONY Model No.: DCR-TRV130 Responsible Party: Sony Electronics lnc. WARNING To prevent fire or shock hazard, do not expose the unit to the presence of the ...
... ion batteries in household or business trash may not cause harmful interference, and (2) this device must accept any questions about this Sony Digital Handycam camcorder. Address: 1 Sony Drive, Park Ridge, NJ, 07656 USA Telephone No.: 201-930-6972 This device complies with superior picture and sound quality. ... to rain or moisture. This symbol is intended to alert the user to your purchase of Conformity Trade Name: SONY Model No.: DCR-TRV130 Responsible Party: Sony Electronics lnc. WARNING To prevent fire or shock hazard, do not expose the unit to the presence of the ...

Operating Instructions
Page 3
... can radiate radio frequency energy and, if not installed and used in a residential installation. Consult the dealer or an experienced radio/TV technician for a Class B digital device, pursuant to Part 15 of the following measures: - For customers in a particular installation. These limits are designed to provide reasonable protection against harmful interference...
... can radiate radio frequency energy and, if not installed and used in a residential installation. Consult the dealer or an experienced radio/TV technician for a Class B digital device, pursuant to Part 15 of the following measures: - For customers in a particular installation. These limits are designed to provide reasonable protection against harmful interference...

Operating Instructions
Page 4
... mode) •Smooth transition between scenes FADER (p. 37) •Taking a still image Tape photo recording (p. 34) •Digital processing of images PICTURE EFFECT (p. 40)/ DIGITAL EFFECT (p. 41) •Creating a soft background for subjects Soft portrait mode (p. 44) •Superimposing a title TITLE (p.... a wide-screen TV Wide mode (p. 36) Functions to use after recording (in the playback mode) •Digital processing of recorded images PICTURE EFFECT (p. 55)/ DIGITAL EFFECT (p. 56) •Displaying the date/time or recording data when you recorded Data code (p. 28) ...
... mode) •Smooth transition between scenes FADER (p. 37) •Taking a still image Tape photo recording (p. 34) •Digital processing of images PICTURE EFFECT (p. 40)/ DIGITAL EFFECT (p. 41) •Creating a soft background for subjects Soft portrait mode (p. 44) •Superimposing a title TITLE (p.... a wide-screen TV Wide mode (p. 36) Functions to use after recording (in the playback mode) •Digital processing of recorded images PICTURE EFFECT (p. 55)/ DIGITAL EFFECT (p. 56) •Displaying the date/time or recording data when you recorded Data code (p. 28) ...
Operating Instructions
Page 5
... Playback Operations Playing back a tape with picture effects 55 Playing back a tape with digital effects 56 Enlarging images recorded on tapes - Insert Editing 77 Customizing Your Camcorder Changing the menu settings 79 Playback - Picture effect .. 40 Using special effects - Digital effect ... 41 Using the PROGRAM AE function .... 44 Adjusting the exposure manually ...... 46...
... Playback Operations Playing back a tape with picture effects 55 Playing back a tape with digital effects 56 Enlarging images recorded on tapes - Insert Editing 77 Customizing Your Camcorder Changing the menu settings 79 Playback - Picture effect .. 40 Using special effects - Digital effect ... 41 Using the PROGRAM AE function .... 44 Adjusting the exposure manually ...... 46...
Operating Instructions
Page 8
.... 8 - Set the POWER switch to indicate that the operation is being carried out. Before using your camcorder With your camcorder are shown in capital letters. To view your recordings on your digital camcorder, we recommend using Hi8 /Digital8 video cassettes. Using this manual, buttons and settings on a TV, you read through this manual As you...
.... 8 - Set the POWER switch to indicate that the operation is being carried out. Before using your camcorder With your camcorder are shown in capital letters. To view your recordings on your digital camcorder, we recommend using Hi8 /Digital8 video cassettes. Using this manual, buttons and settings on a TV, you read through this manual As you...
Operating Instructions
Page 21
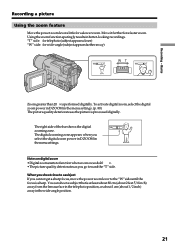
... •Digitalzoomstartstofunctionwhenzoomexceeds20 ×. • The picture quality deteriorates as the picture is processed digitally. Recording - Basics Recording a picture Using the zoom feature Move the power zoom lever a little for a faster zoom. When you...T Zoomgreaterthan20 ×isperformeddigitally.Toactivatedigitalzoom,selectthedigital zoom power in D ZOOM in the menu settings. (p. 80) The picture quality deteriorates as you select the digital zoom power in D ZOOM in better-looking recordings. Move it further for a slower zoom. The right side of the bar shows the...
... •Digitalzoomstartstofunctionwhenzoomexceeds20 ×. • The picture quality deteriorates as the picture is processed digitally. Recording - Basics Recording a picture Using the zoom feature Move the power zoom lever a little for a faster zoom. When you...T Zoomgreaterthan20 ×isperformeddigitally.Toactivatedigitalzoom,selectthedigital zoom power in D ZOOM in the menu settings. (p. 80) The picture quality deteriorates as you select the digital zoom power in D ZOOM in better-looking recordings. Move it further for a slower zoom. The right side of the bar shows the...

Operating Instructions
Page 40
... effects like those in films or on the TV. Using special effects - While using the picture effect function You cannot select OLD MOVIE with the digital effect function. STRETCH [d] : The image expands horizontally. ART [a] : The color and brightness of the image is monochrome (black-and-white). B&W : The image is emphasized, and...
... effects like those in films or on the TV. Using special effects - While using the picture effect function You cannot select OLD MOVIE with the digital effect function. STRETCH [d] : The image expands horizontally. ART [a] : The color and brightness of the image is monochrome (black-and-white). B&W : The image is emphasized, and...
Operating Instructions
Page 41
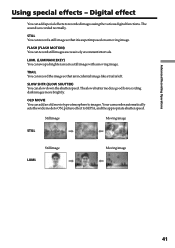
Your camcorder automatically sets the wide mode to ON, picture effect to images. Digital effect You can swap a brighter area in a still image with a moving image. LUMI. (LUMINANCEKEY) You can add special effects to recorded images using the various digital functions. Still image Moving image STILL Still image LUMI. OLD MOVIE You can record...
Your camcorder automatically sets the wide mode to ON, picture effect to images. Digital effect You can swap a brighter area in a still image with a moving image. LUMI. (LUMINANCEKEY) You can add special effects to recorded images using the various digital functions. Still image Moving image STILL Still image LUMI. OLD MOVIE You can record...

Operating Instructions
Page 42
...OLD MOVIE - TRA I L S L OW SH T R O L D MOV I E [ MENU ] : END MANUA L SET D EFFECT L UM I . Digital effect (1) In CAMERA mode, select D EFFECT in in the menu settings (p. 80). (2) Select the desired digital effect mode in the following modes: STILL, FLASH, LUMI. TRA I L S L OW SH T R O L D MOV I E [ MENU ] : END 2... SEL/ PUSH EXEC dial. AUTO SHTR IIIIIIIIIIIIIIII RETURN [ MENU ] : END To cancel the digital effect function Set D EFFECT to superimpose on the screen, the stronger the digital effect. Using special effects - modes, the still image is to adjust the effect as follows...
...OLD MOVIE - TRA I L S L OW SH T R O L D MOV I E [ MENU ] : END MANUA L SET D EFFECT L UM I . Digital effect (1) In CAMERA mode, select D EFFECT in in the menu settings (p. 80). (2) Select the desired digital effect mode in the following modes: STILL, FLASH, LUMI. TRA I L S L OW SH T R O L D MOV I E [ MENU ] : END 2... SEL/ PUSH EXEC dial. AUTO SHTR IIIIIIIIIIIIIIII RETURN [ MENU ] : END To cancel the digital effect function Set D EFFECT to superimpose on the screen, the stronger the digital effect. Using special effects - modes, the still image is to adjust the effect as follows...
Operating Instructions
Page 43
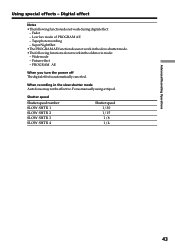
... - Pictureeffect - SuperNightShot •The PROGRAM AE function does not work in the slow shutter mode. • The following functions do not work during digital effect: - Shutter speed Shutter speed number SLOW SHTR 1 SLOW SHTR 2 SLOW SHTR 3 SLOW SHTR 4 Shutter speed 1/30 1/15 1/8 1/4 43... Digital effect Notes • The following functions do not work in the slow shutter mode Auto focus may not be effective. Advanced Recording Operations Using...
... - Pictureeffect - SuperNightShot •The PROGRAM AE function does not work in the slow shutter mode. • The following functions do not work during digital effect: - Shutter speed Shutter speed number SLOW SHTR 1 SLOW SHTR 2 SLOW SHTR 3 SLOW SHTR 4 Shutter speed 1/30 1/15 1/8 1/4 43... Digital effect Notes • The following functions do not work in the slow shutter mode Auto focus may not be effective. Advanced Recording Operations Using...

Operating Instructions
Page 45
...subjects. •The following functions do not work in the middle to far distance. •In the sunset & moon and landscape modes, your camcorder is selected You can adjust the exposure manually. Overlap - If this happens, turn the PROGRAM AE function off. - Dot •While setting... lamp, sodium lamp or mercury lamp Flickering or changes in color may occur in the menu settings, then press the SEL/PUSH EXEC dial. Digital effect - Soft portrait mode - Bounce •The following functions do not work in the menu settings. Advanced Recording Operations MANUA L SET PROGRAM...
...subjects. •The following functions do not work in the middle to far distance. •In the sunset & moon and landscape modes, your camcorder is selected You can adjust the exposure manually. Overlap - If this happens, turn the PROGRAM AE function off. - Dot •While setting... lamp, sodium lamp or mercury lamp Flickering or changes in color may occur in the menu settings, then press the SEL/PUSH EXEC dial. Digital effect - Soft portrait mode - Bounce •The following functions do not work in the menu settings. Advanced Recording Operations MANUA L SET PROGRAM...

Operating Instructions
Page 56
... have processed using the digital effect function with digital effects During playback, you set the POWER switch to adjust the effect. IIIIIIIIIIIIIIII [ MENU ] : END 3 MANUA L SET D EFFECT OFF ST I LL F L ASH L UM I . DV IN/ When you can process a scene using your camcorder as a still image.... (3) Turn the SEL/PUSH EXEC dial to OFF (CHARGE) or stop playing back The digital effect function is automatically canceled. 56 Playing back a tape with this camcorder. and TRAIL. (1) In the playback or playback pause mode, select D EFFECT in in the menu ...
... have processed using the digital effect function with digital effects During playback, you set the POWER switch to adjust the effect. IIIIIIIIIIIIIIII [ MENU ] : END 3 MANUA L SET D EFFECT OFF ST I LL F L ASH L UM I . DV IN/ When you can process a scene using your camcorder as a still image.... (3) Turn the SEL/PUSH EXEC dial to OFF (CHARGE) or stop playing back The digital effect function is automatically canceled. 56 Playing back a tape with this camcorder. and TRAIL. (1) In the playback or playback pause mode, select D EFFECT in in the menu ...
Operating Instructions
Page 64
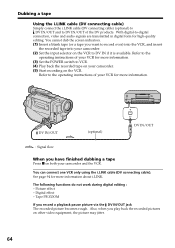
...the VCR, and insert the recorded tape into your camcorder. (5) Start recording on the VCR to DV IN/OUT of the DV products. Picture effect - Digital effect - Refer to -digital connection, video and audio signals are transmitted in digital form for more information. (3) Set the POWER ...switch to VCR. (4) Play back the recorded tape on your camcorder. (2) Set the input selector on the ...
...the VCR, and insert the recorded tape into your camcorder. (5) Start recording on the VCR to DV IN/OUT of the DV products. Picture effect - Digital effect - Refer to -digital connection, video and audio signals are transmitted in digital form for more information. (3) Set the POWER ...switch to VCR. (4) Play back the recorded tape on your camcorder. (2) Set the input selector on the ...
Operating Instructions
Page 65
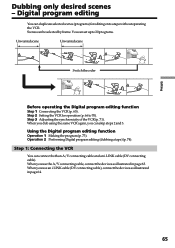
..., you use the A/V connecting cable, connect the devices as illustrated in page 63. Using the Digital program editing function Operation 1 Makingtheprogram(p.73). Editing Dubbing only desired scenes - Digital program editing You can be selected by frame. Step 1: Connecting the VCR You can set up to... 20 programs. Unwanted scene Unwanted scene Switch the order Before operating the Digital program editing function Step 1 Connecting the VCR (p. 65). When you can skip steps 2 and 3. You can connect both an A/V connecting...
..., you use the A/V connecting cable, connect the devices as illustrated in page 63. Using the Digital program editing function Operation 1 Makingtheprogram(p.73). Editing Dubbing only desired scenes - Digital program editing You can be selected by frame. Step 1: Connecting the VCR You can set up to... 20 programs. Unwanted scene Unwanted scene Switch the order Before operating the Digital program editing function Step 1 Connecting the VCR (p. 65). When you can skip steps 2 and 3. You can connect both an A/V connecting...
Operating Instructions
Page 66
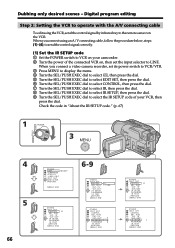
...dial. 9 Turn the SEL/PUSH EXEC dial to select the IR SETUP code of the connected VCR on, then set the input selector to LINE. Digital program editing Step 2: Setting the VCR to operate with the A/V connecting cable To edit using an A/V connecting cable, follow the procedure below, steps ...(1)~(4), to send the control signal correctly. (1) Set the IR SETUP code 1 Set the POWER switch to the remote sensor on your camcorder. 2 Turn the power of your VCR, then press the dial. I N " " CUT-OUT " I R SETUP P AUS EMODE I R TEST RETURN [ MENU ] : END OTHERS ED I T SET ...
...dial. 9 Turn the SEL/PUSH EXEC dial to select the IR SETUP code of the connected VCR on, then set the input selector to LINE. Digital program editing Step 2: Setting the VCR to operate with the A/V connecting cable To edit using an A/V connecting cable, follow the procedure below, steps ...(1)~(4), to send the control signal correctly. (1) Set the IR SETUP code 1 Set the POWER switch to the remote sensor on your camcorder. 2 Turn the power of your VCR, then press the dial. I N " " CUT-OUT " I R SETUP P AUS EMODE I R TEST RETURN [ MENU ] : END OTHERS ED I T SET ...
Operating Instructions
Page 67
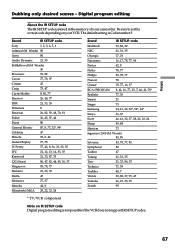
Brand IR SETUP code Sony 1, 2, 3, 4, 5, 6 Admiral (M. Wards) 89 Aiwa 80 Audio Dynamic 21, 35 Bell&Howell (M. Digital program editing About the IR SETUP code The IR SETUP code is Code number 3. Editing Dubbing only desired scenes - The default setting is stored in ..., 35 Technics 77, 78 Toshiba 40, 7 Wards 89, 88, 37, 95, 47 Yamaha 36, 21, 33, 35 Zenith 95 * TV/VCR component Note on your camcorder. Wards) 36 Brocsonic 70, 82 Canon 77, 78, 97 Citizen 47 Craig 73, 47 Curtis Mathis 8, 80, 77 Daewoo 26, 40, 77 DBX 21, 33...
Brand IR SETUP code Sony 1, 2, 3, 4, 5, 6 Admiral (M. Wards) 89 Aiwa 80 Audio Dynamic 21, 35 Bell&Howell (M. Digital program editing About the IR SETUP code The IR SETUP code is Code number 3. Editing Dubbing only desired scenes - The default setting is stored in ..., 35 Technics 77, 78 Toshiba 40, 7 Wards 89, 88, 37, 95, 47 Yamaha 36, 21, 33, 35 Zenith 95 * TV/VCR component Note on your camcorder. Wards) 36 Brocsonic 70, 82 Canon 77, 78, 97 Citizen 47 Craig 73, 47 Curtis Mathis 8, 80, 77 Daewoo 26, 40, 77 DBX 21, 33...

Operating Instructions
Page 68
... recording pause is X. - Select PB if the button to cancel recording pause is N. (3) Setting your camcorder and the VCR to cancel recording pause on your camcorder and face it towards the remote sensor of the VCR. Digital program editing (2) Setting the modes to cancel recording pause on the VCR 1 Turn the SEL/PUSH...
... recording pause is X. - Select PB if the button to cancel recording pause is N. (3) Setting your camcorder and the VCR to cancel recording pause on your camcorder and face it towards the remote sensor of the VCR. Digital program editing (2) Setting the modes to cancel recording pause on the VCR 1 Turn the SEL/PUSH...
Operating Instructions
Page 69
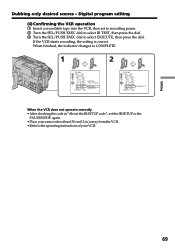
... the VCR does not operate correctly •After checking the code in .) away from the VCR. • Refer to the operating instructions of your camcorder at least 30 cm (12 in "About the IR SETUP code", set to recording pause. 2 Turn the SEL/PUSH EXEC dial to select IR ... to COMPLETE. 1 2 OTHERS ED I T SET CONTROL ADJ TEST " CUT- Editing 69 When finished, the indicator changes to select EXECUTE, then press the dial. Digital program editing (4) Confirming the VCR operation 1 Insert a recordable tape into the VCR, then set the IR SETUP or the PAUSEMODE again. •Place your VCR...
... the VCR does not operate correctly •After checking the code in .) away from the VCR. • Refer to the operating instructions of your camcorder at least 30 cm (12 in "About the IR SETUP code", set to recording pause. 2 Turn the SEL/PUSH EXEC dial to select IR ... to COMPLETE. 1 2 OTHERS ED I T SET CONTROL ADJ TEST " CUT- Editing 69 When finished, the indicator changes to select EXECUTE, then press the dial. Digital program editing (4) Confirming the VCR operation 1 Insert a recordable tape into the VCR, then set the IR SETUP or the PAUSEMODE again. •Place your VCR...
Operating Instructions
Page 70
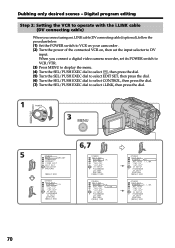
... When you connect using an i.LINK cable (DV connecting cable) (optional), follow the procedure below. (1) Set the POWER switch to VCR on your camcorder . (2) Turn the power of the connected VCR on, then set its POWER switch to VCR/VTR. (3) Press MENU to display the menu. (4) ... " CUT- L I R TEST RETURN [ MENU ] : END IR i . Dubbing only desired scenes - Digital program editing Step 2: Setting the VCR to operate with the i.LINK cable (DV connecting cable) When you connect a digital video camera recorder, set the input selector to select i.LINK, then press the dial. I N " " CUT...
... When you connect using an i.LINK cable (DV connecting cable) (optional), follow the procedure below. (1) Set the POWER switch to VCR on your camcorder . (2) Turn the power of the connected VCR on, then set its POWER switch to VCR/VTR. (3) Press MENU to display the menu. (4) ... " CUT- L I R TEST RETURN [ MENU ] : END IR i . Dubbing only desired scenes - Digital program editing Step 2: Setting the VCR to operate with the i.LINK cable (DV connecting cable) When you connect a digital video camera recorder, set the input selector to select i.LINK, then press the dial. I N " " CUT...


