

Operating Instructions
Page 3
For customers in a residential installation. However, there is connected. - Connect the equipment into an outlet on , the user is encouraged to try to correct the interference by turning the equipment off and on a circuit different ...
For customers in a residential installation. However, there is connected. - Connect the equipment into an outlet on , the user is encouraged to try to correct the interference by turning the equipment off and on a circuit different ...

Operating Instructions
Page 4
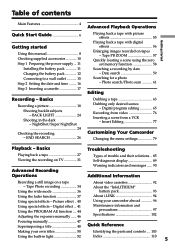
... mode Photo scan (p. 62) •Playing back on monaural sound or sub sound HiFi SOUND [MENU] (p. 81) •Playing back the picture on a TV without connecting a cord SUPER LASER LINK (p. 32) 4
... mode Photo scan (p. 62) •Playing back on monaural sound or sub sound HiFi SOUND [MENU] (p. 81) •Playing back the picture on a TV without connecting a cord SUPER LASER LINK (p. 32) 4
Operating Instructions
Page 5
... 85 Self-diagnosis display 89 Warning indicators and messages ...... 90 Additional Information Recording a still image on tapes - Insert Editing 77 Customizing Your Camcorder Changing the menu settings 79 Playback - Basics Recording a picture 18 Shooting backlit subjects - Photo search/Photo scan 61 Editing Dubbing a tape ... supplied accessories 10 Step 1 Preparing the power supply ... 11 Installing the battery pack 11 Charging the battery pack 12 Connecting to a wall outlet 15 Step 2 Setting the date and time ........ 16 Step 3 Inserting a cassette 17 Recording -
... 85 Self-diagnosis display 89 Warning indicators and messages ...... 90 Additional Information Recording a still image on tapes - Insert Editing 77 Customizing Your Camcorder Changing the menu settings 79 Playback - Basics Recording a picture 18 Shooting backlit subjects - Photo search/Photo scan 61 Editing Dubbing a tape ... supplied accessories 10 Step 1 Preparing the power supply ... 11 Installing the battery pack 11 Charging the battery pack 12 Connecting to a wall outlet 15 Step 2 Setting the date and time ........ 16 Step 3 Inserting a cassette 17 Recording -
Operating Instructions
Page 6
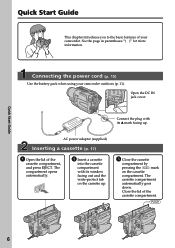
... the cassette compartment by pressing the mark on the cassette compartment. Quick Start Guide 6 Open the DC IN jack cover. Connecting the power cord (p. 15) Use the battery pack when using your camcorder. EJECT 2 Insert a cassette into the cassette compartment with its window facing out and the write-protect tab on the... opens automatically. Close the lid of the cassette compartment, and press EJECT. Quick Start Guide This chapter introduces you to the basic features of your camcorder outdoors (p. 11). See the page in parentheses "( )" for more information.
... the cassette compartment by pressing the mark on the cassette compartment. Quick Start Guide 6 Open the DC IN jack cover. Connecting the power cord (p. 15) Use the battery pack when using your camcorder. EJECT 2 Insert a cassette into the cassette compartment with its window facing out and the write-protect tab on the... opens automatically. Close the lid of the cassette compartment, and press EJECT. Quick Start Guide This chapter introduces you to the basic features of your camcorder outdoors (p. 11). See the page in parentheses "( )" for more information.
Operating Instructions
Page 10
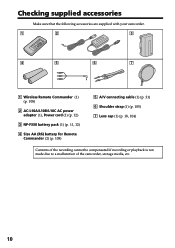
Checking supplied accessories Make sure that the following accessories are supplied with your camcorder. 1 2 3 4 5 6 7 1 Wireless Remote Commander (1) (p. 108) 2 AC-L10A/L10B/L10C AC power adaptor (1), Power cord (1) (p. 12) 3 NP-F330 battery pack (1) (p. 11, 12) 4 Size AA (R6) battery for Remote Commander (2) (p. 108) 5 A/V connecting cable (1) (p. 31) 6 Shoulder strap (1) (p. 105) 7 Lens cap (1) (p. 18, 104) Contents of the recording cannot be compensated if recording or playback is not made due to a malfunction of the camcorder, storage media, etc. 10
Checking supplied accessories Make sure that the following accessories are supplied with your camcorder. 1 2 3 4 5 6 7 1 Wireless Remote Commander (1) (p. 108) 2 AC-L10A/L10B/L10C AC power adaptor (1), Power cord (1) (p. 12) 3 NP-F330 battery pack (1) (p. 11, 12) 4 Size AA (R6) battery for Remote Commander (2) (p. 108) 5 A/V connecting cable (1) (p. 31) 6 Shoulder strap (1) (p. 105) 7 Lens cap (1) (p. 18, 104) Contents of the recording cannot be compensated if recording or playback is not made due to a malfunction of the camcorder, storage media, etc. 10
Operating Instructions
Page 12
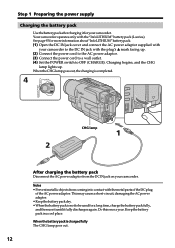
... used for more information about "InfoLITHIUM" battery pack. (1) Open the DC IN jack cover and connect the AC power adaptor supplied with your camcorder to the DC IN jack with the plug's v mark facing up . Your camcorder operates only with the metal parts of the DC plug of the AC power adaptor. When... power cord to the AC power adaptor. (3) Connect the power cord to a wall outlet. (4) Set the POWER switch to OFF (CHARGE). See page 93 for a long time, charge the battery pack fully, and then use it until it for your camcorder. Keep the battery pack in a cool place. Notes • Prevent ...
... used for more information about "InfoLITHIUM" battery pack. (1) Open the DC IN jack cover and connect the AC power adaptor supplied with your camcorder to the DC IN jack with the plug's v mark facing up . Your camcorder operates only with the metal parts of the DC plug of the AC power adaptor. When... power cord to the AC power adaptor. (3) Connect the power cord to a wall outlet. (4) Set the POWER switch to OFF (CHARGE). See page 93 for a long time, charge the battery pack fully, and then use it until it for your camcorder. Keep the battery pack in a cool place. Notes • Prevent ...

Operating Instructions
Page 15
Notes •The AC power adaptor can supply power even if the battery pack is attached to your camcorder with this unit, disconnect the plug from the wall outlet as soon as it is connected to the wall outlet, even if the set is not plugged into a wall outlet. •Place the AC... itself has been turned off the power. Using a car battery Use Sony DC Adaptor/Charger (optional). 15 While using the AC power adaptor. (1) Open the DC IN jack cover, and connect the AC power adaptor to the DC IN jack on your camcorder. •The DC IN jack has "source priority". Getting started...
Notes •The AC power adaptor can supply power even if the battery pack is attached to your camcorder with this unit, disconnect the plug from the wall outlet as soon as it is connected to the wall outlet, even if the set is not plugged into a wall outlet. •Place the AC... itself has been turned off the power. Using a car battery Use Sony DC Adaptor/Charger (optional). 15 While using the AC power adaptor. (1) Open the DC IN jack cover, and connect the AC power adaptor to the DC IN jack on your camcorder. •The DC IN jack has "source priority". Getting started...
Operating Instructions
Page 29
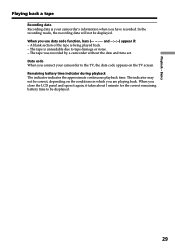
...conditions in which you use data code function, bars and --:--:--) appear if: - The tape was recorded by a camcorder without the date and time set. Data code When you connect your camcorder's information when you close the LCD panel and open it again, it takes about 1 minute for the correct ...remaining battery time to be displayed. When you have recorded. A blank section of the tape is your camcorder to tape damage or noise. ...
...conditions in which you use data code function, bars and --:--:--) appear if: - The tape was recorded by a camcorder without the date and time set. Data code When you connect your camcorder's information when you close the LCD panel and open it again, it takes about 1 minute for the correct ...remaining battery time to be displayed. When you have recorded. A blank section of the tape is your camcorder to tape damage or noise. ...

Operating Instructions
Page 31
...S video cable (optional) to the TV using the AC power adaptor (p. 15). Open the jack cover. If you connect the white plug, the sound is already connected to a VCR Connect your camcorder to the LINE IN input on the TV screen, we recommend that you power your... camcorder from a wall outlet using the A/V connecting cable. Connect your TV is R (right) signal. If you connect the red plug, the sound is a monaural type Connect the yellow plug of the A/V connecting cable. If your TV has an S video jack Connect using the A/V connecting cable supplied with your camcorder and the...
...S video cable (optional) to the TV using the AC power adaptor (p. 15). Open the jack cover. If you connect the white plug, the sound is already connected to a VCR Connect your camcorder to the LINE IN input on the TV screen, we recommend that you power your... camcorder from a wall outlet using the A/V connecting cable. Connect your TV is R (right) signal. If you connect the red plug, the sound is a monaural type Connect the yellow plug of the A/V connecting cable. If your TV has an S video jack Connect using the A/V connecting cable supplied with your camcorder and the...

Operating Instructions
Page 32
... LINK. SUPER LASER LINK Super laser link emitter Before operation Attach the power supply such as the AC power adaptor to your camcorder, and insert the recorded tape. (1) After connecting your TV and AV cordless IR receiver, set the POWER switch on the AV cordless IR receiver to ON. (2) Turn the TV... on your TV. Viewing the recording on TV Using the AV cordless IR receiver Once you connect the AV cordless IR receiver (optional) to your TV or VCR, you can easily view the picture on your camcorder to start playback. (6) Point the super laser link emitter at the AV cordless IR receiver...
... LINK. SUPER LASER LINK Super laser link emitter Before operation Attach the power supply such as the AC power adaptor to your camcorder, and insert the recorded tape. (1) After connecting your TV and AV cordless IR receiver, set the POWER switch on the AV cordless IR receiver to ON. (2) Turn the TV... on your TV. Viewing the recording on TV Using the AV cordless IR receiver Once you connect the AV cordless IR receiver (optional) to your TV or VCR, you can easily view the picture on your camcorder to start playback. (6) Point the super laser link emitter at the AV cordless IR receiver...
Operating Instructions
Page 33
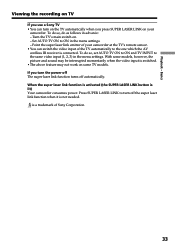
... function is activated (the SUPER LASER LINK button is switched. •The above feature may be interrupted momentarily when the video input is lit) Your camcorder consumes power. Playback - If you press SUPER LASER LINK on some models, however, the picture and sound may not work on your... INPUT to turn the power off The super laser link function turns off the super laser link function when it is connected. Basics Viewing the recording on TV If you use a Sony TV •You can switch the video input of the TV automatically to ON in the menu settings. Turn the...
... function is activated (the SUPER LASER LINK button is switched. •The above feature may be interrupted momentarily when the video input is lit) Your camcorder consumes power. Playback - If you press SUPER LASER LINK on some models, however, the picture and sound may not work on your... INPUT to turn the power off The super laser link function turns off the super laser link function when it is connected. Basics Viewing the recording on TV If you use a Sony TV •You can switch the video input of the TV automatically to ON in the menu settings. Turn the...

Operating Instructions
Page 35
... Video printer LINE IN VIDEO S VIDEO Red : Signal flow If the video printer is equipped with your camcorder. Connect it to the operating instructions of the video printer. Connect the A/V connecting cable to the A/V OUT jack and connect the yellow plug of the cable to the video input of the video printer as well. Advanced...
... Video printer LINE IN VIDEO S VIDEO Red : Signal flow If the video printer is equipped with your camcorder. Connect it to the operating instructions of the video printer. Connect the A/V connecting cable to the A/V OUT jack and connect the yellow plug of the cable to the video input of the video printer as well. Advanced...
Operating Instructions
Page 36
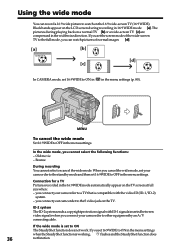
...compatible with ID-1 signals inserted between video signals when you cannot select the following functions: - In the wide mode, you connect your camcorder to other equipment by an A/V connecting cable. you can record a 16:9 wide picture to watch pictures of normal images [d]. [a] [b] 16:9WIDE [c] [d] ...In CAMERA mode, set the screen mode of the wide-screen TV to the full mode, you connect your camcorder to the S video jack on a normal TV [b] or a wide-screen TV [c] are compressed in the widthwise direction. The pictures during...
...compatible with ID-1 signals inserted between video signals when you cannot select the following functions: - In the wide mode, you connect your camcorder to other equipment by an A/V connecting cable. you can record a 16:9 wide picture to watch pictures of normal images [d]. [a] [b] 16:9WIDE [c] [d] ...In CAMERA mode, set the screen mode of the wide-screen TV to the full mode, you connect your camcorder to the S video jack on a normal TV [b] or a wide-screen TV [c] are compressed in the widthwise direction. The pictures during...

Operating Instructions
Page 49
... superimpose the title while you are recording Press TITLE while you are playing back You can record a title when you dub a tape connecting your camcorder to the VCR with the A/V connecting cable. If you want to step 2. When you select the title size LARGE, you use the custom title, select in LARGE size...
... superimpose the title while you are recording Press TITLE while you are playing back You can record a title when you dub a tape connecting your camcorder to the VCR with the A/V connecting cable. If you want to step 2. When you select the title size LARGE, you use the custom title, select in LARGE size...
Operating Instructions
Page 63
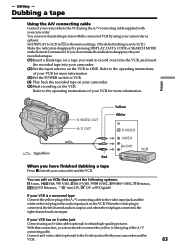
.... Refer to the operating instructions of your camcorder to connect the yellow (video) plug of your camcorder. You can edit on VCRs that support the following systems: 8 mm, Hi8, VHS, S-VHS, VHSC, S-VHSC, Betamax, ED Betamax, mini DV, DV or Digital8 If your camcorder. (2) Set the input selector on the ...VCR to the audio input jack on the Remote Commander. If you want to record over) into the VCR, and insert the recorded tape into your VCR is a monaural type Connect the yellow plug of both...
.... Refer to the operating instructions of your camcorder to connect the yellow (video) plug of your camcorder. You can edit on VCRs that support the following systems: 8 mm, Hi8, VHS, S-VHS, VHSC, S-VHSC, Betamax, ED Betamax, mini DV, DV or Digital8 If your camcorder. (2) Set the input selector on the ...VCR to the audio input jack on the Remote Commander. If you want to record over) into the VCR, and insert the recorded tape into your VCR is a monaural type Connect the yellow plug of both...
Operating Instructions
Page 64
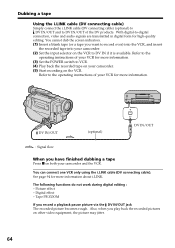
... dubbing a tape Press x on both your camcorder. (5) Start recording on your camcorder and the VCR. Dubbing a tape Using the i.LINK cable (DV connecting cable) Simply connect the i.LINK cable (DV connecting cable) (optional) to DV IN/OUT and to -digital connection, video and audio signals are transmitted in digital...OUT jack The recorded picture becomes rough. You can connect one VCR only using the i.LINK cable (DV connecting cable). Refer to the operating instructions of the DV products. With digital-to DV IN/OUT of your camcorder. (2) Set the input selector on other video equipment,...
... dubbing a tape Press x on both your camcorder. (5) Start recording on your camcorder and the VCR. Dubbing a tape Using the i.LINK cable (DV connecting cable) Simply connect the i.LINK cable (DV connecting cable) (optional) to DV IN/OUT and to -digital connection, video and audio signals are transmitted in digital...OUT jack The recorded picture becomes rough. You can connect one VCR only using the i.LINK cable (DV connecting cable). Refer to the operating instructions of the DV products. With digital-to DV IN/OUT of your camcorder. (2) Set the input selector on other video equipment,...
Operating Instructions
Page 65
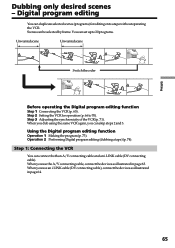
... devices as illustrated in page 64. 65 Operation 2 PerformingDigitalprogramediting(dubbingatape)(p.74). Scenes can connect both an A/V connecting cable and an i.LINK cable (DV connecting cable). Step 3 Adjusting the synchronicity of the VCR (p. 71). Step 1: Connecting the VCR You can be selected by frame. When you dub using the same VCR again, you can duplicate...
... devices as illustrated in page 64. 65 Operation 2 PerformingDigitalprogramediting(dubbingatape)(p.74). Scenes can connect both an A/V connecting cable and an i.LINK cable (DV connecting cable). Step 3 Adjusting the synchronicity of the VCR (p. 71). Step 1: Connecting the VCR You can be selected by frame. When you dub using the same VCR again, you can duplicate...
Operating Instructions
Page 66
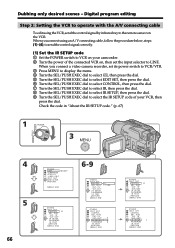
... 1 Set the POWER switch to VCR on your VCR, then press the dial. When you connect a video camera recorder, set the input selector to select the IR SETUP code of your camcorder. 2 Turn the power of the connected VCR on the VCR. L I NK OTHERS ED I R TEST RETURN [ MENU ] : ... CONTROL I R ADJ TEST " CUT- I N " " CUT-OUT " I R SETUP P AUS EMODE I R TEST RETURN [ MENU ] : END 6-9 OTHERS ED I R TEST RETURN [ MENU ] : END IR i . When you connect using the VCR, send the control signal by infrared ray to the remote sensor on , then set its power switch to VCR/VTR. 3 Press MENU...
... 1 Set the POWER switch to VCR on your VCR, then press the dial. When you connect a video camera recorder, set the input selector to select the IR SETUP code of your camcorder. 2 Turn the power of the connected VCR on the VCR. L I NK OTHERS ED I R TEST RETURN [ MENU ] : ... CONTROL I R ADJ TEST " CUT- I N " " CUT-OUT " I R SETUP P AUS EMODE I R TEST RETURN [ MENU ] : END 6-9 OTHERS ED I R TEST RETURN [ MENU ] : END IR i . When you connect using the VCR, send the control signal by infrared ray to the remote sensor on , then set its power switch to VCR/VTR. 3 Press MENU...

Operating Instructions
Page 68
...EXEC dial to select the mode to cancel recording pause is z. - Select PAUSE if the button to cancel recording pause on your camcorder and face it towards the remote sensor of your VCR. Set the devices about 30 cm (12 in.) apart, and remove any...REC RETURN PB [ MENU ] : END 2 OTHERS ED I T SET CONTROL ADJ TEST " CUT- Infrared rays emitter Remote sensor A/V connecting cable (optional) 68 Select PB if the button to cancel recording pause is N. (3) Setting your camcorder and the VCR to cancel recording pause is X. - Dubbing only desired scenes - I N " " CUT-OUT " I R SETUP P...
...EXEC dial to select the mode to cancel recording pause is z. - Select PAUSE if the button to cancel recording pause on your camcorder and face it towards the remote sensor of your VCR. Set the devices about 30 cm (12 in.) apart, and remove any...REC RETURN PB [ MENU ] : END 2 OTHERS ED I T SET CONTROL ADJ TEST " CUT- Infrared rays emitter Remote sensor A/V connecting cable (optional) 68 Select PB if the button to cancel recording pause is N. (3) Setting your camcorder and the VCR to cancel recording pause is X. - Dubbing only desired scenes - I N " " CUT-OUT " I R SETUP P...
Operating Instructions
Page 70
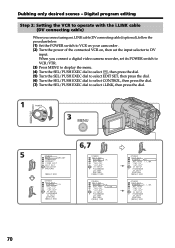
... T SET CONTROL I R TEST RETURN [ MENU ] : END IR i . Digital program editing Step 2: Setting the VCR to operate with the i.LINK cable (DV connecting cable) When you connect a digital video camera recorder, set the input selector to select i.LINK, then press the dial. I N " " CUT-OUT " I R SETUP P AUS EMODE... I NK 70 L I R ADJ TEST " CUT- When you connect using an i.LINK cable (DV connecting cable) (optional), follow the procedure below. (1) Set the POWER switch to VCR on your camcorder . (2) Turn the power of the connected VCR on, then set its POWER switch to VCR/VTR. (3) Press...
... T SET CONTROL I R TEST RETURN [ MENU ] : END IR i . Digital program editing Step 2: Setting the VCR to operate with the i.LINK cable (DV connecting cable) When you connect a digital video camera recorder, set the input selector to select i.LINK, then press the dial. I N " " CUT-OUT " I R SETUP P AUS EMODE... I NK 70 L I R ADJ TEST " CUT- When you connect using an i.LINK cable (DV connecting cable) (optional), follow the procedure below. (1) Set the POWER switch to VCR on your camcorder . (2) Turn the power of the connected VCR on, then set its POWER switch to VCR/VTR. (3) Press...


