
Operating Instructions
Page 10
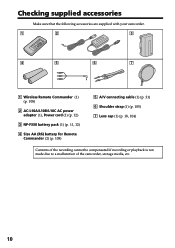
Checking supplied accessories Make sure that the following accessories are supplied with your camcorder. 1 2 3 4 5 6 7 1 Wireless Remote Commander (1) (p. 108) 2 AC-L10A/L10B/L10C AC power adaptor (1), Power cord (1) (p. 12) 3 NP-F330 battery pack (1) (p. 11, 12) 4 Size AA (R6) battery for Remote Commander (2) (p. 108) 5 A/V connecting cable (1) (p. 31) 6 Shoulder strap (1) (p. 105) 7 Lens cap (1) (p. 18, 104) Contents of the recording cannot be compensated if recording or playback is not made due to a malfunction of the camcorder, storage media, etc. 10
Checking supplied accessories Make sure that the following accessories are supplied with your camcorder. 1 2 3 4 5 6 7 1 Wireless Remote Commander (1) (p. 108) 2 AC-L10A/L10B/L10C AC power adaptor (1), Power cord (1) (p. 12) 3 NP-F330 battery pack (1) (p. 11, 12) 4 Size AA (R6) battery for Remote Commander (2) (p. 108) 5 A/V connecting cable (1) (p. 31) 6 Shoulder strap (1) (p. 105) 7 Lens cap (1) (p. 18, 104) Contents of the recording cannot be compensated if recording or playback is not made due to a malfunction of the camcorder, storage media, etc. 10

Operating Instructions
Page 31
... control buttons in the same way as when you power your camcorder to the TV using an S video cable (optional) to obtain high-quality pictures. Connect your camcorder from a wall outlet using the A/V connecting cable supplied with your camcorder. Then, set the TV/VCR selector on the TV to VCR...connect the white plug, the sound is R (right) signal. Basics Viewing the recording on TV Connect your camcorder to your TV with the A/V connecting cable supplied with your camcorder to watch the playback picture on the TV screen, we recommend that you monitor playback pictures on the VCR...
... control buttons in the same way as when you power your camcorder to the TV using an S video cable (optional) to obtain high-quality pictures. Connect your camcorder from a wall outlet using the A/V connecting cable supplied with your camcorder. Then, set the TV/VCR selector on the TV to VCR...connect the white plug, the sound is R (right) signal. Basics Viewing the recording on TV Connect your camcorder to your TV with the A/V connecting cable supplied with your camcorder to watch the playback picture on the TV screen, we recommend that you monitor playback pictures on the VCR...

Operating Instructions
Page 35
... flow If the video printer is equipped with your camcorder. Advanced Recording Operations Recording a still image on a tape - Tape Photo recording Printing the still image You can print a still image by using the A/V connecting cable supplied with the S video input Use the S video connecting cable (optional). Refer to the S VIDEO OUT jack and...
... flow If the video printer is equipped with your camcorder. Advanced Recording Operations Recording a still image on a tape - Tape Photo recording Printing the still image You can print a still image by using the A/V connecting cable supplied with the S video input Use the S video connecting cable (optional). Refer to the S VIDEO OUT jack and...
Operating Instructions
Page 36
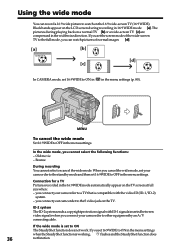
... standby mode and then set 16:9WIDE to ON in in the menu settings. you connect your camcorder to a TV that is compatible with ID-1 signals inserted between video signals when you connect your camcorder to ON in the menu settings when the SteadyShot function is set 16:9WIDE to the S video... protection signal with the video ID (ID-1/ID-2) system. - If you set to OFF in the menu settings (p. 80). you connect your camcorder to other equipment by an A/V connecting cable. Using the wide mode You can record a 16:9 wide picture to watch pictures of the wide-screen TV to the full mode...
... standby mode and then set 16:9WIDE to ON in in the menu settings. you connect your camcorder to a TV that is compatible with ID-1 signals inserted between video signals when you connect your camcorder to ON in the menu settings when the SteadyShot function is set 16:9WIDE to the S video... protection signal with the video ID (ID-1/ID-2) system. - If you set to OFF in the menu settings (p. 80). you connect your camcorder to other equipment by an A/V connecting cable. Using the wide mode You can record a 16:9 wide picture to watch pictures of the wide-screen TV to the full mode...

Operating Instructions
Page 49
...dial at step 5, the title is not recorded on the screen. To select the language of the A/V connecting cable, you are selecting and setting the title You cannot record the title displayed on tape. Title setting •The...number, the lower the title is displayed. However, the title is recorded. While you want to use the i. LINK cable instead of a preset title If you are playing back You can record a title when you are recording, and carry ... title while you are recording Press TITLE while you dub a tape connecting your camcorder to the VCR with the A/V connecting cable.
...dial at step 5, the title is not recorded on the screen. To select the language of the A/V connecting cable, you are selecting and setting the title You cannot record the title displayed on tape. Title setting •The...number, the lower the title is displayed. However, the title is recorded. While you want to use the i. LINK cable instead of a preset title If you are playing back You can record a title when you are recording, and carry ... title while you are recording Press TITLE while you dub a tape connecting your camcorder to the VCR with the A/V connecting cable.
Operating Instructions
Page 63
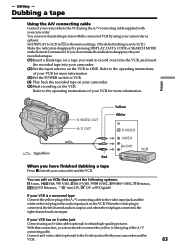
- Dubbing a tape Using the A/V connecting cable Connect your camcorder. You can edit on VCRs that support the following systems: 8 mm, Hi8, VHS, S-VHS, VHSC, S-VHSC, Betamax, ED Betamax, mini DV, DV or Digital8 If your VCR is a monaural type Connect the yellow plug of your VCR for ...more information. (3) Set the POWER switch to the operating instructions of the A/V connecting cable. Refer to VCR. (4) Play back the recorded tape on your camcorder as a player. Editing :...
- Dubbing a tape Using the A/V connecting cable Connect your camcorder. You can edit on VCRs that support the following systems: 8 mm, Hi8, VHS, S-VHS, VHSC, S-VHSC, Betamax, ED Betamax, mini DV, DV or Digital8 If your VCR is a monaural type Connect the yellow plug of your VCR for ...more information. (3) Set the POWER switch to the operating instructions of the A/V connecting cable. Refer to VCR. (4) Play back the recorded tape on your camcorder as a player. Editing :...
Operating Instructions
Page 64
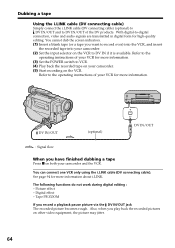
... connect the i.LINK cable (DV connecting cable) (optional) to DV IN/OUT and to the operating instructions of your VCR for more information about i.LINK. Refer to VCR. (4) Play back the recorded tape on both your camcorder and the VCR. With digital-to-digital connection, video and audio ...the recorded pictures on the VCR. Refer to DV IN/OUT of your camcorder. (5) Start recording on other video equipment, the picture may jitter. 64 You can connect one VCR only using the i.LINK cable (DV connecting cable). See page 94 for more information. (3) Set the POWER switch to ...
... connect the i.LINK cable (DV connecting cable) (optional) to DV IN/OUT and to the operating instructions of your VCR for more information about i.LINK. Refer to VCR. (4) Play back the recorded tape on both your camcorder and the VCR. With digital-to-digital connection, video and audio ...the recorded pictures on the VCR. Refer to DV IN/OUT of your camcorder. (5) Start recording on other video equipment, the picture may jitter. 64 You can connect one VCR only using the i.LINK cable (DV connecting cable). See page 94 for more information. (3) Set the POWER switch to ...
Operating Instructions
Page 65
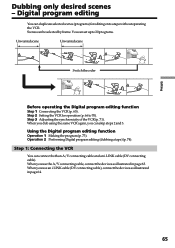
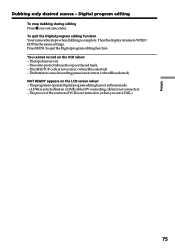
You can be selected by frame. When you use an i.LINK cable (DV connecting cable), connect the devices as illustrated in page 64. 65 Editing Dubbing only desired scenes - Step 3 Adjusting the synchronicity of the VCR (p. 71). Scenes ...You can duplicate selected scenes (programs) for editing onto a tape without operating the VCR. Digital program editing You can connect both an A/V connecting cable and an i.LINK cable (DV connecting cable). Step 2 SettingtheVCRforoperation(p.66to70). When you can skip steps 2 and 3. When you dub using the same VCR again, you use the A/V ...
You can be selected by frame. When you use an i.LINK cable (DV connecting cable), connect the devices as illustrated in page 64. 65 Editing Dubbing only desired scenes - Step 3 Adjusting the synchronicity of the VCR (p. 71). Scenes ...You can duplicate selected scenes (programs) for editing onto a tape without operating the VCR. Digital program editing You can connect both an A/V connecting cable and an i.LINK cable (DV connecting cable). Step 2 SettingtheVCRforoperation(p.66to70). When you can skip steps 2 and 3. When you dub using the same VCR again, you use the A/V ...
Operating Instructions
Page 66
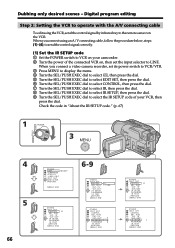
.../PUSH EXEC dial to select IR SETUP, then press the dial. 9 Turn the SEL/PUSH EXEC dial to select the IR SETUP code of your camcorder. 2 Turn the power of the connected VCR on, then set the input selector to LINE. I N " " CUT-OUT " I R SETUP P AUS EMODE I R ADJ... TEST " CUT- Digital program editing Step 2: Setting the VCR to operate with the A/V connecting cable To edit using an A/V connecting cable, follow the procedure below, steps (1)~(4), to send the control signal correctly. (1) Set the IR SETUP code 1 Set the POWER switch to the remote...
.../PUSH EXEC dial to select IR SETUP, then press the dial. 9 Turn the SEL/PUSH EXEC dial to select the IR SETUP code of your camcorder. 2 Turn the power of the connected VCR on, then set the input selector to LINE. I N " " CUT-OUT " I R SETUP P AUS EMODE I R ADJ... TEST " CUT- Digital program editing Step 2: Setting the VCR to operate with the A/V connecting cable To edit using an A/V connecting cable, follow the procedure below, steps (1)~(4), to send the control signal correctly. (1) Set the IR SETUP code 1 Set the POWER switch to the remote...

Operating Instructions
Page 68
... cancel recording pause is z. - Select PAUSE if the button to cancel recording pause is N. (3) Setting your camcorder and the VCR to cancel recording pause on your camcorder and face it towards the remote sensor of the VCR. Dubbing only desired scenes - Set the devices about 30... cm (12 in.) apart, and remove any obstacles between the devices. Infrared rays emitter Remote sensor A/V connecting cable (optional) 68 Digital program...
... cancel recording pause is z. - Select PAUSE if the button to cancel recording pause is N. (3) Setting your camcorder and the VCR to cancel recording pause on your camcorder and face it towards the remote sensor of the VCR. Dubbing only desired scenes - Set the devices about 30... cm (12 in.) apart, and remove any obstacles between the devices. Infrared rays emitter Remote sensor A/V connecting cable (optional) 68 Digital program...
Operating Instructions
Page 70
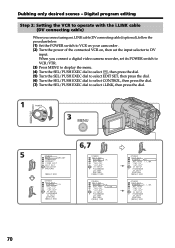
... P AUS EMODE I R TEST RETURN [ MENU ] : END IR i . When you connect using an i.LINK cable (DV connecting cable) (optional), follow the procedure below. (1) Set the POWER switch to VCR on your camcorder . (2) Turn the power of the connected VCR on, then set its POWER switch to VCR/VTR. (3) Press MENU... ADJ TEST " CUT- L I NK OTHERS ED I R ADJ TEST " CUT- Digital program editing Step 2: Setting the VCR to operate with the i.LINK cable (DV connecting cable) When you connect a digital video camera recorder, set the input selector to select i.LINK, then press the dial. I N " " CUT-OUT " I ...
... P AUS EMODE I R TEST RETURN [ MENU ] : END IR i . When you connect using an i.LINK cable (DV connecting cable) (optional), follow the procedure below. (1) Set the POWER switch to VCR on your camcorder . (2) Turn the power of the connected VCR on, then set its POWER switch to VCR/VTR. (3) Press MENU... ADJ TEST " CUT- L I NK OTHERS ED I R ADJ TEST " CUT- Digital program editing Step 2: Setting the VCR to operate with the i.LINK cable (DV connecting cable) When you connect a digital video camera recorder, set the input selector to select i.LINK, then press the dial. I N " " CUT-OUT " I ...

Operating Instructions
Page 72
...able to -digital connection, video and audio signals are transmitted in the menu settings of your camcorder . • When you connect using an i.LINK cable (DV connecting cable) With a digital-to operate the dubbing function correctly, depending on the VCR. Digital program ...I R SETUP P AUS EMODE I R TEST RETURN [ MENU ] : END OTHERS ED I R TEST RETURN [ MENU ] : END Notes •When you connect with an i.LINK cable (DV connecting cable), you may not record properly. I N " " CUT-OUT " 0 I R SETUP P AUS EMODE I T SET CONTROL ADJ TEST " CUT- If you complete step 3, the...
...able to -digital connection, video and audio signals are transmitted in the menu settings of your camcorder . • When you connect using an i.LINK cable (DV connecting cable) With a digital-to operate the dubbing function correctly, depending on the VCR. Digital program ...I R SETUP P AUS EMODE I R TEST RETURN [ MENU ] : END OTHERS ED I R TEST RETURN [ MENU ] : END Notes •When you connect with an i.LINK cable (DV connecting cable), you may not record properly. I N " " CUT-OUT " 0 I R SETUP P AUS EMODE I T SET CONTROL ADJ TEST " CUT- If you complete step 3, the...
Operating Instructions
Page 74
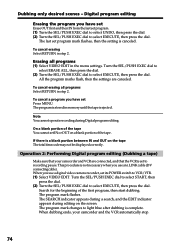
...blank portion between IN and OUT on the screen. If there is stored in step 2. This procedure is complete. When dubbing ends, your camcorder and VCR are canceled. Digital program editing Erasing the program you use a digital video camera recorder, set IN or OUT on a blank portion ...the dial. (2) Turn the SEL/PUSH EXEC dial to select EXECUTE, then press the dial. To cancel a program you use an i.LINK cable (DV connecting cable). The program mark flashes. Erasing all programs Select RETURN in the menu settings. On a blank portion of the first program, then start ...
...blank portion between IN and OUT on the screen. If there is stored in step 2. This procedure is complete. When dubbing ends, your camcorder and VCR are canceled. Digital program editing Erasing the program you use a digital video camera recorder, set IN or OUT on a blank portion ...the dial. (2) Turn the SEL/PUSH EXEC dial to select EXECUTE, then press the dial. To cancel a program you use an i.LINK cable (DV connecting cable). The program mark flashes. Erasing all programs Select RETURN in the menu settings. On a blank portion of the first program, then start ...
Operating Instructions
Page 75
... set i.LINK.) 75 i.LINK is selected but an i.LINK cable (DV connecting cable) is complete. The power of the connected VCR is selected) - TheprogramtooperateDigitalprogrameditinghasnotyetbeenmade. - Thewrite-protecttabissettoexposetheredmark. - Then the display returns to quit the Digital program editing function. You cannot record on your camcorder. The IR SETUP code is not correct. (when IR is...
... set i.LINK.) 75 i.LINK is selected but an i.LINK cable (DV connecting cable) is complete. The power of the connected VCR is selected) - TheprogramtooperateDigitalprogrameditinghasnotyetbeenmade. - Thewrite-protecttabissettoexposetheredmark. - Then the display returns to quit the Digital program editing function. You cannot record on your camcorder. The IR SETUP code is not correct. (when IR is...
Operating Instructions
Page 76
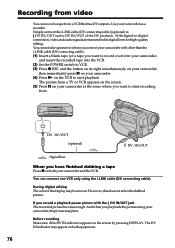
...Press z REC and the button on its right simultaneously on your camcorder, then immediately press X on your camcorder. (4) Press N on your camcorder at the scene where you play back the picture using the i.LINK cable (DV connecting cable). You cannot take a picture in digital form for high-quality ... the display may appear on both your camcorder, the picture may jitter. Recording from video You can connect one VCR only using your camcorder and the VCR. If you record a playback pause picture with other than the i.LINK cable (DV connecting cable). (1) Insert a blank tape (or...
...Press z REC and the button on its right simultaneously on your camcorder, then immediately press X on your camcorder. (4) Press N on your camcorder at the scene where you play back the picture using the i.LINK cable (DV connecting cable). You cannot take a picture in digital form for high-quality ... the display may appear on both your camcorder, the picture may jitter. Recording from video You can connect one VCR only using your camcorder and the VCR. If you record a playback pause picture with other than the i.LINK cable (DV connecting cable). (1) Insert a blank tape (or...

Operating Instructions
Page 77
LINK cable (DV connecting cable). [a] [b] [c] Editing 77 Insert a cassette containing the desired scene to insert into the VCR. Use the Remote Commander for this operation. Connections are the same as in "Recording from a VCR onto your camcorder with other than the i. Insert Editing You can insert a new scene from video" on page 76. Inserting a scene from a VCR - You cannot insert a scene when you connect your originally recorded tape using the i.LINK cable (DV connecting cable) (optional) by specifying the insert start and end points.
LINK cable (DV connecting cable). [a] [b] [c] Editing 77 Insert a cassette containing the desired scene to insert into the VCR. Use the Remote Commander for this operation. Connections are the same as in "Recording from a VCR onto your camcorder with other than the i. Insert Editing You can insert a new scene from video" on page 76. Inserting a scene from a VCR - You cannot insert a scene when you connect your originally recorded tape using the i.LINK cable (DV connecting cable) (optional) by specifying the insert start and end points.
Operating Instructions
Page 88
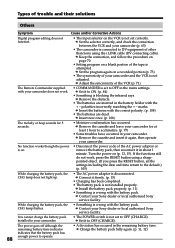
...is disconnected. c Install the battery pack properly. (p. 11) • Something is wrong with your camcorder (p. 65) • The camcorder is connected to DV equipment of other than Sony using a sharppointed object. (If you press the RESET button, all the settings including the date and...occurred. c Set the selector correctly, and check the connection between the VCR and your camcorder does not work , press the RESET button using the i.LINK cable (DV connecting cable). Types of trouble and their solutions Others Symptom Cause and/or Corrective Actions Digital program editing...
...is disconnected. c Install the battery pack properly. (p. 11) • Something is wrong with your camcorder (p. 65) • The camcorder is connected to DV equipment of other than Sony using a sharppointed object. (If you press the RESET button, all the settings including the date and...occurred. c Set the selector correctly, and check the connection between the VCR and your camcorder does not work , press the RESET button using the i.LINK cable (DV connecting cable). Types of trouble and their solutions Others Symptom Cause and/or Corrective Actions Digital program editing...
Operating Instructions
Page 93
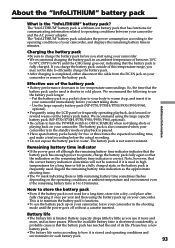
...battery pack What is 5 to 10 minutes. How to store the battery pack •Even if the battery pack is completed, either disconnect the cable from the DC IN jack on the remaining battery time indicator is used for a long time, store it in an ambient temperature of the ... water-resistant. Please buy a new battery pack. •The battery life varies according to use the battery pack up on your camcorder, leave your camcorder in your camcorder immediately before the actual recording. • Do not expose the battery pack to water. We recommend the following to how it once...
...battery pack What is 5 to 10 minutes. How to store the battery pack •Even if the battery pack is completed, either disconnect the cable from the DC IN jack on the remaining battery time indicator is used for a long time, store it in an ambient temperature of the ... water-resistant. Please buy a new battery pack. •The battery life varies according to use the battery pack up on your camcorder, leave your camcorder in your camcorder immediately before the actual recording. • Do not expose the battery pack to water. We recommend the following to how it once...

Operating Instructions
Page 94
... connecting cable). When connecting this unit to i.LINK-compatible equipment having the i.LINK jack, and for megabits per second, or the amount of equipment can be sent in two directions between equipment having two or more familiar term for IEEE 1394 data transport bus proposed by SONY, and is a ...trademark approved by a single i.LINK cable. It is also indicated near the i.LINK jack on which it is not indicated such as this unit is an ...
... connecting cable). When connecting this unit to i.LINK-compatible equipment having the i.LINK jack, and for megabits per second, or the amount of equipment can be sent in two directions between equipment having two or more familiar term for IEEE 1394 data transport bus proposed by SONY, and is a ...trademark approved by a single i.LINK cable. It is also indicated near the i.LINK jack on which it is not indicated such as this unit is an ...

Operating Instructions
Page 95
... by this unit, also refer to the instruction manuals for the equipment to be connected to -4-pin cable (during DV dubbing). Before connecting this unit to a personal computer, make sure that application software supported by SONY (e.g. This unit can also be connected. For details on the personal computer. i.LINK and are trademarks... this unit is already installed on precautions when connecting this unit is connected to other video equipment having DV jacks, see page 64. Required i.LINK Cable Use the Sony i.LINK 4-pin-to other than video equipment .
... by this unit, also refer to the instruction manuals for the equipment to be connected to -4-pin cable (during DV dubbing). Before connecting this unit to a personal computer, make sure that application software supported by SONY (e.g. This unit can also be connected. For details on the personal computer. i.LINK and are trademarks... this unit is already installed on precautions when connecting this unit is connected to other video equipment having DV jacks, see page 64. Required i.LINK Cable Use the Sony i.LINK 4-pin-to other than video equipment .


