
Operating Guide
Page 7
...Compatibility of the sun only in Germany, and Sony Corporation, and produces superior images. The number ...LCD screen, the viewfinder, or the lens to the copyright laws. Unauthorized recording of such materials may be some tiny black points and/or bright points (white, red, blue, or green in each local language are captured using your camcorder. You also cannot play back both movies and still images other DCR-SR100...displays in color) that is grayed out is T coated to suppress unwanted reflections and faithfully reproduce colors. * MTF stands for long periods of the camcorder...
...Compatibility of the sun only in Germany, and Sony Corporation, and produces superior images. The number ...LCD screen, the viewfinder, or the lens to the copyright laws. Unauthorized recording of such materials may be some tiny black points and/or bright points (white, red, blue, or green in each local language are captured using your camcorder. You also cannot play back both movies and still images other DCR-SR100...displays in color) that is grayed out is T coated to suppress unwanted reflections and faithfully reproduce colors. * MTF stands for long periods of the camcorder...
Operating Guide
Page 10
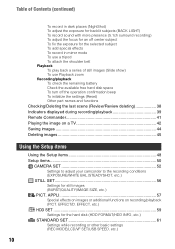
...operation confirmation beep To initialize the settings (Reset) Other part names and functions Checking/Deleting the last scene (Review/Review deleting 38 Indicators displayed during recording/playback 39 Remote Commander 41 Playing the image on recording/playback (PICT. EFFECT, etc.) HDD SET 59 Settings for still ...images 44 Deleting images 45 Using the Setup items Using the Setup items 48 Setup items 50 CAMERA SET 52 Settings to adjust your camcorder to the recording conditions (EXPOSURE/WHITE BAL./STEADYSHOT, etc.) STILL SET 56 Settings for the hard disk (HDD FORMAT/HDD INFO, etc...
...operation confirmation beep To initialize the settings (Reset) Other part names and functions Checking/Deleting the last scene (Review/Review deleting 38 Indicators displayed during recording/playback 39 Remote Commander 41 Playing the image on recording/playback (PICT. EFFECT, etc.) HDD SET 59 Settings for still ...images 44 Deleting images 45 Using the Setup items Using the Setup items 48 Setup items 50 CAMERA SET 52 Settings to adjust your camcorder to the recording conditions (EXPOSURE/WHITE BAL./STEADYSHOT, etc.) STILL SET 56 Settings for the hard disk (HDD FORMAT/HDD INFO, etc...
Operating Guide
Page 18
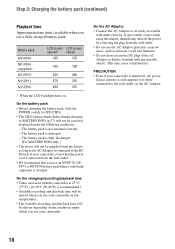
.... - Battery pack NP-FP50 NP-FP60 (supplied) NP-FP70 NP-FP71 NP-FP90 LCD screen LCD screen opened* closed 105 125 160 190 225 265 270 315 400 475 * When the LCD backlight turns on the conditions under the following conditions. - On the AC Adaptor •...;F) is recommended.) • Available recording and playback time will be shorter when you use your camcorder in low temperatures. • The available recording and playback time will not be correctly displayed under which you use a fully charged battery pack. On the charging/recording/playback time •...
.... - Battery pack NP-FP50 NP-FP60 (supplied) NP-FP70 NP-FP71 NP-FP90 LCD screen LCD screen opened* closed 105 125 160 190 225 265 270 315 400 475 * When the LCD backlight turns on the conditions under the following conditions. - On the AC Adaptor •...;F) is recommended.) • Available recording and playback time will be shorter when you use your camcorder in low temperatures. • The available recording and playback time will not be correctly displayed under which you use a fully charged battery pack. On the charging/recording/playback time •...

Operating Guide
Page 19
... After you have set the date and time ([CLOCK SET], p.22), the next time you turn on the power of your camcorder, the current date and time will be displayed on the LCD screen for approximately five minutes, to save battery power. ([A.SHUT OFF], p.64). • When you set the POWER switch to... to edit/delete them To turn on the respective lamp. POWER switch Lens cover 2 Hold your camcorder correctly. Step 3: Turning the power on, and holding your camcorder To record, slide the POWER switch to turn off the power Slide the POWER switch to OFF (CHG). • At the time of purchase, ...
... After you have set the date and time ([CLOCK SET], p.22), the next time you turn on the power of your camcorder, the current date and time will be displayed on the LCD screen for approximately five minutes, to save battery power. ([A.SHUT OFF], p.64). • When you set the POWER switch to... to edit/delete them To turn on the respective lamp. POWER switch Lens cover 2 Hold your camcorder correctly. Step 3: Turning the power on, and holding your camcorder To record, slide the POWER switch to turn off the power Slide the POWER switch to OFF (CHG). • At the time of purchase, ...
Operating Guide
Page 21
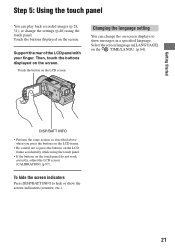
...the screen indicators (counter, etc.). 21 Touch the buttons displayed on the TIME/LANGU. (p.64). Select the screen language in a specified language. Then, touch the buttons displayed on the touch panel do not work correctly, adjust the LCD screen (CALIBRATION) (p.97). Getting Started DISP/BATT INFO &#...8226; Perform the same actions as described above when you press the buttons on the LCD frame. • Be careful not...
...the screen indicators (counter, etc.). 21 Touch the buttons displayed on the TIME/LANGU. (p.64). Select the screen language in a specified language. Then, touch the buttons displayed on the touch panel do not work correctly, adjust the LCD screen (CALIBRATION) (p.97). Getting Started DISP/BATT INFO &#...8226; Perform the same actions as described above when you press the buttons on the LCD frame. • Be careful not...

Operating Guide
Page 29
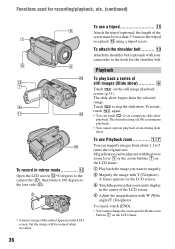
... the VISUAL INDEX screen JAN 1 2006 12:00:00 AM SETUP Previous/Next Recording date/time • It may take some time to display the VISUAL INDEX screen. • When you touch [EDIT] on the VISUAL INDEX screen, you touch Next scene Recording date/time Reverse/.... See "Deleting images" on the LCD screen. 29 Beginning of the still image to play back movie slowly. • Touch [SETUP] t [VOLUME], then adjust it with automatic settings 3 Start playback. disappears on page 45. using your camcorder with /. To cancel Easy Handycam Press EASY again. Still Images Touch ...
... the VISUAL INDEX screen JAN 1 2006 12:00:00 AM SETUP Previous/Next Recording date/time • It may take some time to display the VISUAL INDEX screen. • When you touch [EDIT] on the VISUAL INDEX screen, you touch Next scene Recording date/time Reverse/.... See "Deleting images" on the LCD screen. 29 Beginning of the still image to play back movie slowly. • Touch [SETUP] t [VOLUME], then adjust it with automatic settings 3 Start playback. disappears on page 45. using your camcorder with /. To cancel Easy Handycam Press EASY again. Still Images Touch ...

Operating Guide
Page 31
Movies Touch (Movie) tab and the movie to be displayed at the same time. • Touch [ DISPLAY] in STANDARD SET to the VISUAL Previous/ INDEX screen Next Slide show button (p.36) To adjust the volume Touch t [VOLUME], then adjust it approximately 60 .... 101-0001 P-MENU Go to set the number of thumbnails that appear in [SETUP] (p.48). , touch Continued , 31 The VISUAL INDEX screen appears on the LCD screen. Also, when you touch i, you can play back movie slowly. • One touch of the Toggles Play scene/previous or Pause as you cannot...
Movies Touch (Movie) tab and the movie to be displayed at the same time. • Touch [ DISPLAY] in STANDARD SET to the VISUAL Previous/ INDEX screen Next Slide show button (p.36) To adjust the volume Touch t [VOLUME], then adjust it approximately 60 .... 101-0001 P-MENU Go to set the number of thumbnails that appear in [SETUP] (p.48). , touch Continued , 31 The VISUAL INDEX screen appears on the LCD screen. Also, when you touch i, you can play back movie slowly. • One touch of the Toggles Play scene/previous or Pause as you cannot...
Operating Guide
Page 32
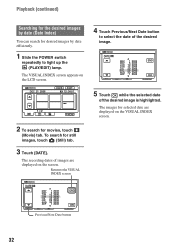
.../EDIT) lamp. The images for movies, touch (Movie) tab. The VISUAL INDEX screen appears on the LCD screen. 60min DEC 21 2006 DATE EDIT 12 : 34:01 P-MENU 2 To search for selected date are displayed on the VISUAL INDEX screen. 32 To search for desired images by date (Date Index) You can... SEP 1 2006 5 2006 10 2006 15 2006 20 2006 25 2006 30 2006 1 2006 END OK P-MENU 5 Touch while the selected date of images are displayed on the screen.
.../EDIT) lamp. The images for movies, touch (Movie) tab. The VISUAL INDEX screen appears on the LCD screen. 60min DEC 21 2006 DATE EDIT 12 : 34:01 P-MENU 2 To search for selected date are displayed on the VISUAL INDEX screen. 32 To search for desired images by date (Date Index) You can... SEP 1 2006 5 2006 10 2006 15 2006 20 2006 25 2006 30 2006 1 2006 END OK P-MENU 5 Touch while the selected date of images are displayed on the screen.

Operating Guide
Page 34
...functions in dark places (NightShot 9 Set the NIGHTSHOT switch 9 to remove your camcorder and the subject to a level greater than 10 × (p.56). If ... an image brighter, use Super NightShot function (p.55). Wider range of the lever moving may cause a malfunction. No indicator displayed: Automatically flashes when there is 0.3 to 2.7 m (1 to select the setting. To record in bright places. Move it...ZOOM] if you do not cover the infrared port 4 with the zoom buttons 7 on the LCD frame. • The minimum distance required between your finger suddenly from the surface of the flash...
...functions in dark places (NightShot 9 Set the NIGHTSHOT switch 9 to remove your camcorder and the subject to a level greater than 10 × (p.56). If ... an image brighter, use Super NightShot function (p.55). Wider range of the lever moving may cause a malfunction. No indicator displayed: Automatically flashes when there is 0.3 to 2.7 m (1 to select the setting. To record in bright places. Move it...ZOOM] if you do not cover the infrared port 4 with the zoom buttons 7 on the LCD frame. • The minimum distance required between your finger suddenly from the surface of the flash...
Operating Guide
Page 36
... You cannot change the zoom speed with W (Wide angle)/T (Telephoto). A frame appears on the LCD screen. 3 Touch the portion that you want to display in mirror mode qs Open the LCD screen qs 90 degrees to the camcorder (1), then rotate it 180 degrees to the lens side (2). • A mirror-image of the ...subject appears on the LCD screen, but the image will be normal when recorded. 36...
... You cannot change the zoom speed with W (Wide angle)/T (Telephoto). A frame appears on the LCD screen. 3 Touch the portion that you want to display in mirror mode qs Open the LCD screen qs 90 degrees to the camcorder (1), then rotate it 180 degrees to the lens side (2). • A mirror-image of the ...subject appears on the LCD screen, but the image will be normal when recorded. 36...

Operating Guide
Page 37
...about seven seconds. Press the button while BATTERY INFO appears on Personal Menu are displayed. qf Set the POWER switch to the 20second maximum. BATTERY INFO BATTERY CHARGE LEVEL REC TIME AVAILABLE LCD SCREEN: 90 VIEWFINDER: 99 Remaining battery (approx.) Recording capacity (approx.) Check...-in red during recording (p.63). qd Speaker Sounds come out from the speaker while playing back. • For how to operate your camcorder. 4 Recording lamp The recording lamp lights up in 4ch microphone When an external microphone (optional) is running low. To initialize the settings...
...about seven seconds. Press the button while BATTERY INFO appears on Personal Menu are displayed. qf Set the POWER switch to the 20second maximum. BATTERY INFO BATTERY CHARGE LEVEL REC TIME AVAILABLE LCD SCREEN: 90 VIEWFINDER: 99 Remaining battery (approx.) Recording capacity (approx.) Check...-in red during recording (p.63). qd Speaker Sounds come out from the speaker while playing back. • For how to operate your camcorder. 4 Recording lamp The recording lamp lights up in 4ch microphone When an external microphone (optional) is running low. To initialize the settings...
Operating Guide
Page 40
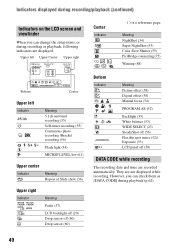
... 9 . However, you can check them as [DATA CODE] during recording or playback, following indicators are not displayed while recording. Indicators displayed during recording/playback (continued) Indicators on the LCD screen and viewfinder When you can change the setup items, or during playback (p.62). 40 They are... displayed. Upper left Upper Center Upper right 60min STBY 00:01:00 [60min] Bottom P-MENU Center Upper left ...
... 9 . However, you can check them as [DATA CODE] during recording or playback, following indicators are not displayed while recording. Indicators displayed during recording/playback (continued) Indicators on the LCD screen and viewfinder When you can change the setup items, or during playback (p.62). 40 They are... displayed. Upper left Upper Center Upper right 60min STBY 00:01:00 [60min] Bottom P-MENU Center Upper left ...
Operating Guide
Page 41
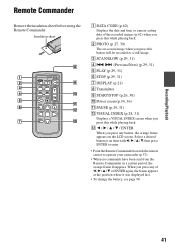
...an item with b / B / v / V, then press ENTER to enter. • Point the Remote Commander towards the remote sensor to operate your camcorder (p.37). • When no commands have been sent from the Remote Commander in a certain period, the orange frame disappears. Power zoom (p.34, 36) ...back. When you press this while playing back. 2 PHOTO (p.27, 30) The on the LCD screen. Recording/Playback Remote Commander Remove the insulation sheet before using the Remote Commander. Insulation sheet 1 DATA CODE (p.62) Displays the date and time or camera setting data of b / B / v / V, or ...
...an item with b / B / v / V, then press ENTER to enter. • Point the Remote Commander towards the remote sensor to operate your camcorder (p.37). • When no commands have been sent from the Remote Commander in a certain period, the orange frame disappears. Power zoom (p.34, 36) ...back. When you press this while playing back. 2 PHOTO (p.27, 30) The on the LCD screen. Recording/Playback Remote Commander Remove the insulation sheet before using the Remote Commander. Insulation sheet 1 DATA CODE (p.62) Displays the date and time or camera setting data of b / B / v / V, or ...
Operating Guide
Page 46
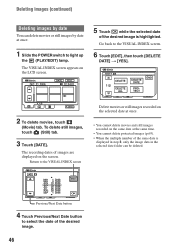
The recording dates of the desired image is displayed in step 3, only the image data in the selected date folder can delete movies or still images by date at the same time. • You ... same date at once. 1 Slide the POWER switch to select the date of the desired image. 5 Touch while the selected date of images are displayed on the LCD screen. 60min DEC 21 2006 DATE EDIT 12 : 34:01 P-MENU 2 To delete movies, touch (Movie) tab. To delete still images, touch (Still) tab...
The recording dates of the desired image is displayed in step 3, only the image data in the selected date folder can delete movies or still images by date at the same time. • You ... same date at once. 1 Slide the POWER switch to select the date of the desired image. 5 Touch while the selected date of images are displayed on the LCD screen. 60min DEC 21 2006 DATE EDIT 12 : 34:01 P-MENU 2 To delete movies, touch (Movie) tab. To delete still images, touch (Still) tab...
Operating Guide
Page 48
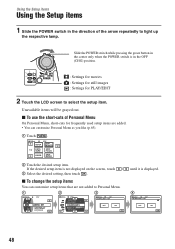
... POWER switch is in the direction of Personal Menu On Personal Menu, short-cuts for PLAY/EDIT 2 Touch the LCD screen to select the setup item. If the desired setup item is displayed. 4 60min STBY COLOR SLOW S: ON OFF ON OK 48 Unavailable items will be grayed out. x To use the ... STBY FOCUS SUPER NS NS LIGHT COLOR SLOW S SELF-TIMER DIZITAL ZOOM STEADYSHOT OK 3 60min STBY COLOR SLOW S: OFF OFF ON until it is not displayed on the screen, touch / 3 Select the desired setting, then touch . x To change the setup items You can customize setup items that are added. •...
... POWER switch is in the direction of Personal Menu On Personal Menu, short-cuts for PLAY/EDIT 2 Touch the LCD screen to select the setup item. If the desired setup item is displayed. 4 60min STBY COLOR SLOW S: ON OFF ON OK 48 Unavailable items will be grayed out. x To use the ... STBY FOCUS SUPER NS NS LIGHT COLOR SLOW S SELF-TIMER DIZITAL ZOOM STEADYSHOT OK 3 60min STBY COLOR SLOW S: OFF OFF ON until it is not displayed on the screen, touch / 3 Select the desired setting, then touch . x To change the setup items You can customize setup items that are added. •...

Operating Guide
Page 51
... SET z z z -*1 LANGUAGE z z z -*1 *1 The setting values before Easy Handycam operation are maintained. *2 [USB SELECT] appears automatically when your camcorder is connected to a computer or other device with the USB cable. 51 NORMAL SUR MONITOR z - - - ON BEEP z z z z*1 DISP OUTPUT z z z LCD PANEL SETUP ROTATE z z z - HQ VOLUME - - z DATE/TIME DISPLAY - - Using the Setup items Position of lamp: Movie...
... SET z z z -*1 LANGUAGE z z z -*1 *1 The setting values before Easy Handycam operation are maintained. *2 [USB SELECT] appears automatically when your camcorder is connected to a computer or other device with the USB cable. 51 NORMAL SUR MONITOR z - - - ON BEEP z z z z*1 DISP OUTPUT z z z LCD PANEL SETUP ROTATE z z z - HQ VOLUME - - z DATE/TIME DISPLAY - - Using the Setup items Position of lamp: Movie...
Operating Guide
Page 58
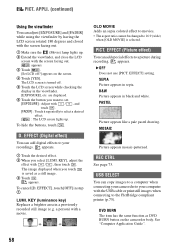
... to the PictBridge compliant printer (p.75). B&W Picture appears in sepia. REC CTRL See page 73. The LCD screen is turned off ?] appears on the camcorder body. The image displayed when you select [LUMI. LUMI. PICT. B OFF Does not use [PICT. appears. KEY (luminance key...the viewfinder, and close the LCD screen with the screen facing out. appears. 3 Touch . [Set LCD off . 5 Touch the LCD screen while checking the display in the viewfinder. [EXPOSURE], etc. EFFECT (Digital effect) You can copy images to a computer when connecting your camcorder to your computer with the ...
... to the PictBridge compliant printer (p.75). B&W Picture appears in sepia. REC CTRL See page 73. The LCD screen is turned off ?] appears on the camcorder body. The image displayed when you select [LUMI. LUMI. PICT. B OFF Does not use [PICT. appears. KEY (luminance key...the viewfinder, and close the LCD screen with the screen facing out. appears. 3 Touch . [Set LCD off . 5 Touch the LCD screen while checking the display in the viewfinder. [EXPOSURE], etc. EFFECT (Digital effect) You can copy images to a computer when connecting your camcorder to your computer with the ...

Operating Guide
Page 61
...indicators in 5.1ch mode. See page 48 for more than five minutes. LP ( LP ) Increases the recording time (Long Play) (approx. MULTI-SOUND You can display the direction from three levels. B NORMAL Records various surround sounds, converting them into the same level. This setting is not suitable for recording conversations. •...mode (approx. B HQ ( HQ ) Records in standard quality mode (approx. Using the Setup items STANDARD SET Settings while recording or other basic settings (REC MODE/LCD/VF SET/USB SPEED, etc.) The default settings are marked with dual sound or stereo sound.
...indicators in 5.1ch mode. See page 48 for more than five minutes. LP ( LP ) Increases the recording time (Long Play) (approx. MULTI-SOUND You can display the direction from three levels. B NORMAL Records various surround sounds, converting them into the same level. This setting is not suitable for recording conversations. •...mode (approx. B HQ ( HQ ) Records in standard quality mode (approx. Using the Setup items STANDARD SET Settings while recording or other basic settings (REC MODE/LCD/VF SET/USB SPEED, etc.) The default settings are marked with dual sound or stereo sound.
Operating Guide
Page 62
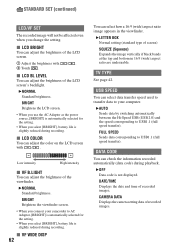
...Adaptor, [BRIGHT] is automatically selected for the setting. • When you connect your computer. B OFF Data code is not displayed. x LCD COLOR You can check the information recorded automatically (data code) during playback. BRIGHT Brightens the viewfinder screen. • When you ...x VF WIDE DISP 62 You can adjust the brightness of the LCD screen's backlight. B NORMAL Standard brightness. FULL SPEED Sends data corresponding to your camcorder to USB1.1 (full speed transfer). CAMERA DATA Displays the camera setting data of screen) SQUEZE (Squeeze) Expands the image...
...Adaptor, [BRIGHT] is automatically selected for the setting. • When you connect your computer. B OFF Data code is not displayed. x LCD COLOR You can check the information recorded automatically (data code) during playback. BRIGHT Brightens the viewfinder screen. • When you ...x VF WIDE DISP 62 You can adjust the brightness of the LCD screen's backlight. B NORMAL Standard brightness. FULL SPEED Sends data corresponding to your camcorder to USB1.1 (full speed transfer). CAMERA DATA Displays the camera setting data of screen) SQUEZE (Squeeze) Expands the image...

Operating Guide
Page 63
... free space indicator. Thumbnail Glossary (p.102) B ZOOM LINK Change the number of thumbnails (6 or 12) with the zoom lever on your camcorder.* 6IMAGES Displays thumbnails of 6 images. 12IMAGES Displays thumbnails of the camcorder, bars [--:--:--] appear. • The setting returns to [OFF] after you remove the power source for more than five minutes for more...:00 JAN 1 2006 1:12:34 AM 00:00:00 AWB Still image 60min 10/10 3SteadyShot off to on, with the zoom buttons on the LCD frame or on the Remote Commander.
... free space indicator. Thumbnail Glossary (p.102) B ZOOM LINK Change the number of thumbnails (6 or 12) with the zoom lever on your camcorder.* 6IMAGES Displays thumbnails of 6 images. 12IMAGES Displays thumbnails of the camcorder, bars [--:--:--] appear. • The setting returns to [OFF] after you remove the power source for more than five minutes for more...:00 JAN 1 2006 1:12:34 AM 00:00:00 AWB Still image 60min 10/10 3SteadyShot off to on, with the zoom buttons on the LCD frame or on the Remote Commander.


