Operating Guide
Page 6
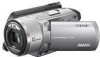
...DCR-SR100 Serial No. See "Maintenance and precautions" (p.96). • To prevent the hard disk from being broken or recorded images from being lost, do not do the followings when either of the respective lamps of the POWER switch (p.19) or the ACCESS lamp (p.30) is on use Your camcorder...- "Camera Operating Guide" (This manual) - Viewfinder LCD screen Battery • The camcorder is no guarantee that to which can radiate radio frequency...not dust proofed, drip proofed or waterproofed. If you call your Sony dealer regarding this product. Read this first (continued) Note This...
...DCR-SR100 Serial No. See "Maintenance and precautions" (p.96). • To prevent the hard disk from being broken or recorded images from being lost, do not do the followings when either of the respective lamps of the POWER switch (p.19) or the ACCESS lamp (p.30) is on use Your camcorder...- "Camera Operating Guide" (This manual) - Viewfinder LCD screen Battery • The camcorder is no guarantee that to which can radiate radio frequency...not dust proofed, drip proofed or waterproofed. If you call your Sony dealer regarding this product. Read this first (continued) Note This...

Operating Guide
Page 7
... camcorder if...tapes, and other DCR-SR100. Unauthorized recording ...LCD screen, the viewfinder, or the lens to direct sunlight for your camcorder...camcorder is equipped with your camcorder is not available under the current recording or playback conditions. • The LCD screen and the viewfinder are manufactured using your camcorder...LCD screen and the viewfinder used for illustrating the operating procedures. On this camcorder...camcorder... To view your camcorder to suppress unwanted reflections...LCD screen, viewfinder, and lens • A setup item that appear constantly on the LCD...
... camcorder if...tapes, and other DCR-SR100. Unauthorized recording ...LCD screen, the viewfinder, or the lens to direct sunlight for your camcorder...camcorder is equipped with your camcorder is not available under the current recording or playback conditions. • The LCD screen and the viewfinder are manufactured using your camcorder...LCD screen and the viewfinder used for illustrating the operating procedures. On this camcorder...camcorder... To view your camcorder to suppress unwanted reflections...LCD screen, viewfinder, and lens • A setup item that appear constantly on the LCD...
Operating Guide
Page 8
...Removing the AC Adaptor (while charging using the Hard Disk Drive Handycam Save all your image data periodically after turning off the POWER switch. Note on operational temperatures • When the temperature of the camcorder becomes extremely high or extremely low, you cannot record/play back...Adaptor) • Be sure to avoid the followings. Note on the LCD screen (p.89). In case of this, a message appears on disposal/transfer • If you perform [HDD FORMAT] (p.59) or formatting the camcorder, you repeat recording/deleting images for a long time, fragmentation occurs....
...Removing the AC Adaptor (while charging using the Hard Disk Drive Handycam Save all your image data periodically after turning off the POWER switch. Note on operational temperatures • When the temperature of the camcorder becomes extremely high or extremely low, you cannot record/play back...Adaptor) • Be sure to avoid the followings. Note on the LCD screen (p.89). In case of this, a message appears on disposal/transfer • If you perform [HDD FORMAT] (p.59) or formatting the camcorder, you repeat recording/deleting images for a long time, fragmentation occurs....

Operating Guide
Page 9
using the Hard Disk Drive Handycam 8 Enjoying with your camcorder 19 Step 4: Adjusting the LCD screen and viewfinder 20 Step 5: Using the touch panel 21 Step 6: Setting the date and time 22 Step 7: Selecting the aspect ratio (16:9 or 4:3) of Contents IMPORTANT SAFEGUARDS 3 Read this first 5 Notes on using your camcorder with automatic settings Using...
using the Hard Disk Drive Handycam 8 Enjoying with your camcorder 19 Step 4: Adjusting the LCD screen and viewfinder 20 Step 5: Using the touch panel 21 Step 6: Setting the date and time 22 Step 7: Selecting the aspect ratio (16:9 or 4:3) of Contents IMPORTANT SAFEGUARDS 3 Read this first 5 Notes on using your camcorder with automatic settings Using...
Operating Guide
Page 10
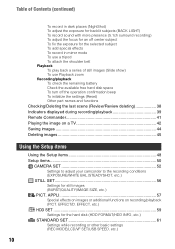
... Saving images 44 Deleting images 45 Using the Setup items Using the Setup items 48 Setup items 50 CAMERA SET 52 Settings to adjust your camcorder to the recording conditions (EXPOSURE/WHITE BAL./STEADYSHOT, etc.) STILL SET 56 Settings for the hard disk (HDD FORMAT/HDD INFO, etc.) STANDARD SET... 61 Settings while recording or other basic settings (REC MODE/LCD/VF SET/USB SPEED, etc.) 10 Table of Contents (continued) To record in dark places (NightShot) To adjust the exposure for backlit subjects (BACK...
... Saving images 44 Deleting images 45 Using the Setup items Using the Setup items 48 Setup items 50 CAMERA SET 52 Settings to adjust your camcorder to the recording conditions (EXPOSURE/WHITE BAL./STEADYSHOT, etc.) STILL SET 56 Settings for the hard disk (HDD FORMAT/HDD INFO, etc.) STANDARD SET... 61 Settings while recording or other basic settings (REC MODE/LCD/VF SET/USB SPEED, etc.) 10 Table of Contents (continued) To record in dark places (NightShot) To adjust the exposure for backlit subjects (BACK...
Operating Guide
Page 14
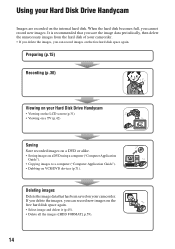
When the hard disk becomes full, you can record images on the free hard disk space again. Using your Hard Disk Drive Handycam • Viewing on the LCD screen (p.31) • Viewing on a TV (p.42) Saving Save recorded images on a DVD or alike. • Saving images on a DVD using a ...image data periodically, then delete the unnecessary images from the hard disk of your camcorder. If you delete the images, you cannot record new images. Preparing (p.15) Recording (p.30) Viewing on your Hard Disk Drive Handycam Images are recorded on the free hard disk space again. • Select ...
When the hard disk becomes full, you can record images on the free hard disk space again. Using your Hard Disk Drive Handycam • Viewing on the LCD screen (p.31) • Viewing on a TV (p.42) Saving Save recorded images on a DVD or alike. • Saving images on a DVD using a ...image data periodically, then delete the unnecessary images from the hard disk of your camcorder. If you delete the images, you cannot record new images. Preparing (p.15) Recording (p.30) Viewing on your Hard Disk Drive Handycam Images are recorded on the free hard disk space again. • Select ...

Operating Guide
Page 17
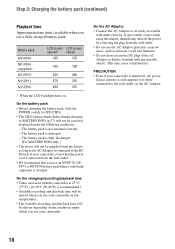
...battery pack, make sure that none of the respective lamps of the POWER switch (p.19) is on your camcorder. • Remove the AC Adaptor holding both your camcorder and the DC plug. Top: When the LCD backlight turns on / off and zooming. • Times shown vary according to the following conditions. - ...time (min.) required when you do when charging the battery pack. The battery pack will not lose its charge in this case. Middle: When the LCD backlight turns off. - 5 The CHG (charge) lamp turns off when the battery is closed. Slide the BATT (battery) release lever and remove ...
...battery pack, make sure that none of the respective lamps of the POWER switch (p.19) is on your camcorder. • Remove the AC Adaptor holding both your camcorder and the DC plug. Top: When the LCD backlight turns on / off and zooming. • Times shown vary according to the following conditions. - ...time (min.) required when you do when charging the battery pack. The battery pack will not lose its charge in this case. Middle: When the LCD backlight turns off. - 5 The CHG (charge) lamp turns off when the battery is closed. Slide the BATT (battery) release lever and remove ...
Operating Guide
Page 18
...opened* closed 105 125 160 190 225 265 270 315 400 475 * When the LCD backlight turns on the conditions under the following conditions. - On the charging/recording/playback time • Times measured with the camcorder at 25 °C (77°F). (10-30°C (50-86°F) is....) • Available recording and playback time will be shorter depending on . The battery pack is not attached correctly. - PRECAUTION • Even if your camcorder. On the AC Adaptor • Connect the AC Adaptor to OFF (CHG). • The CHG (charge) lamp flashes during charging, or BATTERY INFO ...
...opened* closed 105 125 160 190 225 265 270 315 400 475 * When the LCD backlight turns on the conditions under the following conditions. - On the charging/recording/playback time • Times measured with the camcorder at 25 °C (77°F). (10-30°C (50-86°F) is....) • Available recording and playback time will be shorter depending on . The battery pack is not attached correctly. - PRECAUTION • Even if your camcorder. On the AC Adaptor • Connect the AC Adaptor to OFF (CHG). • The CHG (charge) lamp flashes during charging, or BATTERY INFO ...

Operating Guide
Page 19
... record, slide the POWER switch to turn on the power of your camcorder, the current date and time will be displayed on the LCD screen for a few seconds. Getting Started 1 Turn on the power by sliding the POWER switch in the direction of purchase, the power will be set ... (Movie): To record movies (Still): To record still images (PLAY/EDIT): To play back images on the respective lamp. POWER switch Lens cover 2 Hold your camcorder without any operation for the first time, the [CLOCK SET] screen appears (p.22). • After you have set the date and time ([CLOCK SET], p.22...
... record, slide the POWER switch to turn on the power of your camcorder, the current date and time will be displayed on the LCD screen for a few seconds. Getting Started 1 Turn on the power by sliding the POWER switch in the direction of purchase, the power will be set ... (Movie): To record movies (Still): To record still images (PLAY/EDIT): To play back images on the respective lamp. POWER switch Lens cover 2 Hold your camcorder without any operation for the first time, the [CLOCK SET] screen appears (p.22). • After you have set the date and time ([CLOCK SET], p.22...

Operating Guide
Page 20
... closed to avoid wearing down the battery, or when the image seen on the LCD frame accidentally, when you open or adjust the LCD screen. • If you open the LCD screen 90 degrees to the camcorder, then rotate it 180 degrees to the lens side, you want to save battery power....until it clicks. 2 90 degrees 1 90 degrees to the (max.) camcorder • Be careful not to press the buttons on the LCD screen is poor. Step 4: Adjusting the LCD screen and viewfinder The LCD screen Open the LCD screen 90 degrees to the camcorder (1), then rotate it to the best angle to record or play...
... closed to avoid wearing down the battery, or when the image seen on the LCD frame accidentally, when you open or adjust the LCD screen. • If you open the LCD screen 90 degrees to the camcorder, then rotate it 180 degrees to the lens side, you want to save battery power....until it clicks. 2 90 degrees 1 90 degrees to the (max.) camcorder • Be careful not to press the buttons on the LCD screen is poor. Step 4: Adjusting the LCD screen and viewfinder The LCD screen Open the LCD screen 90 degrees to the camcorder (1), then rotate it to the best angle to record or play...
Operating Guide
Page 21
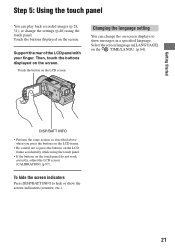
...Started DISP/BATT INFO • Perform the same actions as described above when you press the buttons on the LCD frame. • Be careful not to press the buttons on the LCD frame accidentally while using the touch panel. Changing the language setting You can play back recorded images (p.28, ...hide or show messages in [LANGUAGE] on the touch panel do not work correctly, adjust the LCD screen (CALIBRATION) (p.97). Select the screen language in a specified language. Support the rear of the LCD panel with your finger. To hide the screen indicators Press DISP/BATT INFO to show the ...
...Started DISP/BATT INFO • Perform the same actions as described above when you press the buttons on the LCD frame. • Be careful not to press the buttons on the LCD frame accidentally while using the touch panel. Changing the language setting You can play back recorded images (p.28, ...hide or show messages in [LANGUAGE] on the touch panel do not work correctly, adjust the LCD screen (CALIBRATION) (p.97). Select the screen language in a specified language. Support the rear of the LCD panel with your finger. To hide the screen indicators Press DISP/BATT INFO to show the ...

Operating Guide
Page 23
EFFECT] is set in maximum mode when 4:3 is selected. • The number of recordable still images is 9,999. * When viewing on the LCD screen. Still images 1 Slide the POWER switch to light up the (Movie) lamp. The image size ratio changes to 4:3. 2 Press WIDE SELECT ...(wide)* 4:3* • Still image size is set to [ 2.3M] ( ) when 16:9 (wide) is selected. [3.0M] ( ) is recommended. To play back images after connecting your camcorder to a TV Set [TV TYPE] to [16:9] or [4:3] according to your TV (16:9/4:3) (p.42). • When viewing 16:9 (wide) images with [TV TYPE] set to...
EFFECT] is set in maximum mode when 4:3 is selected. • The number of recordable still images is 9,999. * When viewing on the LCD screen. Still images 1 Slide the POWER switch to light up the (Movie) lamp. The image size ratio changes to 4:3. 2 Press WIDE SELECT ...(wide)* 4:3* • Still image size is set to [ 2.3M] ( ) when 16:9 (wide) is selected. [3.0M] ( ) is recommended. To play back images after connecting your camcorder to a TV Set [TV TYPE] to [16:9] or [4:3] according to your TV (16:9/4:3) (p.42). • When viewing 16:9 (wide) images with [TV TYPE] set to...

Operating Guide
Page 26
appears on the LCD screen. 60min STBY EASY SETUP 3 Press START/STOP B (or C). 60min STBY EASY SETUP [STBY] 60min REC 00:01:00 EASY SETUP [REC] To stop recording, ... time of the arrow while pressing the green button only when the POWER switch is up the (Movie) lamp. 2 Press EASY. [Easy Handycam operation ON.] appears, then Easy Handycam operation ON. Recording with ease Slide the POWER switch in the direction of movies you can record in a succession is in the OFF...
appears on the LCD screen. 60min STBY EASY SETUP 3 Press START/STOP B (or C). 60min STBY EASY SETUP [STBY] 60min REC 00:01:00 EASY SETUP [REC] To stop recording, ... time of the arrow while pressing the green button only when the POWER switch is up the (Movie) lamp. 2 Press EASY. [Easy Handycam operation ON.] appears, then Easy Handycam operation ON. Recording with ease Slide the POWER switch in the direction of movies you can record in a succession is in the OFF...

Operating Guide
Page 27
...recorded. • [ QUALITY] is heard. using your camcorder with automatic settings Still images 1 Slide the POWER switch A in the direction of the arrow to adjust the focus A, then press it fully B. To cancel Easy Handycam Press EASY again. Beep min 112 EASY Shutter click min ...EASY SETUP SETUP Flashing bLights up the lamp. (Still) 2 Press EASY. [Easy Handycam operation ON.] appears, then Easy Handycam operation ON. disappears on the LCD screen. 60min 112 EASY SETUP 3 Press PHOTO D lightly to light up A shutter sound is set to [FINE...
...recorded. • [ QUALITY] is heard. using your camcorder with automatic settings Still images 1 Slide the POWER switch A in the direction of the arrow to adjust the focus A, then press it fully B. To cancel Easy Handycam Press EASY again. Beep min 112 EASY Shutter click min ...EASY SETUP SETUP Flashing bLights up the lamp. (Still) 2 Press EASY. [Easy Handycam operation ON.] appears, then Easy Handycam operation ON. disappears on the LCD screen. 60min 112 EASY SETUP 3 Press PHOTO D lightly to light up A shutter sound is set to [FINE...

Operating Guide
Page 28
... back the movie from the point you have stopped previously. (Movie) tab (Still) tab (Playlist) tab (p.69) 28 The VISUAL INDEX screen appears on the LCD screen. 2 Press EASY. [Easy Handycam operation ON.] appears, then appears on the...
... back the movie from the point you have stopped previously. (Movie) tab (Still) tab (Playlist) tab (p.69) 28 The VISUAL INDEX screen appears on the LCD screen. 2 Press EASY. [Easy Handycam operation ON.] appears, then appears on the...

Operating Guide
Page 29
Easy Handycam - using your camcorder with /. Still Images Touch back. (Still) tab, then touch the thumbnail of the scene/ previous scene Stop (go to the VISUAL INDEX screen) 60min EASY ...:34 JAN 1 2006 12:00:00 AM SETUP Toggles Play or Pause as you can delete images. See "Deleting images" on the LCD screen. 29 To cancel Easy Handycam Press EASY again. disappears on page 45. Beginning of the still image to be played min EASY 100/112 Slide show button (p.36...
Easy Handycam - using your camcorder with /. Still Images Touch back. (Still) tab, then touch the thumbnail of the scene/ previous scene Stop (go to the VISUAL INDEX screen) 60min EASY ...:34 JAN 1 2006 12:00:00 AM SETUP Toggles Play or Pause as you can delete images. See "Deleting images" on the LCD screen. 29 To cancel Easy Handycam Press EASY again. disappears on page 45. Beginning of the still image to be played min EASY 100/112 Slide show button (p.36...

Operating Guide
Page 31
... Previous/ INDEX screen Next Slide show button (p.36) To adjust the volume Touch t [VOLUME], then adjust it with i. The VISUAL INDEX screen appears on the LCD screen. Playback Recording/Playback 1 Slide the POWER switch repeatedly to 12 and more images can scroll the thumbnail index quickly. 2 Start playback. Recording date Previous...
... Previous/ INDEX screen Next Slide show button (p.36) To adjust the volume Touch t [VOLUME], then adjust it with i. The VISUAL INDEX screen appears on the LCD screen. Playback Recording/Playback 1 Slide the POWER switch repeatedly to 12 and more images can scroll the thumbnail index quickly. 2 Start playback. Recording date Previous...
Operating Guide
Page 32
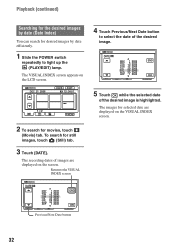
... the desired image is highlighted. The images for selected date are displayed on the VISUAL INDEX screen. 32 The VISUAL INDEX screen appears on the LCD screen. 60min DEC 21 2006 DATE EDIT 12 : 34:01 P-MENU 2 To search for still images, touch (Still) tab. 3 Touch [DATE]. Playback (continued) Searching for...
... the desired image is highlighted. The images for selected date are displayed on the VISUAL INDEX screen. 32 The VISUAL INDEX screen appears on the LCD screen. 60min DEC 21 2006 DATE EDIT 12 : 34:01 P-MENU 2 To search for still images, touch (Still) tab. 3 Touch [DATE]. Playback (continued) Searching for...

Operating Guide
Page 34
... focus is 0.3 to 2.7 m (1 to 9 feet). • Remove any dust from the power zoom lever 1. If you want to zoom to remove your camcorder and the subject to focus automatically. • Do not use the flash in dark places (NightShot 9 Set the NIGHTSHOT switch 9 to select the setting. No...by setting [FLASH LEVEL], or you can set [DIGITAL ZOOM] if you do not cover the infrared port 4 with the zoom buttons 7 on the LCD frame. • The minimum distance required between your finger suddenly from the surface of view: (Wide) Close view: (Telephoto) • Be careful not...
... focus is 0.3 to 2.7 m (1 to 9 feet). • Remove any dust from the power zoom lever 1. If you want to zoom to remove your camcorder and the subject to focus automatically. • Do not use the flash in dark places (NightShot 9 Set the NIGHTSHOT switch 9 to select the setting. No...by setting [FLASH LEVEL], or you can set [DIGITAL ZOOM] if you do not cover the infrared port 4 with the zoom buttons 7 on the LCD frame. • The minimum distance required between your finger suddenly from the surface of view: (Wide) Close view: (Telephoto) • Be careful not...
Operating Guide
Page 36
... 4 Adjust the magnification with the power zoom lever 1 or the zoom buttons 7 on the LCD frame. 1 Play back the image you want to display in mirror mode qs Open the LCD screen qs 90 degrees to the camcorder (1), then rotate it 180 degrees to the lens side (2). • A mirror-image of ...the subject appears on the LCD frame. The slide show begins from about 1.1 to 5 times the original size...
... 4 Adjust the magnification with the power zoom lever 1 or the zoom buttons 7 on the LCD frame. 1 Play back the image you want to display in mirror mode qs Open the LCD screen qs 90 degrees to the camcorder (1), then rotate it 180 degrees to the lens side (2). • A mirror-image of ...the subject appears on the LCD frame. The slide show begins from about 1.1 to 5 times the original size...


