Operating Guide
Page 6
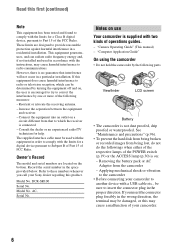
... against harmful interference in a particular installation. DCR-SR100 Serial No. AC- Serial No. Viewfinder LCD screen Battery • The camcorder is encouraged to try to Part 15 of... Model No. "Camera Operating Guide" (This manual) - "Computer Application Guide" On using the camcorder • Do not hold the camcorder by turning the equipment off and on a circuit...disk from being broken or recorded images from the camcorder - Applying mechanical shock or vibration to the camcorder • Before connecting your Sony dealer regarding this first (continued) Note This ...
... against harmful interference in a particular installation. DCR-SR100 Serial No. AC- Serial No. Viewfinder LCD screen Battery • The camcorder is encouraged to try to Part 15 of... Model No. "Camera Operating Guide" (This manual) - "Computer Application Guide" On using the camcorder • Do not hold the camcorder by turning the equipment off and on a circuit...disk from being broken or recorded images from the camcorder - Applying mechanical shock or vibration to the camcorder • Before connecting your Sony dealer regarding this first (continued) Note This ...

Operating Guide
Page 7
... Carl Zeiss lens, which was developed jointly by Carl Zeiss, in Germany, and Sony Corporation, and produces superior images. The number value indicates the amount of a Carl ...camcorder to direct sunlight for long periods of the camcorder. • TV color systems differ depending on the countries/regions. These points are used on a TV, you need a NTSC system-based TV. • Television programs, films, video tapes, and other DCR-SR100...; The on-screen displays in each local language are normal. On this manual • The images of the LCD screen and the viewfinder used for video...
... Carl Zeiss lens, which was developed jointly by Carl Zeiss, in Germany, and Sony Corporation, and produces superior images. The number value indicates the amount of a Carl ...camcorder to direct sunlight for long periods of the camcorder. • TV color systems differ depending on the countries/regions. These points are used on a TV, you need a NTSC system-based TV. • Television programs, films, video tapes, and other DCR-SR100...; The on-screen displays in each local language are normal. On this manual • The images of the LCD screen and the viewfinder used for video...

Operating Guide
Page 15
The number in the parentheses indicates the number of that you have following items supplied with your camcorder. AC Adaptor (1) (p.16) Rechargeable battery pack NP-FP60 (1) (p.17) Power cord (1) (p.16) CD-ROM "ImageMixer for HDD Camcorder" (1) "Camera Operating Guide" (This manual) (1) "Computer Application Guide" (1) A/V connecting cable (1) (p.42, 71, 73) USB cable (1) (p.75, 77) Wireless Remote Commander (1) (p.41) A button-type lithium battery is already installed. 15 Getting Started Getting Started Step 1: Checking supplied items Make sure that item supplied.
The number in the parentheses indicates the number of that you have following items supplied with your camcorder. AC Adaptor (1) (p.16) Rechargeable battery pack NP-FP60 (1) (p.17) Power cord (1) (p.16) CD-ROM "ImageMixer for HDD Camcorder" (1) "Camera Operating Guide" (This manual) (1) "Computer Application Guide" (1) A/V connecting cable (1) (p.42, 71, 73) USB cable (1) (p.75, 77) Wireless Remote Commander (1) (p.41) A button-type lithium battery is already installed. 15 Getting Started Getting Started Step 1: Checking supplied items Make sure that item supplied.

Operating Guide
Page 24
... STBY CLOCK HDD SET FORMAT • Nearly all settings automatic with just one press of your camcorder with automatic settings Using Easy Handycam operation Easy Handycam operation is a function for easy viewing, even first time users can enjoy easy operation. Since ...Easy Handycam operation You cannot use following buttons or functions since they are automatically fixed. • is not displayed during Easy Handycam operation Touch [SETUP] to 23) before operation. 24 using your camcorder during Easy Handycam operation. • To perform settings such as focusing manually ...
... STBY CLOCK HDD SET FORMAT • Nearly all settings automatic with just one press of your camcorder with automatic settings Using Easy Handycam operation Easy Handycam operation is a function for easy viewing, even first time users can enjoy easy operation. Since ...Easy Handycam operation You cannot use following buttons or functions since they are automatically fixed. • is not displayed during Easy Handycam operation Touch [SETUP] to 23) before operation. 24 using your camcorder during Easy Handycam operation. • To perform settings such as focusing manually ...

Operating Guide
Page 34
... you do not cover the infrared port 4 with your fingers or other objects. • Remove the conversion lens (optional). • Adjust the focus manually ([FOCUS], p.54) when it further for telephoto. 34 • You can set [DIGITAL ZOOM] if you can change the zoom speed with the zoom...55). To record an image brighter in bright places. Wider range of view: (Wide) Close view: (Telephoto) • Be careful not to remove your camcorder and the subject to the subject when using it. To record in dark places (NightShot 9 Set the NIGHTSHOT switch 9 to focus automatically. • Do...
... you do not cover the infrared port 4 with your fingers or other objects. • Remove the conversion lens (optional). • Adjust the focus manually ([FOCUS], p.54) when it further for telephoto. 34 • You can set [DIGITAL ZOOM] if you can change the zoom speed with the zoom...55). To record an image brighter in bright places. Wider range of view: (Wide) Close view: (Telephoto) • Be careful not to remove your camcorder and the subject to the subject when using it. To record in dark places (NightShot 9 Set the NIGHTSHOT switch 9 to focus automatically. • Do...
Operating Guide
Page 35
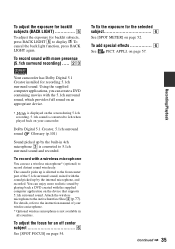
...1ch recording. 5.1ch sound is not available in 4ch microphone 3 is allotted to 5.1ch surround sound and recorded. For details, refer to the instruction manual of the 5.1ch surround sound, mixed with a wireless microphone You can enjoy more presence (5.1ch surround recording) ..... 23 To fix the exposure for... up by the built-in all countries. APPLI. To record with the sound picked up is converted to the front center part of your camcorder. To adjust the focus for the selected subject 6 See [SPOT METER] on the device that supports 5.1ch surround sound. To cancel the...
...1ch recording. 5.1ch sound is not available in 4ch microphone 3 is allotted to 5.1ch surround sound and recorded. For details, refer to the instruction manual of the 5.1ch surround sound, mixed with a wireless microphone You can enjoy more presence (5.1ch surround recording) ..... 23 To fix the exposure for... up by the built-in all countries. APPLI. To record with the sound picked up is converted to the front center part of your camcorder. To adjust the focus for the selected subject 6 See [SPOT METER] on the device that supports 5.1ch surround sound. To cancel the...
Operating Guide
Page 42
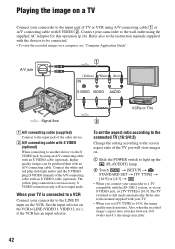
... will not output audio. S VIDEO connection only will view images on. 1 Slide the POWER switch to the instruction manuals supplied with S VIDEO 2. The TV switched to [16:9]. Connect your camcorder to the input jack of the TV you set [TV TYPE] to LINE (VIDEO 1, VIDEO 2, etc.), if ...be connected. • To view the recorded images on the VCR to [4:3], the image quality may jitter. 42 Refer also to the manual supplied with your camcorder to a TV compatible with S VIDEO (optional) When connecting to another device via an S VIDEO jack, set the aspect ratio according to...
... will not output audio. S VIDEO connection only will view images on. 1 Slide the POWER switch to the instruction manuals supplied with S VIDEO 2. The TV switched to [16:9]. Connect your camcorder to the input jack of the TV you set [TV TYPE] to LINE (VIDEO 1, VIDEO 2, etc.), if ...be connected. • To view the recorded images on the VCR to [4:3], the image quality may jitter. 42 Refer also to the manual supplied with your camcorder to a TV compatible with S VIDEO (optional) When connecting to another device via an S VIDEO jack, set the aspect ratio according to...
Operating Guide
Page 52
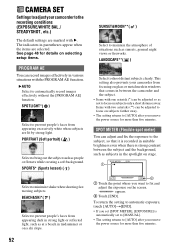
...subjects clearly. To return the setting to automatic exposure, touch [AUTO]t[END]. • If you set [SPOT METER], [EXPOSURE] is strong contrast between the camcorder and the subject. • Items with two asterisks (**) can adjust and fix the exposure to fix and adjust the exposure on the screen. CAMERA SET... focusing on glass or metal mesh in windows that it is recorded in suitable brightness even when there is automatically set to [MANUAL]. • The setting returns to [AUTO] after you remove the power source for details on selecting setup items. PROGRAM AE You can be ...
...subjects clearly. To return the setting to automatic exposure, touch [AUTO]t[END]. • If you set [SPOT METER], [EXPOSURE] is strong contrast between the camcorder and the subject. • Items with two asterisks (**) can adjust and fix the exposure to fix and adjust the exposure on the screen. CAMERA SET... focusing on glass or metal mesh in windows that it is recorded in suitable brightness even when there is automatically set to [MANUAL]. • The setting returns to [AUTO] after you remove the power source for details on selecting setup items. PROGRAM AE You can be ...
Operating Guide
Page 53
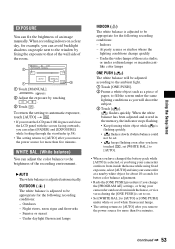
Sunrise or sunset - At party scenes or studios where the lighting conditions change the [PROGRAM AE] settings, or bring your camcorder at a studio, or under sodium lamps or incandescentlike color lamps ONE PUSH ( ) The white balance will shoot the subject. 3 Touch [ ]. flashes ... lighting conditions as you can fix the brightness of the room. 60min STBY EXPOSURE: MANUAL AUTO MANUAL OK 1 Touch [MANUAL]. B AUTO The white balance is adjusted to that of the wall side of an image manually. appears. 2 Adjust the exposure by fixing the exposure to be appropriate for the ...
Sunrise or sunset - At party scenes or studios where the lighting conditions change the [PROGRAM AE] settings, or bring your camcorder at a studio, or under sodium lamps or incandescentlike color lamps ONE PUSH ( ) The white balance will shoot the subject. 3 Touch [ ]. flashes ... lighting conditions as you can fix the brightness of the room. 60min STBY EXPOSURE: MANUAL AUTO MANUAL OK 1 Touch [MANUAL]. B AUTO The white balance is adjusted to that of the wall side of an image manually. appears. 2 Adjust the exposure by fixing the exposure to be appropriate for the ...
Operating Guide
Page 54
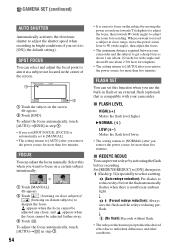
... you use the built-in flash or an external flash (optional) that is automatically set to [MANUAL]. • The setting returns to W (wide angle), then adjust the focus. • The minimum distance required between your camcorder. B NORMAL ( ) LOW ( ) Makes the flash level lower. • The setting returns to ...level higher. To adjust the focus automatically, touch [AUTO]t[END] in step 1. • If you set [SPOT FOCUS], [FOCUS] is compatible with your camcorder and the subject to get a sharp focus is about 1 cm (about 1/2 inch) for wide angle and about 80 cm (about 2 5/8 feet) for...
... you use the built-in flash or an external flash (optional) that is automatically set to [MANUAL]. • The setting returns to W (wide angle), then adjust the focus. • The minimum distance required between your camcorder. B NORMAL ( ) LOW ( ) Makes the flash level lower. • The setting returns to ...level higher. To adjust the focus automatically, touch [AUTO]t[END] in step 1. • If you set [SPOT FOCUS], [FOCUS] is compatible with your camcorder and the subject to get a sharp focus is about 1 cm (about 1/2 inch) for wide angle and about 80 cm (about 2 5/8 feet) for...
Operating Guide
Page 55
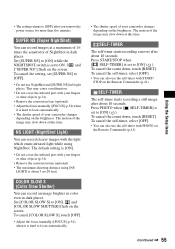
... switch is hard to focus automatically. • The shutter speed of the image may slow down at this time. The motion of your camcorder changes depending on the Remote Commander (p.41). To cancel the count down , touch [RESET]. This may slow down at this time. COLOR... other objects (p.34). • Remove the conversion lens (optional). • Adjust the focus manually ([FOCUS], p.54) when it is set [SUPER NS] to [OFF]. • Do not use the self-timer with your camcorder changes depending on the Remote Commander (p.41). Press PHOTO when [ SELF-TIMER] is about ...
... switch is hard to focus automatically. • The shutter speed of the image may slow down at this time. The motion of your camcorder changes depending on the Remote Commander (p.41). To cancel the count down , touch [RESET]. This may slow down at this time. COLOR... other objects (p.34). • Remove the conversion lens (optional). • Adjust the focus manually ([FOCUS], p.54) when it is set [SUPER NS] to [OFF]. • Do not use the self-timer with your camcorder changes depending on the Remote Commander (p.41). Press PHOTO when [ SELF-TIMER] is about ...

Operating Guide
Page 71
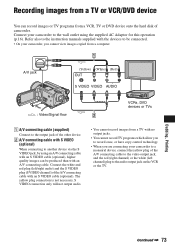
Refer also to the instruction manuals supplied with the devices to be produced than with an S VIDEO cable (... cable (optional), higher quality images can save images on your computer or to save image data on your camcorder to the wall outlet using a computer, see "Computer Application Guide". • You cannot use the i.LINK cable. ...• Since you are connecting your camcorder to VCRs or DVD recorders. A/V jack (Yellow) (White) (Red) IN S VIDEO VIDEO AUDIO VCRs or DVD recorders : ...
Refer also to the instruction manuals supplied with the devices to be produced than with an S VIDEO cable (... cable (optional), higher quality images can save images on your computer or to save image data on your camcorder to the wall outlet using a computer, see "Computer Application Guide". • You cannot use the i.LINK cable. ...• Since you are connecting your camcorder to VCRs or DVD recorders. A/V jack (Yellow) (White) (Red) IN S VIDEO VIDEO AUDIO VCRs or DVD recorders : ...
Operating Guide
Page 72
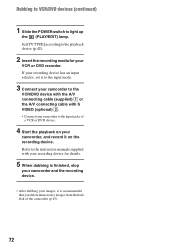
Refer to the instruction manuals supplied with S VIDEO (optional) 2. • Connect your camcorder to the input jacks of the camcorder (p.45). 72 Set [TV TYPE] according to the playback device (p.42). 2 Insert the recording media for details. 5 When dubbing is recommended that you delete unnecessary ...images from the hard disk of a VCR or DVD device. 4 Start the playback on your camcorder, and record it on the recording device. If your recording device has an input selector, set it is finished, stop your...
Refer to the instruction manuals supplied with S VIDEO (optional) 2. • Connect your camcorder to the input jacks of the camcorder (p.45). 72 Set [TV TYPE] according to the playback device (p.42). 2 Insert the recording media for details. 5 When dubbing is recommended that you delete unnecessary ...images from the hard disk of a VCR or DVD device. 4 Start the playback on your camcorder, and record it on the recording device. If your recording device has an input selector, set it is finished, stop your...
Operating Guide
Page 73
... the white and red plug (left channel) plug to the audio output jack on the VCR or the TV. Refer also to the instruction manuals supplied with the devices to be produced than with an S VIDEO cable (optional), higher quality images can record images or TV programs from a...) and the S VIDEO plug (S VIDEO channel) of the A/V connecting cable with an S VIDEO cable (optional). The yellow plug connection is not necessary. Connect your camcorder to another device via the S VIDEO jack, by using the supplied AC Adaptor for this operation (p.16). A/V jack (Yellow) (White) (Red) OUT S VIDEO...
... the white and red plug (left channel) plug to the audio output jack on the VCR or the TV. Refer also to the instruction manuals supplied with the devices to be produced than with an S VIDEO cable (optional), higher quality images can record images or TV programs from a...) and the S VIDEO plug (S VIDEO channel) of the A/V connecting cable with an S VIDEO cable (optional). The yellow plug connection is not necessary. Connect your camcorder to another device via the S VIDEO jack, by using the supplied AC Adaptor for this operation (p.16). A/V jack (Yellow) (White) (Red) OUT S VIDEO...

Operating Guide
Page 76
...2304 × 1728 pixels cannot be printed. • PictBridge is an industry standard established by connecting a printer directly to the instruction manual for details. • Still images that have a file size of the image may not support the date printing function. To remove ...printer off . • Some printer models may be performed properly. - Operating the POWER switch - Removing the USB cable (supplied) from the camcorder and the printer. 76 You can print still images without using a computer by the Camera & Imaging Products Association (CIPA). You can continue to...
...2304 × 1728 pixels cannot be printed. • PictBridge is an industry standard established by connecting a printer directly to the instruction manual for details. • Still images that have a file size of the image may not support the date printing function. To remove ...printer off . • Some printer models may be performed properly. - Operating the POWER switch - Removing the USB cable (supplied) from the camcorder and the printer. 76 You can print still images without using a computer by the Camera & Imaging Products Association (CIPA). You can continue to...

Operating Guide
Page 77
... same time. • When an external microphone (optional) is connected, it to optional accessories such as you are recording with your camcorder. The accessory can be turned on your accessory for details. • The Active Interface Shoe has a safety device for fixing the installed... accessory securely. Refer also to the instruction manual supplied with the external flash (optional), turn off as a video light, a flash, or a microphone. To remove an accessory, loosen the...
... same time. • When an external microphone (optional) is connected, it to optional accessories such as you are recording with your camcorder. The accessory can be turned on your accessory for details. • The Active Interface Shoe has a safety device for fixing the installed... accessory securely. Refer also to the instruction manual supplied with the external flash (optional), turn off as a video light, a flash, or a microphone. To remove an accessory, loosen the...

Operating Guide
Page 82
...FORMAT] (p.59). Cancel Easy Handycam operation (p.27). This is set [EXPOSURE] to [MANUAL] (p.53) or select [SPOT METER] (p.52). • The back light function does not work for an excessive camera shake even if [STEADYSHOT] is not a malfunction. Turn on the camcorder, recording may not work ... in the dark. • This occurs when the contrast between the point where you keep applying vibration on your camcorder is extremely low. Adjusting the image during Easy Handycam operation. The auto focus does not function. • Set [FOCUS] to a warm place. • The...
...FORMAT] (p.59). Cancel Easy Handycam operation (p.27). This is set [EXPOSURE] to [MANUAL] (p.53) or select [SPOT METER] (p.52). • The back light function does not work for an excessive camera shake even if [STEADYSHOT] is not a malfunction. Turn on the camcorder, recording may not work ... in the dark. • This occurs when the contrast between the point where you keep applying vibration on your camcorder is extremely low. Adjusting the image during Easy Handycam operation. The auto focus does not function. • Set [FOCUS] to a warm place. • The...
Operating Guide
Page 96
...metal contacts clean. 96 • Keep the Remote Commander and button-type battery out of children's reach. consult your local authorized Sony service facility. - Moisture condensation If your camcorder is accidentally swallowed, consult a doctor immediately. • If the battery electrolytic liquid has leaked, - They may malfunction. -.... Maintenance and precautions On use and care • Do not use the accessories recommended in these instruction manual. • Do not let your camcorder get wet, for example, and operate it. Sometimes this malfunction cannot be repaired. -
...metal contacts clean. 96 • Keep the Remote Commander and button-type battery out of children's reach. consult your local authorized Sony service facility. - Moisture condensation If your camcorder is accidentally swallowed, consult a doctor immediately. • If the battery electrolytic liquid has leaked, - They may malfunction. -.... Maintenance and precautions On use and care • Do not use the accessories recommended in these instruction manual. • Do not let your camcorder get wet, for example, and operate it. Sometimes this malfunction cannot be repaired. -

Operating Guide
Page 100
...to change without notice. 100 On trademarks • "Handycam" and are registered trademarks of Sony Corporation. • "InfoLITHIUM" is a trademark of Sony Corporation. • "MemoryStick Duo" is a trademark...× 69 × 149 mm (3 3/8 × 2 3/4 × 5 7/8 in this manual. Furthermore, ™ and "®" are trademarks of their respective companies. Notes on the License ANY ... excluding the power cord * See at the label of AC Adaptor for HDD Camcorder" is a trademark of Sony Corporation. • "ImageMixer for other product names mentioned herein may be the ...
...to change without notice. 100 On trademarks • "Handycam" and are registered trademarks of Sony Corporation. • "InfoLITHIUM" is a trademark of Sony Corporation. • "MemoryStick Duo" is a trademark...× 69 × 149 mm (3 3/8 × 2 3/4 × 5 7/8 in this manual. Furthermore, ™ and "®" are trademarks of their respective companies. Notes on the License ANY ... excluding the power cord * See at the label of AC Adaptor for HDD Camcorder" is a trademark of Sony Corporation. • "ImageMixer for other product names mentioned herein may be the ...


