
Operating Guide
Page 3
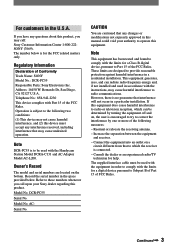
...cause undesired operation. Note DCR-PC55 is for a digital device pursuant to radio communications. Owner's Record The model and serial numbers are cautioned that any changes or modifications not expressly approved in order to comply with the Handycam Station Model DCRA-C131 ... measures: - If this equipment. Model No. Continued 3 Refer to Part 15 of Conformity Trade Name: SONY Model No.: DCR-PC55 Responsible Party: Sony Electronics Inc. DCR-PC55 Serial No. Consult the dealer or an experienced radio/TV technician for a Class B digital device, pursuant to these...
...cause undesired operation. Note DCR-PC55 is for a digital device pursuant to radio communications. Owner's Record The model and serial numbers are cautioned that any changes or modifications not expressly approved in order to comply with the Handycam Station Model DCRA-C131 ... measures: - If this equipment. Model No. Continued 3 Refer to Part 15 of Conformity Trade Name: SONY Model No.: DCR-PC55 Responsible Party: Sony Electronics Inc. DCR-PC55 Serial No. Consult the dealer or an experienced radio/TV technician for a Class B digital device, pursuant to these...
Operating Guide
Page 4
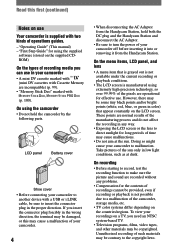
...8226; Exposing the LCD screen or the lens to malfunction. "First Step Guide" for the contents of your camcorder. 4 • When disconnecting the AC Adaptor from the Handycam Station. If you can use in color) that is grayed out is not available under the current recording or... on the countries/regions. Take pictures of operations guides. - Doing so might cause your camcorder off before inserting it into or removing it from the Handycam Station, hold the camcorder by the following parts. Unauthorized recording of recording media you insert the connector plug forcibly in...
...8226; Exposing the LCD screen or the lens to malfunction. "First Step Guide" for the contents of your camcorder. 4 • When disconnecting the AC Adaptor from the Handycam Station. If you can use in color) that is grayed out is not available under the current recording or... on the countries/regions. Take pictures of operations guides. - Doing so might cause your camcorder off before inserting it into or removing it from the Handycam Station, hold the camcorder by the following parts. Unauthorized recording of recording media you insert the connector plug forcibly in...
Operating Guide
Page 6
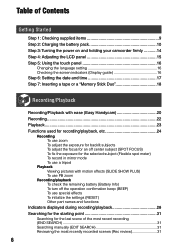
... Contents Getting Started Step 1: Checking supplied items 9 Step 2: Charging the battery pack 10 Step 3: Turning the power on and holding your camcorder firmly ...........14 Step 4: Adjusting the LCD panel 15 Step 5: Using the touch panel 16 Changing the language setting 16 Checking the ...6: Setting the date and time 17 Step 7: Inserting a tape or a "Memory Stick Duo 18 Recording/Playback Recording/Playback with ease (Easy Handycam 20 Recording 22 Playback 23 Functions used for recording/playback, etc 24 Recording To use zoom To adjust the exposure for backlit subjects To adjust...
... Contents Getting Started Step 1: Checking supplied items 9 Step 2: Charging the battery pack 10 Step 3: Turning the power on and holding your camcorder firmly ...........14 Step 4: Adjusting the LCD panel 15 Step 5: Using the touch panel 16 Changing the language setting 16 Checking the ...6: Setting the date and time 17 Step 7: Inserting a tape or a "Memory Stick Duo 18 Recording/Playback Recording/Playback with ease (Easy Handycam 20 Recording 22 Playback 23 Functions used for recording/playback, etc 24 Recording To use zoom To adjust the exposure for backlit subjects To adjust...
Operating Guide
Page 9
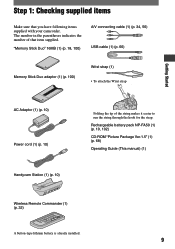
..., 56) USB cable (1) (p. 66) Memory Stick Duo adaptor (1) (p. 100) Wrist strap (1) • To attach the Wrist strap Getting Started AC Adaptor (1) (p. 10) Power cord (1) (p. 10) Handycam Station (1) (p. 10) Folding the tip of that you have following items supplied with your camcorder. Step 1: Checking supplied items Make sure that item supplied.
..., 56) USB cable (1) (p. 66) Memory Stick Duo adaptor (1) (p. 100) Wrist strap (1) • To attach the Wrist strap Getting Started AC Adaptor (1) (p. 10) Power cord (1) (p. 10) Handycam Station (1) (p. 10) Folding the tip of that you have following items supplied with your camcorder. Step 1: Checking supplied items Make sure that item supplied.
Operating Guide
Page 10
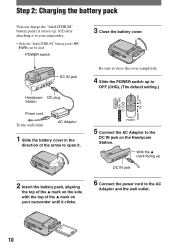
...(The default setting.) 5 Connect the AC Adaptor to the DC IN jack on your camcorder. • Only the "InfoLITHIUM" battery pack (NPFA50) can be used. POWER switch 3 Close the battery cover. DC IN jack Handycam DC plug Station Power cord To the wall outlet AC Adaptor 1 Slide the battery cover... in the direction of the mark on the Handycam Station. Step 2: Charging the battery pack You can charge the "InfoLITHIUM" ...
...(The default setting.) 5 Connect the AC Adaptor to the DC IN jack on your camcorder. • Only the "InfoLITHIUM" battery pack (NPFA50) can be used. POWER switch 3 Close the battery cover. DC IN jack Handycam DC plug Station Power cord To the wall outlet AC Adaptor 1 Slide the battery cover... in the direction of the mark on the Handycam Station. Step 2: Charging the battery pack You can charge the "InfoLITHIUM" ...
Operating Guide
Page 11
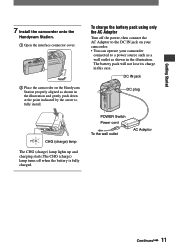
Getting Started 7 Install the camcorder onto the Handycam Station. Open the interface connector cover. Place the camcorder on your camcorder. • You can operate your camcorder connected to a power source such as a wall outlet as shown in this case. CHG (charge) lamp The CHG (charge) lamp lights up and ... lose its charge in the illustration and gently push down at the point indicated by the arrow to the DC IN jack on the Handycam Station properly aligned as shown in the illustration. To charge the battery pack using only the AC Adaptor Turn off when the battery is...
Getting Started 7 Install the camcorder onto the Handycam Station. Open the interface connector cover. Place the camcorder on your camcorder. • You can operate your camcorder connected to a power source such as a wall outlet as shown in this case. CHG (charge) lamp The CHG (charge) lamp lights up and ... lose its charge in the illustration and gently push down at the point indicated by the arrow to the DC IN jack on the Handycam Station properly aligned as shown in the illustration. To charge the battery pack using only the AC Adaptor Turn off when the battery is...
Operating Guide
Page 12
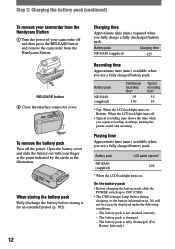
...battery pack Turn off and zooming. Open the battery cover and slide the battery out with your camcorder off and then press the RELEASE button and remove the camcorder from the Handycam Station Turn the power of your finger at the point indicated by the circle... battery pack. The battery pack is fully discharged. (For Battery Info only.) 12 Step 2: Charging the battery pack (continued) To remove your camcorder from the Handycam Station. Battery pack LCD panel opened* NP-FA50 (supplied) 105 * When the LCD backlight turns on . On the battery pack • ...
...battery pack Turn off and zooming. Open the battery cover and slide the battery out with your camcorder off and then press the RELEASE button and remove the camcorder from the Handycam Station Turn the power of your finger at the point indicated by the circle... battery pack. The battery pack is fully discharged. (For Battery Info only.) 12 Step 2: Charging the battery pack (continued) To remove your camcorder from the Handycam Station. Battery pack LCD panel opened* NP-FA50 (supplied) 105 * When the LCD backlight turns on . On the battery pack • ...
Operating Guide
Page 13
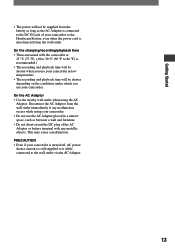
On the AC Adaptor • Use the nearby wall outlet when using your camcorder or the Handycam Station, even when the power cord is connected to the wall outlet via the AC Adaptor. 13 Disconnect the AC Adaptor from the wall outlet. ... the AC Adaptor placed in a narrow space, such as between a wall and furniture. • Do not short-circuit the DC plug of your camcorder. • Do not use your camcorder in low temperatures. • The recording and playback time will not be shorter depending on the conditions under which you use your...
On the AC Adaptor • Use the nearby wall outlet when using your camcorder or the Handycam Station, even when the power cord is connected to the wall outlet via the AC Adaptor. 13 Disconnect the AC Adaptor from the wall outlet. ... the AC Adaptor placed in a narrow space, such as between a wall and furniture. • Do not short-circuit the DC plug of your camcorder. • Do not use your camcorder in low temperatures. • The recording and playback time will not be shorter depending on the conditions under which you use your...
Operating Guide
Page 16
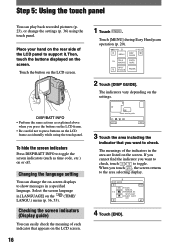
... you want to check, touch / to press buttons on the settings. Place your hand on the (TIME/ LANGU.) menu (p. 36, 53). Touch [MENU] during Easy Handycam operation (p. 20). 60min MENU 0:00:00 DISP GUIDE 1/3 TELE MACRO EXPOSURE SPOT FOCUS FADER 2 Touch [DISP GUIDE]. DISP GUIDE END 3 Touch the area including the...
... you want to check, touch / to press buttons on the settings. Place your hand on the (TIME/ LANGU.) menu (p. 36, 53). Touch [MENU] during Easy Handycam operation (p. 20). 60min MENU 0:00:00 DISP GUIDE 1/3 TELE MACRO EXPOSURE SPOT FOCUS FADER 2 Touch [DISP GUIDE]. DISP GUIDE END 3 Touch the area including the...

Operating Guide
Page 20
... described in the direction of the camera E settings are automatically adjusted optimally, which frees you from detailed adjustment. Easy Handycam operation ON 3 Start recording. A DB Recording with ease (Easy Handycam) With this Easy Handycam operation, most of the arrow repeatedly to turn on the respective lamp to select a recording medium. To stop recording...
... described in the direction of the camera E settings are automatically adjusted optimally, which frees you from detailed adjustment. Easy Handycam operation ON 3 Start recording. A DB Recording with ease (Easy Handycam) With this Easy Handycam operation, most of the arrow repeatedly to turn on the respective lamp to select a recording medium. To stop recording...
Operating Guide
Page 21
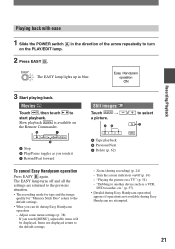
..."Memory Stick Duo" return to the default settings. • What you can do during recording) (p. 24) - Zoom (during Easy Handycam operation - "Playing the picture on the Remote Commander. Adjust some menu settings (p. 38) If you touch it Rewind/Fast forward ...EASY . Items not displayed return to turn on /off and all the settings are attempted. 21 Still images Touch a picture. Easy Handycam operation ON Recording/Playback 3 Start playing back. Slow playback is available on a TV" (p. 34) - Playing back with ease 1 Slide the POWER ...
..."Memory Stick Duo" return to the default settings. • What you can do during recording) (p. 24) - Zoom (during Easy Handycam operation - "Playing the picture on the Remote Commander. Adjust some menu settings (p. 38) If you touch it Rewind/Fast forward ...EASY . Items not displayed return to turn on /off and all the settings are attempted. 21 Still images Touch a picture. Easy Handycam operation ON Recording/Playback 3 Start playing back. Slow playback is available on a TV" (p. 34) - Playing back with ease 1 Slide the POWER ...
Operating Guide
Page 25
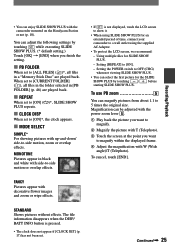
... finish the setting. PB FOLDER When set to [ON]*, the clock appears. MODE SELECT SIMPLE* For showing pictures with the camcorder mounted on the Handycam Station or not (p. 10). To use PB zoom You can enjoy SLIDE SHOW PLUS with up-and-down/ side-to-side motion, zoom or... button is not displayed, touch the LCD screen to show it. • When using SLIDE SHOW PLUS for an extended period of time, connect your camcorder to [ON]. -
... finish the setting. PB FOLDER When set to [ON]*, the clock appears. MODE SELECT SIMPLE* For showing pictures with the camcorder mounted on the Handycam Station or not (p. 10). To use PB zoom You can enjoy SLIDE SHOW PLUS with up-and-down/ side-to-side motion, zoom or... button is not displayed, touch the LCD screen to show it. • When using SLIDE SHOW PLUS for an extended period of time, connect your camcorder to [ON]. -
Operating Guide
Page 32
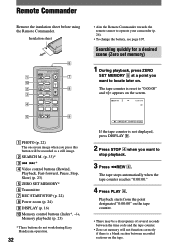
...; DISPLAY (p. 16) Memory control buttons (Index*, -/+, Memory playback) (p. 23) * These buttons do not work during Easy Handycam operation. 32 • Aim the Remote Commander towards the remote sensor to locate later on the tape. The tape stops automatically when the tape... time code and the tape counter. • Zero set memory) 1 During playback, press ZERO SET MEMORY at a point you want to operate your camcorder (p. 26). • To change the battery, see page 107. The tape counter is reset to stop playback. 3 Press REW . Insulation sheet ...
...; DISPLAY (p. 16) Memory control buttons (Index*, -/+, Memory playback) (p. 23) * These buttons do not work during Easy Handycam operation. 32 • Aim the Remote Commander towards the remote sensor to locate later on the tape. The tape stops automatically when the tape... time code and the tape counter. • Zero set memory) 1 During playback, press ZERO SET MEMORY at a point you want to operate your camcorder (p. 26). • To change the battery, see page 107. The tape counter is reset to stop playback. 3 Press REW . Insulation sheet ...
Operating Guide
Page 34
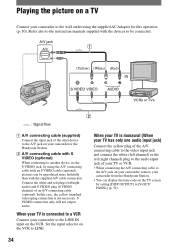
...channel) plug to the audio input jack of your TV or VCR. • When connecting the A/V connecting cable to the A/V jack on your camcorder, remove your camcorder or the Handycam Station. A/V connecting cable with S VIDEO (optional) When connecting to another device via the S VIDEO jack, by setting [DISP OUTPUT... connect the white (left /right audio) and S VIDEO plug (S VIDEO channel) of the other device to the A/V jack on your camcorder from the Handycam Station. • You can display the time code on the TV screen by using the supplied AC Adaptor for this operation (p. 10). ...
...channel) plug to the audio input jack of your TV or VCR. • When connecting the A/V connecting cable to the A/V jack on your camcorder, remove your camcorder or the Handycam Station. A/V connecting cable with S VIDEO (optional) When connecting to another device via the S VIDEO jack, by setting [DISP OUTPUT... connect the white (left /right audio) and S VIDEO plug (S VIDEO channel) of the other device to the A/V jack on your camcorder from the Handycam Station. • You can display the time code on the TV screen by using the supplied AC Adaptor for this operation (p. 10). ...
Operating Guide
Page 39
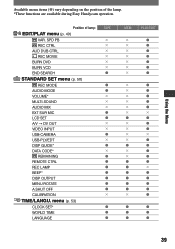
...; BEEP* DISP OUTPUT MENU ROTATE A.SHUT OFF CALIBRATION × TIME/LANGU. Position of the lamp. *These functions are available during Easy Handycam operation. Using the Menu Available menu items () vary depending on the position of lamp: TAPE EDIT/PLAY menu (p. 49) VAR.
...; BEEP* DISP OUTPUT MENU ROTATE A.SHUT OFF CALIBRATION × TIME/LANGU. Position of the lamp. *These functions are available during Easy Handycam operation. Using the Menu Available menu items () vary depending on the position of lamp: TAPE EDIT/PLAY menu (p. 49) VAR.
Operating Guide
Page 52
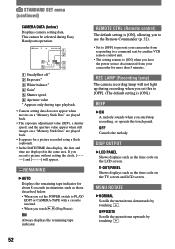
... such as the time code on the TV screen and LCD screen . ON Always displays the remaining tape indicator. This cannot be selected during Easy Handycam operation. 60min 1 0:00:00:00 2 6 5 AUTO 100 AWB F1. 8 9dB 3 4 SteadyShot off* Exposure* White balance* ... Gain* Shutter speed Aperture value * Appears only during recording when you set the POWER switch to prevent your camcorder from your camcorder for a picture recorded using a flash (optional). • In the DATE/TIME data display, the date and time are played back...
... such as the time code on the TV screen and LCD screen . ON Always displays the remaining tape indicator. This cannot be selected during Easy Handycam operation. 60min 1 0:00:00:00 2 6 5 AUTO 100 AWB F1. 8 9dB 3 4 SteadyShot off* Exposure* White balance* ... Gain* Shutter speed Aperture value * Appears only during recording when you set the POWER switch to prevent your camcorder from your camcorder for a picture recorded using a flash (optional). • In the DATE/TIME data display, the date and time are played back...
Operating Guide
Page 56
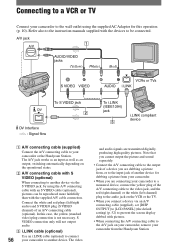
... using the A/V connecting cable with pictures. • When connecting the A/V connecting cable to the audio jack on your camcorder, remove your camcorder or the Handycam Station. S VIDEO connection only will not output audio. i.LINK cable (optional) Use an i.LINK cable (optional... another device for this case, the yellow (standard video) plug connection is not necessary. The video and audio signals are connecting your camcorder to your camcorder from the Handycam Station. A/V jack 1 AUDIO/VIDEO jacks (Yellow) (White) (Red) VCRs or TVs To S VIDEO jack 2 DV Interface ...
... using the A/V connecting cable with pictures. • When connecting the A/V connecting cable to the audio jack on your camcorder, remove your camcorder or the Handycam Station. S VIDEO connection only will not output audio. i.LINK cable (optional) Use an i.LINK cable (optional... another device for this case, the yellow (standard video) plug connection is not necessary. The video and audio signals are connecting your camcorder to your camcorder from the Handycam Station. A/V jack 1 AUDIO/VIDEO jacks (Yellow) (White) (Red) VCRs or TVs To S VIDEO jack 2 DV Interface ...
Operating Guide
Page 60
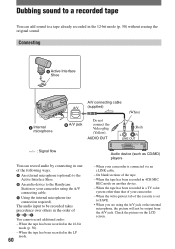
When the tape has been recorded in a TV color system other than that of your camcorder is set to the Handycam Station or your camcorder using the A/V jack or the internal microphone, the picture will not be recorded takes precedence over others in the 12-bit mode (p. 50) without ...erasing the original sound. The audio input to a tape already recorded in the order of the cassette is connected via an i.LINK cable. - When your camcorder. - Dubbing sound to a recorded tape You can record audio by connecting in the LP mode. 60 Audio device (such as CD/MD) players - AUDIO...
When the tape has been recorded in a TV color system other than that of your camcorder is set to the Handycam Station or your camcorder using the A/V jack or the internal microphone, the picture will not be recorded takes precedence over others in the 12-bit mode (p. 50) without ...erasing the original sound. The audio input to a tape already recorded in the order of the cassette is connected via an i.LINK cable. - When your camcorder. - Dubbing sound to a recorded tape You can record audio by connecting in the LP mode. 60 Audio device (such as CD/MD) players - AUDIO...
Operating Guide
Page 61
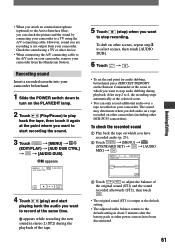
...afterwards (ST2), then touch . • The original sound (ST1) is not output from the Handycam Station. To check the recorded sound Play back the tape on your camcorder to a TV using a TV or other power sources have been disconnected. 61 Dubbing/Editing After ... . • To set the end point for audio dubbing, beforehand, press ZERO SET MEMORY on other DCR-PC55 camcorders). The sound may deteriorate when you dub audio on a tape recorded on other camcorders (including other scenes, repeat step 2 to 4, the recording stops automatically at the selected scene. •...
...afterwards (ST2), then touch . • The original sound (ST1) is not output from the Handycam Station. To check the recorded sound Play back the tape on your camcorder to a TV using a TV or other power sources have been disconnected. 61 Dubbing/Editing After ... . • To set the end point for audio dubbing, beforehand, press ZERO SET MEMORY on other DCR-PC55 camcorders). The sound may deteriorate when you dub audio on a tape recorded on other camcorders (including other scenes, repeat step 2 to 4, the recording stops automatically at the selected scene. •...
Operating Guide
Page 63
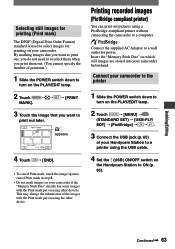
... the image again to cancel Print mark in step 3. • Do not mark images on your camcorder beforehand. Connect your camcorder to the printer 1 Slide the POWER switch down to turn on the Handycam Station to ON (p. 65). PRINT 3 Touch the image that you print them out. (You cannot... specify the number of the images with the Print mark put on using a PictBridge compliant printer without connecting the camcorder to a wall outlet for printing on your Handycam Station to a printer using the USB cable. 4 Set the (USB) ON/OFF switch on the PLAY/EDIT lamp. 2 Touch...
... the image again to cancel Print mark in step 3. • Do not mark images on your camcorder beforehand. Connect your camcorder to the printer 1 Slide the POWER switch down to turn on the Handycam Station to ON (p. 65). PRINT 3 Touch the image that you print them out. (You cannot... specify the number of the images with the Print mark put on using a PictBridge compliant printer without connecting the camcorder to a wall outlet for printing on your Handycam Station to a printer using the USB cable. 4 Set the (USB) ON/OFF switch on the PLAY/EDIT lamp. 2 Touch...


