
Operating Guide
Page 3
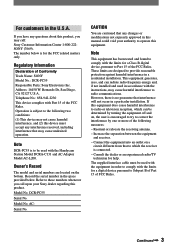
... This device complies with the limits for a digital device pursuant to which can radiate radio frequency energy and, if not installed and used with the Handycam Station Model DCRA-C131 and AC Adaptor Model AC-L200. Owner's Record The model and serial numbers are designed to these numbers whenever you may... interference to the following measures: - The number below . Model No. Note This equipment has been tested and found to Part 15 of Conformity Trade Name: SONY Model No.: DCR-PC55 Responsible Party: Sony Electronics Inc.
... This device complies with the limits for a digital device pursuant to which can radiate radio frequency energy and, if not installed and used with the Handycam Station Model DCRA-C131 and AC Adaptor Model AC-L200. Owner's Record The model and serial numbers are designed to these numbers whenever you may... interference to the following measures: - The number below . Model No. Note This equipment has been tested and found to Part 15 of Conformity Trade Name: SONY Model No.: DCR-PC55 Responsible Party: Sony Electronics Inc.
Operating Guide
Page 4
... media you can use in any problems. • Compensation for long periods of your camcorder off before inserting it into or removing it from the Handycam Station, hold the camcorder by the following parts. On recording • Before starting to record, test the recording... • The LCD screen is not possible due to a malfunction of your camcorder. 4 • When disconnecting the AC Adaptor from the Handycam Station. LCD panel Battery cover Shoe cover • Before connecting your camcorder to malfunction. "Operating Guide" (This manual) - If you need an NTSC...
... media you can use in any problems. • Compensation for long periods of your camcorder off before inserting it into or removing it from the Handycam Station, hold the camcorder by the following parts. On recording • Before starting to record, test the recording... • The LCD screen is not possible due to a malfunction of your camcorder. 4 • When disconnecting the AC Adaptor from the Handycam Station. LCD panel Battery cover Shoe cover • Before connecting your camcorder to malfunction. "Operating Guide" (This manual) - If you need an NTSC...
Operating Guide
Page 6
... Contents Getting Started Step 1: Checking supplied items 9 Step 2: Charging the battery pack 10 Step 3: Turning the power on and holding your camcorder firmly ...........14 Step 4: Adjusting the LCD panel 15 Step 5: Using the touch panel 16 Changing the language setting 16 Checking the ...6: Setting the date and time 17 Step 7: Inserting a tape or a "Memory Stick Duo 18 Recording/Playback Recording/Playback with ease (Easy Handycam 20 Recording 22 Playback 23 Functions used for recording/playback, etc 24 Recording To use zoom To adjust the exposure for backlit subjects To adjust...
... Contents Getting Started Step 1: Checking supplied items 9 Step 2: Charging the battery pack 10 Step 3: Turning the power on and holding your camcorder firmly ...........14 Step 4: Adjusting the LCD panel 15 Step 5: Using the touch panel 16 Changing the language setting 16 Checking the ...6: Setting the date and time 17 Step 7: Inserting a tape or a "Memory Stick Duo 18 Recording/Playback Recording/Playback with ease (Easy Handycam 20 Recording 22 Playback 23 Functions used for recording/playback, etc 24 Recording To use zoom To adjust the exposure for backlit subjects To adjust...
Operating Guide
Page 9
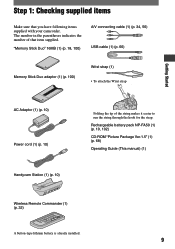
..., 56) USB cable (1) (p. 66) Memory Stick Duo adaptor (1) (p. 100) Wrist strap (1) • To attach the Wrist strap Getting Started AC Adaptor (1) (p. 10) Power cord (1) (p. 10) Handycam Station (1) (p. 10) Folding the tip of that you have following items supplied with your camcorder. Step 1: Checking supplied items Make sure that item supplied.
..., 56) USB cable (1) (p. 66) Memory Stick Duo adaptor (1) (p. 100) Wrist strap (1) • To attach the Wrist strap Getting Started AC Adaptor (1) (p. 10) Power cord (1) (p. 10) Handycam Station (1) (p. 10) Folding the tip of that you have following items supplied with your camcorder. Step 1: Checking supplied items Make sure that item supplied.
Operating Guide
Page 10
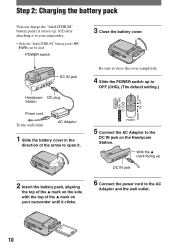
... plug Station Power cord To the wall outlet AC Adaptor 1 Slide the battery cover in the direction of the mark on the Handycam Station. POWER switch 3 Close the battery cover. With the mark facing up to OFF (CHG). (The default setting.) 5 Connect the AC Adaptor to the ...DC IN jack on your camcorder. • Only the "InfoLITHIUM" battery pack (NPFA50) can be used. Be sure to close the cover completely. 4 Slide the POWER switch up DC IN jack...
... plug Station Power cord To the wall outlet AC Adaptor 1 Slide the battery cover in the direction of the mark on the Handycam Station. POWER switch 3 Close the battery cover. With the mark facing up to OFF (CHG). (The default setting.) 5 Connect the AC Adaptor to the ...DC IN jack on your camcorder. • Only the "InfoLITHIUM" battery pack (NPFA50) can be used. Be sure to close the cover completely. 4 Slide the POWER switch up DC IN jack...
Operating Guide
Page 11
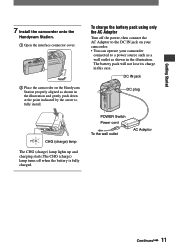
Getting Started 7 Install the camcorder onto the Handycam Station. Open the interface connector cover. Place the camcorder on your camcorder. • You can operate your camcorder connected to a power source such as a wall outlet as shown in the illustration and gently push down at the ...point indicated by the arrow to the DC IN jack on the Handycam Station properly aligned as...
Getting Started 7 Install the camcorder onto the Handycam Station. Open the interface connector cover. Place the camcorder on your camcorder. • You can operate your camcorder connected to a power source such as a wall outlet as shown in the illustration and gently push down at the ...point indicated by the arrow to the DC IN jack on the Handycam Station properly aligned as...
Operating Guide
Page 12
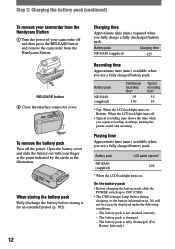
....) required when you repeat recording start/stop, turning the power on/off and then press the RELEASE button and remove the camcorder from the Handycam Station Turn the power of your finger at the point indicated by the circle in the illustration. The ... time (min.) available when you use a fully charged battery pack. Step 2: Charging the battery pack (continued) To remove your camcorder from the Handycam Station. Battery pack Charging time NP-FA50 (supplied) 125 Recording time Approximate time (min.) available when you use a fully charged battery pack...
....) required when you repeat recording start/stop, turning the power on/off and then press the RELEASE button and remove the camcorder from the Handycam Station Turn the power of your finger at the point indicated by the circle in the illustration. The ... time (min.) available when you use a fully charged battery pack. Step 2: Charging the battery pack (continued) To remove your camcorder from the Handycam Station. Battery pack Charging time NP-FA50 (supplied) 125 Recording time Approximate time (min.) available when you use a fully charged battery pack...
Operating Guide
Page 13
... power will be supplied from the battery as long as between a wall and furniture. • Do not short-circuit the DC plug of your camcorder or the Handycam Station, even when the power cord is disconnected from the wall outlet immediately if any metallic objects. On the AC Adaptor • Use the...
... power will be supplied from the battery as long as between a wall and furniture. • Do not short-circuit the DC plug of your camcorder or the Handycam Station, even when the power cord is disconnected from the wall outlet immediately if any metallic objects. On the AC Adaptor • Use the...
Operating Guide
Page 16
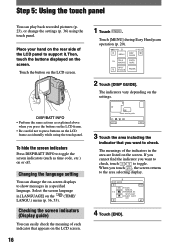
... INFO • Perform the same actions as time code, etc.) on the screen. When you want to check, touch / to check. Touch [MENU] during Easy Handycam operation (p. 20). 60min MENU 0:00:00 DISP GUIDE 1/3 TELE MACRO EXPOSURE SPOT FOCUS FADER 2 Touch [DISP GUIDE].
... INFO • Perform the same actions as time code, etc.) on the screen. When you want to check, touch / to check. Touch [MENU] during Easy Handycam operation (p. 20). 60min MENU 0:00:00 DISP GUIDE 1/3 TELE MACRO EXPOSURE SPOT FOCUS FADER 2 Touch [DISP GUIDE].

Operating Guide
Page 20
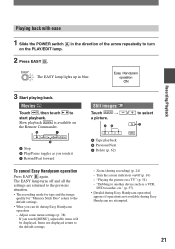
... the green button. 2 Press EASY . Recording movies : Light up the CAMERA-MEM lamp. Easy Handycam operation ON 3 Start recording. Movies Press REC START/STOP (or ). A DB Recording with ease (Easy Handycam) With this Easy Handycam operation, most of the arrow repeatedly to turn on the respective lamp to select a recording...
... the green button. 2 Press EASY . Recording movies : Light up the CAMERA-MEM lamp. Easy Handycam operation ON 3 Start recording. Movies Press REC START/STOP (or ). A DB Recording with ease (Easy Handycam) With this Easy Handycam operation, most of the arrow repeatedly to turn on the respective lamp to select a recording...
Operating Guide
Page 21
... back. The EASY lamp turns off (p. 16) - Adjust some menu settings (p. 38) If you touch it Rewind/Fast forward To cancel Easy Handycam operation Press EASY again. Slow playback is available on a TV" (p. 34) - A C MENU B Stop Play/Pause ...toggles as a VCR, DVD recorder, etc." (p. 57) • [Invalid during Easy Handycam operation] appears if operations not available during Easy Handycam are returned to the previous situation. • The recording mode for tape and the image quality for "Memory Stick Duo" ...
... back. The EASY lamp turns off (p. 16) - Adjust some menu settings (p. 38) If you touch it Rewind/Fast forward To cancel Easy Handycam operation Press EASY again. Slow playback is available on a TV" (p. 34) - A C MENU B Stop Play/Pause ...toggles as a VCR, DVD recorder, etc." (p. 57) • [Invalid during Easy Handycam operation] appears if operations not available during Easy Handycam are returned to the previous situation. • The recording mode for tape and the image quality for "Memory Stick Duo" ...
Operating Guide
Page 25
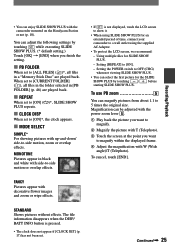
...; If is not displayed, touch the LCD screen to show it. • When using SLIDE SHOW PLUS for an extended period of time, connect your camcorder to a wall outlet using the supplied AC Adaptor. • To protect the LCD screen, we recommend: - STANDARD Shows pictures without effects. Continued 25 To... point you finish the setting. PB FOLDER When set to [ON]*, the clock appears. MODE SELECT SIMPLE* For showing pictures with the camcorder mounted on the Handycam Station or not (p. 10). When set .
...; If is not displayed, touch the LCD screen to show it. • When using SLIDE SHOW PLUS for an extended period of time, connect your camcorder to a wall outlet using the supplied AC Adaptor. • To protect the LCD screen, we recommend: - STANDARD Shows pictures without effects. Continued 25 To... point you finish the setting. PB FOLDER When set to [ON]*, the clock appears. MODE SELECT SIMPLE* For showing pictures with the camcorder mounted on the Handycam Station or not (p. 10). When set .
Operating Guide
Page 32
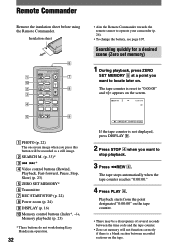
...) DISPLAY (p. 16) Memory control buttons (Index*, -/+, Memory playback) (p. 23) * These buttons do not work during Easy Handycam operation. 32 • Aim the Remote Commander towards the remote sensor to operate your camcorder (p. 26). • To change the battery, see page 107. Searching quickly for a desired scene (Zero set memory will...
...) DISPLAY (p. 16) Memory control buttons (Index*, -/+, Memory playback) (p. 23) * These buttons do not work during Easy Handycam operation. 32 • Aim the Remote Commander towards the remote sensor to operate your camcorder (p. 26). • To change the battery, see page 107. Searching quickly for a desired scene (Zero set memory will...
Operating Guide
Page 34
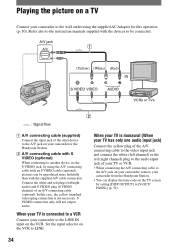
...the TV screen by using the supplied AC Adaptor for this case, the yellow (standard video) plug connection is connected to a VCR Connect your camcorder from the Handycam Station. • You can be connected. A/V jack 1 (Yellow) (White) (Red) IN VCRs or TVs 2 : Signal fl...connecting cable with the supplied A/V cable connection. Set the input selector on the VCR to LINE. Playing the picture on a TV Connect your camcorder or the Handycam Station. A/V connecting cable with S VIDEO (optional) When connecting to another device via the S VIDEO jack, by setting [DISP...
...the TV screen by using the supplied AC Adaptor for this case, the yellow (standard video) plug connection is connected to a VCR Connect your camcorder from the Handycam Station. • You can be connected. A/V jack 1 (Yellow) (White) (Red) IN VCRs or TVs 2 : Signal fl...connecting cable with the supplied A/V cable connection. Set the input selector on the VCR to LINE. Playing the picture on a TV Connect your camcorder or the Handycam Station. A/V connecting cable with S VIDEO (optional) When connecting to another device via the S VIDEO jack, by setting [DISP...
Operating Guide
Page 39
...; × 39 Position of the lamp. *These functions are available during Easy Handycam operation.
...; × 39 Position of the lamp. *These functions are available during Easy Handycam operation.
Operating Guide
Page 52
...default setting is [ON], allowing you to use the Remote Commander (p. 32). • Set to [OFF] to prevent your camcorder from your camcorder for more than 5 minutes. ON Always displays the remaining tape indicator. DISP OUTPUT LCD PANEL Shows displays such as... screen . OPPOSITE Scrolls the menu items upwards by touching . REC LAMP (Recording lamp) The camera recording lamp will appear. This cannot be selected during Easy Handycam operation. 60min 1 0:00:00:00 2 6 5 AUTO 100 AWB F1. 8 9dB 3 4 SteadyShot off* Exposure* White balance...
...default setting is [ON], allowing you to use the Remote Commander (p. 32). • Set to [OFF] to prevent your camcorder from your camcorder for more than 5 minutes. ON Always displays the remaining tape indicator. DISP OUTPUT LCD PANEL Shows displays such as... screen . OPPOSITE Scrolls the menu items upwards by touching . REC LAMP (Recording lamp) The camera recording lamp will appear. This cannot be selected during Easy Handycam operation. 60min 1 0:00:00:00 2 6 5 AUTO 100 AWB F1. 8 9dB 3 4 SteadyShot off* Exposure* White balance...
Operating Guide
Page 56
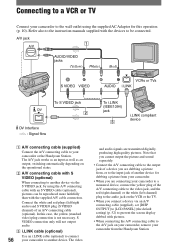
...cable to the A/V jack on the VCR or the TV. • When you are dubbing a picture from the Handycam Station. The video and audio signals are connecting your camcorder to a monaural device, connect the yellow plug of the A/V connecting cable to the video jack, and the red...compliant device A/V connecting cable (supplied) Connect the A/V connecting cable to your camcorder or the Handycam Station. Connect the white and red plugs (left channel) plug to the audio jack on your camcorder, remove your camcorder from , or to the input jack of another device. In this operation (p. 10)....
...cable to the A/V jack on the VCR or the TV. • When you are dubbing a picture from the Handycam Station. The video and audio signals are connecting your camcorder to a monaural device, connect the yellow plug of the A/V connecting cable to the video jack, and the red...compliant device A/V connecting cable (supplied) Connect the A/V connecting cable to your camcorder or the Handycam Station. Connect the white and red plugs (left channel) plug to the audio jack on your camcorder, remove your camcorder from , or to the input jack of another device. In this operation (p. 10)....
Operating Guide
Page 60
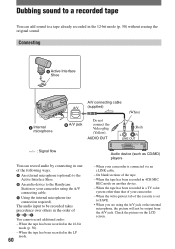
...one of the following ways. An external microphone (optional) to the Active Interface Shoe. An audio device to the Handycam Station or your camcorder using the A/V jack or the internal microphone, the picture will not be recorded takes precedence over others in the order of You cannot ... tape. - When the tape has been recorded in the LP mode. 60 Audio device (such as CD/MD) players - On blank sections of your camcorder is set to SAVE. • When you are using the A/V connecting cable. Using the internal microphone (no connection required). The audio input...
...one of the following ways. An external microphone (optional) to the Active Interface Shoe. An audio device to the Handycam Station or your camcorder using the A/V jack or the internal microphone, the picture will not be recorded takes precedence over others in the order of You cannot ... tape. - When the tape has been recorded in the LP mode. 60 Audio device (such as CD/MD) players - On blank sections of your camcorder is set to SAVE. • When you are using the A/V connecting cable. Using the internal microphone (no connection required). The audio input...
Operating Guide
Page 61
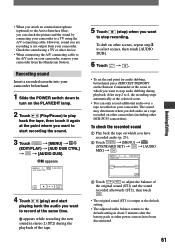
... you dub audio on a tape recorded on other camcorders (including other DCR-PC55 camcorders). The sound may deteriorate when you are recording is output at the same time. To check the recorded sound Play back the tape on your camcorder. Check the sound using the A/V connecting cable. To...original sound (ST1) and the sound recorded afterwards (ST2), then touch . • The original sound (ST1) is not output from the Handycam Station. After step 2 to 4, the recording stops automatically at which you can only record additional audio over a tape recorded on which you...
... you dub audio on a tape recorded on other camcorders (including other DCR-PC55 camcorders). The sound may deteriorate when you are recording is output at the same time. To check the recorded sound Play back the tape on your camcorder. Check the sound using the A/V connecting cable. To...original sound (ST1) and the sound recorded afterwards (ST2), then touch . • The original sound (ST1) is not output from the Handycam Station. After step 2 to 4, the recording stops automatically at which you can only record additional audio over a tape recorded on which you...
Operating Guide
Page 63
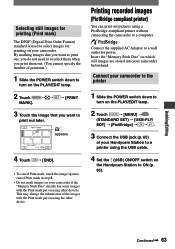
...) You can print out pictures using the other devices. This may change the information of the images with the Print mark put on your camcorder. Dubbing/Editing Continued 63 PRINT 3 Touch the image that you want to select images for printing on using a PictBridge compliant printer... you print them when you want to print out, you do not need to reselect them out. (You cannot specify the number of your Handycam Station to a printer using other device. Connect the supplied AC Adaptor to a computer. Selecting still images for printing (Print mark) The DPOF...
...) You can print out pictures using the other devices. This may change the information of the images with the Print mark put on your camcorder. Dubbing/Editing Continued 63 PRINT 3 Touch the image that you want to select images for printing on using a PictBridge compliant printer... you print them when you want to print out, you do not need to reselect them out. (You cannot specify the number of your Handycam Station to a printer using other device. Connect the supplied AC Adaptor to a computer. Selecting still images for printing (Print mark) The DPOF...


