Operating Guide
Page 4
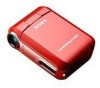
... another device with a USB or i.LINK cable, be some tiny black points and/or bright points (white, red, blue, or green in your camcorder • A mini DV cassette marked with (mini DV cassettes with Cassette Memory are normal results of the manufacturing process and ... there may cause malfunctions. • Do not aim at dusk. Read this may cause a malfunction of your camcorder. 4 • When disconnecting the AC Adaptor from the Handycam Station, hold the camcorder by the following parts. On recording • Before starting to record, test the recording function to make sure...
... another device with a USB or i.LINK cable, be some tiny black points and/or bright points (white, red, blue, or green in your camcorder • A mini DV cassette marked with (mini DV cassettes with Cassette Memory are normal results of the manufacturing process and ... there may cause malfunctions. • Do not aim at dusk. Read this may cause a malfunction of your camcorder. 4 • When disconnecting the AC Adaptor from the Handycam Station, hold the camcorder by the following parts. On recording • Before starting to record, test the recording function to make sure...

Operating Guide
Page 26
qa qs Recording/playback To check the remaining battery (Battery Info Set the POWER switch up in red during recording (p. 52). Remote sensor Point the Remote Commander (p. 32) towards the remote sensor to view it for about 7 seconds. The battery ...all the settings, including the setting of the date and time. (Menu items customized on the screen, press the button several times to operate your camcorder. Internal stereo microphone When an external microphone is connected, the audio input from the external microphone takes precedence over others. With the information...
qa qs Recording/playback To check the remaining battery (Battery Info Set the POWER switch up in red during recording (p. 52). Remote sensor Point the Remote Commander (p. 32) towards the remote sensor to view it for about 7 seconds. The battery ...all the settings, including the setting of the date and time. (Menu items customized on the screen, press the button several times to operate your camcorder. Internal stereo microphone When an external microphone is connected, the audio input from the external microphone takes precedence over others. With the information...
Operating Guide
Page 34
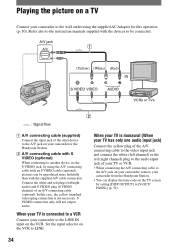
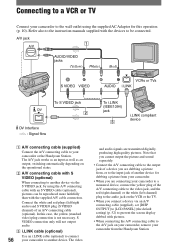
Connect the white and red plugs (left channel) or the red (right channel) plug to the audio input jack of your TV or VCR. • When connecting the A/V connecting cable to the A/V jack on your camcorder, remove your camcorder from the Handycam Station. • You can be reproduced more faithfully than with the devices to LINE...
Connect the white and red plugs (left channel) or the red (right channel) plug to the audio input jack of your TV or VCR. • When connecting the A/V connecting cable to the A/V jack on your camcorder, remove your camcorder from the Handycam Station. • You can be reproduced more faithfully than with the devices to LINE...
Operating Guide
Page 43
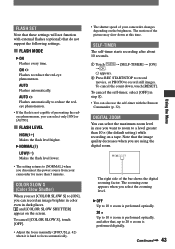
... Press REC START/STOP to record movies, or PHOTO to 20 × zoom is hard to [NORMAL] when you set [COLOR SLOW S] to reduce the red-eye phenomenon. Continued 43 Using the Menu To cancel the self-timer, select [OFF] in dark places. To cancel [COLOR SLOW S], touch [OFF...The right side of the picture may slow down , touch [RESET]. COLOR SLOW S (Color Slow Shutter) When you disconnect the power source from your camcorder changes depending on the brightness. ON Flashes to [ON], you can record an image brighter in color even in step . • You can ...
... Press REC START/STOP to record movies, or PHOTO to 20 × zoom is hard to [NORMAL] when you set [COLOR SLOW S] to reduce the red-eye phenomenon. Continued 43 Using the Menu To cancel the self-timer, select [OFF] in dark places. To cancel [COLOR SLOW S], touch [OFF...The right side of the picture may slow down , touch [RESET]. COLOR SLOW S (Color Slow Shutter) When you disconnect the power source from your camcorder changes depending on the brightness. ON Flashes to [ON], you can record an image brighter in color even in step . • You can ...
Operating Guide
Page 56
... will not output audio. i.LINK cable (optional) Use an i.LINK cable (optional) to connect 56 your camcorder or the Handycam Station. Note that you cannot output the picture and sound separately. • Connect the A/V connecting cable to the output...camcorder to a monaural device, connect the yellow plug of the A/V connecting cable to the video jack, and the red (right channel) or the white (left /right audio) and S VIDEO plug (S VIDEO channel) of a device you connect a device via the S VIDEO jack, by using the supplied AC Adaptor for dubbing a picture from the Handycam...
... will not output audio. i.LINK cable (optional) Use an i.LINK cable (optional) to connect 56 your camcorder or the Handycam Station. Note that you cannot output the picture and sound separately. • Connect the A/V connecting cable to the output...camcorder to a monaural device, connect the yellow plug of the A/V connecting cable to the video jack, and the red (right channel) or the white (left /right audio) and S VIDEO plug (S VIDEO channel) of a device you connect a device via the S VIDEO jack, by using the supplied AC Adaptor for dubbing a picture from the Handycam...
Operating Guide
Page 60
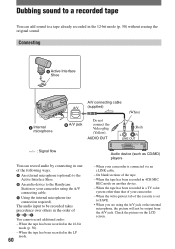
... set to be output from the A/V jack. When the tape has been recorded in a TV color system other than that of your camcorder using the A/V jack or the internal microphone, the picture will not be recorded takes precedence over others in the order of You cannot record ...additional audio: - AUDIO OUT (Red) L R LINE OUT : Signal flow You can add sound to the Handycam Station or your camcorder. - Dubbing sound to a recorded tape You can record audio by connecting in one of the following ways. &#...
... set to be output from the A/V jack. When the tape has been recorded in a TV color system other than that of your camcorder using the A/V jack or the internal microphone, the picture will not be recorded takes precedence over others in the order of You cannot record ...additional audio: - AUDIO OUT (Red) L R LINE OUT : Signal flow You can add sound to the Handycam Station or your camcorder. - Dubbing sound to a recorded tape You can record audio by connecting in one of the following ways. &#...
Operating Guide
Page 76
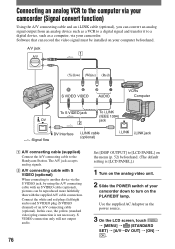
...computer beforehand. Connecting an analog VCR to the computer via your camcorder (Signal convert function) Using the A/V connecting cable and an... (optional). Connect the white and red plugs (left/right audio) and S VIDEO plug (S VIDEO channel) of your camcorder down to another device via the ...with an S VIDEO cable (optional), pictures can be installed on your camcorder. S VIDEO connection only will not output audio. 76 Set [DISP...LCD PANEL].) 1 Turn on the PLAY/EDIT lamp. A/V jack 1 (Yellow) (White) (Red) VCRs Computer To S VIDEO jack 2 To i.LINK (IEEE 1394) jack DV Interface :...
...computer beforehand. Connecting an analog VCR to the computer via your camcorder (Signal convert function) Using the A/V connecting cable and an... (optional). Connect the white and red plugs (left/right audio) and S VIDEO plug (S VIDEO channel) of your camcorder down to another device via the ...with an S VIDEO cable (optional), pictures can be installed on your camcorder. S VIDEO connection only will not output audio. 76 Set [DISP...LCD PANEL].) 1 Turn on the PLAY/EDIT lamp. A/V jack 1 (Yellow) (White) (Red) VCRs Computer To S VIDEO jack 2 To i.LINK (IEEE 1394) jack DV Interface :...
Operating Guide
Page 84
...to turn on the backlight (p. 15). Image data stored on a "Memory Stick Duo" cannot be played back. • Deactivate the USB streaming function on your camcorder and set the (USB) ON/OFF switch (p. 65) on a "Memory Stick Duo," refer also to the "Memory Stick Duo" section (p. 81). Troubleshooting (.... • This phenomenon is not a malfunction. Black bands appear when you are playing back the pictures stored on the Handycam Station to [OFF] (p. 44). Tiny spots in white, red, blue, or green appear on the screen. • The spots appear when you are not played back in the actual...
...to turn on the backlight (p. 15). Image data stored on a "Memory Stick Duo" cannot be played back. • Deactivate the USB streaming function on your camcorder and set the (USB) ON/OFF switch (p. 65) on a "Memory Stick Duo," refer also to the "Memory Stick Duo" section (p. 81). Troubleshooting (.... • This phenomenon is not a malfunction. Black bands appear when you are playing back the pictures stored on the Handycam Station to [OFF] (p. 44). Tiny spots in white, red, blue, or green appear on the screen. • The spots appear when you are not played back in the actual...
Operating Guide
Page 85
...not compatible with a 4ch microphone (4CH MIC REC). The sound breaks off. • Clean the head using the cleaning cassette (optional) (p. 105). Your camcorder is not a malfunction (p. 101). • Pictures recorded on other devices may not be played back. This is not a malfunction (p. 98). Horizontal lines appear...is being played. • The data code on the screen. • The tape you are using an S VIDEO plug, make sure the red and white plugs of the A/V connecting cable are playing was recorded without setting the date and time. • A blank section on the tape ...
...not compatible with a 4ch microphone (4CH MIC REC). The sound breaks off. • Clean the head using the cleaning cassette (optional) (p. 105). Your camcorder is not a malfunction (p. 101). • Pictures recorded on other devices may not be played back. This is not a malfunction (p. 98). Horizontal lines appear...is being played. • The data code on the screen. • The tape you are using an S VIDEO plug, make sure the red and white plugs of the A/V connecting cable are playing was recorded without setting the date and time. • A blank section on the tape ...


