Operating Guide
Page 2
.... You can help preserve our environment by returning your used rechargeable batteries to discontinue midway (fail), restart the application or disconnect and connect the communication cable (USB, etc.) again. Operation is intended to alert the user to the presence of the FCC Rules. Read this first Before operating the unit...
.... You can help preserve our environment by returning your used rechargeable batteries to discontinue midway (fail), restart the application or disconnect and connect the communication cable (USB, etc.) again. Operation is intended to alert the user to the presence of the FCC Rules. Read this first Before operating the unit...
Operating Guide
Page 3
...protection against harmful interference in a particular installation. Increase the separation between the equipment and receiver. - The supplied interface cable must accept any interference received, including interference that any questions about this equipment does cause harmful interference to Subpart B of... and used in this manual could void your Sony dealer regarding this equipment. Reorient or relocate the receiving antenna. - DCR-PC55 Serial No. Telephone No.: 858-942-2230 This device complies with the Handycam Station Model DCRA-C131 and AC Adaptor Model ...
...protection against harmful interference in a particular installation. Increase the separation between the equipment and receiver. - The supplied interface cable must accept any interference received, including interference that any questions about this equipment does cause harmful interference to Subpart B of... and used in this manual could void your Sony dealer regarding this equipment. Reorient or relocate the receiving antenna. - DCR-PC55 Serial No. Telephone No.: 858-942-2230 This device complies with the Handycam Station Model DCRA-C131 and AC Adaptor Model ...
Operating Guide
Page 4
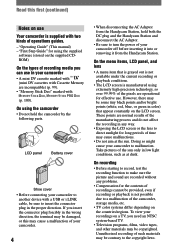
... appear constantly on the LCD screen. Take pictures of the sun only in the proper direction. Doing so might cause your camcorder to another device with a USB or i.LINK cable, be contrary to insert the connector plug in low light conditions, such as at the sun. However, there may be...without any way. • Exposing the LCD screen or the lens to malfunction. "First Step Guide" for using the camcorder • Do not hold both the DC plug and the Handycam Station and disconnect the AC Adaptor. • Be sure to turn the power of recordings cannot be damaged, or this...
... appear constantly on the LCD screen. Take pictures of the sun only in the proper direction. Doing so might cause your camcorder to another device with a USB or i.LINK cable, be contrary to insert the connector plug in low light conditions, such as at the sun. However, there may be...without any way. • Exposing the LCD screen or the lens to malfunction. "First Step Guide" for using the camcorder • Do not hold both the DC plug and the Handycam Station and disconnect the AC Adaptor. • Be sure to turn the power of recordings cannot be damaged, or this...
Operating Guide
Page 9
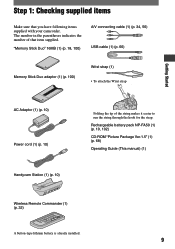
... Duo" 16MB (1) (p. 18, 100) A/V connecting cable (1) (p. 34, 56) USB cable (1) (p. 66) Memory Stick Duo adaptor (1) (p. 100) Wrist strap (1) • To attach the Wrist strap Getting Started AC Adaptor (1) (p. 10) Power cord (1) (p. 10) Handycam Station (1) (p. 10) Folding the tip of that you have following items supplied with your camcorder. Rechargeable battery pack NP-FA50 (1) (p. 10...
... Duo" 16MB (1) (p. 18, 100) A/V connecting cable (1) (p. 34, 56) USB cable (1) (p. 66) Memory Stick Duo adaptor (1) (p. 100) Wrist strap (1) • To attach the Wrist strap Getting Started AC Adaptor (1) (p. 10) Power cord (1) (p. 10) Handycam Station (1) (p. 10) Folding the tip of that you have following items supplied with your camcorder. Rechargeable battery pack NP-FA50 (1) (p. 10...
Operating Guide
Page 34
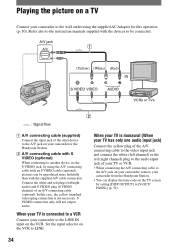
...of the other device to the A/V jack on the VCR to [V-OUT/ PANEL] (p. 52). 34 Set the input selector on your camcorder or the Handycam Station. A/V connecting cable with S VIDEO (optional) When connecting to another device via the S VIDEO jack, by setting [DISP OUTPUT] to LINE. Refer ...of an A/V connecting cable (optional). S VIDEO connection only will not output audio. When your TV is not necessary. Connect the white and red plugs (left channel) or the red (right channel) plug to the LINE IN input on a TV Connect your camcorder from the Handycam Station. • You...
...of the other device to the A/V jack on the VCR to [V-OUT/ PANEL] (p. 52). 34 Set the input selector on your camcorder or the Handycam Station. A/V connecting cable with S VIDEO (optional) When connecting to another device via the S VIDEO jack, by setting [DISP OUTPUT] to LINE. Refer ...of an A/V connecting cable (optional). S VIDEO connection only will not output audio. When your TV is not necessary. Connect the white and red plugs (left channel) or the red (right channel) plug to the LINE IN input on a TV Connect your camcorder from the Handycam Station. • You...
Operating Guide
Page 51
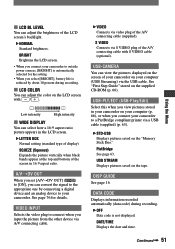
... is reduced by connecting a digital device and an analog device to your computer (USB Streaming) via S VIDEO plug of the A/V connecting cable with / . VIDEO INPUT Selects the video plug to outside power sources, [BRIGHT] is automatically selected for details. USB STREAM Displays pictures ...the LCD screen with S VIDEO cable (optional). DISP GUIDE See page 16. DATA CODE Displays information recorded automatically (data code) during recording. LCD COLOR You can select how a 16:9 aspect ratio picture appears in your camcorder on your camcorder. PictBridge See page 63. Low ...
... is reduced by connecting a digital device and an analog device to your computer (USB Streaming) via S VIDEO plug of the A/V connecting cable with / . VIDEO INPUT Selects the video plug to outside power sources, [BRIGHT] is automatically selected for details. USB STREAM Displays pictures ...the LCD screen with S VIDEO cable (optional). DISP GUIDE See page 16. DATA CODE Displays information recorded automatically (data code) during recording. LCD COLOR You can select how a 16:9 aspect ratio picture appears in your camcorder on your camcorder. PictBridge See page 63. Low ...
Operating Guide
Page 56
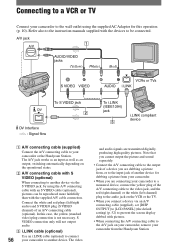
... than with the devices to be connected. Refer also to connect 56 your camcorder or the Handycam Station. S VIDEO connection only will not output audio. i.LINK cable (optional) Use an i.LINK cable (optional) to the instruction manuals supplied with the supplied A/V cable connection. Note that you cannot output the picture and sound separately. •...
... than with the devices to be connected. Refer also to connect 56 your camcorder or the Handycam Station. S VIDEO connection only will not output audio. i.LINK cable (optional) Use an i.LINK cable (optional) to the instruction manuals supplied with the supplied A/V cable connection. Note that you cannot output the picture and sound separately. •...
Operating Guide
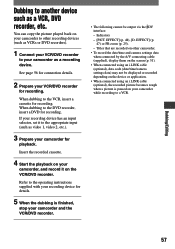
Page 57
...cassette for recording. If your recording device has an input selector, set it on your camcorder to other camcorder. • To record the date/time and camera settings data when connected by the A/V connecting cable (supplied), display them on the screen (p. 51). • When connected using an... i.LINK cable (optional), the recorded picture becomes rough when a picture is finished, stop your camcorder and the VCR/DVD recorder. • The ...
...cassette for recording. If your recording device has an input selector, set it on your camcorder to other camcorder. • To record the date/time and camera settings data when connected by the A/V connecting cable (supplied), display them on the screen (p. 51). • When connected using an... i.LINK cable (optional), the recorded picture becomes rough when a picture is finished, stop your camcorder and the VCR/DVD recorder. • The ...
Operating Guide
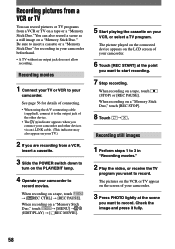
Page 58
... cassette. 3 Slide the POWER switch down to turn on the LCD screen of your camcorder. 3 Press PHOTO lightly at the point you want to the output jack of connecting. • When using the A/V connecting cable (supplied), connect it fully. 58 The picture played on the connected device appears on ...the PLAY/EDIT lamp. 4 Operate your camcorder to record movies. Check the image and press it to record. Be sure to...
... cassette. 3 Slide the POWER switch down to turn on the LCD screen of your camcorder. 3 Press PHOTO lightly at the point you want to the output jack of connecting. • When using the A/V connecting cable (supplied), connect it fully. 58 The picture played on the connected device appears on ...the PLAY/EDIT lamp. 4 Operate your camcorder to record movies. Check the image and press it to record. Be sure to...
Operating Guide
Page 60
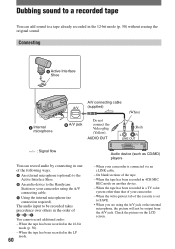
... picture on another device. - AUDIO OUT (Red) L R LINE OUT : Signal flow You can add sound to the Handycam Station or your camcorder using the A/V jack or the internal microphone, the picture will not be recorded takes precedence over others in the order of the following...- When the tape has been recorded in 4CH MIC REC mode on the LCD screen. Connecting Active Interface Shoe Internal microphone A/V connecting cable (supplied) (White) A/V jack Do not connect the Video plug (Yellow). When the tape has been recorded in a TV color system other...
... picture on another device. - AUDIO OUT (Red) L R LINE OUT : Signal flow You can add sound to the Handycam Station or your camcorder using the A/V jack or the internal microphone, the picture will not be recorded takes precedence over others in the order of the following...- When the tape has been recorded in 4CH MIC REC mode on the LCD screen. Connecting Active Interface Shoe Internal microphone A/V connecting cable (supplied) (White) A/V jack Do not connect the Video plug (Yellow). When the tape has been recorded in a TV color system other...
Operating Guide
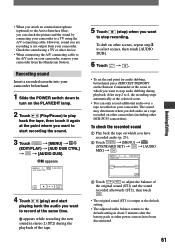
Page 61
... sound (ST1) is not output from the Handycam Station. To check the recorded sound Play back the tape on your camcorder, remove your camcorder from your camcorder to a TV using a TV or other device. • When connecting the A/V connecting cable to the A/V jack on which you want ...to turn on the Remote Commander at the scene at the same time. Recording sound Insert a recorded cassette into your camcorder. To dub on other DCR-PC55 camcorders). • When you attach an external microphone (optional) to the Active Interface Shoe, you can only record additional audio...
... sound (ST1) is not output from the Handycam Station. To check the recorded sound Play back the tape on your camcorder, remove your camcorder from your camcorder to a TV using a TV or other device. • When connecting the A/V connecting cable to the A/V jack on which you want ...to turn on the Remote Commander at the scene at the same time. Recording sound Insert a recorded cassette into your camcorder. To dub on other DCR-PC55 camcorders). • When you attach an external microphone (optional) to the Active Interface Shoe, you can only record additional audio...
Operating Guide
Page 63
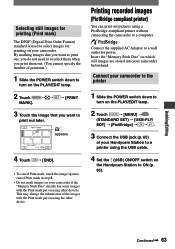
...when you want to cancel Print mark in step 3. • Do not mark images on your Handycam Station to a printer using a PictBridge compliant printer without connecting the camcorder to a wall outlet for power. Printing recorded images (PictBridge compliant printer) You can print out ...pictures using the USB cable. 4 Set the (USB) ON/OFF switch on the Handycam Station to ON (p. 65). PRINT 3 Touch the ...
...when you want to cancel Print mark in step 3. • Do not mark images on your Handycam Station to a printer using a PictBridge compliant printer without connecting the camcorder to a wall outlet for power. Printing recorded images (PictBridge compliant printer) You can print out ...pictures using the USB cable. 4 Set the (USB) ON/OFF switch on the Handycam Station to ON (p. 65). PRINT 3 Touch the ...
Operating Guide
Page 64
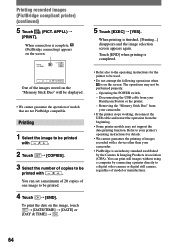
... may not be printed. 4 Touch [END]. Removing the "Memory Stick Duo" from your camcorder. • If the printer stops working, disconnect the USB cable and restart the operation from your printer's operating instructions for the printer to be performed properly. - You...copies to a digital video camera or digital still camera, regardless of models that are not PictBridge compatible. Printing 1 Select the image to your Handycam Station or the printer. - Printing recorded images (PictBridge compliant printer) (continued) 5 Touch (PICT. PRINT 101-0001 1 / 10 101...
... may not be printed. 4 Touch [END]. Removing the "Memory Stick Duo" from your camcorder. • If the printer stops working, disconnect the USB cable and restart the operation from your printer's operating instructions for the printer to be performed properly. - You...copies to a digital video camera or digital still camera, regardless of models that are not PictBridge compatible. Printing 1 Select the image to your Handycam Station or the printer. - Printing recorded images (PictBridge compliant printer) (continued) 5 Touch (PICT. PRINT 101-0001 1 / 10 101...
Operating Guide
Page 66
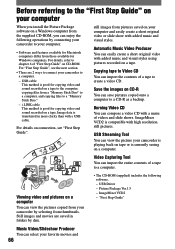
... the images on CD-R You can save pictures copied onto a computer to a computer. - Still images and movies are 2 ways to connect your camcorder to a CD-R as a backup. Picture Package Ver.1.5 - "First Step Guide" Music Video/Slideshow Producer You can import the entire contents of videos...the next section. • There are saved in more clarity than with a USB cable. Viewing video and pictures on a computer You can view the pictures copied from your camcorder by connecting your camcorder to your computer. • Software and features available for copying video and sound recorded ...
... the images on CD-R You can save pictures copied onto a computer to a computer. - Still images and movies are 2 ways to connect your camcorder to a CD-R as a backup. Picture Package Ver.1.5 - "First Step Guide" Music Video/Slideshow Producer You can import the entire contents of videos...the next section. • There are saved in more clarity than with a USB cable. Viewing video and pictures on a computer You can view the pictures copied from your camcorder by connecting your camcorder to your computer. • Software and features available for copying video and sound recorded ...
Operating Guide
Page 67
...less than 256 colors.) Others: USB port (This must be provided as standard), DV Interface (IEEE1394, i.LINK) (to connect via an i.LINK cable), disc drive (You need a CD-R drive to general operation the first time you use the software stored on DirectX technology. Operation is... For the compatible drive, visit the following URL: http://www.ppackage.com/) When playing pictures recorded on a "Memory Stick Duo" on your camcorder and computer and making settings, to create a video CD. This "First Step Guide" describes basic operations, from initial hookup of all the ...
...less than 256 colors.) Others: USB port (This must be provided as standard), DV Interface (IEEE1394, i.LINK) (to connect via an i.LINK cable), disc drive (You need a CD-R drive to general operation the first time you use the software stored on DirectX technology. Operation is... For the compatible drive, visit the following URL: http://www.ppackage.com/) When playing pictures recorded on a "Memory Stick Duo" on your camcorder and computer and making settings, to create a video CD. This "First Step Guide" describes basic operations, from initial hookup of all the ...
Operating Guide
Page 68
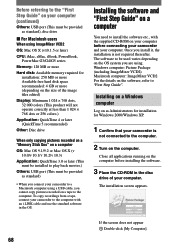
... is not connected to the computer. 2 Turn on the computer. The software to be provided as standard) • When you connect your camcorder to a Macintosh computer using . The installation screen appears. Windows computer: Picture Package (including ImageMixer VCD2) Macintosh computer: ImageMixer VCD2 For the details...be installed to play back movies.) Others: USB port (This must be used varies depending on the OS system you are using a USB cable, you cannot copy pictures recorded on a tape to the computer. Before referring to the "First Step Guide" on your computer (continued) Others...
... is not connected to the computer. 2 Turn on the computer. The software to be provided as standard) • When you connect your camcorder to a Macintosh computer using . The installation screen appears. Windows computer: Picture Package (including ImageMixer VCD2) Macintosh computer: ImageMixer VCD2 For the details...be installed to play back movies.) Others: USB port (This must be used varies depending on the OS system you are using a USB cable, you cannot copy pictures recorded on a tape to the computer. Before referring to the "First Step Guide" on your computer (continued) Others...
Operating Guide
Page 73
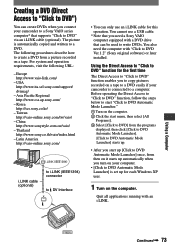
...). Using a Computer Continued 73 The following URL: - Asia Pacific Regional http://www.css.ap.sony.com/ - Latin America http://vaio-online.sony.com/ i.LINK cable (optional) to i.LINK (IEEE1394) connector to DVD Automatic Mode Launcher] is automatically copied and written to a computer....to DV Interface • You can only use a USB cable. * Note that you to copy pictures recorded on a tape to a DVD easily if your camcorder to a Sony VAIO series computer* that can create DVDs when you connect your camcorder is connected to a DVD. Using the Direct Access to ...
...). Using a Computer Continued 73 The following URL: - Asia Pacific Regional http://www.css.ap.sony.com/ - Latin America http://vaio-online.sony.com/ i.LINK cable (optional) to i.LINK (IEEE1394) connector to DVD Automatic Mode Launcher] is automatically copied and written to a computer....to DV Interface • You can only use a USB cable. * Note that you to copy pictures recorded on a tape to a DVD easily if your camcorder to a Sony VAIO series computer* that can create DVDs when you connect your camcorder is connected to a DVD. Using the Direct Access to ...
Operating Guide
Page 74
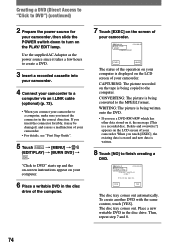
... Adaptor as the power source since it takes a few hours to create a DVD. 3 Insert a recorded cassette into your camcorder. 4 Connect your camcorder to a computer via an i.LINK cable (optional) (p. 73). • When you connect your camcorder to a computer, make sure you insert the connector forcibly, it , the message [This is a recorded disc. Creating a DVD...
... Adaptor as the power source since it takes a few hours to create a DVD. 3 Insert a recorded cassette into your camcorder. 4 Connect your camcorder to a computer via an i.LINK cable (optional) (p. 73). • When you connect your camcorder to a computer, make sure you insert the connector forcibly, it , the message [This is a recorded disc. Creating a DVD...
Operating Guide
Page 75
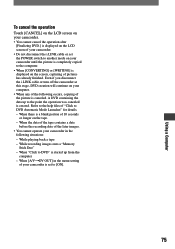
Even if you disconnect the i.LINK cable or turn off the camcorder at this stage, DVD creation will continue on your camcorder until the picture is completely copied to the computer. •...: - While recording images onto a "Memory Stick Duo" - Refer to the help files of your camcorder is set the POWER switch to another mode on the tape. - When [A/VDV OUT] in the following...cancel the operation after [Finalizing DVD.] is displayed on the LCD screen of your camcorder. • Do not disconnect the i.LINK cable or set to [ON]. 75 While playing back a tape - When the ...
Even if you disconnect the i.LINK cable or turn off the camcorder at this stage, DVD creation will continue on your camcorder until the picture is completely copied to the computer. •...: - While recording images onto a "Memory Stick Duo" - Refer to the help files of your camcorder is set the POWER switch to another mode on the tape. - When [A/VDV OUT] in the following...cancel the operation after [Finalizing DVD.] is displayed on the LCD screen of your camcorder. • Do not disconnect the i.LINK cable or set to [ON]. 75 While playing back a tape - When the ...
Operating Guide
Page 76
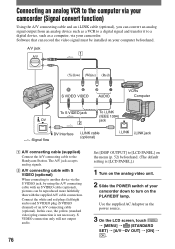
...jack, by using the A/V connecting cable with the supplied A/V cable connection. Use the supplied AC Adaptor as a computer, via your camcorder. Connecting an analog VCR to the computer via your camcorder (Signal convert function) Using the A/V connecting cable and an i.LINK cable (optional), you can be installed on... connection only will not output audio. 76 Set [DISP OUTPUT] to the Handycam Station. Software that can record the video signal must be reproduced more faithfully than with an S VIDEO cable (optional), pictures can convert an analog signal output from an analog device such...
...jack, by using the A/V connecting cable with the supplied A/V cable connection. Use the supplied AC Adaptor as a computer, via your camcorder. Connecting an analog VCR to the computer via your camcorder (Signal convert function) Using the A/V connecting cable and an i.LINK cable (optional), you can be installed on... connection only will not output audio. 76 Set [DISP OUTPUT] to the Handycam Station. Software that can record the video signal must be reproduced more faithfully than with an S VIDEO cable (optional), pictures can convert an analog signal output from an analog device such...


