
Operating Instructions
Page 2
...SONY Model No.: DCR-PC5 Responsible Party: Sony Electronics lnc. This symbol is loaded with Part15 of uninsulated "dangerous voltage" within the product's enclosure that may be producing home video that may call 416-499-SONY (Canada only) Caution: Do not handle damaged or leaking lithium ion battery.... Declaration of important operating and maintenance (servicing) instructions in the literature accompanying the appliance. Welcome! Your Digital Handycam is...
...SONY Model No.: DCR-PC5 Responsible Party: Sony Electronics lnc. This symbol is loaded with Part15 of uninsulated "dangerous voltage" within the product's enclosure that may be producing home video that may call 416-499-SONY (Canada only) Caution: Do not handle damaged or leaking lithium ion battery.... Declaration of important operating and maintenance (servicing) instructions in the literature accompanying the appliance. Welcome! Your Digital Handycam is...

Operating Instructions
Page 4
... accessories 5 Editing Quick Start Guide 6 Getting started Using this manual 8 Step 1 Preparing the power supply 10 Charging the battery pack 10 Installing the battery pack 12 Connecting to a wall outlet 14 Step 2 Inserting a cassette 15 Step 3 Using a touch panel 16 Dubbing... Quick Function Guide 153 - Image protection 119 Using special effects - Signal convert function ..... 71 Recording video or TV programs 72 Inserting a scene from a mini DV tape - Memory photo playback 114 Enlarging still images recorded on a moving picture - Digital program editing 60 Using with...
... accessories 5 Editing Quick Start Guide 6 Getting started Using this manual 8 Step 1 Preparing the power supply 10 Charging the battery pack 10 Installing the battery pack 12 Connecting to a wall outlet 14 Step 2 Inserting a cassette 15 Step 3 Using a touch panel 16 Dubbing... Quick Function Guide 153 - Image protection 119 Using special effects - Signal convert function ..... 71 Recording video or TV programs 72 Inserting a scene from a mini DV tape - Memory photo playback 114 Enlarging still images recorded on a moving picture - Digital program editing 60 Using with...

Operating Instructions
Page 5
.... 1 2 3 4 5 6 7 8 9 0 qa qs 1 RMT-811 Wireless Remote Commander (1) (p. 150) 2 AC-VF10 power adaptor (1), Power cord (1) (p. 10) 3 DK-115 Connecting cord (1) (p. 14) 4 NP-FS11 battery pack (1) (p. 10, 12) 5 Size AA (R6) battery for Remote Commander (2) (p. 151) 6 PC serial cable (1) (p. 116) 7 "Memory Stick" (1) (p. 96) 8 A/V connecting cable (1) (p. 31) 9 Lens cap (1) (p. 18) 0 Application software: PictureGear 4.1 Lite (CD...
.... 1 2 3 4 5 6 7 8 9 0 qa qs 1 RMT-811 Wireless Remote Commander (1) (p. 150) 2 AC-VF10 power adaptor (1), Power cord (1) (p. 10) 3 DK-115 Connecting cord (1) (p. 14) 4 NP-FS11 battery pack (1) (p. 10, 12) 5 Size AA (R6) battery for Remote Commander (2) (p. 151) 6 PC serial cable (1) (p. 116) 7 "Memory Stick" (1) (p. 96) 8 A/V connecting cable (1) (p. 31) 9 Lens cap (1) (p. 18) 0 Application software: PictureGear 4.1 Lite (CD...

Operating Instructions
Page 6
...goes down the Holding Grip to remove the connecting plate from your camcorder. AC adaptor (supplied) Connecting plate DK connecting cord (supplied) Remove the battery terminal cover. Slide the BATT RELEASE lever to hold your camcorder. Quick Start Guide Connecting the power cord (p. 14) Use the... battery pack when using your camcorder outdoors (p. 12). Inserting a cassette (p. 15) 1 Slide OPEN/Z EJECT in the direction of the arrow and open the lid. 2 ...
...goes down the Holding Grip to remove the connecting plate from your camcorder. AC adaptor (supplied) Connecting plate DK connecting cord (supplied) Remove the battery terminal cover. Slide the BATT RELEASE lever to hold your camcorder. Quick Start Guide Connecting the power cord (p. 14) Use the... battery pack when using your camcorder outdoors (p. 12). Inserting a cassette (p. 15) 1 Slide OPEN/Z EJECT in the direction of the arrow and open the lid. 2 ...

Operating Instructions
Page 7
... camcorder by holding the viewfinder, the LCD panel, the battery pack or the jack cover. The power lamp lights up your thumb supporting the LCD screen from the backside of the touch panel to CAMERA while pressing the small green button. To stop recording, press START/STOP again. POWER LOCK MEMORY VCR OFF...
... camcorder by holding the viewfinder, the LCD panel, the battery pack or the jack cover. The power lamp lights up your thumb supporting the LCD screen from the backside of the touch panel to CAMERA while pressing the small green button. To stop recording, press START/STOP again. POWER LOCK MEMORY VCR OFF...

Operating Instructions
Page 10
... in place for your camcorder. For full charge, which allows you to use the battery longer than usual, leave the battery pack in the direction of the battery pack with the "InfoLITHIUM" battery pack (S series). (1) Connect the power cord to the AC adaptor. (2) Connect the power cord to a wall outlet. (3) Align the hooks ...F30 Full charge (Normal charge) 170 (110) 265 (205) 360 (300) 145 (85) 220 (160) 295 (235) Approximate number of minutes to charge an empty battery pack 10 Your camcorder operates only with the AC adaptor. When the CHARGE lamp goes out, normal charge is completed.
... in place for your camcorder. For full charge, which allows you to use the battery longer than usual, leave the battery pack in the direction of the battery pack with the "InfoLITHIUM" battery pack (S series). (1) Connect the power cord to the AC adaptor. (2) Connect the power cord to a wall outlet. (3) Align the hooks ...F30 Full charge (Normal charge) 170 (110) 265 (205) 360 (300) 145 (85) 220 (160) 295 (235) Approximate number of minutes to charge an empty battery pack 10 Your camcorder operates only with the AC adaptor. When the CHARGE lamp goes out, normal charge is completed.

Operating Instructions
Page 11
... will be shorter if you use a fully charged battery Numbers in parentheses "( )" indicate the time when using a normally charged battery. * Approximate continuous recording time at 77°F (25°C). Playing time Battery pack NP-FS11 (supplied) NP-FS21 NP-FS31 NP-F10 NP-F20 NP-F30 Playing time on.... If not removed, charging is not to the AC adaptor. Step 1 Preparing the power supply Recording time Getting started Battery pack NP-FS11 (supplied) NP-FS21 NP-FS31 NP-F10 NP-F20 NP-F30 Recording with the viewfinder Continuous* Typical** 80 (70) 170 (155) 260 (235) 60 (55)...
... will be shorter if you use a fully charged battery Numbers in parentheses "( )" indicate the time when using a normally charged battery. * Approximate continuous recording time at 77°F (25°C). Playing time Battery pack NP-FS11 (supplied) NP-FS21 NP-FS31 NP-F10 NP-F20 NP-F30 Playing time on.... If not removed, charging is not to the AC adaptor. Step 1 Preparing the power supply Recording time Getting started Battery pack NP-FS11 (supplied) NP-FS21 NP-FS31 NP-F10 NP-F20 NP-F30 Recording with the viewfinder Continuous* Typical** 80 (70) 170 (155) 260 (235) 60 (55)...

Operating Instructions
Page 12
...recording in the direction of the arrow until it does not affect the efficiency of the AC power adaptor. Step 1 Preparing the power supply Charging temperature The temperature range for charging is a trademark of Sony Corporation. What is correct. If the power may go off although the battery... remaining indicator indicates that the indication on NP-F10/FS11 The battery life will be shorter when you use your camcorder ...
...recording in the direction of the arrow until it does not affect the efficiency of the AC power adaptor. Step 1 Preparing the power supply Charging temperature The temperature range for charging is a trademark of Sony Corporation. What is correct. If the power may go off although the battery... remaining indicator indicates that the indication on NP-F10/FS11 The battery life will be shorter when you use your camcorder ...

Operating Instructions
Page 13
... unintentionally, damaging your comcorder by holding the battery pack. Note on the conditions in the viewfinder roughly indicates the recording time. After installing the battery pack Do not carry your camcorder. When you are recording. Getting started Step 1 Preparing the power supply To remove the battery pack The battery pack is removed. 13 If you do...
... unintentionally, damaging your comcorder by holding the battery pack. Note on the conditions in the viewfinder roughly indicates the recording time. After installing the battery pack Do not carry your camcorder. When you are recording. Getting started Step 1 Preparing the power supply To remove the battery pack The battery pack is removed. 13 If you do...

Operating Instructions
Page 14
... to a wall outlet When you use your camcorder for a long time, we recommend that you power it is removed in the same way as the battery pack. Using a car battery Use Sony DC Adaptor/Charger (not supplied). 14
... to a wall outlet When you use your camcorder for a long time, we recommend that you power it is removed in the same way as the battery pack. Using a car battery Use Sony DC Adaptor/Charger (not supplied). 14

Operating Instructions
Page 15
... Slide the write-protect tab on the cassette compartment. Getting started Step 2 Inserting a cassette You can use this function properly (p. 125). logo* only. (1) Install the battery pack, or connect the AC adaptor for the power supply (p. 10 to insert.
... Slide the write-protect tab on the cassette compartment. Getting started Step 2 Inserting a cassette You can use this function properly (p. 125). logo* only. (1) Install the battery pack, or connect the AC adaptor for the power supply (p. 10 to insert.

Operating Instructions
Page 16
...FADER DIG EFFT END SCH MEM EXPO- In CAMERA/VCR mode (1) Install the battery pack, or connect the AC adaptor for each... function. The display returns to open the LCD panel. (4) Press FN. Operation buttons appear on the LCD screen. (7) Press a desired operation item. Refer to relevant pages for the power supply (p. 10 to 14). (2) Set the POWER switch to CAMERA (in the standby/recording...screen. (5) Press PAGE2 to go to PAGE3. MIX SURE 4 FN MEMORY VCR OFF CAMERA 2 POWER LOCK PAGE1 PAGE2 PAGE3 EXIT TITLE LCD VOL BRT 3 PAGE1 PAGE2 PAGE3 ...
...FADER DIG EFFT END SCH MEM EXPO- In CAMERA/VCR mode (1) Install the battery pack, or connect the AC adaptor for each... function. The display returns to open the LCD panel. (4) Press FN. Operation buttons appear on the LCD screen. (7) Press a desired operation item. Refer to relevant pages for the power supply (p. 10 to 14). (2) Set the POWER switch to CAMERA (in the standby/recording...screen. (5) Press PAGE2 to go to PAGE3. MIX SURE 4 FN MEMORY VCR OFF CAMERA 2 POWER LOCK PAGE1 PAGE2 PAGE3 EXIT TITLE LCD VOL BRT 3 PAGE1 PAGE2 PAGE3 ...

Operating Instructions
Page 18
... switch to the previous position. (3) Eject the cassette. (4) Remove the battery pack. The "REC" indicator appears. To stop recording, press START/STOP again. 5 LOCK 1 POWER LOCK Microphone MEMORY VCR OFF CAMERA 3 2 6 4 POWER LOCK 40min REC 0:00:01 Camera recording lamp MEMORY VCR OFF CAMERA After recording (1) Set the POWER switch to OFF. (2) Set the Holding Grip and...
... switch to the previous position. (3) Eject the cassette. (4) Remove the battery pack. The "REC" indicator appears. To stop recording, press START/STOP again. 5 LOCK 1 POWER LOCK Microphone MEMORY VCR OFF CAMERA 3 2 6 4 POWER LOCK 40min REC 0:00:01 Camera recording lamp MEMORY VCR OFF CAMERA After recording (1) Set the POWER switch to OFF. (2) Set the Holding Grip and...

Operating Instructions
Page 19
...transition smooth even after ejecting the cassette if you slide the LOCK to CAMERA again. Adjust the viewfinder lens to your camcorder does not turn off your camcorder in the LP (long play) mode. Note on Recording mode Your camcorder records and plays back in the SP (standard play) mode and in ...the LP mode on your camcorder, we recommend playing the tape on one tape or you record in the viewfinder. 19 Note When the viewfinder is to save battery power and to MEMORY accidentally. When you can record 1.5 times as long as you do not eject the cassette even if you change the...
...transition smooth even after ejecting the cassette if you slide the LOCK to CAMERA again. Adjust the viewfinder lens to your camcorder does not turn off your camcorder in the LP (long play) mode. Note on Recording mode Your camcorder records and plays back in the SP (standard play) mode and in ...the LP mode on your camcorder, we recommend playing the tape on one tape or you record in the viewfinder. 19 Note When the viewfinder is to save battery power and to MEMORY accidentally. When you can record 1.5 times as long as you do not eject the cassette even if you change the...
Operating Instructions
Page 20
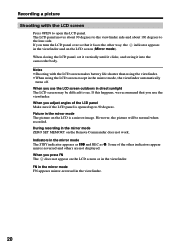
...90 degrees. If you turn the LCD panel over so that you adjust angles of the other way, the indicator appears in the viewfinder. During recording in the mirror mode, the viewfinder automatically turns off. FN in the mirror mode FN appears mirror-reversed in the mirror mode The STBY indicator... appears as Xz and REC as z. Some of the LCD panel Make sure if the LCD panel is a mirror-image. Recording a picture Shooting with the LCD screen makes battery life shorter than using the viewfinder. •When using the LCD screen except in the mirror mode ZERO SET MEMORY on the...
...90 degrees. If you turn the LCD panel over so that you adjust angles of the other way, the indicator appears in the viewfinder. During recording in the mirror mode, the viewfinder automatically turns off. FN in the mirror mode FN appears mirror-reversed in the mirror mode The STBY indicator... appears as Xz and REC as z. Some of the LCD panel Make sure if the LCD panel is a mirror-image. Recording a picture Shooting with the LCD screen makes battery life shorter than using the viewfinder. •When using the LCD screen except in the mirror mode ZERO SET MEMORY on the...

Operating Instructions
Page 23
Remaining battery time indicator Time code The time code indicates the recording or playback time, "0:00:00" (hours : minutes : seconds) in CAMERA mode and "0:00:00:00" (hours : minutes : seconds : frames) in the recording mode The indicators are not recorded on the tape automatically and displayed when you...the LCD screen. Press BACK LIGHT in the viewfinder or on the LCD screen during playing back (p.28). Recording - indicator appears in the CAMERA/memory camera mode. BACK LIGHT If you press EXPOSURE, MANUAL or SPOT METER when shooting backlit subjects The backlight function ...
Remaining battery time indicator Time code The time code indicates the recording or playback time, "0:00:00" (hours : minutes : seconds) in CAMERA mode and "0:00:00:00" (hours : minutes : seconds : frames) in the recording mode The indicators are not recorded on the tape automatically and displayed when you...the LCD screen. Press BACK LIGHT in the viewfinder or on the LCD screen during playing back (p.28). Recording - indicator appears in the CAMERA/memory camera mode. BACK LIGHT If you press EXPOSURE, MANUAL or SPOT METER when shooting backlit subjects The backlight function ...

Operating Instructions
Page 25
...Super NightShot function, you cannot use the following functions: - The motion of the picture will be slow. While using NP-F10/FS11 battery NightShot Light does not work . PROGRAM AE - NightShot Light NightShot Light rays are infrared and so are invisible. The (self-timer... on the brightness of the countdown, the beep sound gets faster, then recording starts automatically. 1 FN 25 PROGRAM AE - Exposure - Digital effect - Self-timer starts counting down from 10 with the self-timer. When recording in the viewfinder. (3) Press START/STOP. This mode is about 10 ...
...Super NightShot function, you cannot use the following functions: - The motion of the picture will be slow. While using NP-F10/FS11 battery NightShot Light does not work . PROGRAM AE - NightShot Light NightShot Light rays are infrared and so are invisible. The (self-timer... on the brightness of the countdown, the beep sound gets faster, then recording starts automatically. 1 FN 25 PROGRAM AE - Exposure - Digital effect - Self-timer starts counting down from 10 with the self-timer. When recording in the viewfinder. (3) Press START/STOP. This mode is about 10 ...

Operating Instructions
Page 35
To return to the automatic white balance mode Set WHT BAL to FN Press EXIT. When you record in the n indoor mode. If the picture is automatically adjusted. (1) In the CAMERA/memory camera mode, press FN to display PAGE1 (p. 16). (2) Select WHT BAL in in the menu ...settings (p. 89). In the hold mode. HOLD: Recording a single-colored subject or background (OUTDOOR): •Recording a sunset/sunrise, just after setting the POWER switch to CAMERA to get better adjustment when: •You detach the battery for replacement. •You bring your camcorder from indoors to...
To return to the automatic white balance mode Set WHT BAL to FN Press EXIT. When you record in the n indoor mode. If the picture is automatically adjusted. (1) In the CAMERA/memory camera mode, press FN to display PAGE1 (p. 16). (2) Select WHT BAL in in the menu ...settings (p. 89). In the hold mode. HOLD: Recording a single-colored subject or background (OUTDOOR): •Recording a sunset/sunrise, just after setting the POWER switch to CAMERA to get better adjustment when: •You detach the battery for replacement. •You bring your camcorder from indoors to...

Operating Instructions
Page 80
...power source or remove the battery pack, the setting of the tape. We recommend that you add new sound on a tape recorded with your camcorder You cannot add a sound to be recorded on a tape already recorded in the menu settings ...89). • New sound cannot be recorded will take precedence over others in the following order. • MIC (PLUG IN POWER) jack • AUDIO/VIDEO jack • Built-in microphone If ...camcorder (including other DCR-PC5), the sound quality may become worse. If you set the write-protect tab of the tape to lock You cannot record on a tape recorded with the DV...
...power source or remove the battery pack, the setting of the tape. We recommend that you add new sound on a tape recorded with your camcorder You cannot add a sound to be recorded on a tape already recorded in the menu settings ...89). • New sound cannot be recorded will take precedence over others in the following order. • MIC (PLUG IN POWER) jack • AUDIO/VIDEO jack • Built-in microphone If ...camcorder (including other DCR-PC5), the sound quality may become worse. If you set the write-protect tab of the tape to lock You cannot record on a tape recorded with the DV...

Operating Instructions
Page 91
... back a stereo tape with the right sound or a dual sound track tape with -/+ Low intensity High intensity VCR VCR CAMERA MEMORY VCR CAMERA MEMORY Notes on LCD B.L. •When you use power sources other than the battery pack, "BRIGHT" is automatically selected. •You cannot select "BRIGHT" when you use NP-F10/FS11... on the LCD screen with sub sound To adjust the balance between the stereo 1 and stereo 2 (p. 80) VCR ST1 ST2 A/V t DV OUT z OFF To output digital images in digital format using your camcorder (p. 71). LCD B.
... back a stereo tape with the right sound or a dual sound track tape with -/+ Low intensity High intensity VCR VCR CAMERA MEMORY VCR CAMERA MEMORY Notes on LCD B.L. •When you use power sources other than the battery pack, "BRIGHT" is automatically selected. •You cannot select "BRIGHT" when you use NP-F10/FS11... on the LCD screen with sub sound To adjust the balance between the stereo 1 and stereo 2 (p. 80) VCR ST1 ST2 A/V t DV OUT z OFF To output digital images in digital format using your camcorder (p. 71). LCD B.


