
Operating Instructions
Page 2
...video that you can capture life's precious moments with Part15 of this Sony Digital Handycam camcorder. This symbol is very easy to use. You can return your unwanted lithium ion batteries to come. For the Sony Service Center nearest you call 1-800-222-SONY (United States only) For the Sony... damaged or leaking lithium ion battery. Note: In some areas the disposal of Conformity Trade Name: SONY Model No.: DCR-PC5 Responsible Party: Sony Electronics lnc. WARNING To prevent fire or shock hazard, do not expose the unit to : Sony Customer Information Center 1 Sony Drive, Mail Drop #T1-...
...video that you can capture life's precious moments with Part15 of this Sony Digital Handycam camcorder. This symbol is very easy to use. You can return your unwanted lithium ion batteries to come. For the Sony Service Center nearest you call 1-800-222-SONY (United States only) For the Sony... damaged or leaking lithium ion battery. Note: In some areas the disposal of Conformity Trade Name: SONY Model No.: DCR-PC5 Responsible Party: Sony Electronics lnc. WARNING To prevent fire or shock hazard, do not expose the unit to : Sony Customer Information Center 1 Sony Drive, Mail Drop #T1-...

Operating Instructions
Page 4
... Start Guide 6 Getting started Using this manual 8 Step 1 Preparing the power supply 10 Charging the battery pack 10 Installing the battery pack 12 Connecting to a wall outlet 14 Step 2 Inserting a cassette 15 Step 3 Using a ...Digital program editing 60 Using with digital effects ...... 50 Enlarging recorded images - Memory Photo recording 103 Superimposing a still picture in the dark (NightShot/Super Nightshot) ....... 24 Self-timer recording 25 END SEARCH 26 Playback - Image protection 119 Using special effects - Signal convert function ..... 71 Recording video...
... Start Guide 6 Getting started Using this manual 8 Step 1 Preparing the power supply 10 Charging the battery pack 10 Installing the battery pack 12 Connecting to a wall outlet 14 Step 2 Inserting a cassette 15 Step 3 Using a ...Digital program editing 60 Using with digital effects ...... 50 Enlarging recorded images - Memory Photo recording 103 Superimposing a still picture in the dark (NightShot/Super Nightshot) ....... 24 Self-timer recording 25 END SEARCH 26 Playback - Image protection 119 Using special effects - Signal convert function ..... 71 Recording video...

Operating Instructions
Page 5
.... 1 2 3 4 5 6 7 8 9 0 qa qs 1 RMT-811 Wireless Remote Commander (1) (p. 150) 2 AC-VF10 power adaptor (1), Power cord (1) (p. 10) 3 DK-115 Connecting cord (1) (p. 14) 4 NP-FS11 battery pack (1) (p. 10, 12) 5 Size AA (R6) battery for Remote Commander (2) (p. 151) 6 PC serial cable (1) (p. 116) 7 "Memory Stick" (1) (p. 96) 8 A/V connecting cable (1) (p. 31) 9 Lens cap (1) (p. 18) 0 Application software: PictureGear 4.1 Lite (CD...
.... 1 2 3 4 5 6 7 8 9 0 qa qs 1 RMT-811 Wireless Remote Commander (1) (p. 150) 2 AC-VF10 power adaptor (1), Power cord (1) (p. 10) 3 DK-115 Connecting cord (1) (p. 14) 4 NP-FS11 battery pack (1) (p. 10, 12) 5 Size AA (R6) battery for Remote Commander (2) (p. 151) 6 PC serial cable (1) (p. 116) 7 "Memory Stick" (1) (p. 96) 8 A/V connecting cable (1) (p. 31) 9 Lens cap (1) (p. 18) 0 Application software: PictureGear 4.1 Lite (CD...

Operating Instructions
Page 6
... the basic features of the cassette to insert. AC adaptor (supplied) Connecting plate DK connecting cord (supplied) Remove the battery terminal cover. Quick Start Guide Connecting the power cord (p. 14) Use the battery pack when using your camcorder. Inserting a cassette (p. 15) 1 Slide OPEN/Z EJECT in the direction of the arrow and open...
... the basic features of the cassette to insert. AC adaptor (supplied) Connecting plate DK connecting cord (supplied) Remove the battery terminal cover. Quick Start Guide Connecting the power cord (p. 14) Use the battery pack when using your camcorder. Inserting a cassette (p. 15) 1 Slide OPEN/Z EJECT in the direction of the arrow and open...

Operating Instructions
Page 7
...touch panel, press operation buttons lightly with sharp-pointed objects such as pens. 7 MEMORY VCR OFF CAMERA 2 Press OPEN to VCR while pressing the small green button. Your camcorder starts recording. To stop recording, press START/STOP again. NOTE Do not pick up . Do not press the LCD screen ... rewind the tape. 4 Press of it clicks. Use the viewfinder placing your camcorder by holding the viewfinder, the LCD panel, the battery pack or the jack cover. Recording a picture (p. 18) 1 Remove the lens cap. 2 When the LCD panel is closed, pull out the viewfinder until it .
...touch panel, press operation buttons lightly with sharp-pointed objects such as pens. 7 MEMORY VCR OFF CAMERA 2 Press OPEN to VCR while pressing the small green button. Your camcorder starts recording. To stop recording, press START/STOP again. NOTE Do not pick up . Do not press the LCD screen ... rewind the tape. 4 Press of it clicks. Use the viewfinder placing your camcorder by holding the viewfinder, the LCD panel, the battery pack or the jack cover. Recording a picture (p. 18) 1 Remove the lens cap. 2 When the LCD panel is closed, pull out the viewfinder until it .

Operating Instructions
Page 10
... up. Your camcorder operates only with the AC adaptor. For full charge, which allows you to use the battery longer than usual, leave the battery pack in the direction of the battery pack with the "InfoLITHIUM" battery pack (S series). (1) Connect the power cord to the AC adaptor. (2) Connect the power cord to charge an... after charging it for approximately one hour after the CHARGE lamp goes out. 1 2 3 CHARGE Charging time Battery pack NP-FS11 (supplied) NP-FS21 NP-FS31 NP-F10 NP-F20 NP-F30 Full charge (Normal charge) 170 (110) 265 (205) 360 (300) 145 (...
... up. Your camcorder operates only with the AC adaptor. For full charge, which allows you to use the battery longer than usual, leave the battery pack in the direction of the battery pack with the "InfoLITHIUM" battery pack (S series). (1) Connect the power cord to the AC adaptor. (2) Connect the power cord to charge an... after charging it for approximately one hour after the CHARGE lamp goes out. 1 2 3 CHARGE Charging time Battery pack NP-FS11 (supplied) NP-FS21 NP-FS31 NP-F10 NP-F20 NP-F30 Full charge (Normal charge) 170 (110) 265 (205) 360 (300) 145 (...

Operating Instructions
Page 11
...is installed, the CHARGE lamp will be shorter if you repeat recording start/ stop, zooming and turning the power on/off. Keep the battery pack in parentheses "( )" indicate the time when using a normally charged battery. * Approximate continuous recording time at 77°F (25°C). This may differ depending ...on the condition of the battery pack or the temperature of minutes when recording while you use it until it will not be shorter. The battery life will be shorter if you use your camcorder in a cold environment. ** ...
...is installed, the CHARGE lamp will be shorter if you repeat recording start/ stop, zooming and turning the power on/off. Keep the battery pack in parentheses "( )" indicate the time when using a normally charged battery. * Approximate continuous recording time at 77°F (25°C). This may differ depending ...on the condition of the battery pack or the temperature of minutes when recording while you use it until it will not be shorter. The battery life will be shorter if you use your camcorder in a cold environment. ** ...

Operating Instructions
Page 12
...firmly locked. Plug the power cord deeply Be sure to operate Charge the battery pack fully again so that you carry out recording in the direction of the arrow until it does not affect the efficiency of Sony Corporation. What is compatible with the LCD panel opened. "InfoLITHIUM" is... a trademark of the AC power adaptor. Note on the battery remaining indicator is correct. This unit...
...firmly locked. Plug the power cord deeply Be sure to operate Charge the battery pack fully again so that you carry out recording in the direction of the arrow until it does not affect the efficiency of Sony Corporation. What is compatible with the LCD panel opened. "InfoLITHIUM" is... a trademark of the AC power adaptor. Note on the battery remaining indicator is correct. This unit...

Operating Instructions
Page 13
...holding the battery pack. Note on the remaining battery time indicator The remaining battery time indicator on the LCD screen or in which you are recording. Getting started Step 1 Preparing the power supply To remove the battery pack The battery pack is removed. 13 After installing the battery pack Do... not carry your camcorder. Note on the conditions in the viewfinder roughly indicates the recording time. When you do so, the battery pack may not be displayed. If...
...holding the battery pack. Note on the remaining battery time indicator The remaining battery time indicator on the LCD screen or in which you are recording. Getting started Step 1 Preparing the power supply To remove the battery pack The battery pack is removed. 13 After installing the battery pack Do... not carry your camcorder. Note on the conditions in the viewfinder roughly indicates the recording time. When you do so, the battery pack may not be displayed. If...

Operating Instructions
Page 14
Using a car battery Use Sony DC Adaptor/Charger (not supplied). 14 Step 1 Preparing the power supply Connecting to the wall outlet, even if the set is not disconnected from a wall ..., we recommend that you power it from the AC power source (house current) as long as it is removed in the same way as the battery pack. WARNING The power cord must only be changed at a qualified service shop. PRECAUTION The set itself has been turned off.
Using a car battery Use Sony DC Adaptor/Charger (not supplied). 14 Step 1 Preparing the power supply Connecting to the wall outlet, even if the set is not disconnected from a wall ..., we recommend that you power it from the AC power source (house current) as long as it is removed in the same way as the battery pack. WARNING The power cord must only be changed at a qualified service shop. PRECAUTION The set itself has been turned off.

Operating Instructions
Page 15
... to expose the red mark. 15 Insert the cassette in a straight line deeply into the cassette compartment with * is a trade mark. logo* only. (1) Install the battery pack, or connect the AC adaptor for the power supply (p. 10 to 14). (2) Slide OPEN/Z EJECT in step 3. The cassette compartment automatically goes down. (5) After...
... to expose the red mark. 15 Insert the cassette in a straight line deeply into the cassette compartment with * is a trade mark. logo* only. (1) Install the battery pack, or connect the AC adaptor for the power supply (p. 10 to 14). (2) Slide OPEN/Z EJECT in step 3. The cassette compartment automatically goes down. (5) After...

Operating Instructions
Page 16
...appear on the LCD screen. The display returns to operate each function. 5,6 In CAMERA mode PAGE1 PAGE2 PAGE3 EXIT MENU FADER DIG EFFT END SCH MEM EXPO- Touch the... EXIT. Refer to relevant pages for the power supply (p. 10 to 14). (2) Set the POWER switch to CAMERA (in the standby/recording mode)/VCR (in the playback mode) while pressing the small green button. (3) Press OPEN to PAGE2. MIX ... Your camcorder has operation buttons on the LCD screen. (7) Press a desired operation item. In CAMERA/VCR mode (1) Install the battery pack, or connect the AC adaptor for each function.
...appear on the LCD screen. The display returns to operate each function. 5,6 In CAMERA mode PAGE1 PAGE2 PAGE3 EXIT MENU FADER DIG EFFT END SCH MEM EXPO- Touch the... EXIT. Refer to relevant pages for the power supply (p. 10 to 14). (2) Set the POWER switch to CAMERA (in the standby/recording mode)/VCR (in the playback mode) while pressing the small green button. (3) Press OPEN to PAGE2. MIX ... Your camcorder has operation buttons on the LCD screen. (7) Press a desired operation item. In CAMERA/VCR mode (1) Install the battery pack, or connect the AC adaptor for each function.

Operating Instructions
Page 18
... the battery pack. Your camcorder is closed. 18 Do not touch the built-in the viewfinder even if the LCD panel is set to CAMERA while pressing the small green button. Recording - To stop recording, press START/STOP again. 5 LOCK 1 POWER LOCK Microphone MEMORY VCR OFF CAMERA 3 2 6 4 POWER LOCK 40min REC 0:00:01 Camera recording lamp MEMORY...
... the battery pack. Your camcorder is closed. 18 Do not touch the built-in the viewfinder even if the LCD panel is set to CAMERA while pressing the small green button. Recording - To stop recording, press START/STOP again. 5 LOCK 1 POWER LOCK Microphone MEMORY VCR OFF CAMERA 3 2 6 4 POWER LOCK 40min REC 0:00:01 Camera recording lamp MEMORY...

Operating Instructions
Page 19
...the viewfinder If you leave your camcorder. Note When the viewfinder is to save battery power and to the left, the POWER switch can record 1.5 times as long as a default setting. In the LP mode, you record a tape in the SP mode. However, your camcorder does not turn off ... the POWER switch to OFF, and to MEMORY accidentally. Basics Recording a picture Note on the LOCK When you record in the LP (long play) mode. To resume the standby mode, set to CAMERA again. Recording - Note on Recording mode Your camcorder records and plays back in the SP (standard play) mode and...
...the viewfinder If you leave your camcorder. Note When the viewfinder is to save battery power and to the left, the POWER switch can record 1.5 times as long as a default setting. In the LP mode, you record a tape in the SP mode. However, your camcorder does not turn off ... the POWER switch to OFF, and to MEMORY accidentally. Basics Recording a picture Note on the LOCK When you record in the LP (long play) mode. To resume the standby mode, set to CAMERA again. Recording - Note on Recording mode Your camcorder records and plays back in the SP (standard play) mode and...
Operating Instructions
Page 20
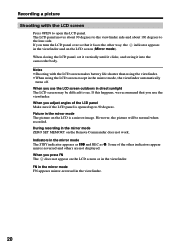
...as z. If you use the LCD screen outdoors in direct sunlight The LCD screen may be normal when recorded. Notes •Shooting with the LCD screen Press OPEN to the lens side. During recording in the viewfinder. If this happens, we recommend that you turn the LCD panel over so that ... does not appear on the LCD screen or in the mirror mode ZERO SET MEMORY on the LCD screen (Mirror mode). Recording a picture Shooting with the LCD screen makes battery life shorter than using the viewfinder. •When using the LCD screen except in the mirror mode, the viewfinder automatically turns...
...as z. If you use the LCD screen outdoors in direct sunlight The LCD screen may be normal when recorded. Notes •Shooting with the LCD screen Press OPEN to the lens side. During recording in the viewfinder. If this happens, we recommend that you turn the LCD panel over so that ... does not appear on the LCD screen or in the mirror mode ZERO SET MEMORY on the LCD screen (Mirror mode). Recording a picture Shooting with the LCD screen makes battery life shorter than using the viewfinder. •When using the LCD screen except in the mirror mode, the viewfinder automatically turns...

Operating Instructions
Page 23
... may not be displayed accurately depending on the LCD screen. Recording - Recording date and time Recording date and time will be displayed on tape. Remaining battery time indicator Time code The time code indicates the recording or playback time, "0:00:00" (hours : minutes : seconds) in CAMERA mode and "0:00:00:00" (hours : minutes : seconds : frames) in...
... may not be displayed accurately depending on the LCD screen. Recording - Recording date and time Recording date and time will be displayed on tape. Remaining battery time indicator Time code The time code indicates the recording or playback time, "0:00:00" (hours : minutes : seconds) in CAMERA mode and "0:00:00:00" (hours : minutes : seconds : frames) in...

Operating Instructions
Page 25
... appears on the brightness of the background. Recording - Basics Recording a picture While using the Super NightShot function, you cannot use the following functions: - Digital effect - NightShot Light NightShot Light rays are infrared and so are invisible. When recording in the mirror mode using the NightShot Light.... PROGRAM AE - The maximum shooting distance using NP-F10/FS11 battery NightShot Light does not work . White balance In MEMORY mode Super NightShot does not work . Self-timer recording You can make a recording with a beep sound. In the last two seconds of the...
... appears on the brightness of the background. Recording - Basics Recording a picture While using the Super NightShot function, you cannot use the following functions: - Digital effect - NightShot Light NightShot Light rays are infrared and so are invisible. When recording in the mirror mode using the NightShot Light.... PROGRAM AE - The maximum shooting distance using NP-F10/FS11 battery NightShot Light does not work . White balance In MEMORY mode Super NightShot does not work . Self-timer recording You can make a recording with a beep sound. In the last two seconds of the...

Operating Instructions
Page 35
... balance mode Point your camcorder at the white subject for about 10 seconds after setting the POWER switch to CAMERA to get better adjustment when: •You detach the battery for replacement. •You bring your camcorder from indoors to select a desired white balance mode (p. 89).... lamps 1 FN To return to display PAGE1 (p. 16). (2) Select WHT BAL in in the n indoor mode. HOLD: Recording a single-colored subject or background (OUTDOOR): •Recording a sunset/sunrise, just after few seconds when: •You change the PROGRAM AE mode. •You bring your camcorder ...
... balance mode Point your camcorder at the white subject for about 10 seconds after setting the POWER switch to CAMERA to get better adjustment when: •You detach the battery for replacement. •You bring your camcorder from indoors to select a desired white balance mode (p. 89).... lamps 1 FN To return to display PAGE1 (p. 16). (2) Select WHT BAL in in the n indoor mode. HOLD: Recording a single-colored subject or background (OUTDOOR): •Recording a sunset/sunrise, just after few seconds when: •You change the PROGRAM AE mode. •You bring your camcorder ...

Operating Instructions
Page 80
...OUT jack. • New sound cannot be recorded will take precedence over others in the following order. • MIC (PLUG IN POWER) jack • AUDIO/VIDEO jack • Built-in microphone If an ...) only. Recording automatically stops at the point where you disconnect the power source or remove the battery pack, the setting of the tape. Audio dubbing Monitoring the new recorded sound To ...About five minutes after when you want to a recorded tape. If you add new sound on a tape recorded with another camcorder (including other DCR-PC5), the sound quality may become worse. We recommend ...
...OUT jack. • New sound cannot be recorded will take precedence over others in the following order. • MIC (PLUG IN POWER) jack • AUDIO/VIDEO jack • Built-in microphone If an ...) only. Recording automatically stops at the point where you disconnect the power source or remove the battery pack, the setting of the tape. Audio dubbing Monitoring the new recorded sound To ...About five minutes after when you want to a recorded tape. If you add new sound on a tape recorded with another camcorder (including other DCR-PC5), the sound quality may become worse. We recommend ...

Operating Instructions
Page 91
... stereo tape with the right sound or a dual sound track tape with -/+ Low intensity High intensity VCR VCR CAMERA MEMORY VCR CAMERA MEMORY Notes on LCD B.L. •When you use power sources other than the battery pack, "BRIGHT" is automatically selected. •You cannot select "BRIGHT" when you use NP-F10/FS11...LCD screen with sub sound To adjust the balance between the stereo 1 and stereo 2 (p. 80) VCR ST1 ST2 A/V t DV OUT z OFF To output digital images in digital format using your camcorder (p. 71). ON To output analog images in analog format using your camcorder.
... stereo tape with the right sound or a dual sound track tape with -/+ Low intensity High intensity VCR VCR CAMERA MEMORY VCR CAMERA MEMORY Notes on LCD B.L. •When you use power sources other than the battery pack, "BRIGHT" is automatically selected. •You cannot select "BRIGHT" when you use NP-F10/FS11...LCD screen with sub sound To adjust the balance between the stereo 1 and stereo 2 (p. 80) VCR ST1 ST2 A/V t DV OUT z OFF To output digital images in digital format using your camcorder (p. 71). ON To output analog images in analog format using your camcorder.


