Computer Applications Guide
Page 10
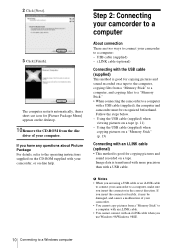
..." to a computer, and copying files to a "Memory Stick." • When connecting the camcorder to a computer with an i.LINK cable. • You cannot connect with a USB cable. If you use Windows 98/Windows 98SE. 10 Connecting to the operating instructions supplied on the CD-ROM supplied with an i.LINK cable (optional) • This...
..." to a computer, and copying files to a "Memory Stick." • When connecting the camcorder to a computer with an i.LINK cable. • You cannot connect with a USB cable. If you use Windows 98/Windows 98SE. 10 Connecting to the operating instructions supplied on the CD-ROM supplied with an i.LINK cable (optional) • This...
Computer Applications Guide
Page 16
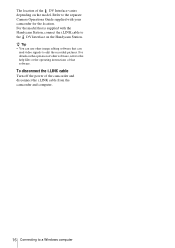
...For details on the operation of other image editing software that can read video signals to the help files or the operating instructions of that is supplied with your camcorder for the location. z Tip • You can use other software, refer to edit the recorded pictures. For the model... the i.LINK cable Turn off the power of the camcorder and disconnect the i.LINK cable from the camcorder and computer. 16 Connecting to the DV Interface on the model. Refer to the separate Camera Operations Guide supplied with the Handycam Station, connect the i.LINK cable to a Windows computer...
...For details on the operation of other image editing software that can read video signals to the help files or the operating instructions of that is supplied with your camcorder for the location. z Tip • You can use other software, refer to edit the recorded pictures. For the model... the i.LINK cable Turn off the power of the camcorder and disconnect the i.LINK cable from the camcorder and computer. 16 Connecting to the DV Interface on the model. Refer to the separate Camera Operations Guide supplied with the Handycam Station, connect the i.LINK cable to a Windows computer...
Computer Applications Guide
Page 25
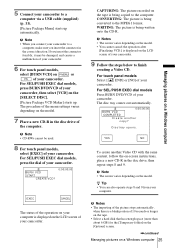
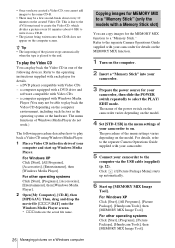
...forcibly, it may be used. 8 For touch panel models, select [EXEC] of your camcorder. The disc tray comes out automatically. . 0:00:00:00 BURN VCD COMPLETED Create another Video CD with the same content, follow the on-screen instructions, place a new CD-R in the disc drive, then repeat steps 8 and 9. YES... NO To create another copy? For SEL/PUSH EXEC dial models Press BURN DVD/VCD of your camcorder. . 0:00:00:00 BURN VCD START CREATE VCD? b ...
...forcibly, it may be used. 8 For touch panel models, select [EXEC] of your camcorder. The disc tray comes out automatically. . 0:00:00:00 BURN VCD COMPLETED Create another Video CD with the same content, follow the on-screen instructions, place a new CD-R in the disc drive, then repeat steps 8 and 9. YES... NO To create another copy? For SEL/PUSH EXEC dial models Press BURN DVD/VCD of your camcorder. . 0:00:00:00 BURN VCD START CREATE VCD? b ...
Computer Applications Guide
Page 26
... Video CD in the menu settings of the picture stops automatically when the tape is due to the AVI format used to the operating instructions supplied with Video CDs - Refer to create the Video CD, which divides a picture every 10 minutes (about every 10 minutes on ... a computer equipped with a DVD drive and software compatible with each player for your camcorder, then slide the POWER switch repeatedly to the end. For Windows XP Click [Start], [All Programs], [Picture Package], [Handycam Tools], then [MEMORY MIX Image Tool]. For other operating systems Click [Start], [...
... Video CD in the menu settings of the picture stops automatically when the tape is due to the AVI format used to the operating instructions supplied with Video CDs - Refer to create the Video CD, which divides a picture every 10 minutes (about every 10 minutes on ... a computer equipped with a DVD drive and software compatible with each player for your camcorder, then slide the POWER switch repeatedly to the end. For Windows XP Click [Start], [All Programs], [Picture Package], [Handycam Tools], then [MEMORY MIX Image Tool]. For other operating systems Click [Start], [...
Computer Applications Guide
Page 31
...model. 3 Insert a recorded cassette into your camcorder. 4 Connect your camcorder to a computer via an i.LINK cable (optional). (p. 15) b Note • When you connect your camcorder to DVD" starts up and the on-screen instructions appear on your camcorder. The procedure of the menu setting varies ...depending on the LCD screen of your camcorder. Delete and overwrite?] appears on the model. 6 Place a ...
...model. 3 Insert a recorded cassette into your camcorder. 4 Connect your camcorder to a computer via an i.LINK cable (optional). (p. 15) b Note • When you connect your camcorder to DVD" starts up and the on-screen instructions appear on your camcorder. The procedure of the menu setting varies ...depending on the LCD screen of your camcorder. Delete and overwrite?] appears on the model. 6 Place a ...
Computer Applications Guide
Page 34
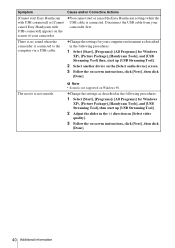
...lack the smoothness. • The location of the USB jack and the shape of the cable vary depending on the condition of your camcorder. • You cannot transfer pictures with the software or on your computer. If you insert the connector in the correct direction. ...8226; The bundled software Picture Package or ImageMixer VCD2 do not support the digital convert function. • You may be able to output the pictures correctly depending on the model. Regarding operation, refer to the operating instructions supplied with copyright protection signals to a computer. • You can ...
...lack the smoothness. • The location of the USB jack and the shape of the cable vary depending on the condition of your camcorder. • You cannot transfer pictures with the software or on your computer. If you insert the connector in the correct direction. ...8226; The bundled software Picture Package or ImageMixer VCD2 do not support the digital convert function. • You may be able to output the pictures correctly depending on the model. Regarding operation, refer to the operating instructions supplied with copyright protection signals to a computer. • You can ...
Computer Applications Guide
Page 40
... [Start], [Programs]( [All Programs] for your camcorder first. cChange the settings as described in the (-) direction on [Select video quality]. 3 Follow the on -screen instructions, click [Next] , then click [Done]. Symptom Cause and/or Corrective Actions [Cannot start Easy Handycam with USB connected] or [Cannot cancel Easy Handycam with USB connected] appears on Windows...
... [Start], [Programs]( [All Programs] for your camcorder first. cChange the settings as described in the (-) direction on [Select video quality]. 3 Follow the on -screen instructions, click [Next] , then click [Done]. Symptom Cause and/or Corrective Actions [Cannot start Easy Handycam with USB connected] or [Cannot cancel Easy Handycam with USB connected] appears on Windows...
Camera Operations Guide
Page 2
... not expose the unit to the collection and recycling location nearest you. For more information regarding recycling of important operating and maintenance (servicing) instructions in the U.S.A. This Class B digital apparatus complies with Part 15 of the FCC Rules. b Notice If static electricity or electromagnetic interference causes data transfer to the presence of...
... not expose the unit to the collection and recycling location nearest you. For more information regarding recycling of important operating and maintenance (servicing) instructions in the U.S.A. This Class B digital apparatus complies with Part 15 of the FCC Rules. b Notice If static electricity or electromagnetic interference causes data transfer to the presence of...

Camera Operations Guide
Page 3
...camcorder is based on , the user is connected. - Consult a Sony dealer or an experienced radio/TV technician for a Class B digital device, pursuant to the following measures: - Notes on use Title search (p. 61), Date search (p. 62), [ TITLE] (p. 81), [ TAPE TITLE] (p. 83). For customers in accordance with the instructions... is subject to Part 15 of mini DV cassettes with Handycam Station Model DCRA-C111 and AC Power Adaptor Model AC... camcorder. Note on the bottom. These limits are located on the type of Conformity Trade Name: SONY Model No.: DCR-PC109 Responsible Party: Sony ...
...camcorder is based on , the user is connected. - Consult a Sony dealer or an experienced radio/TV technician for a Class B digital device, pursuant to the following measures: - Notes on use Title search (p. 61), Date search (p. 62), [ TITLE] (p. 81), [ TAPE TITLE] (p. 83). For customers in accordance with the instructions... is subject to Part 15 of mini DV cassettes with Handycam Station Model DCRA-C111 and AC Power Adaptor Model AC... camcorder. Note on the bottom. These limits are located on the type of Conformity Trade Name: SONY Model No.: DCR-PC109 Responsible Party: Sony ...
Camera Operations Guide
Page 8
... 95 Dubbing pictures from a tape to a "Memory Stick Duo 96 Dubbing still images from a "Memory Stick Duo" to other operating instructions supplied with your camcorder: • Editing images with specific information - PICT. Digital program editing 98 Dubbing sound to a recorded tape 105 Deleting recorded pictures .........107 Marking recorded images with your computer cComputer...
... 95 Dubbing pictures from a tape to a "Memory Stick Duo 96 Dubbing still images from a "Memory Stick Duo" to other operating instructions supplied with your camcorder: • Editing images with specific information - PICT. Digital program editing 98 Dubbing sound to a recorded tape 105 Deleting recorded pictures .........107 Marking recorded images with your computer cComputer...
Camera Operations Guide
Page 14
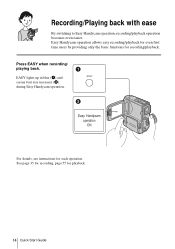
Press EASY when recording/ playing back. See page 35 for recording, page 55 for recording/playback. Easy Handycam operation allows easy recording/playback for even first time users by providing only the basic functions for playback. 14 Quick Start Guide EASY lights up in blue (1) and screen font size increases (2) during Easy Handycam operation. Easy Handycam operation ON For details, see instructions for each operation. Recording/Playing back with ease By switching to Easy Handycam operation, recording/playback operation becomes even easier.
Press EASY when recording/ playing back. See page 35 for recording, page 55 for recording/playback. Easy Handycam operation allows easy recording/playback for even first time users by providing only the basic functions for playback. 14 Quick Start Guide EASY lights up in blue (1) and screen font size increases (2) during Easy Handycam operation. Easy Handycam operation ON For details, see instructions for each operation. Recording/Playing back with ease By switching to Easy Handycam operation, recording/playback operation becomes even easier.
Camera Operations Guide
Page 60
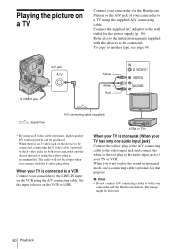
...the devices to another tape, see page 94. Refer also to a TV using the yellow plug is connected to a VCR Connect your camcorder and the Handycam Station. When there is monaural (When your TV has only one audio input jack) Connect the yellow plug of the A/V connecting cable to... the video input jack and connect the white or the red plug to the audio input jack of your TV is recommended. When your camcorder to the instruction...
...the devices to another tape, see page 94. Refer also to a TV using the yellow plug is connected to a VCR Connect your camcorder and the Handycam Station. When there is monaural (When your TV has only one audio input jack) Connect the yellow plug of the A/V connecting cable to... the video input jack and connect the white or the red plug to the audio input jack of your TV is recommended. When your camcorder to the instruction...
Camera Operations Guide
Page 94
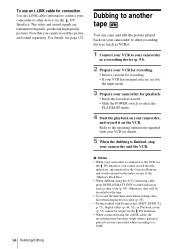
... separately. To use an i.LINK cable for connection Use an i.LINK cable (optional) to connect your camcorder and the VCR. The video and sound signals are transmitted digitally, producing high quality pictures. Note that you cannot record the title, indicators, information for the Cassette Memory...input selector, set it on your camcorder to other device via the DV Interface. Refer to the operating instructions supplied with Picture effect ([PICT. Dubbing to another tape You can copy and edit the picture played back on the VCR. EFFECT] p. 75), Digital effect (p. 44, 52), or Playback...
... separately. To use an i.LINK cable for connection Use an i.LINK cable (optional) to connect your camcorder and the VCR. The video and sound signals are transmitted digitally, producing high quality pictures. Note that you cannot record the title, indicators, information for the Cassette Memory...input selector, set it on your camcorder to other device via the DV Interface. Refer to the operating instructions supplied with Picture effect ([PICT. Dubbing to another tape You can copy and edit the picture played back on the VCR. EFFECT] p. 75), Digital effect (p. 44, 52), or Playback...

Camera Operations Guide
Page 100
Refer to the operating instructions supplied with your VCR for the manufacturer of your VCR, try again. [..., then touch . When there is set at "3" as the default setting.) Manufacturing company [IR SETUP] code Sony 1, 2, 3, 4, 5, 6 Admiral (M. The recording starts on your camcorder by your VCR, refer to "[IR SETUP] code list" (p. 100). Go on your VCR, then touch ...default. (It is more than one code listed for details on operation. 5 Point the infrared ray emitter of your camcorder towards the remote sensor on your VCR, from about 30 cm (12 in.) away, with no obstructions. 6 ...
Refer to the operating instructions supplied with your VCR for the manufacturer of your VCR, try again. [..., then touch . When there is set at "3" as the default setting.) Manufacturing company [IR SETUP] code Sony 1, 2, 3, 4, 5, 6 Admiral (M. The recording starts on your camcorder by your VCR, refer to "[IR SETUP] code list" (p. 100). Go on your VCR, then touch ...default. (It is more than one code listed for details on operation. 5 Point the infrared ray emitter of your camcorder towards the remote sensor on your VCR, from about 30 cm (12 in.) away, with no obstructions. 6 ...
Camera Operations Guide
Page 111
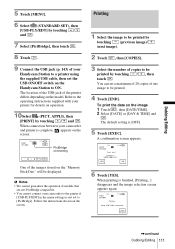
...7 Select [PictBridge], then touch . 8 Touch . 9 Connect the USB jack (p. 143) of your Handycam Station to a printer using the supplied USB cable, then set the USB ON/OFF switch on the Handycam Station to be printed by touching / , then touch . To print the date on the screen. PRINT...continued Dubbing/Editing 111 Refer to be displayed. b Notes • We cannot guarantee the operation of one image to the operating instructions supplied with your camcorder to the printer if [USB-PLY/EDT] in the menu settings is finished, [Printing...] disappears and the image selection screen appears...
...7 Select [PictBridge], then touch . 8 Touch . 9 Connect the USB jack (p. 143) of your Handycam Station to a printer using the supplied USB cable, then set the USB ON/OFF switch on the Handycam Station to be printed by touching / , then touch . To print the date on the screen. PRINT...continued Dubbing/Editing 111 Refer to be displayed. b Notes • We cannot guarantee the operation of one image to the operating instructions supplied with your camcorder to the printer if [USB-PLY/EDT] in the menu settings is finished, [Printing...] disappears and the image selection screen appears...

Camera Operations Guide
Page 112
...USB cable from your Handycam Station and printer. Disconnecting the USB cable from your Handycam Station or printer - b Notes • Do not attempt the following operations when is on the screen. Sliding the POWER switch to 6. Refer to your printer's operating instructions for details. •...while printing. To print another image Repeat steps 1 to select other than your camcorder • If the printer stops working, disconnect the USB cable and restart the operation from your camcorder. 112 Dubbing/Editing Removing the "Memory Stick Duo" from the beginning. •...
...USB cable from your Handycam Station and printer. Disconnecting the USB cable from your Handycam Station or printer - b Notes • Do not attempt the following operations when is on the screen. Sliding the POWER switch to 6. Refer to your printer's operating instructions for details. •...while printing. To print another image Repeat steps 1 to select other than your camcorder • If the printer stops working, disconnect the USB cable and restart the operation from your camcorder. 112 Dubbing/Editing Removing the "Memory Stick Duo" from the beginning. •...

Camera Operations Guide
Page 132
... and as time passes. This section describes the i.LINK standard and its life. When two or more DV Interfaces, refer to the operating instructions of the device to but also with other devices via the directly connected device. b Note • Normally, only one device can be ... About i.LINK Baud rate i.LINK's maximum baud rate varies according to other device using an i.LINK cable. What is a digital serial interface for the IEEE 1394 data transport bus proposed by Sony, and is a trademark approved by many corporations. • IEEE 1394 is limited. z Tips • i.LINK is ...
... and as time passes. This section describes the i.LINK standard and its life. When two or more DV Interfaces, refer to the operating instructions of the device to but also with other devices via the directly connected device. b Note • Normally, only one device can be ... About i.LINK Baud rate i.LINK's maximum baud rate varies according to other device using an i.LINK cable. What is a digital serial interface for the IEEE 1394 data transport bus proposed by Sony, and is a trademark approved by many corporations. • IEEE 1394 is limited. z Tips • i.LINK is ...
Camera Operations Guide
Page 133
...). • For DC or AC operation, use or store the camcorder and accessories in these operating instructions. • Do not let your camcorder gets wet, it may differ from rain or sea water. Maintenance ...176;F), such as Digital Televisions, DVD recorders/players, and MICROMV recorders/players are not compatible with DV device or not. i.LINK and are not using your camcorder, it may ...- Sometimes this unit is "S100." For example, a baud rate of Sony Corporation. About the required i.LINK cable Use the Sony i.LINK 4-pin-to record properly. - It is connected to other i....
...). • For DC or AC operation, use or store the camcorder and accessories in these operating instructions. • Do not let your camcorder gets wet, it may differ from rain or sea water. Maintenance ...176;F), such as Digital Televisions, DVD recorders/players, and MICROMV recorders/players are not compatible with DV device or not. i.LINK and are not using your camcorder, it may ...- Sometimes this unit is "S100." For example, a baud rate of Sony Corporation. About the required i.LINK cable Use the Sony i.LINK 4-pin-to record properly. - It is connected to other i....
Camera Operations Guide
Page 140
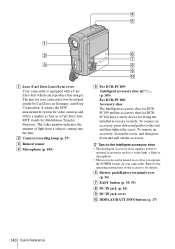
...video cameras and offers a quality as fine as you operate the POWER switch on your camcorder was developed jointly by Carl Zeiss, in Germany, and Sony Corporation. B Camera recording lamp (p. 27) C Remote sensor D Microphone (p. 105)...accessory shoe • The Intelligent accessory shoe supplies power to the operating instructions of light from a subject coming into the lens. To connect an accessory... camcorder is equipped with a Carl Zeiss lens which can be turned on or off as a Carl Zeiss lens. The lens for details. E For DCR-PC109: Intelligent accessory shoe (p. 105) For DCR-PC108...
...video cameras and offers a quality as fine as you operate the POWER switch on your camcorder was developed jointly by Carl Zeiss, in Germany, and Sony Corporation. B Camera recording lamp (p. 27) C Remote sensor D Microphone (p. 105)...accessory shoe • The Intelligent accessory shoe supplies power to the operating instructions of light from a subject coming into the lens. To connect an accessory... camcorder is equipped with a Carl Zeiss lens which can be turned on or off as a Carl Zeiss lens. The lens for details. E For DCR-PC109: Intelligent accessory shoe (p. 105) For DCR-PC108...

Camera Operations Guide
Page 145
b Notes on the Remote Commander • A button-type lithium battery (CR2025) is used batteries according to the manufacturer's instructions. Replace only with your camcorder, your VCR may also operate. Do not recharge, disassemble or dispose of in the Remote Commander. WARNING Battery may not function properly when the remote ...
b Notes on the Remote Commander • A button-type lithium battery (CR2025) is used batteries according to the manufacturer's instructions. Replace only with your camcorder, your VCR may also operate. Do not recharge, disassemble or dispose of in the Remote Commander. WARNING Battery may not function properly when the remote ...


