Operating Instructions
Page 2
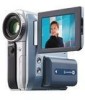
...in the U.S.A. Operation is intended to alert the user to discontinue midway (fail), restart the application or disconnect and connect the USB cable again. 2 "Memory Stick" This device complies with Canadian ICES-003. Notice If static electricity or electromagnetism causes data transfer... presence of this device must accept any interference received, including interference that may not cause harmful interference, and (2) this Sony Handycam. With your Handycam, you . and CANADA CAUTION TO PREVENT ELECTRIC SHOCK, MATCH WIDE BLADE OF PLUG TO WIDE SLOT, FULLY INSERT. ...
...in the U.S.A. Operation is intended to alert the user to discontinue midway (fail), restart the application or disconnect and connect the USB cable again. 2 "Memory Stick" This device complies with Canadian ICES-003. Notice If static electricity or electromagnetism causes data transfer... presence of this device must accept any interference received, including interference that may not cause harmful interference, and (2) this Sony Handycam. With your Handycam, you . and CANADA CAUTION TO PREVENT ELECTRIC SHOCK, MATCH WIDE BLADE OF PLUG TO WIDE SLOT, FULLY INSERT. ...
Operating Instructions
Page 4
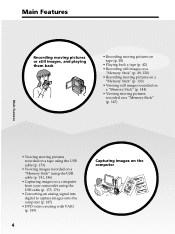
... Stick" (p. 147) Main Features • Viewing moving pictures recorded on a tape using the USB cable (p. 173) • Viewing images recorded on a "Memory Stick" using the USB cable (p. 181, 186) • Capturing images on a computer from your camcorder using the USB cable (p. 175, 176) • Converting an analog signal into digital to capture images onto...
... Stick" (p. 147) Main Features • Viewing moving pictures recorded on a tape using the USB cable (p. 173) • Viewing images recorded on a "Memory Stick" using the USB cable (p. 181, 186) • Capturing images on a computer from your camcorder using the USB cable (p. 175, 176) • Converting an analog signal into digital to capture images onto...
Operating Instructions
Page 7
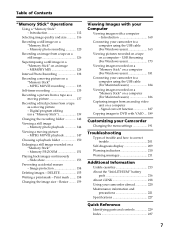
... ......... 159 Viewing Images with your Computer Viewing images with VAIO .... 189 Customizing your Camcorder Changing the menu settings 191 Troubleshooting Types of Contents "Memory Stick" Operations Using a "Memory Stick" - USB Streaming (For Windows users 173 Viewing images recorded on a "Memory Stick" on a... computer (For Windows users 181 Connecting your camcorder to a computer using the USB cable (For Windows users 163 Viewing pictures recorded on a tape on an image - Introduction 112 Selecting image quality ...
... ......... 159 Viewing Images with your Computer Viewing images with VAIO .... 189 Customizing your Camcorder Changing the menu settings 191 Troubleshooting Types of Contents "Memory Stick" Operations Using a "Memory Stick" - USB Streaming (For Windows users 173 Viewing images recorded on a "Memory Stick" on a... computer (For Windows users 181 Connecting your camcorder to a computer using the USB cable (For Windows users 163 Viewing pictures recorded on a tape on an image - Introduction 112 Selecting image quality ...
Operating Instructions
Page 12
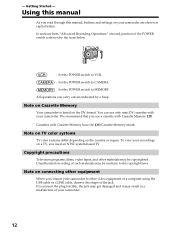
...need an NTSC system-based TV. Cassettes with your camcorder to other materials may be copyrighted. To view your recordings on your camcorder. 12 Copyright precautions Television programs, films, video tapes, and other video equipment or a computer using the USB cable or i.LINK cable, observe the shape of ... settings on a TV, you carry out are shown in a malfunction of the POWER switch is based on Cassette Memory Your camcorder is shown by a beep. You can use a cassette with Cassette Memory . In sections from "Advanced Recording Operations" onward, position of your...
...need an NTSC system-based TV. Cassettes with your camcorder to other materials may be copyrighted. To view your recordings on your camcorder. 12 Copyright precautions Television programs, films, video tapes, and other video equipment or a computer using the USB cable or i.LINK cable, observe the shape of ... settings on a TV, you carry out are shown in a malfunction of the POWER switch is based on Cassette Memory Your camcorder is shown by a beep. You can use a cassette with Cassette Memory . In sections from "Advanced Recording Operations" onward, position of your...
Operating Instructions
Page 14
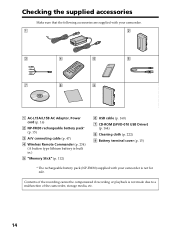
... Remote Commander (p. 234) (A button type lithium battery is built in.) 5 "Memory Stick" (p. 112) 6 USB cable (p. 160) 7 CD-ROM (SPVD-010 USB Driver) (p. 164) 8 Cleaning cloth (p. 222) 9 Battery terminal cover (p. 15) * The rechargeable battery pack (NP-FM30) supplied with your camcorder is not made due to a malfunction of the recording cannot be compensated if...
... Remote Commander (p. 234) (A button type lithium battery is built in.) 5 "Memory Stick" (p. 112) 6 USB cable (p. 160) 7 CD-ROM (SPVD-010 USB Driver) (p. 164) 8 Cleaning cloth (p. 222) 9 Battery terminal cover (p. 15) * The rechargeable battery pack (NP-FM30) supplied with your camcorder is not made due to a malfunction of the recording cannot be compensated if...
Operating Instructions
Page 23
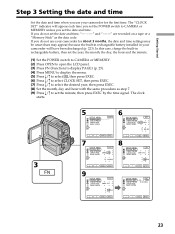
... and time. EXEC RET. 23 In this case, charge the built-in your camcorder for the first time. The clock starts. 3 FN 5 SETUP MENU EXIT CLOCK SET USB STREAM LANGUAGE DEMO MODE 6 SETUP MENU EXIT CLOCK SET USB STREAM LANGUAGE 2003 JAN 1 DEMO MODE 12 00 AM EXEC RET. 7 SETUP ...L 4 DEMO MODE 5 00 PM EXEC RET. 9 SETUP MENU EXIT CLOCK SET USB STREAM LANGUAGE 2003 JUL 4 DEMO MODE 5 30 PM EXEC RET. Getting Started Step 3 Setting the date and time Set the date and time when you use your camcorder will appear each time you set the POWER switch to CAMERA or...
... and time. EXEC RET. 23 In this case, charge the built-in your camcorder for the first time. The clock starts. 3 FN 5 SETUP MENU EXIT CLOCK SET USB STREAM LANGUAGE DEMO MODE 6 SETUP MENU EXIT CLOCK SET USB STREAM LANGUAGE 2003 JAN 1 DEMO MODE 12 00 AM EXEC RET. 7 SETUP ...L 4 DEMO MODE 5 00 PM EXEC RET. 9 SETUP MENU EXIT CLOCK SET USB STREAM LANGUAGE 2003 JUL 4 DEMO MODE 5 30 PM EXEC RET. Getting Started Step 3 Setting the date and time Set the date and time when you use your camcorder will appear each time you set the POWER switch to CAMERA or...
Operating Instructions
Page 160
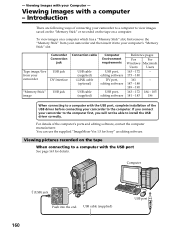
Viewing Images with the USB port See page 163 for Sony" as editing software. USB cable (supplied) 160 USB port For details of the USB driver before connecting your camcorder to a computer with your Computer - Computer (USB) jack Push into your camcorder to the computer first, you will not be able to view images saved on the "Memory Stick...
Viewing Images with the USB port See page 163 for Sony" as editing software. USB cable (supplied) 160 USB port For details of the USB driver before connecting your camcorder to a computer with your Computer - Computer (USB) jack Push into your camcorder to the computer first, you will not be able to view images saved on the "Memory Stick...

Operating Instructions
Page 161
... installed that can use the supplied "ImageMixer Ver.1.5 for both the i.LINK connection and the USB connection. Introduction When connecting to the operation manual, or the on-line help of "ImageMixer Ver.1.5 for Sony" for Sony" (1) Perform steps 8 and 9 on page 173. (2) Click in step 10 on ...-line help of the software. •"ImageMixer Ver.1.5 for Sony" operations are almost the same for Sony" as editing software. For operation details, refer to a ...
... installed that can use the supplied "ImageMixer Ver.1.5 for both the i.LINK connection and the USB connection. Introduction When connecting to the operation manual, or the on-line help of "ImageMixer Ver.1.5 for Sony" for Sony" (1) Perform steps 8 and 9 on page 173. (2) Click in step 10 on ...-line help of the software. •"ImageMixer Ver.1.5 for Sony" operations are almost the same for Sony" as editing software. For operation details, refer to a ...
Operating Instructions
Page 162
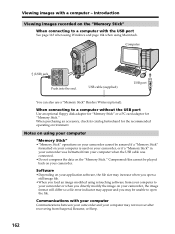
...may be assured if a "Memory Stick" formatted on your computer is used on your camcorder, or if a "Memory Stick" in your camcorder was formatted from your computer to a computer without the USB port Use an optional floppy disk adaptor for "Memory Stick" or a PC card ... use a "Memory Stick" Reader/Writer (optional). Introduction Viewing images recorded on your camcorder cannot be unable to a computer with your computer Communications between your camcorder and your camcorder. Communications with the USB port See page 163 when using Windows and page 184 when using your computer "Memory...
...may be assured if a "Memory Stick" formatted on your computer is used on your camcorder, or if a "Memory Stick" in your camcorder was formatted from your computer to a computer without the USB port Use an optional floppy disk adaptor for "Memory Stick" or a PC card ... use a "Memory Stick" Reader/Writer (optional). Introduction Viewing images recorded on your camcorder cannot be unable to a computer with your computer Communications between your camcorder and your camcorder. Communications with the USB port See page 163 when using Windows and page 184 when using your computer "Memory...
Operating Instructions
Page 163
...upgraded OS. You can process or edit them in the Macintosh environment. 163 Viewing Images with your Computer Connecting your camcorder to a computer using the USB cable, you can view pictures live from your computer is running Windows 98, but you can read still images. ...is based on a computer. Furthermore, if you connect your camcorder to a computer. If you download pictures from your camcorder and pictures recorded on the tape on the size of the USB driver before connecting your camcorder to the computer's USB port. When connecting to a computer with the application software...
...upgraded OS. You can process or edit them in the Macintosh environment. 163 Viewing Images with your Computer Connecting your camcorder to a computer using the USB cable, you can view pictures live from your computer is running Windows 98, but you can read still images. ...is based on a computer. Furthermore, if you connect your camcorder to a computer. If you download pictures from your camcorder and pictures recorded on the tape on the size of the USB driver before connecting your camcorder to the computer's USB port. When connecting to a computer with the application software...
Operating Instructions
Page 164
...active applications. (2) Insert the supplied CD-ROM in with USB cable and viewing the "Memory Stick" images on a computer and allow Windows to load. If you connect 2 or more USB equipment to "Making the computer recognize your camcorder to a computer using Windows XP, log in this ...manual. Installing the USB driver Start the following operation without connecting the USB cable to play back moving pictures). Windows Media Player ...
...active applications. (2) Insert the supplied CD-ROM in with USB cable and viewing the "Memory Stick" images on a computer and allow Windows to load. If you connect 2 or more USB equipment to "Making the computer recognize your camcorder to a computer using Windows XP, log in this ...manual. Installing the USB driver Start the following operation without connecting the USB cable to play back moving pictures). Windows Media Player ...
Operating Instructions
Page 165
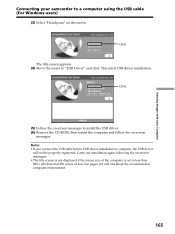
Carry out installation again following the on -screen messages to "USB Driver" and click. Viewing Images with your Computer Connecting your camcorder to less than 800 × 600 dots and 256 colors or less. Click (5) Follow the on -screen messages. •The title .... See pages 163 and 164 about the recommended computer environment. 165 Notes •If you connect the USB cable before USB driver installation is set to a computer using the USB cable (For Windows users) (3) Select "Handycam" on -screen messages. Click The title screen appears. (4) Move the cursor to install the...
Carry out installation again following the on -screen messages to "USB Driver" and click. Viewing Images with your Computer Connecting your camcorder to less than 800 × 600 dots and 256 colors or less. Click (5) Follow the on -screen messages. •The title .... See pages 163 and 164 about the recommended computer environment. 165 Notes •If you connect the USB cable before USB driver installation is set to a computer using the USB cable (For Windows users) (3) Select "Handycam" on -screen messages. Click The title screen appears. (4) Move the cursor to install the...

Operating Instructions
Page 166
... (For Windows users) Installing Image Transfer Make sure USB driver installation is complete. The title screen appears. (4) Move the cursor to a computer using Windows XP, log in the CD-ROM drive of administrators. The ... installation. (6) Follow the on your computer and allow Windows to load. Click The Install Wizard program starts up . (3) Select "Handycam" on the "Memory Stick" to be automatically transferred (copied) to your camcorder to "Image Transfer" and click. If you are using Windows 2000, log in with permission of computer administrators. (1) Turn on...
... (For Windows users) Installing Image Transfer Make sure USB driver installation is complete. The title screen appears. (4) Move the cursor to a computer using Windows XP, log in the CD-ROM drive of administrators. The ... installation. (6) Follow the on your computer and allow Windows to load. Click The Install Wizard program starts up . (3) Select "Handycam" on the "Memory Stick" to be automatically transferred (copied) to your camcorder to "Image Transfer" and click. If you are using Windows 2000, log in with permission of computer administrators. (1) Turn on...
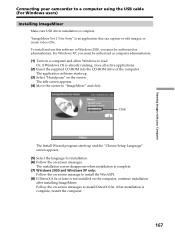
Operating Instructions
Page 167
... appears. (5) Select the language for Sony" is an application that can capture or edit images, or create video CDs. Click The Install Wizard program starts up . (3) Select "Handycam" on -screen messages. Viewing Images with your Computer Connecting your camcorder to "ImageMixer" and click. The ... complete, restart the computer. 167 The title screen appears. (4) Move the cursor to a computer using the USB cable (For Windows users) Installing ImageMixer Make sure USB driver installation is not installed on -screen messages to load. For Windows XP, you must be authorized as ...
... appears. (5) Select the language for Sony" is an application that can capture or edit images, or create video CDs. Click The Install Wizard program starts up . (3) Select "Handycam" on -screen messages. Viewing Images with your Computer Connecting your camcorder to "ImageMixer" and click. The ... complete, restart the computer. 167 The title screen appears. (4) Move the cursor to a computer using the USB cable (For Windows users) Installing ImageMixer Make sure USB driver installation is not installed on -screen messages to load. For Windows XP, you must be authorized as ...

Operating Instructions
Page 168
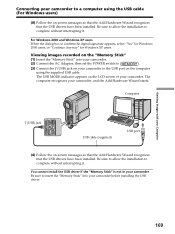
... pictures recorded on the tape (1) Connect the AC Adaptor to your camcorder. (2) Set the POWER switch to . (3) Press FN to display PAGE1. (4) Press MENU to display the menu. (5) Select USB STREAM in there. Replacing WinASPI To use the ImageMixer CD writing function..., you are using the supplied USB cable. Computer (USB) jack USB cable (supplied) USB port 168 If a different writing application was already installed, its writing function may not work correctly. Making the computer recognize your camcorder, and the Windows Add Hardware Wizard starts....
... pictures recorded on the tape (1) Connect the AC Adaptor to your camcorder. (2) Set the POWER switch to . (3) Press FN to display PAGE1. (4) Press MENU to display the menu. (5) Select USB STREAM in there. Replacing WinASPI To use the ImageMixer CD writing function..., you are using the supplied USB cable. Computer (USB) jack USB cable (supplied) USB port 168 If a different writing application was already installed, its writing function may not work correctly. Making the computer recognize your camcorder, and the Windows Add Hardware Wizard starts....
Operating Instructions
Page 169
... complete without interrupting it . Be sure to allow the installation to complete without interrupting it . The USB MODE indicator appears on the LCD screen of your camcorder, and the Add Hardware Wizard starts. Computer (USB) jack USB cable (supplied) USB port (4) Follow the on-screen messages so that the Add Hardware Wizard recognizes that the...
... complete without interrupting it . Be sure to allow the installation to complete without interrupting it . The USB MODE indicator appears on the LCD screen of your camcorder, and the Add Hardware Wizard starts. Computer (USB) jack USB cable (supplied) USB port (4) Follow the on-screen messages so that the Add Hardware Wizard recognizes that the...
Operating Instructions
Page 170
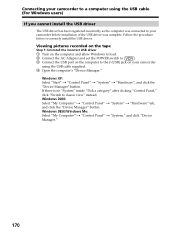
...2 Connect the AC Adaptor and set the POWER switch to . 3 Connect the USB port on the computer to the (USB) jack on your camcorder before installation of the USB driver was connected to your camcorder using the USB cable supplied. 4 Open the computer's "Device Manager." Windows 2000: Select "My..." t "Control Panel" t "System," and click "Device Manager." 170 Connecting your camcorder to a computer using the USB cable (For Windows users) If you cannot install the USB driver The USB driver has been registered incorrectly as the computer was complete. Follow the procedure below to ...
...2 Connect the AC Adaptor and set the POWER switch to . 3 Connect the USB port on the computer to the (USB) jack on your camcorder before installation of the USB driver was connected to your camcorder using the USB cable supplied. 4 Open the computer's "Device Manager." Windows 2000: Select "My..." t "Control Panel" t "System," and click "Device Manager." 170 Connecting your camcorder to a computer using the USB cable (For Windows users) If you cannot install the USB driver The USB driver has been registered incorrectly as the computer was complete. Follow the procedure below to ...
Operating Instructions
Page 171
Connecting your Computer Windows 2000 Windows XP 171 Windows 98SE Windows Me Viewing Images with your camcorder to a computer using the USB cable (For Windows users) 5 Select and delete the underlined devices below.
Connecting your Computer Windows 2000 Windows XP 171 Windows 98SE Windows Me Viewing Images with your camcorder to a computer using the USB cable (For Windows users) 5 Select and delete the underlined devices below.
Operating Instructions
Page 172
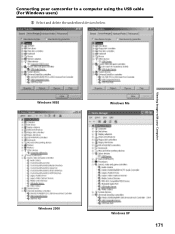
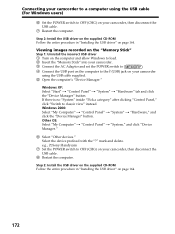
..." t "System" t "Hardware," and click the "Device Manager" button. Connecting your camcorder to a computer using the USB cable (For Windows users) 6 Set the POWER switch to OFF (CHG) on your camcorder using the USB cable supplied. 5 Open the computer's "Device Manager." mark and delete. e.g., (?)Sony Handycam 7 Set the POWER switch to classic view" instead. If there is...
..." t "System" t "Hardware," and click the "Device Manager" button. Connecting your camcorder to a computer using the USB cable (For Windows users) 6 Set the POWER switch to OFF (CHG) on your camcorder using the USB cable supplied. 5 Open the computer's "Device Manager." mark and delete. e.g., (?)Sony Handycam 7 Set the POWER switch to classic view" instead. If there is...
Operating Instructions
Page 173
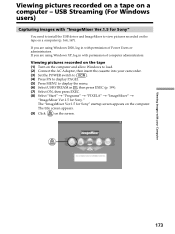
... recorded on the tape (1) Turn on the screen. Viewing Images with "ImageMixer Ver.1.5 for Sony" You need to install the USB driver and ImageMixer to display the menu. (6) Select USB STREAM in with permission of computer administrators. Viewing pictures recorded on a tape on the computer.... The "ImageMixer Ver.1.5 for Sony." If you are using Windows 2000, log in with permission of Power Users or administrators. USB Streaming (For Windows users) Capturing images with your camcorder. (3) Set the POWER switch to . (4) Press FN to display...
... recorded on the tape (1) Turn on the screen. Viewing Images with "ImageMixer Ver.1.5 for Sony" You need to install the USB driver and ImageMixer to display the menu. (6) Select USB STREAM in with permission of computer administrators. Viewing pictures recorded on a tape on the computer.... The "ImageMixer Ver.1.5 for Sony." If you are using Windows 2000, log in with permission of Power Users or administrators. USB Streaming (For Windows users) Capturing images with your camcorder. (3) Set the POWER switch to . (4) Press FN to display...


