Operating Instructions
Page 6
... by date - Insert editing 100 Audio dubbing 102 Superimposing a title on a cassette with Cassette Memory 106 Making your camcorder on a "Memory Stick 10 Getting Started Using this manual 12 Checking the supplied accessories .......... 14 Step 1 Preparing the power source ......... 15 Installing the battery pack 15 Charging the battery pack 16 Checking status...
... by date - Insert editing 100 Audio dubbing 102 Superimposing a title on a cassette with Cassette Memory 106 Making your camcorder on a "Memory Stick 10 Getting Started Using this manual 12 Checking the supplied accessories .......... 14 Step 1 Preparing the power source ......... 15 Installing the battery pack 15 Charging the battery pack 16 Checking status...
Operating Instructions
Page 14
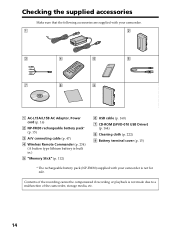
Checking the supplied accessories Make sure that the following accessories are supplied with your camcorder. 1 2 3 4 5 6 7 8 9 1 AC-L15A/L15B AC Adaptor, Power cord (p. 16) 2 NP-FM30 rechargeable battery pack* (p. 15) 3 A/V connecting cable (p. 47) 4 Wireless Remote Commander ...) (p. 164) 8 Cleaning cloth (p. 222) 9 Battery terminal cover (p. 15) * The rechargeable battery pack (NP-FM30) supplied with your camcorder is not made due to a malfunction of the camcorder, storage media, etc. 14 Contents of the recording cannot be compensated if recording or playback is not for sale.
Checking the supplied accessories Make sure that the following accessories are supplied with your camcorder. 1 2 3 4 5 6 7 8 9 1 AC-L15A/L15B AC Adaptor, Power cord (p. 16) 2 NP-FM30 rechargeable battery pack* (p. 15) 3 A/V connecting cable (p. 47) 4 Wireless Remote Commander ...) (p. 164) 8 Cleaning cloth (p. 222) 9 Battery terminal cover (p. 15) * The rechargeable battery pack (NP-FM30) supplied with your camcorder is not made due to a malfunction of the camcorder, storage media, etc. 14 Contents of the recording cannot be compensated if recording or playback is not for sale.
Operating Instructions
Page 102
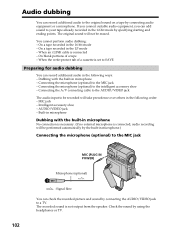
.../VIDEO jack The audio input to be erased. On a tape recorded in the 12-bit mode by connecting the AUDIO/VIDEO jack to a TV. Intelligent accessory shoe - AUDIO/VIDEO jack - Built-in microphone Dubbing with the built-in the 16-bit mode - If you connect suitable audio equipment, you can add... audio to the original sound on a tape by using the headphones or TV. You cannot perform audio dubbing: - Connecting the microphone (optional) to the intelligent accessory shoe - The recorded sound is connected - Check the sound by connecting audio equipment or a microphone.
.../VIDEO jack The audio input to be erased. On a tape recorded in the 12-bit mode by connecting the AUDIO/VIDEO jack to a TV. Intelligent accessory shoe - AUDIO/VIDEO jack - Built-in microphone Dubbing with the built-in the 16-bit mode - If you connect suitable audio equipment, you can add... audio to the original sound on a tape by using the headphones or TV. You cannot perform audio dubbing: - Connecting the microphone (optional) to the intelligent accessory shoe - The recorded sound is connected - Check the sound by connecting audio equipment or a microphone.
Operating Instructions
Page 103
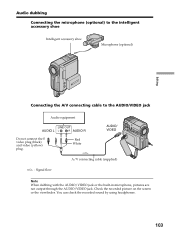
Audio dubbing Connecting the microphone (optional) to the intelligent accessory shoe Intelligent accessory shoe Microphone (optional) Editing Connecting the A/V connecting cable to the AUDIO/VIDEO jack Audio equipment LINE OUT AUDIO L L R AUDIO R Do not connect the S video plug (...
Audio dubbing Connecting the microphone (optional) to the intelligent accessory shoe Intelligent accessory shoe Microphone (optional) Editing Connecting the A/V connecting cable to the AUDIO/VIDEO jack Audio equipment LINE OUT AUDIO L L R AUDIO R Do not connect the S video plug (...
Operating Instructions
Page 162
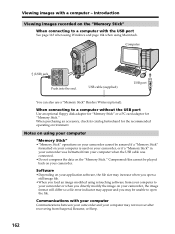
...back on your camcorder, or if a "Memory Stick" in your camcorder was connected. •Do not compress the data on your camcorder. Communications with the USB port See page 163 when using Windows and page 184 when using Macintosh. When purchasing an accessory, check its catalog... beforehand for "Memory Stick." Software •Depending on the "Memory Stick." Computer (USB) jack Push into the end. When connecting to your camcorder or when you directly modify the image on your camcorder, the image format will...
...back on your camcorder, or if a "Memory Stick" in your camcorder was connected. •Do not compress the data on your camcorder. Communications with the USB port See page 163 when using Windows and page 184 when using Macintosh. When purchasing an accessory, check its catalog... beforehand for "Memory Stick." Software •Depending on the "Memory Stick." Computer (USB) jack Push into the end. When connecting to your camcorder or when you directly modify the image on your camcorder, the image format will...
Operating Instructions
Page 179
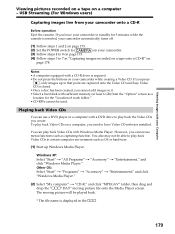
...;Once a disc has been created, you press , only images up Windows Media Player. Windows XP: Select "Start" t "All Programs" t "Accessory" t "Entertainment," and click "Windows Media Player." Playing back Video CDs You can play back Video CDs with Windows Media Player. If you cannot ... player or a computer with a DVD drive to it. •Select a hard disk with sufficient memory (at least 6 GB) from your camcorder onto a CD-R Before operation Eject the cassette. However, you need to have Video CD software installed. Viewing Images with your Computer Viewing pictures ...
...;Once a disc has been created, you press , only images up Windows Media Player. Windows XP: Select "Start" t "All Programs" t "Accessory" t "Entertainment," and click "Windows Media Player." Playing back Video CDs You can play back Video CDs with Windows Media Player. If you cannot ... player or a computer with a DVD drive to it. •Select a hard disk with sufficient memory (at least 6 GB) from your camcorder onto a CD-R Before operation Eject the cassette. However, you need to have Video CD software installed. Viewing Images with your Computer Viewing pictures ...
Operating Instructions
Page 224
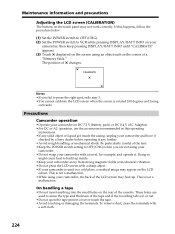
...screen (CALIBRATION) The buttons on the touch panel may heat up inside the casing, unplug your camcorder and have it checked by a Sony dealer before operating it . Precautions Camcorder operation •Operate your camcorder on the rear of the tape and if the recording tab is used to VCR while pressing ...;Do not wrap your camcorder, the back of the LCD screen may not work correctly. On handling a tape •Do not insert anything into the small holes on DC 7.2 V (battery pack) or DC 8.4 V (AC Adaptor). •For DC or AC operation, use the accessories recommended in or out. •...
...screen (CALIBRATION) The buttons on the touch panel may heat up inside the casing, unplug your camcorder and have it checked by a Sony dealer before operating it . Precautions Camcorder operation •Operate your camcorder on the rear of the tape and if the recording tab is used to VCR while pressing ...;Do not wrap your camcorder, the back of the LCD screen may not work correctly. On handling a tape •Do not insert anything into the small holes on DC 7.2 V (battery pack) or DC 8.4 V (AC Adaptor). •For DC or AC operation, use the accessories recommended in or out. •...
Operating Instructions
Page 227
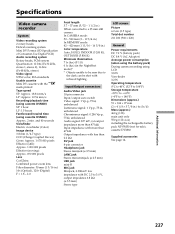
... (lux) (in .) (w/h/d) Mass (approx.) 460 g (1 lb) main unit only 550 g (1 lb 4 oz) including the rechargeable battery pack NP-FM30 (not for sale), cassette DVM60 Supplied accessories See page 14.
... (lux) (in .) (w/h/d) Mass (approx.) 460 g (1 lb) main unit only 550 g (1 lb 4 oz) including the rechargeable battery pack NP-FM30 (not for sale), cassette DVM60 Supplied accessories See page 14.
Operating Instructions
Page 232
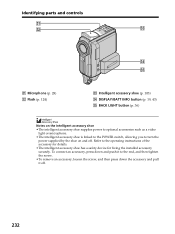
... pull it to the operating instructions of the accessory for details. •The intelligent accessory shoe has a safety device for fixing the installed accessory securely. Refer to the end, and then tighten the screw. •To remove an accessory, loosen the screw, and then press down and ...(p. 19, 43) eg BACK LIGHT button (p. 36) Notes on the intelligent accessory shoe •The intelligent accessory shoe supplies power to optional accessories such as a video light or microphone. •The intelligent accessory shoe is linked to the POWER switch, allowing you to turn the power supplied ...
... pull it to the operating instructions of the accessory for details. •The intelligent accessory shoe has a safety device for fixing the installed accessory securely. Refer to the end, and then tighten the screw. •To remove an accessory, loosen the screw, and then press down and ...(p. 19, 43) eg BACK LIGHT button (p. 36) Notes on the intelligent accessory shoe •The intelligent accessory shoe supplies power to optional accessories such as a video light or microphone. •The intelligent accessory shoe is linked to the POWER switch, allowing you to turn the power supplied ...

Operating Instructions
Page 237
... protection 154 Image quality 116 Image size 117 Index screen 146 "InfoLITHIUM" battery pack 16, 216 Infrared rays emitter ......... 37, 89 Insert editing 100 Intelligent accessory shoe 103, 232 Interval Recording 71 Interval Photo Recording ..... 132 JPEG 112 Labeling a cassette 110 LANC jack 233 Luminance key 61 M, N M. CHROM 128 CALIBRATION 224...
... protection 154 Image quality 116 Image size 117 Index screen 146 "InfoLITHIUM" battery pack 16, 216 Infrared rays emitter ......... 37, 89 Insert editing 100 Intelligent accessory shoe 103, 232 Interval Recording 71 Interval Photo Recording ..... 132 JPEG 112 Labeling a cassette 110 LANC jack 233 Luminance key 61 M, N M. CHROM 128 CALIBRATION 224...

