Operating Instructions
Page 2
... the following two conditions: (1) This device may not cause harmful interference, and (2) this Sony Handycam. "Memory Stick" This device complies with superior picture and sound quality. For customers in... unit to discontinue midway (fail), restart the application or disconnect and connect the USB cable again. 2 Operation is intended to alert the user to use. and CANADA CAUTION ...may be producing home video that may cause undesired operation. Notice If static electricity or electromagnetism causes data transfer to rain or moisture. Your Handycam is loaded with Canadian ...
... the following two conditions: (1) This device may not cause harmful interference, and (2) this Sony Handycam. "Memory Stick" This device complies with superior picture and sound quality. For customers in... unit to discontinue midway (fail), restart the application or disconnect and connect the USB cable again. 2 Operation is intended to alert the user to use. and CANADA CAUTION ...may be producing home video that may cause undesired operation. Notice If static electricity or electromagnetism causes data transfer to rain or moisture. Your Handycam is loaded with Canadian ...
Operating Instructions
Page 4
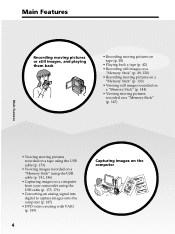
..." (p. 147) Main Features • Viewing moving pictures recorded on a tape using the USB cable (p. 173) • Viewing images recorded on a "Memory Stick" using the USB cable (p. 181, 186) • Capturing images on a computer from your camcorder using the USB cable (p. 175, 176) • Converting an analog signal into digital to capture images onto the...
..." (p. 147) Main Features • Viewing moving pictures recorded on a tape using the USB cable (p. 173) • Viewing images recorded on a "Memory Stick" using the USB cable (p. 181, 186) • Capturing images on a computer from your camcorder using the USB cable (p. 175, 176) • Converting an analog signal into digital to capture images onto the...
Operating Instructions
Page 7
... 211 Additional Information Usable cassettes 213 About the "InfoLITHIUM" battery pack 216 About i.LINK 218 Using your camcorder to a computer using the USB cable (For Macintosh users 184 Viewing images recorded on a "Memory Stick" on a computer (For Macintosh users...picture - Memory photo playback 144 Viewing a moving picture 137 Recording edited pictures from an analog video unit on a "Memory Stick" - Introduction 160 Connecting your camcorder abroad 220 Maintenance information and precautions 221 Specifications 227 Quick Reference Identifying parts and controls 229 Index...
... 211 Additional Information Usable cassettes 213 About the "InfoLITHIUM" battery pack 216 About i.LINK 218 Using your camcorder to a computer using the USB cable (For Macintosh users 184 Viewing images recorded on a "Memory Stick" on a computer (For Macintosh users...picture - Memory photo playback 144 Viewing a moving picture 137 Recording edited pictures from an analog video unit on a "Memory Stick" - Introduction 160 Connecting your camcorder abroad 220 Maintenance information and precautions 221 Specifications 227 Quick Reference Identifying parts and controls 229 Index...
Operating Instructions
Page 12
... switch to VCR. : Set the POWER switch to CAMERA. : Set the POWER switch to other video equipment or a computer using the USB cable or i.LINK cable, observe the shape of the POWER switch is based on Cassette Memory Your camcorder is shown by a beep. Cassettes with Cassette Memory . In sections from "Advanced Recording Operations...
... switch to VCR. : Set the POWER switch to CAMERA. : Set the POWER switch to other video equipment or a computer using the USB cable or i.LINK cable, observe the shape of the POWER switch is based on Cassette Memory Your camcorder is shown by a beep. Cassettes with Cassette Memory . In sections from "Advanced Recording Operations...

Operating Instructions
Page 47
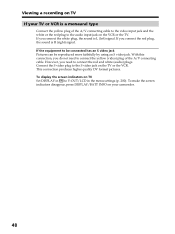
... camcorder from your camcorder to a TV with the A/V connecting cable supplied with the A/V connecting cable. Then, set the TV/VCR selector on the VCR with the A/V connecting cable supplied with an S video plug and a video plug. Use either the S video plug or the video plug depending on the LCD screen. AUDIO/ VIDEO Black Yellow A/V connecting cable (supplied) : Signal flow IN S VIDEO TV VIDEO...
... camcorder from your camcorder to a TV with the A/V connecting cable supplied with the A/V connecting cable. Then, set the TV/VCR selector on the VCR with the A/V connecting cable supplied with an S video plug and a video plug. Use either the S video plug or the video plug depending on the LCD screen. AUDIO/ VIDEO Black Yellow A/V connecting cable (supplied) : Signal flow IN S VIDEO TV VIDEO...
Operating Instructions
Page 48
...200). If you do not need to the S video jack on your TV or VCR is a monaural type Connect the yellow plug of the A/V connecting cable. This connection produces higher quality DV format pictures. Viewing a recording on TV If your camcorder. 48 With this connection, you connect the red plug..., the sound is L (left) signal. If the equipment to V-OUT/LCD in to be connected has an S video jack Pictures can...
...200). If you do not need to the S video jack on your TV or VCR is a monaural type Connect the yellow plug of the A/V connecting cable. This connection produces higher quality DV format pictures. Viewing a recording on TV If your camcorder. 48 With this connection, you connect the red plug..., the sound is L (left) signal. If the equipment to V-OUT/LCD in to be connected has an S video jack Pictures can...
Operating Instructions
Page 56
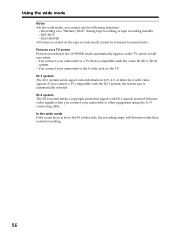
... the wide mode If the zoom lever is compatible with ID-1 signals inserted between video signals when you cannot use the following functions: - Recording on the TV screen at full size when: - You connect your camcorder to a TV that is set to the W (wide) side, the recording ...angle will become wider than normal recording. 56 Using the wide mode Notes •In the wide mode, you connect your camcorder to other equipment using the A/V connecting cable. If you connect a TV compatible with video signals.
... the wide mode If the zoom lever is compatible with ID-1 signals inserted between video signals when you cannot use the following functions: - Recording on the TV screen at full size when: - You connect your camcorder to a TV that is set to the W (wide) side, the recording ...angle will become wider than normal recording. 56 Using the wide mode Notes •In the wide mode, you connect your camcorder to other equipment using the A/V connecting cable. If you connect a TV compatible with video signals.
Operating Instructions
Page 84
... your VCR is a monaural type Connect the yellow plug of the S video jack. Use either the A/V connecting cable (supplied) or i.LINK cable (optional). See page 48 for high-quality editing. If your camcorder as a player. When the white plug is connected, the left channel audio... you connect with the i.LINK cable (optional), video and audio signals are transmitted in digital form for details of the A/V connecting cable to the video input jack and the white or the red plug to your camcorder using the A/V connecting cable The supplied A/V connecting cable is output. 84 - Editing...
... your VCR is a monaural type Connect the yellow plug of the S video jack. Use either the A/V connecting cable (supplied) or i.LINK cable (optional). See page 48 for high-quality editing. If your camcorder as a player. When the white plug is connected, the left channel audio... you connect with the i.LINK cable (optional), video and audio signals are transmitted in digital form for details of the A/V connecting cable to the video input jack and the white or the red plug to your camcorder using the A/V connecting cable The supplied A/V connecting cable is output. 84 - Editing...
Operating Instructions
Page 86
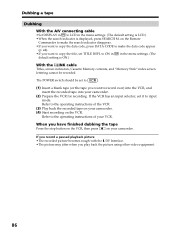
... connecting cable •Set DISPLAY in to LCD in the menu settings. (The default setting is displayed, press SEARCH M. When you play back the picture using other video equipment. 86 Refer to record over) into the VCR, and insert the recorded tape into your camcorder. (4) Start recording on your camcorder. (2) ...the VCR has an input selector, set to . (1) Insert a blank tape (or the tape you want to the operating instructions of your camcorder. on the Remote Commander to make the search indicator disappear. •If you want to copy the data code, press DATA CODE to make ...
... connecting cable •Set DISPLAY in to LCD in the menu settings. (The default setting is displayed, press SEARCH M. When you play back the picture using other video equipment. 86 Refer to record over) into the VCR, and insert the recorded tape into your camcorder. (4) Start recording on your camcorder. (2) ...the VCR has an input selector, set to . (1) Insert a blank tape (or the tape you want to the operating instructions of your camcorder. on the Remote Commander to make the search indicator disappear. •If you want to copy the data code, press DATA CODE to make ...
Operating Instructions
Page 87
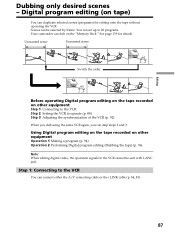
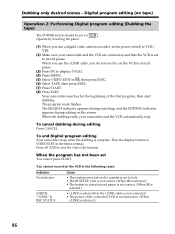
When you dub using the same VCR again, you can connect either the A/V connecting cable or the i.LINK cable (p. 84, 85). 87 Note When editing digital video, the operation signals to the VCR cannot be selected by frame. Scenes can be sent with LANC jack. See...Unwanted scene Switch the order Before operating Digital program editing on the tape recorded on the "Memory Stick." Step 1: Connecting to 20 programs. Your camcorder can duplicate selected scenes (programs) for details. Step 2 Setting the VCR to the VCR. Operation 2 Performing Digital program editing (Dubbing the ...
When you dub using the same VCR again, you can connect either the A/V connecting cable or the i.LINK cable (p. 84, 85). 87 Note When editing digital video, the operation signals to the VCR cannot be selected by frame. Scenes can be sent with LANC jack. See...Unwanted scene Switch the order Before operating Digital program editing on the tape recorded on the "Memory Stick." Step 1: Connecting to 20 programs. Your camcorder can duplicate selected scenes (programs) for details. Step 2 Setting the VCR to the VCR. Operation 2 Performing Digital program editing (Dubbing the ...
Operating Instructions
Page 88
...) Step 2: Setting the VCR to operate When you are connecting the camcorder and VCR using the A/V connecting cable, the signal is emitted from the infrared rays emitter of your camcorder to the remote sensor on the VCR to display PAGE1. (3) Press MENU. (4) Select VIDEO EDIT in "About the IR SETUP code" (p. 91). (11)... the code in , then press EXEC. (5) Select TAPE, then press EXEC. (6) Press EDIT SET. (7) Select CONTROL, then press EXEC. (8) When connecting with the i.LINK cable, select i.LINK, press EXEC, then go to cancel record pause on . When connecting with the A/V connecting...
...) Step 2: Setting the VCR to operate When you are connecting the camcorder and VCR using the A/V connecting cable, the signal is emitted from the infrared rays emitter of your camcorder to the remote sensor on the VCR to display PAGE1. (3) Press MENU. (4) Select VIDEO EDIT in "About the IR SETUP code" (p. 91). (11)... the code in , then press EXEC. (5) Select TAPE, then press EXEC. (6) Press EDIT SET. (7) Select CONTROL, then press EXEC. (8) When connecting with the i.LINK cable, select i.LINK, press EXEC, then go to cancel record pause on . When connecting with the A/V connecting...
Operating Instructions
Page 93
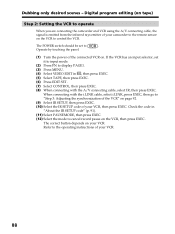
... ED I T ED I T SET CONTROL ADJ TEST "CUT - To return to FN Press END to return to adjust the synchronization is , and make the A/V connecting cable settings (p. 88). Be sure to execute. 2 V I DEO ED I T ED I T SET CONTROL ADJ TEST "CUT - to allow about 50 seconds. •If...SETUP PAUSEMODE I R TEST END RETURN EXECUTE ENGAGE REC PAUSE EXEC RET. 6 V I DEO ED I T ED I T SET CONTROL ADJ TEST "CUT - Video and audio are sent by the i.LINK cable, leave the connection as it is recorded for about 10 seconds' lead before starting the recording. •When the recording unit cannot...
... ED I T ED I T SET CONTROL ADJ TEST "CUT - To return to FN Press END to return to adjust the synchronization is , and make the A/V connecting cable settings (p. 88). Be sure to execute. 2 V I DEO ED I T ED I T SET CONTROL ADJ TEST "CUT - to allow about 50 seconds. •If...SETUP PAUSEMODE I R TEST END RETURN EXECUTE ENGAGE REC PAUSE EXEC RET. 6 V I DEO ED I T ED I T SET CONTROL ADJ TEST "CUT - Video and audio are sent by the i.LINK cable, leave the connection as it is recorded for about 10 seconds' lead before starting the recording. •When the recording unit cannot...
Operating Instructions
Page 96
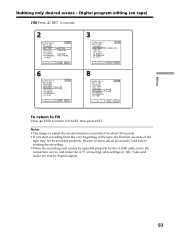
...To end Digital program editing Your camcorder stops when the dubbing is not turned on the screen. When you use the i.LINK cable, you use a digital video camera recorder, set the VCR to record pause. (3) Press FN to VCR/ VTR. (2) Make sure your camcorder and the VCR automatically stop. Then... the display returns to VIDEO EDIT in the following cases: Indicator No indicator CHECK...
...To end Digital program editing Your camcorder stops when the dubbing is not turned on the screen. When you use the i.LINK cable, you use a digital video camera recorder, set the VCR to record pause. (3) Press FN to VCR/ VTR. (2) Make sure your camcorder and the VCR automatically stop. Then... the display returns to VIDEO EDIT in the following cases: Indicator No indicator CHECK...
Operating Instructions
Page 97
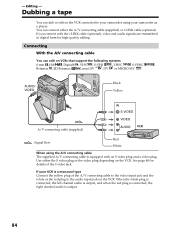
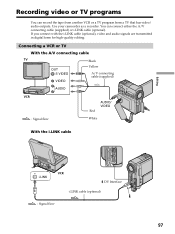
... tape from another VCR or a TV program from a TV that has video/ audio outputs. Connecting a VCR or TV With the A/V connecting cable TV Black OUT S VIDEO VIDEO Yellow A/V connecting cable (supplied) AUDIO VCR : Signal flow AUDIO/ VIDEO Red White With the i.LINK cable Editing i.LINK VCR DV Interface i.LINK cable (optional) : Signal flow 97 Use your camcorder as a recorder.
... tape from another VCR or a TV program from a TV that has video/ audio outputs. Connecting a VCR or TV With the A/V connecting cable TV Black OUT S VIDEO VIDEO Yellow A/V connecting cable (supplied) AUDIO VCR : Signal flow AUDIO/ VIDEO Red White With the i.LINK cable Editing i.LINK VCR DV Interface i.LINK cable (optional) : Signal flow 97 Use your camcorder as a recorder.

Operating Instructions
Page 98
...the VCR or the TV. To return to use the S video jack, select S VIDEO, then press EXEC. Recording video or TV programs If your TV or VCR is a monaural type Connect the yellow plug of the A/V connecting cable to the video output jack and the white or red plug to the audio ...output jack on the VCR or the TV. Selecting a video jack The supplied A/V connecting cable is VIDEO. The POWER switch should be done. The default setting is equipped with an S video plug and a video plug. When the white plug is connected, the left channel audio is output, and...
...the VCR or the TV. To return to use the S video jack, select S VIDEO, then press EXEC. Recording video or TV programs If your TV or VCR is a monaural type Connect the yellow plug of the A/V connecting cable to the video output jack and the white or red plug to the audio ...output jack on the VCR or the TV. Selecting a video jack The supplied A/V connecting cable is VIDEO. The POWER switch should be done. The default setting is equipped with an S video plug and a video plug. When the white plug is connected, the left channel audio is output, and...
Operating Instructions
Page 99
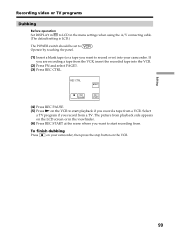
... Press REC PAUSE. (5) Press N on the VCR to start recording from the VCR, insert the recorded tape into your camcorder, then press the stop button on the VCR. Recording video or TV programs Dubbing Before operation Set DISPLAY in to LCD in the viewfinder. (6) Press REC START at the scene where...RET. If you record from a VCR. Editing 99 The picture from playback side appears on your camcorder. To finish dubbing Press on the LCD screen or in the menu settings when using the A/V connecting cable. (The default setting is LCD.) The POWER switch should be set to record over) into ...
... Press REC PAUSE. (5) Press N on the VCR to start recording from the VCR, insert the recorded tape into your camcorder, then press the stop button on the VCR. Recording video or TV programs Dubbing Before operation Set DISPLAY in to LCD in the viewfinder. (6) Press REC START at the scene where...RET. If you record from a VCR. Editing 99 The picture from playback side appears on your camcorder. To finish dubbing Press on the LCD screen or in the menu settings when using the A/V connecting cable. (The default setting is LCD.) The POWER switch should be set to record over) into ...
Operating Instructions
Page 102
...: - MIC jack - When the write-protect tab of a tape - AUDIO/VIDEO jack - On a tape recorded in the LP mode - Connecting the A/V connecting cable to the AUDIO/VIDEO jack The audio input to the MIC jack - When an i.LINK cable is set to SAVE Preparing for audio dubbing You can record additional audio... accessory shoe - On a tape recorded in the 16-bit mode - Dubbing with the built-in the 12-bit mode by connecting the AUDIO/VIDEO jack to the intelligent accessory shoe - Audio dubbing You can record additional audio to the original sound on a tape by using the headphones or TV...
...: - MIC jack - When the write-protect tab of a tape - AUDIO/VIDEO jack - On a tape recorded in the LP mode - Connecting the A/V connecting cable to the AUDIO/VIDEO jack The audio input to the MIC jack - When an i.LINK cable is set to SAVE Preparing for audio dubbing You can record additional audio... accessory shoe - On a tape recorded in the 16-bit mode - Dubbing with the built-in the 12-bit mode by connecting the AUDIO/VIDEO jack to the intelligent accessory shoe - Audio dubbing You can record additional audio to the original sound on a tape by using the headphones or TV...
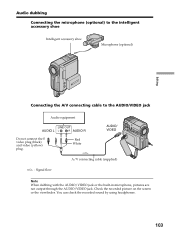
Operating Instructions
Page 103
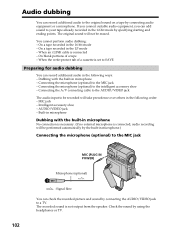
... Intelligent accessory shoe Microphone (optional) Editing Connecting the A/V connecting cable to the AUDIO/VIDEO jack Audio equipment LINE OUT AUDIO L L R AUDIO R Do not connect the S video plug (black) and video (yellow) plug. Red White AUDIO/ VIDEO A/V connecting cable (supplied) : Signal flow Note When dubbing with the AUDIO/VIDEO jack or the built-in microphone, pictures are not...
... Intelligent accessory shoe Microphone (optional) Editing Connecting the A/V connecting cable to the AUDIO/VIDEO jack Audio equipment LINE OUT AUDIO L L R AUDIO R Do not connect the S video plug (black) and video (yellow) plug. Red White AUDIO/ VIDEO A/V connecting cable (supplied) : Signal flow Note When dubbing with the AUDIO/VIDEO jack or the built-in microphone, pictures are not...
Operating Instructions
Page 127
Recording an image from a tape as a still image Recording a still image from other equipment is LCD.) Also, select the video jack for the connection. When connecting with the A/V connecting cable, set to . (1) Play back the recorded tape on the VCR, or turn the TV on page 126. The image of the ...settings. (The default setting is displayed on the LCD screen or in poor condition due to being used repeatedly for dubbing and so on, your camcorder may not be set DISPLAY in to record the image, or the recorded image may appear jagged. See page 97 for connection (p. 98). "Memory...
Recording an image from a tape as a still image Recording a still image from other equipment is LCD.) Also, select the video jack for the connection. When connecting with the A/V connecting cable, set to . (1) Play back the recorded tape on the VCR, or turn the TV on page 126. The image of the ...settings. (The default setting is displayed on the LCD screen or in poor condition due to being used repeatedly for dubbing and so on, your camcorder may not be set DISPLAY in to record the image, or the recorded image may appear jagged. See page 97 for connection (p. 98). "Memory...
Operating Instructions
Page 138
...you want to record, press START/STOP. The POWER switch should be recorded by your camcorder has been recorded. The image of the other equipment You can use either A/V connecting cable or i.LINK cable. Note Your camcorder may stop recording the image, or the recorded image may be saved on the tape... are not recorded. If the tape is in poor condition due to being used repeatedly for the connection. If the input signal is LCD.) Also, select the video jack ...
...you want to record, press START/STOP. The POWER switch should be recorded by your camcorder has been recorded. The image of the other equipment You can use either A/V connecting cable or i.LINK cable. Note Your camcorder may stop recording the image, or the recorded image may be saved on the tape... are not recorded. If the tape is in poor condition due to being used repeatedly for the connection. If the input signal is LCD.) Also, select the video jack ...

