Operating Instructions
Page 2
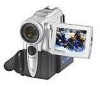
Trade Name: SONY Model No.: DCR-PC101 Responsible Party: Sony Electronics Inc. Operation is subject to the following measures: - CAUTION This symbol is no guarantee that you . You can enjoy for a Class B digital ... life's precious moments with Part 15 of this Sony Handycam. If this device must accept any interference received, including interference that to use. Caution: Do not handle damaged or leaking Lithium-Ion batteries. For more of rechargeable batteries, call : Sony Customer Information Center 1-800-222-SONY (7669) The number below is encouraged to try...
Trade Name: SONY Model No.: DCR-PC101 Responsible Party: Sony Electronics Inc. Operation is subject to the following measures: - CAUTION This symbol is no guarantee that you . You can enjoy for a Class B digital ... life's precious moments with Part 15 of this Sony Handycam. If this device must accept any interference received, including interference that to use. Caution: Do not handle damaged or leaking Lithium-Ion batteries. For more of rechargeable batteries, call : Sony Customer Information Center 1-800-222-SONY (7669) The number below is encouraged to try...
Operating Instructions
Page 3
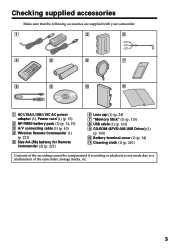
... supplied accessories Make sure that the following accessories are supplied with your camcorder. 1 2 3 4 5 6 7 8 9 q; qa 1 AC-L10A/L10B/L10C AC power adaptor (1), Power cord (1) (p. 15) 2 NP-FM50 battery pack (1) (p. 14, 15) 3 A/V connecting cable (1) (p. 43) 4 Wireless Remote Commander (1) (p. 221) 5 Size AA (R6) battery for Remote Commander (2) (p. 221) 6 Lens cap (1) (p. 24) 7 "Memory Stick" (1) (p. 113) 8 USB cable...
... supplied accessories Make sure that the following accessories are supplied with your camcorder. 1 2 3 4 5 6 7 8 9 q; qa 1 AC-L10A/L10B/L10C AC power adaptor (1), Power cord (1) (p. 15) 2 NP-FM50 battery pack (1) (p. 14, 15) 3 A/V connecting cable (1) (p. 43) 4 Wireless Remote Commander (1) (p. 221) 5 Size AA (R6) battery for Remote Commander (2) (p. 221) 6 Lens cap (1) (p. 24) 7 "Memory Stick" (1) (p. 113) 8 USB cable...
Operating Instructions
Page 6
... by date - Basics - Frame recording 69 Using the viewfinder 70 Using this manual 12 Step 1 Preparing the power supply .... 14 Installing the battery pack 14 Advanced Playback Operations Charging the battery pack 15 Playing back a tape with picture effect ..... 72 Connecting to a wall outlet 18 Playing back a tape with digital effect .... 73...
... by date - Basics - Frame recording 69 Using the viewfinder 70 Using this manual 12 Step 1 Preparing the power supply .... 14 Installing the battery pack 14 Advanced Playback Operations Charging the battery pack 15 Playing back a tape with picture effect ..... 72 Connecting to a wall outlet 18 Playing back a tape with digital effect .... 73...
Operating Instructions
Page 7
...display 200 Warning indicators and messages .... 201 Additional Information Usable cassettes 203 About the "InfoLITHIUM" battery pack 205 About i.LINK 206 Using your camcorder abroad .......... 208 Maintenance information and precautions 209 Specifications 214 Quick Reference Identifying the parts and ... the optional printer 161 Viewing images with your computer Viewing images with your computer - Signal convert function 183 Customizing Your Camcorder Changing the menu settings 184 Troubleshooting Types of contents Recording a picture from a tape as a moving picture 139 Recording...
...display 200 Warning indicators and messages .... 201 Additional Information Usable cassettes 203 About the "InfoLITHIUM" battery pack 205 About i.LINK 206 Using your camcorder abroad .......... 208 Maintenance information and precautions 209 Specifications 214 Quick Reference Identifying the parts and ... the optional printer 161 Viewing images with your computer Viewing images with your computer - Signal convert function 183 Customizing Your Camcorder Changing the menu settings 184 Troubleshooting Types of contents Recording a picture from a tape as a moving picture 139 Recording...
Operating Instructions
Page 8
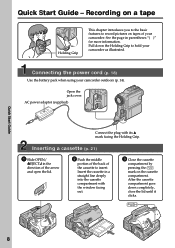
... After the cassette compartment goes down the Holding Grip to record pictures on the cassette compartment. Connecting the power cord (p. 18) Use the battery pack when using your camcorder. Open the jack cover. Inserting a cassette (p. 21) 1 Slide OPEN/ ZEJECT in parentheses "( )" for more information. Pull down completely...it clicks. Quick Start Guide 8 Recording on a tape Holding Grip This chapter introduces you to the basic features to hold your camcorder as illustrated. See the page in the direction of the arrow and open the lid. 2 Push the middle portion of the back ...
... After the cassette compartment goes down the Holding Grip to record pictures on the cassette compartment. Connecting the power cord (p. 18) Use the battery pack when using your camcorder. Open the jack cover. Inserting a cassette (p. 21) 1 Slide OPEN/ ZEJECT in parentheses "( )" for more information. Pull down completely...it clicks. Quick Start Guide 8 Recording on a tape Holding Grip This chapter introduces you to the basic features to hold your camcorder as illustrated. See the page in the direction of the arrow and open the lid. 2 Push the middle portion of the back ...
Operating Instructions
Page 9
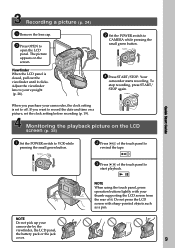
..., set to off. Do not press the LCD screen with your camcorder by the viewfinder, the LCD panel, the battery pack or the jack cover. Adjust the viewfinder lens to rewind the tape. 3 Press of it clicks. Your camcorder starts recording. POWER LOCK 2 Press of the touch panel to your... camcorder, the clock setting is closed, pull out the viewfinder until it ....
..., set to off. Do not press the LCD screen with your camcorder by the viewfinder, the LCD panel, the battery pack or the jack cover. Adjust the viewfinder lens to rewind the tape. 3 Press of it clicks. Your camcorder starts recording. POWER LOCK 2 Press of the touch panel to your... camcorder, the clock setting is closed, pull out the viewfinder until it ....
Operating Instructions
Page 10
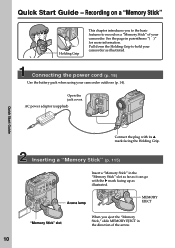
... Guide - Access lamp MEMORY EJECT "Memory Stick" slot When you to the basic features to hold your camcorder as illustrated. Open the jack cover. Connecting the power cord (p. 18) Use the battery pack when using your camcorder. Inserting a "Memory Stick" (p. 115) Insert a "Memory Stick" in the "Memory Stick" slot as far as it.... AC power adaptor (supplied) Quick Start Guide Connect the plug with the B mark facing up as illustrated. See the page in the direction of your camcorder outdoors (p. 14).
... Guide - Access lamp MEMORY EJECT "Memory Stick" slot When you to the basic features to hold your camcorder as illustrated. Open the jack cover. Connecting the power cord (p. 18) Use the battery pack when using your camcorder. Inserting a "Memory Stick" (p. 115) Insert a "Memory Stick" in the "Memory Stick" slot as far as it.... AC power adaptor (supplied) Quick Start Guide Connect the plug with the B mark facing up as illustrated. See the page in the direction of your camcorder outdoors (p. 14).

Operating Instructions
Page 11
... POWER switch to the right (unlock) position. Viewfinder When the LCD panel is displayed. Make sure that the LOCK switch is set to your camcorder, the clock setting is set to MEMORY while pressing the small green button. If you purchase your eyesight (p. 28). 5 Press PHOTO deeper. ...2 Set the POWER switch to open the LCD panel. Quick Start Guide NOTE Do not pick up your camcorder by the viewfinder, the LCD panel, the battery pack or the jack cover. The picture appears on a "Memory Stick" (p. 122) 1 Remove the lens cap. 4 Press PHOTO lightly....
... POWER switch to the right (unlock) position. Viewfinder When the LCD panel is displayed. Make sure that the LOCK switch is set to your camcorder, the clock setting is set to MEMORY while pressing the small green button. If you purchase your eyesight (p. 28). 5 Press PHOTO deeper. ...2 Set the POWER switch to open the LCD panel. Quick Start Guide NOTE Do not pick up your camcorder by the viewfinder, the LCD panel, the battery pack or the jack cover. The picture appears on a "Memory Stick" (p. 122) 1 Remove the lens cap. 4 Press PHOTO lightly....

Operating Instructions
Page 14
Step 1 Preparing the power supply Installing the battery pack (1) While sliding BATT (battery) release lever in the direction of the arrow 1, slide the battery terminal cover in the direction of the arrow 2. (2) Insert the battery pack in the direction of the arrow until it clicks. 1 2 2 1 To remove the battery pack The battery pack is removed. 14 Note on the battery terminal cover To protect the battery terminals, install the battery terminal cover after the battery pack is removed in the same way as the battery terminal cover.
Step 1 Preparing the power supply Installing the battery pack (1) While sliding BATT (battery) release lever in the direction of the arrow 1, slide the battery terminal cover in the direction of the arrow 2. (2) Insert the battery pack in the direction of the arrow until it clicks. 1 2 2 1 To remove the battery pack The battery pack is removed. 14 Note on the battery terminal cover To protect the battery terminals, install the battery terminal cover after the battery pack is removed in the same way as the battery terminal cover.
Operating Instructions
Page 15
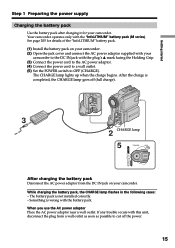
...LOCK VCR MEMORY OFF CAMERA (CHARGE) After charging the battery pack Disconnect the AC power adaptor from the DC IN jack on your camcorder. (2) Open the jack cover and connect the AC power adaptor supplied with your camcorder to the DC IN jack with this unit, disconnect... outlet. See page 205 for your camcorder. Getting started Step 1 Preparing the power supply Charging the battery pack Use the battery pack after charging it for details of the "InfoLITHIUM" battery pack. (1) Install the battery pack on your camcorder. While charging the battery pack, the CHARGE lamp flashes in ...
...LOCK VCR MEMORY OFF CAMERA (CHARGE) After charging the battery pack Disconnect the AC power adaptor from the DC IN jack on your camcorder. (2) Open the jack cover and connect the AC power adaptor supplied with your camcorder to the DC IN jack with this unit, disconnect... outlet. See page 205 for your camcorder. Getting started Step 1 Preparing the power supply Charging the battery pack Use the battery pack after charging it for details of the "InfoLITHIUM" battery pack. (1) Install the battery pack on your camcorder. While charging the battery pack, the CHARGE lamp flashes in ...

Operating Instructions
Page 16
... is extremely high or low because of the ambient temperature. Recording time Battery pack Recording with the viewfinder Continuous Typical* NP-FM50 (supplied) 150 85 NP-FM70 310 180 NP-QM71 365 215 NP-FM90 475 280 NP-... 150 300 175 390 230 455 265 Approximate minutes when you use a fully charged battery * Approximate recording time when you use a fully charged battery 16 Playback time Battery pack Playback time on /off. Step 1 Preparing the power supply Charging time Battery pack Full charge NP-FM50 (supplied) 150 NP-FM70 240 NP-QM71 260...
... is extremely high or low because of the ambient temperature. Recording time Battery pack Recording with the viewfinder Continuous Typical* NP-FM50 (supplied) 150 85 NP-FM70 310 180 NP-QM71 365 215 NP-FM90 475 280 NP-... 150 300 175 390 230 455 265 Approximate minutes when you use a fully charged battery * Approximate recording time when you use a fully charged battery 16 Playback time Battery pack Playback time on /off. Step 1 Preparing the power supply Charging time Battery pack Full charge NP-FM50 (supplied) 150 NP-FM70 240 NP-QM71 260...
Operating Instructions
Page 17
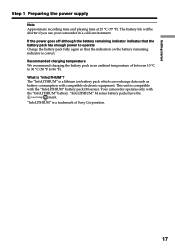
... you use your camcorder in an ambient temperature of Sony Corporation. 17 Recommended charging temperature We recommend charging the battery pack in a cold environment. The "InfoLITHIUM" is compatible with the "InfoLITHIUM" battery pack (M series). This unit is a lithium ion battery pack which can exchange data such as battery consumption with the "InfoLITHIUM" battery. "InfoLITHIUM" M series battery packs have...
... you use your camcorder in an ambient temperature of Sony Corporation. 17 Recommended charging temperature We recommend charging the battery pack in a cold environment. The "InfoLITHIUM" is compatible with the "InfoLITHIUM" battery pack (M series). This unit is a lithium ion battery pack which can exchange data such as battery consumption with the "InfoLITHIUM" battery. "InfoLITHIUM" M series battery packs have...
Operating Instructions
Page 18
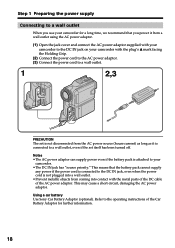
... adaptor can supply power even if the battery pack is attached to your camcorder. •The DC IN jack has "source priority." This may cause a short-circuit, damaging the AC power adaptor. Using a car battery Use Sony Car Battery Adaptor (optional). Refer to the operating instructions of the Car Battery Adaptor for a long time, we recommend...
... adaptor can supply power even if the battery pack is attached to your camcorder. •The DC IN jack has "source priority." This may cause a short-circuit, damaging the AC power adaptor. Using a car battery Use Sony Car Battery Adaptor (optional). Refer to the operating instructions of the Car Battery Adaptor for a long time, we recommend...
Operating Instructions
Page 19
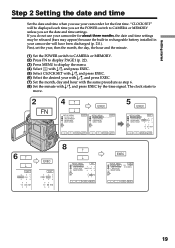
... the minute with r/R, and press EXEC by the time signal. If you do not use your camcorder for about three months, the date and time settings may appear) because the built-in rechargeable battery installed in your camcorder will have been discharged (p. 211). First, set the date and time settings. "CLOCK SET" will... SET USB STREAM LANGUAGE DEMO MODE r R EXEC RET. Getting started Step 2 Setting the date and time Set the date and time when you use your camcorder for the first time.
... the minute with r/R, and press EXEC by the time signal. If you do not use your camcorder for about three months, the date and time settings may appear) because the built-in rechargeable battery installed in your camcorder will have been discharged (p. 211). First, set the date and time settings. "CLOCK SET" will... SET USB STREAM LANGUAGE DEMO MODE r R EXEC RET. Getting started Step 2 Setting the date and time Set the date and time when you use your camcorder for the first time.

Operating Instructions
Page 24
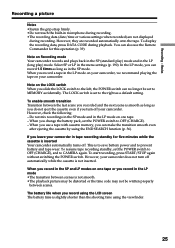
... Set the POWER switch to OFF (CHARGE). (2) Close the LCD panel and set the Holding Grip back to open the LCD panel. Recording a picture Your camcorder automatically focuses for more information (p. 14 to CAMERA while pressing the small green button. The camera recording lamp located on the LCD panel. (6) Press START.../STOP. The picture appears on the front of your camcorder firmly as illustrated. (4) Set the POWER switch to 21). (3) Pull down the Holding Grip. The REC indicator appears. Your...
... Set the POWER switch to OFF (CHARGE). (2) Close the LCD panel and set the Holding Grip back to open the LCD panel. Recording a picture Your camcorder automatically focuses for more information (p. 14 to CAMERA while pressing the small green button. The camera recording lamp located on the LCD panel. (6) Press START.../STOP. The picture appears on the front of your camcorder firmly as illustrated. (4) Set the POWER switch to 21). (3) Pull down the Holding Grip. The REC indicator appears. Your...
Operating Instructions
Page 25
... they are not displayed during playback. In the LP mode, you slide the LOCK switch to prevent battery and tape wear. However, check the following: - If you turn off your camcorder does not turn off . To resume tape recording standby, set the POWER switch to MEMORY accidentally. ... the Remote Commander for five minutes while the cassette is slightly shorter than the shooting time using the LCD screen The battery time is inserted Your camcorder automatically turns off automatically while the cassette is not smooth. •The playback picture may be distorted or the time...
... they are not displayed during playback. In the LP mode, you slide the LOCK switch to prevent battery and tape wear. However, check the following: - If you turn off your camcorder does not turn off . To resume tape recording standby, set the POWER switch to MEMORY accidentally. ... the Remote Commander for five minutes while the cassette is slightly shorter than the shooting time using the LCD screen The battery time is inserted Your camcorder automatically turns off automatically while the cassette is not smooth. •The playback picture may be distorted or the time...

Operating Instructions
Page 27
... BRT + the bar indicator OPEN To return to adjust the brightness of the LCD screen appears. (3) Adjust the brightness of the LCD screen using the battery pack (p. 187). Even if you set the POWER switch to VCR, press FN to PAGE1/PAGE2/PAGE3. 1 FN 2,3 LCD BRT OK - Basics Recording a picture Adjusting...
... BRT + the bar indicator OPEN To return to adjust the brightness of the LCD screen appears. (3) Adjust the brightness of the LCD screen using the battery pack (p. 187). Even if you set the POWER switch to VCR, press FN to PAGE1/PAGE2/PAGE3. 1 FN 2,3 LCD BRT OK - Basics Recording a picture Adjusting...
Operating Instructions
Page 28
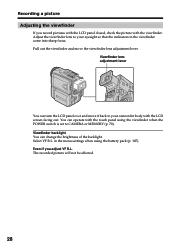
...and move the viewfinder lens adjustment lever. in the viewfinder come into sharp focus. Pull out the viewfinder and move it back to your camcorder body with the LCD screen facing out. Even if you record pictures with the LCD panel closed, check the picture with the touch ...panel using the battery pack (p. 187). Viewfinder lens adjustment lever You can operate with the viewfinder. Select VF B.L. Viewfinder backlight You can change the brightness of the...
...and move the viewfinder lens adjustment lever. in the viewfinder come into sharp focus. Pull out the viewfinder and move it back to your camcorder body with the LCD screen facing out. Even if you record pictures with the LCD panel closed, check the picture with the touch ...panel using the battery pack (p. 187). Viewfinder lens adjustment lever You can operate with the viewfinder. Select VF B.L. Viewfinder backlight You can change the brightness of the...
Operating Instructions
Page 31
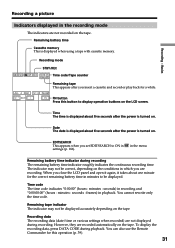
... indicator during playback. To display the recording data, press DATA CODE during recording The remaining battery time indicator roughly indicates the continuous recording time. JUL 4 2002 12 : 05 : 56 AM / - Time code The time code indicates "0:00:00" (hours ... are recording. Recording a picture Recording - Basics Indicators displayed in which you insert a cassette and record or play back for the correct remaining battery time in minutes to ON in playback. You can also use the Remote Commander for this button to display operation buttons on . Remaining tape ...
... indicator during playback. To display the recording data, press DATA CODE during recording The remaining battery time indicator roughly indicates the continuous recording time. JUL 4 2002 12 : 05 : 56 AM / - Time code The time code indicates "0:00:00" (hours ... are recording. Recording a picture Recording - Basics Indicators displayed in which you insert a cassette and record or play back for the correct remaining battery time in minutes to ON in playback. You can also use the Remote Commander for this button to display operation buttons on . Remaining tape ...
Operating Instructions
Page 41
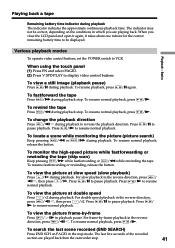
... LCD panel and open it again, it takes about one minute for the correct remaining battery time to reverse the playback direction. Playing back a tape Remaining battery time indicator during playback stop. The indicator may not be displayed. To monitor the high...-speed picture while fastforwarding or rewinding the tape (skip scan) Keep pressing /M while fastforwarding or /m while rewinding the tape. Press / N to resume normal playback. When you are played back then the camcorder...
... LCD panel and open it again, it takes about one minute for the correct remaining battery time to reverse the playback direction. Playing back a tape Remaining battery time indicator during playback stop. The indicator may not be displayed. To monitor the high...-speed picture while fastforwarding or rewinding the tape (skip scan) Keep pressing /M while fastforwarding or /m while rewinding the tape. Press / N to resume normal playback. When you are played back then the camcorder...


