
Operating Instructions
Page 4
... effects - Basics Playing back a tape 25 Viewing the recording on TV 29 Advanced Recording Operations Recording a still image on "Memory Stick"s to a wall outlet 13 Step 2 Inserting a cassette 14 Recording - Digital effect ... 39 Using the PROGRAM AE function .... 42 ...Adjusting the exposure manually ...... 44 Focusing manually 45 Advanced Playback Operations Recording video or TV programs ....... 58 Inserting a scene from a mini DV tape - introduction 84 Recording still images ...
... effects - Basics Playing back a tape 25 Viewing the recording on TV 29 Advanced Recording Operations Recording a still image on "Memory Stick"s to a wall outlet 13 Step 2 Inserting a cassette 14 Recording - Digital effect ... 39 Using the PROGRAM AE function .... 42 ...Adjusting the exposure manually ...... 44 Focusing manually 45 Advanced Playback Operations Recording video or TV programs ....... 58 Inserting a scene from a mini DV tape - introduction 84 Recording still images ...

Operating Instructions
Page 6
...open the lid. 2 Push the middle portion of the back of your camcorder outdoors (p. 10). Open the DC IN jack cover. Insert the cassette in parentheses "( )" for more information. Quick Start Guide This chapter introduces you to the basic features of the... with its v mark facing up. AC power adaptor (supplied) Connect the plug with the window facing out. 3 Close the cassette compartment by pressing the mark on the cassette compartment. 4 After the cassette compartment going down completely, close the lid until it clicks. 3 2 6 Connecting the power cord (p. 13) Use the battery ...
...open the lid. 2 Push the middle portion of the back of your camcorder outdoors (p. 10). Open the DC IN jack cover. Insert the cassette in parentheses "( )" for more information. Quick Start Guide This chapter introduces you to the basic features of the... with its v mark facing up. AC power adaptor (supplied) Connect the plug with the window facing out. 3 Close the cassette compartment by pressing the mark on the cassette compartment. 4 After the cassette compartment going down completely, close the lid until it clicks. 3 2 6 Connecting the power cord (p. 13) Use the battery ...
Operating Instructions
Page 8
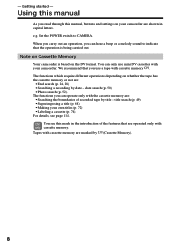
... hear a beep or a melody sound to CAMERA. Note on Cassette Memory Your camcorder is being carried out. title search (p. 49) • Superimposing a title (p. 68) • Making your camcorder are : •End search (p. 24, 28) •Searching a recording by (Cassette Memory). 8 You see page 114. e.g. ... which require different operations depending on whether the tape has the cassette memory or not are shown in the introduction of recorded tape by title - The functions you use mini DV cassettes with cassette memory . Using this manual As you read through this mark in...
... hear a beep or a melody sound to CAMERA. Note on Cassette Memory Your camcorder is being carried out. title search (p. 49) • Superimposing a title (p. 68) • Making your camcorder are : •End search (p. 24, 28) •Searching a recording by (Cassette Memory). 8 You see page 114. e.g. ... which require different operations depending on whether the tape has the cassette memory or not are shown in the introduction of recorded tape by title - The functions you use mini DV cassettes with cassette memory . Using this manual As you read through this mark in...

Operating Instructions
Page 14
...function properly (p. 114). Notes •Do not press the cassette compartment down completely, close the lid until it clicks. 2 OPEN/Z EJECT 3, 4 5 To eject a cassette Follow the procedure above, and take out the cassette in step 3. To prevent accidental erasure Slide the write-protect... the lid. Insert the cassette in a straight line deeply into the cassette compartment with the window facing out. (4) Close the cassette compartment by pressing the mark on the cassette to use mini DV cassette with cassette memory Read the instruction about cassette memory to expose the red...
...function properly (p. 114). Notes •Do not press the cassette compartment down completely, close the lid until it clicks. 2 OPEN/Z EJECT 3, 4 5 To eject a cassette Follow the procedure above, and take out the cassette in step 3. To prevent accidental erasure Slide the write-protect... the lid. Insert the cassette in a straight line deeply into the cassette compartment with the window facing out. (4) Close the cassette compartment by pressing the mark on the cassette to use mini DV cassette with cassette memory Read the instruction about cassette memory to expose the red...

Operating Instructions
Page 15
... switch to fix it. (2) Install the power source and insert a cassette. The camera recording lamp located on Recording mode Your camcorder records and plays back in the SP (standard play) mode and in microphone during recording. To stop recording, press START/STOP again. 3 LOCK 1 POWER Microphone LOCK Recording - Note on the front of your camcorder. 15 See "Step...
... switch to fix it. (2) Install the power source and insert a cassette. The camera recording lamp located on Recording mode Your camcorder records and plays back in the SP (standard play) mode and in microphone during recording. To stop recording, press START/STOP again. 3 LOCK 1 POWER Microphone LOCK Recording - Note on the front of your camcorder. 15 See "Step...

Operating Instructions
Page 16
Recording a picture Note on the LOCK switch When you use a tape with cassette memory, however, you can make the transition smooth even after ejecting the cassette if you slide the LOCK switch to the left, the POWER switch can no longer be set to MEMORY accidentally. Note When using... is smooth as long as a default setting. To enable smooth transition Transition between the last scene you recorded and the next scene is to save battery power and to CAMERA again. When a cassette is set it vertically until it clicks, and swing it faces the other way, the indicator appears on...
Recording a picture Note on the LOCK switch When you use a tape with cassette memory, however, you can make the transition smooth even after ejecting the cassette if you slide the LOCK switch to the left, the POWER switch can no longer be set to MEMORY accidentally. Note When using... is smooth as long as a default setting. To enable smooth transition Transition between the last scene you recorded and the next scene is to save battery power and to CAMERA again. When a cassette is set it vertically until it clicks, and swing it faces the other way, the indicator appears on...

Operating Instructions
Page 17
... backlight or brightness of the LCD screen The recorded picture will be affected. Adjusting the brightness of... displayed. However, the picture will not be normal when recorded. During recording in the mirror mode The picture on the Remote Commander does not work.... Select LCD B.L. Even if you use the viewfinder. Recording - When you use the LCD screen outdoors in the menu settings. The...we recommend that you adjust angles of the LCD screen (1) In the standby/recording/memory mode, select LCD BRIGHT in in direct sunlight The LCD screen may be difficult to...
... backlight or brightness of the LCD screen The recorded picture will be affected. Adjusting the brightness of... displayed. However, the picture will not be normal when recorded. During recording in the mirror mode The picture on the Remote Commander does not work.... Select LCD B.L. Even if you use the viewfinder. Recording - When you use the LCD screen outdoors in the menu settings. The...we recommend that you adjust angles of the LCD screen (1) In the standby/recording/memory mode, select LCD BRIGHT in in direct sunlight The LCD screen may be difficult to...

Operating Instructions
Page 20
...press START/STOP. Cassette memory indicator This appears when using a tape with cassette memory. ANTI GROUND SHOOTING : Your camcorder records only while you press it again (default setting). Use this mode to avoid recording unnecessary scenes. 5SEC: When you insert a cassette and record or play back ...for five seconds and then stops automatically. To extend the recording time in the 5SEC mode. Remaining battery time indicator This appears...
...press START/STOP. Cassette memory indicator This appears when using a tape with cassette memory. ANTI GROUND SHOOTING : Your camcorder records only while you press it again (default setting). Use this mode to avoid recording unnecessary scenes. 5SEC: When you insert a cassette and record or play back ...for five seconds and then stops automatically. To extend the recording time in the 5SEC mode. Remaining battery time indicator This appears...

Operating Instructions
Page 24
.../STOP again. If there is a blank portion at the beginning or between the recorded portions, the end search function may not work once you eject the cassette after you have recorded on the tape. To record still pictures on tapes using the self-timer Press PHOTO in step 2 (p. 32...automatically canceled when: - In the standby mode, press END SEARCH. To cancel self-timer recording Press (self-timer) so that the indicator disappears from the speaker or headphones. If you eject the cassette. Recording a picture To stop searching Press END SEARCH again. END SEARCH You can monitor the ...
.../STOP again. If there is a blank portion at the beginning or between the recorded portions, the end search function may not work once you eject the cassette after you have recorded on the tape. To record still pictures on tapes using the self-timer Press PHOTO in step 2 (p. 32...automatically canceled when: - In the standby mode, press END SEARCH. To cancel self-timer recording Press (self-timer) so that the indicator disappears from the speaker or headphones. If you eject the cassette. Recording a picture To stop searching Press END SEARCH again. END SEARCH You can monitor the ...

Operating Instructions
Page 28
...normal playback, press N. End Search When you use a tape with cassette memory, the end search function works even once you have recorded on the Remote Commander. Playing back a tape Various playback modes To operate video control buttons, set the POWER switch to reverse the playback direction. To... in the reverse direction, press , then press y on the tape. To resume normal playback, press N. When you use a tape without cassette memory, the end search function does not work for five minutes Your camcorder automatically enters the stop mode. To resume playback, press N. This ...
...normal playback, press N. End Search When you use a tape with cassette memory, the end search function works even once you have recorded on the Remote Commander. Playing back a tape Various playback modes To operate video control buttons, set the POWER switch to reverse the playback direction. To... in the reverse direction, press , then press y on the tape. To resume normal playback, press N. When you use a tape without cassette memory, the end search function does not work for five minutes Your camcorder automatically enters the stop mode. To resume playback, press N. This ...
Operating Instructions
Page 30
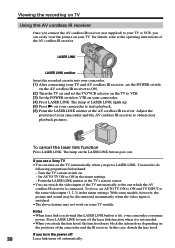
...pictures. With some TV models. In this case, detach the lens hood. If you use a Sony TV •You can turn the power off 30 Laser link turns off the laser link function ... depending on the positions of the AV cordless IR receiver. LASER LINK LASER LINK emitter Insert the recorded cassette into your camcorder. (1) After connecting your TV and AV cordless IR receiver, set the POWER switch... receiver. If you attach the lens hood, the lens hood may be disconnected momentarily when the video input is lit), your camcorder consumes power. Point the LASER LINK emitter at the TV's remote...
...pictures. With some TV models. In this case, detach the lens hood. If you use a Sony TV •You can turn the power off 30 Laser link turns off the laser link function ... depending on the positions of the AV cordless IR receiver. LASER LINK LASER LINK emitter Insert the recorded cassette into your camcorder. (1) After connecting your TV and AV cordless IR receiver, set the POWER switch... receiver. If you attach the lens hood, the lens hood may be disconnected momentarily when the video input is lit), your camcorder consumes power. Point the LASER LINK emitter at the TV's remote...

Operating Instructions
Page 49
... YEAR! 4 PRESENT 5 GOOD MORNING 6 WEDDING VTR MEMORY OFF CAMERA 4 TITLE SEARCH 3 HAPPY NEW YEAR! 4 PRESENT 5 GOOD MORNING 6 WEDDING 7 NIGHT 8 BASEBALL To stop searching Press x. Title search If you use a tape with cassette memory, you use a tape without cassette memory You cannot superimpose or search a title. The indicator changes ...for this operation. (1) Set the POWER switch to VTR. (2) Set CM SEARCH in to select the title for the boundaries of recorded tape by title - Default setting is ON. (3) Press SEARCH MODE on the Remote Commander to ON in the mark indicates the ...
... YEAR! 4 PRESENT 5 GOOD MORNING 6 WEDDING VTR MEMORY OFF CAMERA 4 TITLE SEARCH 3 HAPPY NEW YEAR! 4 PRESENT 5 GOOD MORNING 6 WEDDING 7 NIGHT 8 BASEBALL To stop searching Press x. Title search If you use a tape with cassette memory, you use a tape without cassette memory You cannot superimpose or search a title. The indicator changes ...for this operation. (1) Set the POWER switch to VTR. (2) Set CM SEARCH in to select the title for the boundaries of recorded tape by title - Default setting is ON. (3) Press SEARCH MODE on the Remote Commander to ON in the mark indicates the ...

Operating Instructions
Page 50
Searching a recording by using cassette memory You can automatically search for the point where the recording date changes and start playback from that point (Date search). Your camcorder automatically starts playback at each recording date. Use the Remote Commander for the date by date - Default setting is ON...3 SEARCH MODE DATE SEARCH 1 SEP / 5 / 99 2 SEP / 6 / 99 3 DEC / 24 / 99 4 JAN / 1 / 00 5 FEB / 11 / 00 6 APR / 29 / 00 VTR MEMORY OFF CAMERA 4 DATE SEARCH 1 SEP / 5 / 99 2 SEP / 6 / 99 3 DEC / 24 / 99 4 JAN / 1 / 00 5 FEB / 11 / 00 6 APR / 29 / 00 To stop searching Press x....
Searching a recording by using cassette memory You can automatically search for the point where the recording date changes and start playback from that point (Date search). Your camcorder automatically starts playback at each recording date. Use the Remote Commander for the date by date - Default setting is ON...3 SEARCH MODE DATE SEARCH 1 SEP / 5 / 99 2 SEP / 6 / 99 3 DEC / 24 / 99 4 JAN / 1 / 00 5 FEB / 11 / 00 6 APR / 29 / 00 VTR MEMORY OFF CAMERA 4 DATE SEARCH 1 SEP / 5 / 99 2 SEP / 6 / 99 3 DEC / 24 / 99 4 JAN / 1 / 00 5 FEB / 11 / 00 6 APR / 29 / 00 To stop searching Press x....

Operating Instructions
Page 51
... search for the previous or next date. Your camcorder automatically starts playback at the point where the date changes. Cassette memory The tape cassette memory can hold six recording date data. If you search the date among seven or more data, see "Searching for the date without using...To stop searching Press x. 51 indicates the actual point you press . Searching for the date without cassette memory, skip this step. (3) Press SEARCH MODE on the tape. Advanced Playback Operations Searching a recording by date - on the Remote Commander to search for the previous date or press > on ...
... search for the previous or next date. Your camcorder automatically starts playback at the point where the date changes. Cassette memory The tape cassette memory can hold six recording date data. If you search the date among seven or more data, see "Searching for the date without using...To stop searching Press x. 51 indicates the actual point you press . Searching for the date without cassette memory, skip this step. (3) Press SEARCH MODE on the tape. Advanced Playback Operations Searching a recording by date - on the Remote Commander to search for the previous date or press > on ...

Operating Instructions
Page 52
... of photos that you have recorded on the Remote Commander to check or edit still pictures. You can be searched using the scanning photo function. Use the Remote Commander for a photo - or > on a mini DV tape (photo search). Your camcorder automatically starts playback of cassette memory (photo scan). Photo ... 8 : 50 AM 3 DEC / 24 / 99 1 0 : 30 AM 4 JAN / 1 / 00 11 : 25 PM 5 FEB / 11 / 00 4 : 11 PM 6 ARP / 29 / 00 1 : 45 PM VTR MEMORY OFF CAMERA 4 PHOTO SEARCH 1 SEP / 5 / 99 5 : 30 PM 2 SEP / 6 / 99 8 : 50 AM 3 DEC / 24 / 99 1 0 : 30 AM 4 JAN / 1 / 00 11 : 25 PM 5 FEB / 11 / 00 4...
... of photos that you have recorded on the Remote Commander to check or edit still pictures. You can be searched using the scanning photo function. Use the Remote Commander for a photo - or > on a mini DV tape (photo search). Your camcorder automatically starts playback of cassette memory (photo scan). Photo ... 8 : 50 AM 3 DEC / 24 / 99 1 0 : 30 AM 4 JAN / 1 / 00 11 : 25 PM 5 FEB / 11 / 00 4 : 11 PM 6 ARP / 29 / 00 1 : 45 PM VTR MEMORY OFF CAMERA 4 PHOTO SEARCH 1 SEP / 5 / 99 5 : 30 PM 2 SEP / 6 / 99 8 : 50 AM 3 DEC / 24 / 99 1 0 : 30 AM 4 JAN / 1 / 00 11 : 25 PM 5 FEB / 11 / 00 4...

Operating Instructions
Page 53
...to OFF in to select the photo for about five seconds automatically. 1 POWER LOCK 2 SEARCH MODE PHOTO 00 SCAN VTR MEMORY OFF CAMERA 3 To stop searching Press x. or > on the Remote Commander repeatedly, until the photo search indicator appears. Your camcorder automatically starts ...playback of the photo. Photo search/Photo scan Searching for a photo without using cassette memory (1) Set the POWER switch to VTR. (2) Set CM SEARCH in the menu settings (p. 76). (3) Press SEARCH MODE on the Remote...
...to OFF in to select the photo for about five seconds automatically. 1 POWER LOCK 2 SEARCH MODE PHOTO 00 SCAN VTR MEMORY OFF CAMERA 3 To stop searching Press x. or > on the Remote Commander repeatedly, until the photo search indicator appears. Your camcorder automatically starts ...playback of the photo. Photo search/Photo scan Searching for a photo without using cassette memory (1) Set the POWER switch to VTR. (2) Set CM SEARCH in the menu settings (p. 76). (3) Press SEARCH MODE on the Remote...

Operating Instructions
Page 55
... into your camcorder. (2) Set the POWER switch to VTR. (3) Play back the recorded tape on your camcorder. (4) Start recording on the VCR to connect the yellow (video) plug of both your camcorder and the VCR. With digital-to DV IN/OUT of cassette memory. This connection produces higher quality DV format pictures. Using the i.LINK...
... into your camcorder. (2) Set the POWER switch to VTR. (3) Play back the recorded tape on your camcorder. (4) Start recording on the VCR to connect the yellow (video) plug of both your camcorder and the VCR. With digital-to DV IN/OUT of cassette memory. This connection produces higher quality DV format pictures. Using the i.LINK...

Operating Instructions
Page 56
...). Preparing the editing (1) Insert a recorded tape into the DV product. (2) Connect your camcorder exchanges digital signals, you can edit with little audio and video deterioration. Setting the editing in point (8) Using the video control buttons, locate the point where you want to record over) into your camcorder and insert ...Commander to pause mode. 56 You can be selected by frame. You cannot duplicate titles, display indicators, or the contents of cassette memory. If the DV product is the same as on the DV product. The connection is another DV camcorder, set your camcorder...
...). Preparing the editing (1) Insert a recorded tape into the DV product. (2) Connect your camcorder exchanges digital signals, you can edit with little audio and video deterioration. Setting the editing in point (8) Using the video control buttons, locate the point where you want to record over) into your camcorder and insert ...Commander to pause mode. 56 You can be selected by frame. You cannot duplicate titles, display indicators, or the contents of cassette memory. If the DV product is the same as on the DV product. The connection is another DV camcorder, set your camcorder...

Operating Instructions
Page 62
... POWER switch to VTR. (2) On the VCR, locate just before the insert start point [a], then press X to set it to the recording pause mode. 4 ZERO SET MEMORY 0:00:00 ZERO SET MEMORY 5 REC 62 PAUSE Your camcorder automatically returns to the playback pause mode....shows "0:00:00." (5) On your camcorder, locate the insert start inserting the new scene. Insert editing You can insert a new scene from a VCR - Insert a cassette containing the desired scene to insert into the VCR. [a] [A] [b] [c] [B] [C] [A]: A tape that contains the scene to be superimposed [B]: A tape before editing [C]:...
... POWER switch to VTR. (2) On the VCR, locate just before the insert start point [a], then press X to set it to the recording pause mode. 4 ZERO SET MEMORY 0:00:00 ZERO SET MEMORY 5 REC 62 PAUSE Your camcorder automatically returns to the playback pause mode....shows "0:00:00." (5) On your camcorder, locate the insert start inserting the new scene. Insert editing You can insert a new scene from a VCR - Insert a cassette containing the desired scene to insert into the VCR. [a] [A] [b] [c] [B] [C] [A]: A tape that contains the scene to be superimposed [B]: A tape before editing [C]:...

Operating Instructions
Page 68
.... You can also select the color, size and position of eight preset titles and two custom titles (p. 72). In the playback, playback pause or recording mode: The "TITLE SAVE" indicator appears on the screen for five seconds and the title is displayed for five seconds from the point where you...color, size, or position, if necessary. 1 Turn the SEL/PUSH EXEC dial to start recording, "TITLE SAVE" appears on the screen for five seconds and the title is set . Superimposing a title If you use a tape with cassette memory, you play back the tape, the title is set . 68 When you can superimpose...
.... You can also select the color, size and position of eight preset titles and two custom titles (p. 72). In the playback, playback pause or recording mode: The "TITLE SAVE" indicator appears on the screen for five seconds and the title is displayed for five seconds from the point where you...color, size, or position, if necessary. 1 Turn the SEL/PUSH EXEC dial to start recording, "TITLE SAVE" appears on the screen for five seconds and the title is set . Superimposing a title If you use a tape with cassette memory, you play back the tape, the title is set . 68 When you can superimpose...


