
Operating Instructions
Page 1
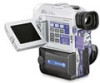
Refer to these numbers whenever you call upon your Sony dealer regarding this manual thoroughly, and retain it for future reference. Serial No. 3-867-752-12 (1) Digital Video Camera Recorder Operating Instructions Before operating the unit, please read this product. DCR-PC100 Model No. Owner's Record The model and serial numbers are located on the bottom. Serial No. AC- Model No. DCR-PC100 ©1999 Sony Corporation Record the serial number in the space provided below.
Refer to these numbers whenever you call upon your Sony dealer regarding this manual thoroughly, and retain it for future reference. Serial No. 3-867-752-12 (1) Digital Video Camera Recorder Operating Instructions Before operating the unit, please read this product. DCR-PC100 Model No. Owner's Record The model and serial numbers are located on the bottom. Serial No. AC- Model No. DCR-PC100 ©1999 Sony Corporation Record the serial number in the space provided below.

Operating Instructions
Page 2
...;C) such as in a car parked in a residential installation. Caution: Do not handle damaged or leaking lithium ion battery. Your Digital Handycam is loaded with Part 15 of important operating and maintenance (servicing) instructions in a particular installation. and CANADA DISPOSAL OF LITHIUM ION BATTERY. You will not occur in the literature accompanying the appliance. Address: 1 Sony Drive, Park Ridge, NJ, 07656 USA Telephone No...
...;C) such as in a car parked in a residential installation. Caution: Do not handle damaged or leaking lithium ion battery. Your Digital Handycam is loaded with Part 15 of important operating and maintenance (servicing) instructions in a particular installation. and CANADA DISPOSAL OF LITHIUM ION BATTERY. You will not occur in the literature accompanying the appliance. Address: 1 Sony Drive, Park Ridge, NJ, 07656 USA Telephone No...

Operating Instructions
Page 4
... 5 Quick Start Guide 6 Getting started Using this manual 8 Step 1 Preparing the power supply ... 10 Installing the battery pack 10 Charging the battery pack 11 Connecting to mini DV tapes 106 Playing back images continuously - Date search 50 Searching for a photo - Table of recorded tape by date - Basics Playing back a tape 25 Viewing the recording on TV 29 Advanced Recording Operations Recording a still image on "Memory Stick"s - introduction 84 Recording still images on a tape - Photo search/ Photo scan 52 Additional Information Usable cassettes 114 Troubleshooting...
... 5 Quick Start Guide 6 Getting started Using this manual 8 Step 1 Preparing the power supply ... 10 Installing the battery pack 10 Charging the battery pack 11 Connecting to mini DV tapes 106 Playing back images continuously - Date search 50 Searching for a photo - Table of recorded tape by date - Basics Playing back a tape 25 Viewing the recording on TV 29 Advanced Recording Operations Recording a still image on "Memory Stick"s - introduction 84 Recording still images on a tape - Photo search/ Photo scan 52 Additional Information Usable cassettes 114 Troubleshooting...

Operating Instructions
Page 16
... degrees to CAMERA again. Note When using the LCD screen except in the standby mode for five minutes while the cassette is to save battery power and to MEMORY accidentally. If you turn off . 16 To resume the standby mode, set to prevent battery and tape wear. The LOCK switch is set to the right as you do not eject the cassette even if you leave your camcorder in the...
... degrees to CAMERA again. Note When using the LCD screen except in the standby mode for five minutes while the cassette is to save battery power and to MEMORY accidentally. If you turn off . 16 To resume the standby mode, set to prevent battery and tape wear. The LOCK switch is set to the right as you do not eject the cassette even if you leave your camcorder in the...

Operating Instructions
Page 27
... TV, the data code also appears on the tape. Playback - In the recording mode, the recording data will not be displayed. When you have recorded. Basics Playing back a tape Using the data code function Your camcorder automatically records not only images on the tape but also the recording data (date/time or various settings when recorded) (Data code). You can check the recording date/time while in playback mode by a camcorder without the date and time set. The display changes as follows: date/time t various settings (SteadyShot, white balance, gain, shutter speed, aperture value...
... TV, the data code also appears on the tape. Playback - In the recording mode, the recording data will not be displayed. When you have recorded. Basics Playing back a tape Using the data code function Your camcorder automatically records not only images on the tape but also the recording data (date/time or various settings when recorded) (Data code). You can check the recording date/time while in playback mode by a camcorder without the date and time set. The display changes as follows: date/time t various settings (SteadyShot, white balance, gain, shutter speed, aperture value...
Operating Instructions
Page 29
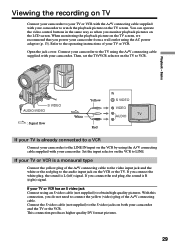
Open the jack cover. Then, set the TV/VCR selector on the TV to LINE. Basics S VIDEO AUDIO/VIDEO : Signal flow Yellow White Red IN S VIDEO VIDEO AUDIO If your TV is L (left) signal. If you monitor playback pictures on the LCD screen. If your camcorder. This connection produces higher quality DV format pictures. 29 Viewing the recording on TV Connect your camcorder to your TV or VCR with the A/V connecting cable supplied with your camcorder and the...
Open the jack cover. Then, set the TV/VCR selector on the TV to LINE. Basics S VIDEO AUDIO/VIDEO : Signal flow Yellow White Red IN S VIDEO VIDEO AUDIO If your TV is L (left) signal. If you monitor playback pictures on the LCD screen. If your camcorder. This connection produces higher quality DV format pictures. 29 Viewing the recording on TV Connect your camcorder to your TV or VCR with the A/V connecting cable supplied with your camcorder and the...
Operating Instructions
Page 30
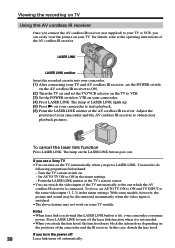
... on and set AUTO TV ON to ON and TV INPUT to the same video input (1, 2, 3) in the menu settings. - Turn the TV's main switch on your camcorder to start playback. (6) Point the LASER LINK emitter at the TV's remote sensor. •You can switch the video input of the camcorder and the IR receiver. Viewing the recording on TV Using the AV cordless IR receiver Once you connect the...
... on and set AUTO TV ON to ON and TV INPUT to the same video input (1, 2, 3) in the menu settings. - Turn the TV's main switch on your camcorder to start playback. (6) Point the LASER LINK emitter at the TV's remote sensor. •You can switch the video input of the camcorder and the IR receiver. Viewing the recording on TV Using the AV cordless IR receiver Once you connect the...

Operating Instructions
Page 31
... use . Advanced Recording Operations - The still picture on the LCD screen or in the LP mode on a tape - To use . - To record clear and less fluctuated still pictures We recommend that you print a picture using the Remote Commander Press PHOTO on "Memory Stick"s (p. 91). (1) Set the POWER switch to record a picture or when you record on other equipment, the picture may fluctuate. To change the mode or setting. •The photo recording function does not work: - The sound during normal CAMERA recording You cannot check...
... use . Advanced Recording Operations - The still picture on the LCD screen or in the LP mode on a tape - To use . - To record clear and less fluctuated still pictures We recommend that you print a picture using the Remote Commander Press PHOTO on "Memory Stick"s (p. 91). (1) Set the POWER switch to record a picture or when you record on other equipment, the picture may fluctuate. To change the mode or setting. •The photo recording function does not work: - The sound during normal CAMERA recording You cannot check...

Operating Instructions
Page 46
... or stop playing back The picture effect function is input from other equipment using the picture effect function. • To record pictures that you have processed using the picture effect function, record the pictures on the VCR, using the picture effect functions: NEG. - In the playback/playback pause mode, select the desired picture effect mode in the menu settings (p. 76). For details of each picture effect function, see page 38. When you can process a scene using your camcorder as a player. Advanced Playback Operations - Pictures...
... or stop playing back The picture effect function is input from other equipment using the picture effect function. • To record pictures that you have processed using the picture effect function, record the pictures on the VCR, using the picture effect functions: NEG. - In the playback/playback pause mode, select the desired picture effect mode in the menu settings (p. 76). For details of each picture effect function, see page 38. When you can process a scene using your camcorder as a player. Advanced Playback Operations - Pictures...
Operating Instructions
Page 77
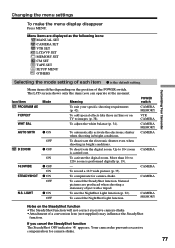
...; zoom is the default setting. To record a 16:9 wide picture (p. 35). Natural pictures are displayed as the following icons: MANUAL SET CAMERA SET VTR SET LCD/VF SET MEMORY SET CM SET TAPE SET SETUP MENU OTHERS Customizing Your Camcorder Selecting the mode setting of each item z is carried out. To use the NightShot Light function (p. 22). POWER switch CAMERA MEMORY VTR CAMERA CAMERA MEMORY CAMERA CAMERA CAMERA CAMERA CAMERA MEMORY Notes on TV to images (p. 38). To adjust the white balance (p. 34). To cancel the NightShot Light function. Changing the menu settings To...
...; zoom is the default setting. To record a 16:9 wide picture (p. 35). Natural pictures are displayed as the following icons: MANUAL SET CAMERA SET VTR SET LCD/VF SET MEMORY SET CM SET TAPE SET SETUP MENU OTHERS Customizing Your Camcorder Selecting the mode setting of each item z is carried out. To use the NightShot Light function (p. 22). POWER switch CAMERA MEMORY VTR CAMERA CAMERA MEMORY CAMERA CAMERA CAMERA CAMERA CAMERA MEMORY Notes on TV to images (p. 38). To adjust the white balance (p. 34). To cancel the NightShot Light function. Changing the menu settings To...
Operating Instructions
Page 83
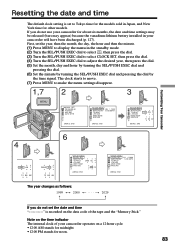
.... Note on the time indicator The internal clock of the tape and the "Memory Stick." The clock starts to move. (7) Press MENU to make the menu settings disappear. 1,7 2 3 MENU MANUAL SET PROGRAM AE P EFFECT WHT BAL AUTO SHTR [MENU] : END SETUP MENU CLOCK SET JAN 1 1999 AUTO TV ON 12:00:00AM TV INPUT LTR SIZE DEMO MODE RETURN [MENU] : END SETUP MENU CLOCK SET AUTO TV ON TV INPUT 1999 JAN 1 LTR SIZE DEMO MODE RETURN 12 00 AM...
.... Note on the time indicator The internal clock of the tape and the "Memory Stick." The clock starts to move. (7) Press MENU to make the menu settings disappear. 1,7 2 3 MENU MANUAL SET PROGRAM AE P EFFECT WHT BAL AUTO SHTR [MENU] : END SETUP MENU CLOCK SET JAN 1 1999 AUTO TV ON 12:00:00AM TV INPUT LTR SIZE DEMO MODE RETURN [MENU] : END SETUP MENU CLOCK SET AUTO TV ON TV INPUT 1999 JAN 1 LTR SIZE DEMO MODE RETURN 12 00 AM...

Operating Instructions
Page 96
... on the Remote Commander. (4) Turn the SEL/PUSH EXEC dial to superimpose. The mode changes as a thumbnail image. (3) Press MEMORY+/- or +/- LUMI M. To see the next image, press MEMORY+ or + on the moving picture - The last recorded or last composed image appears on the Remote Commander. CHROM y M. MEMORY MIX Before operation Insert a recorded "Memory Stick" and a mini DV tape to be recorded into your camcorder. (1) Set the POWER switch to start recording. 2 PLAY VTR 1 POWER LOCK MEMORY OFF CAMERA M.
... on the Remote Commander. (4) Turn the SEL/PUSH EXEC dial to superimpose. The mode changes as a thumbnail image. (3) Press MEMORY+/- or +/- LUMI M. To see the next image, press MEMORY+ or + on the moving picture - The last recorded or last composed image appears on the Remote Commander. CHROM y M. MEMORY MIX Before operation Insert a recorded "Memory Stick" and a mini DV tape to be recorded into your camcorder. (1) Set the POWER switch to start recording. 2 PLAY VTR 1 POWER LOCK MEMORY OFF CAMERA M.

Operating Instructions
Page 98
... turn the power off , eject a "Memory Stick" or remove the battery pack. "CAPTURE" appears on a mini DV tape You cannot record the sound from the mini DV tape freezes. If you press PHOTO lightly in the playback mode Your camcorder stops momentarily. Sound recorded on the LCD screen or in the viewfinder. Your camcorder can read moving picture data through the input connector and record it as a still image on the mini DV tape is played back. (3) Keep pressing PHOTO lightly until the picture from a mini DV tape...
... turn the power off , eject a "Memory Stick" or remove the battery pack. "CAPTURE" appears on a mini DV tape You cannot record the sound from the mini DV tape freezes. If you press PHOTO lightly in the playback mode Your camcorder stops momentarily. Sound recorded on the LCD screen or in the viewfinder. Your camcorder can read moving picture data through the input connector and record it as a still image on the mini DV tape is played back. (3) Keep pressing PHOTO lightly until the picture from a mini DV tape...

Operating Instructions
Page 103
... is displayed. (4) Press MEMORY +/- or +/- Note The pictures taken on the "Memory Stick" are not recorded with other equipment You may appear to open the LCD panel. (3) Press MEMORY PLAY. Memory photo playback You can play back six images at a time by pressing DATA CODE on the Remote Commander. 3 PLAY 1 POWER LOCK LOCK VTR "Memory Stick" Operations MEMORY OFF CAMERA 2 4+ - You can check the recording date/time while in memory playback mode by selecting the index screen. on a "Memory Stick." To play them back with your camcorder. (1) Set the POWER switch...
... is displayed. (4) Press MEMORY +/- or +/- Note The pictures taken on the "Memory Stick" are not recorded with other equipment You may appear to open the LCD panel. (3) Press MEMORY PLAY. Memory photo playback You can play back six images at a time by pressing DATA CODE on the Remote Commander. 3 PLAY 1 POWER LOCK LOCK VTR "Memory Stick" Operations MEMORY OFF CAMERA 2 4+ - You can check the recording date/time while in memory playback mode by selecting the index screen. on a "Memory Stick." To play them back with your camcorder. (1) Set the POWER switch...

Operating Instructions
Page 114
... recording when: - The functions using a digital video camera recorder without cassette memory. Your camcorder does not record copyright control signals on the LCD screen, in the beginning or between the recorded portions, a title may not be displayed properly or the search functions may occur. Sony recommends that you use any blank portion on your camcorder. Not to make any other video camera recorder, you record, using the cassette memory require successive signals recorded on the cassette The memory capacity of software...
... recording when: - The functions using a digital video camera recorder without cassette memory. Your camcorder does not record copyright control signals on the LCD screen, in the beginning or between the recorded portions, a title may not be displayed properly or the search functions may occur. Sony recommends that you use any blank portion on your camcorder. Not to make any other video camera recorder, you record, using the cassette memory require successive signals recorded on the cassette The memory capacity of software...
Operating Instructions
Page 117
... horizontal lines on the LCD screen or in the viewfinder. c Adjust it to OFF in the menu settings. c Clean the heads using the Sony DVM12CL cleaning cassette (not supplied). (p. 127) • The volume is set to VTR. (p. 25) • The tape has run out. The click of the shutter does not sound. The title search function does not work. c Turn up the volume. (p. 25) • AUDIO MIX is turned to OFF in...
... horizontal lines on the LCD screen or in the viewfinder. c Adjust it to OFF in the menu settings. c Clean the heads using the Sony DVM12CL cleaning cassette (not supplied). (p. 127) • The volume is set to VTR. (p. 25) • The tape has run out. The click of the shutter does not sound. The title search function does not work. c Turn up the volume. (p. 25) • AUDIO MIX is turned to OFF in...

Operating Instructions
Page 128
... in use your camcorder on the power, operate the CAMERA and VTR sections and play back a tape for example, and operate it any solid object or liquid get into the small holes on the LCD screen. To disconnect the power cord, pull it . Sand or dust may be used to build up . These holes are not using the unit for a long time. • Clean the lens with...
... in use your camcorder on the power, operate the CAMERA and VTR sections and play back a tape for example, and operate it any solid object or liquid get into the small holes on the LCD screen. To disconnect the power cord, pull it . Sand or dust may be used to build up . These holes are not using the unit for a long time. • Clean the lens with...
Operating Instructions
Page 130
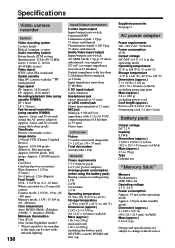
... mm/s Recording/playback time (using cassette DVM60) SP: 1 hour LP: 1.5 hours Fast-forward/rewind time (using cassette DVM60) Approx. 1 min. Specifications Video camera recorder System Video recording system 2 rotary heads Helical scanning system Audio recording system Rotary heads, PCM system Quantization: 12 bits (Fs 32 kHz, stereo 1, stereo 2), 16 bits (Fs 48 kHz, stereo) Video signal NTSC color, EIA standards Usable cassette Mini DV cassette with 2.5 to 3.0 V DC, output impedance 6.8 kilohms (ø 3.5 mm) Stereo type LCD screen Picture 2.5 inches...
... mm/s Recording/playback time (using cassette DVM60) SP: 1 hour LP: 1.5 hours Fast-forward/rewind time (using cassette DVM60) Approx. 1 min. Specifications Video camera recorder System Video recording system 2 rotary heads Helical scanning system Audio recording system Rotary heads, PCM system Quantization: 12 bits (Fs 32 kHz, stereo 1, stereo 2), 16 bits (Fs 48 kHz, stereo) Video signal NTSC color, EIA standards Usable cassette Mini DV cassette with 2.5 to 3.0 V DC, output impedance 6.8 kilohms (ø 3.5 mm) Stereo type LCD screen Picture 2.5 inches...
Operating Instructions
Page 134
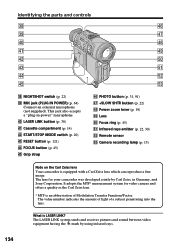
... the parts and controls ek rh el rj r; What is equipped with a Carl Zeiss lens which can reproduce a fine image. LASER LINK button (p. 30) ra Cassette compartment (p. 14) rs START/STOP MODE switch (p. 20) rd RESET button (p. 121) rf FOCUS button (p. 45) rg Grip strap rh PHOTO button (p. 31, 91) rj +SLOW SHTR button (p. 22) rk Power zoom lever (p. 19) rl Lens t; The value number indicates the amount of light of Modulation Transfer Function...
... the parts and controls ek rh el rj r; What is equipped with a Carl Zeiss lens which can reproduce a fine image. LASER LINK button (p. 30) ra Cassette compartment (p. 14) rs START/STOP MODE switch (p. 20) rd RESET button (p. 121) rf FOCUS button (p. 45) rg Grip strap rh PHOTO button (p. 31, 91) rj +SLOW SHTR button (p. 22) rk Power zoom lever (p. 19) rl Lens t; The value number indicates the amount of light of Modulation Transfer Function...

Operating Instructions
Page 140
... Heads 127 HiFi SOUND 78 Main sound 78 Manual focus 45 Memory chromakey 95 Memory luminancekey .......... 95 Memory mix 95 Memory photo recording ...... 91 "Memory Stick 84 Menu settings 76 Mirror mode 16 Moisture condensation ........ 126 MONOTONE 36 NIGHTSHOT 22 NightShot +Slow shutter ....... 22 Normal charge 11 NTSC system 125 O, P, Q OLD MOVIE 39 Operation indicators 138 OVERLAP 36 Photo recording on tapes ....... 31 Photo scan 53 Photo search 52 PICTURE EFFECT 38 Picture search 28 Playback pause 28 +SLOW SHTR 22 Power sources (battery...
... Heads 127 HiFi SOUND 78 Main sound 78 Manual focus 45 Memory chromakey 95 Memory luminancekey .......... 95 Memory mix 95 Memory photo recording ...... 91 "Memory Stick 84 Menu settings 76 Mirror mode 16 Moisture condensation ........ 126 MONOTONE 36 NIGHTSHOT 22 NightShot +Slow shutter ....... 22 Normal charge 11 NTSC system 125 O, P, Q OLD MOVIE 39 Operation indicators 138 OVERLAP 36 Photo recording on tapes ....... 31 Photo scan 53 Photo search 52 PICTURE EFFECT 38 Picture search 28 Playback pause 28 +SLOW SHTR 22 Power sources (battery...


