Insert: Getting Online with your Camera
Page 2
...Other ISP setting procedure DCR-IP7BT DCR-PC120BT DCR-TRV50, 950 DCR-IP55 Not compatible Not compatible P.37 P.39 P.23 P.28 DCR-TRV80, 70, 39 P.48 P.54 P.32 DCR-IP220 P.37 P.43 P.27 * If you do not have a PC or Internet access, please call 1-800-222-SONY -2- Customer must separately... However, "So-net" ISP service is discontinued. Please refer to the table below for the page number in the Operating Instructions manual containing the appropriate instructions for assistance. About So-net internet service provider (ISP) You may also find references to "So-net"...
...Other ISP setting procedure DCR-IP7BT DCR-PC120BT DCR-TRV50, 950 DCR-IP55 Not compatible Not compatible P.37 P.39 P.23 P.28 DCR-TRV80, 70, 39 P.48 P.54 P.32 DCR-IP220 P.37 P.43 P.27 * If you do not have a PC or Internet access, please call 1-800-222-SONY -2- Customer must separately... However, "So-net" ISP service is discontinued. Please refer to the table below for the page number in the Operating Instructions manual containing the appropriate instructions for assistance. About So-net internet service provider (ISP) You may also find references to "So-net"...
MovieShaker v3.1 Operating Instructions
Page 2
...MS-DOS and Windows are not shown in other countries. About the copyright: Video or audio files recorded using this manual may arise due to make video or audio files recordings that may be somewhat different than that specified. ❒ The software specifications .... All rights reserved. QuickTime and the QuickTime logo are trademarks of Sony Corporation. is a trademark of Sony Corporation. Program © 2001 Sony Corporation Documentation © 2001 Sony Corporation © 2001 Sony Corporation. QuickTime is obtained. and other than those you actually see ...
...MS-DOS and Windows are not shown in other countries. About the copyright: Video or audio files recorded using this manual may arise due to make video or audio files recordings that may be somewhat different than that specified. ❒ The software specifications .... All rights reserved. QuickTime and the QuickTime logo are trademarks of Sony Corporation. is a trademark of Sony Corporation. Program © 2001 Sony Corporation Documentation © 2001 Sony Corporation © 2001 Sony Corporation. QuickTime is obtained. and other than those you actually see ...

MovieShaker v3.1 Operating Instructions
Page 3
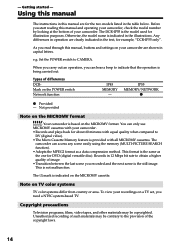
Table of Contents Before Use What you can do with MovieShaker 5 Precautions for Use 6 About the MICROMV 6 Using MovieShaker 7 How to Use this Manual 9 How to Use this Help 9 Installing the software 11 To install MovieShaker 11 To Install QuickTime 5 16 To Install DirectX 8.0a 17 If you are ...
Table of Contents Before Use What you can do with MovieShaker 5 Precautions for Use 6 About the MICROMV 6 Using MovieShaker 7 How to Use this Manual 9 How to Use this Help 9 Installing the software 11 To install MovieShaker 11 To Install QuickTime 5 16 To Install DirectX 8.0a 17 If you are ...
MovieShaker v3.1 Operating Instructions
Page 9
...help is called the left frame. • Select "Contents" or "Index" to switch displays. Continued 9 Before Use How to Use this Manual This manual describes how to use MovieShaker on -line help provides more detailed information than this Help MovieShaker on -line help . You not only can type... in any words you like to search for instructions on how to Use this manual. How to use MovieShaker, from capturing images from predetermined keywords but also you can find descriptions from a MICROMV device to creating a movie....
...help is called the left frame. • Select "Contents" or "Index" to switch displays. Continued 9 Before Use How to Use this Manual This manual describes how to use MovieShaker on -line help provides more detailed information than this Help MovieShaker on -line help . You not only can type... in any words you like to search for instructions on how to Use this manual. How to use MovieShaker, from capturing images from predetermined keywords but also you can find descriptions from a MICROMV device to creating a movie....
MovieShaker v3.1 Operating Instructions
Page 23
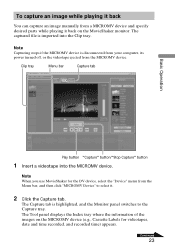
... videotape ejected from the Menu bar, and then click "MICROMV Device" to the Capture tray. Note When you use MovieShaker for videotapes, date and time recorded, and recorded time) appears. The Capture tab is imported into the MICROMV device. Clip tray Menu bar Capture tab Basic Operation Play button "Capture" button/"Stop... for the DV device, select the "Device" menu from the MICROMV device. To capture an image while playing it back You can capture an image manually from a MICROMV device and specify desired parts while playing it . 2 Click the Capture tab.
... videotape ejected from the Menu bar, and then click "MICROMV Device" to the Capture tray. Note When you use MovieShaker for videotapes, date and time recorded, and recorded time) appears. The Capture tab is imported into the MICROMV device. Clip tray Menu bar Capture tab Basic Operation Play button "Capture" button/"Stop... for the DV device, select the "Device" menu from the MICROMV device. To capture an image while playing it back You can capture an image manually from a MICROMV device and specify desired parts while playing it . 2 Click the Capture tab.
Operating Instructions
Page 1
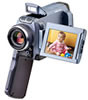
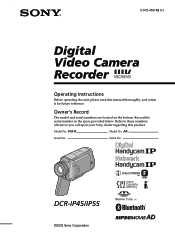
Model No. Serial No. 3-075-459-12 (1) Digital Video Camera Recorder Operating Instructions Before operating the unit, please read this product. DCR-IP Model No. AC- Serial No. Refer to these numbers whenever you call upon your Sony dealer regarding this manual thoroughly, and retain it for future reference. Record the serial number in the space provided below. DCR-IP45/IP55 ©2002 Sony Corporation Owner's Record The model and serial numbers are located on the bottom.
Model No. Serial No. 3-075-459-12 (1) Digital Video Camera Recorder Operating Instructions Before operating the unit, please read this product. DCR-IP Model No. AC- Serial No. Refer to these numbers whenever you call upon your Sony dealer regarding this manual thoroughly, and retain it for future reference. Record the serial number in the space provided below. DCR-IP45/IP55 ©2002 Sony Corporation Owner's Record The model and serial numbers are located on the bottom.
Operating Instructions
Page 3
...for a digital device pursuant to which can be used in this product, you have any changes or modifications not expressly approved in accordance with FCC RF exposure compliance requirements, the following measures: - DCR-IP55 only IMPORTANT NOTE To comply with the instructions, may call: Sony Customer Information... antenna. - Increase the separation between the equipment and receiver. - These limits are cautioned that any questions about this manual could void your authority to provide reasonable protection against harmful interference in a particular installation.
...for a digital device pursuant to which can be used in this product, you have any changes or modifications not expressly approved in accordance with FCC RF exposure compliance requirements, the following measures: - DCR-IP55 only IMPORTANT NOTE To comply with the instructions, may call: Sony Customer Information... antenna. - Increase the separation between the equipment and receiver. - These limits are cautioned that any questions about this manual could void your authority to provide reasonable protection against harmful interference in a particular installation.
Operating Instructions
Page 5
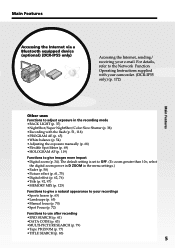
... Internet via a Bluetooth equipped device (optional) (DCR-IP55 only) Accessing the Internet, sending/ receiving your recordings •Sports lesson (p. 65) •Landscape (p. 65) •Manual focus (p. 70) •Spot Focus (p. 72) Functions to use after recording •END SEARCH (p. 41) •DATA... the Network Function Operating Instructions supplied with your camcorder. (DCR-IP55 only) (p. 172) Main Features Other uses Functions to adjust exposure in the menu settings.) •Fader (p. 58) •Picture effect (p. 61, 75) •Digital effect (p. 62, 76) •Title (p. 92, 97...
... Internet via a Bluetooth equipped device (optional) (DCR-IP55 only) Accessing the Internet, sending/ receiving your recordings •Sports lesson (p. 65) •Landscape (p. 65) •Manual focus (p. 70) •Spot Focus (p. 72) Functions to use after recording •END SEARCH (p. 41) •DATA... the Network Function Operating Instructions supplied with your camcorder. (DCR-IP55 only) (p. 172) Main Features Other uses Functions to adjust exposure in the menu settings.) •Fader (p. 58) •Picture effect (p. 61, 75) •Digital effect (p. 62, 76) •Title (p. 92, 97...

Operating Instructions
Page 6
...effects ... 75 Playing back a tape with digital effects .... 76 Enlarging images recorded on a "Memory Stick 12 Getting started Using this manual 14 Checking supplied accessories 16 Step 1 ...touch panel 27 Recording - Display function 43 Viewing the recording on a tape 10 - TITLE SEARCH 83 Searching a recording by title - DATE SEARCH 84 Editing Dubbing a tape 85 Recording video or TV ... Basic operations 8 Quick Start Guide - BACK LIGHT 37 Shooting in CAMERA mode ... 49 Adjusting the white balance manually ... 54 Using the wide mode 56 Using the fader function 58 Using...
...effects ... 75 Playing back a tape with digital effects .... 76 Enlarging images recorded on a "Memory Stick 12 Getting started Using this manual 14 Checking supplied accessories 16 Step 1 ...touch panel 27 Recording - Display function 43 Viewing the recording on a tape 10 - TITLE SEARCH 83 Searching a recording by title - DATE SEARCH 84 Editing Dubbing a tape 85 Recording video or TV ... Basic operations 8 Quick Start Guide - BACK LIGHT 37 Shooting in CAMERA mode ... 49 Adjusting the white balance manually ... 54 Using the wide mode 56 Using the fader function 58 Using...
Operating Instructions
Page 14
... manual The instructions in the text, for illustration purposes. As you need a NTSC system-based TV. Unauthorized recording of such materials may be contrary to DV (digital video). •The Micro Cassette Memory feature is the model used for example, "DCR-IP55 ...only". This is indicated on TV color systems TV color systems differ from country or area. You can hear a beep to CAMERA. Getting started - The DCR-IP55...
... manual The instructions in the text, for illustration purposes. As you need a NTSC system-based TV. Unauthorized recording of such materials may be contrary to DV (digital video). •The Micro Cassette Memory feature is the model used for example, "DCR-IP55 ...only". This is indicated on TV color systems TV color systems differ from country or area. You can hear a beep to CAMERA. Getting started - The DCR-IP55...
Operating Instructions
Page 27
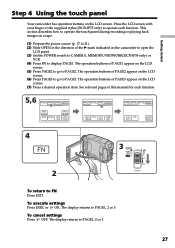
... mark indicated on the camcorder to open the LCD panel. (3) Set the POWER switch to CAMERA, MEMORY/NETWORK(DCR-IP55 only) or VCR. (4) Press FN to display PAGE1. WORK VCR (CHG) OFF ON ...MODE POWER To return to PAGE1, 2 or 3. The display returns to FN Press EXIT. This section describes how to operate the touch panel during recording... LCD VOL BRT COUNT RESET 4 FN 2 3 CAMERA MEMORY/ NET- Press the LCD screen with your finger or the supplied stylus (DCR-IP55 only) to PAGE2. The operation buttons of PAGE2 ...
... mark indicated on the camcorder to open the LCD panel. (3) Set the POWER switch to CAMERA, MEMORY/NETWORK(DCR-IP55 only) or VCR. (4) Press FN to display PAGE1. WORK VCR (CHG) OFF ON ...MODE POWER To return to PAGE1, 2 or 3. The display returns to FN Press EXIT. This section describes how to operate the touch panel during recording... LCD VOL BRT COUNT RESET 4 FN 2 3 CAMERA MEMORY/ NET- Press the LCD screen with your finger or the supplied stylus (DCR-IP55 only) to PAGE2. The operation buttons of PAGE2 ...
Operating Instructions
Page 37
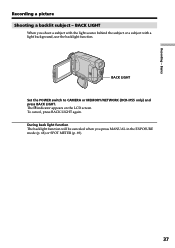
Recording - During back light function The backlight function will be canceled when you shoot a subject with the light source behind the subject or a subject with a light background, use the backlight function. BACK LIGHT When you press MANUAL in the EXPOSURE mode (p. 68) or SPOT METER (p. 69). 37 BACK LIGHT Set the POWER switch to CAMERA or MEMORY/NETWORK (DCR-IP55 only) and press BACK LIGHT. The . indicator appears on the LCD screen. To cancel, press BACK LIGHT again. Basics Recording a picture Shooting a backlit subject -
Recording - During back light function The backlight function will be canceled when you shoot a subject with the light source behind the subject or a subject with a light background, use the backlight function. BACK LIGHT When you press MANUAL in the EXPOSURE mode (p. 68) or SPOT METER (p. 69). 37 BACK LIGHT Set the POWER switch to CAMERA or MEMORY/NETWORK (DCR-IP55 only) and press BACK LIGHT. The . indicator appears on the LCD screen. To cancel, press BACK LIGHT again. Basics Recording a picture Shooting a backlit subject -
Operating Instructions
Page 39
...feet). Exposure - Digital effect - HOLOGRAM AF - outdoors in incorrect or unnatural colors. •If focusing is difficult with the flash While using the NightShot Light is set to MEMORY/NETWORK (DCR-IP55 only) You cannot use the NightShot function in normal recording, the picture may... - Flexible Spot Meter - PROGRAM AE - Flexible Spot Meter - PROGRAM AE - Flexble Spot Meter - Recording with the autofocus mode when using the NightShot function, focus manually. •Do not cover the NightShot Light emitter when using the Color Slow Shutter function, you cannot use...
...feet). Exposure - Digital effect - HOLOGRAM AF - outdoors in incorrect or unnatural colors. •If focusing is difficult with the flash While using the NightShot Light is set to MEMORY/NETWORK (DCR-IP55 only) You cannot use the NightShot function in normal recording, the picture may... - Flexible Spot Meter - PROGRAM AE - Flexible Spot Meter - PROGRAM AE - Flexble Spot Meter - Recording with the autofocus mode when using the NightShot function, focus manually. •Do not cover the NightShot Light emitter when using the Color Slow Shutter function, you cannot use...

Operating Instructions
Page 51
...71) for focusing manually. 51 To change FLASH LVL to find the most appropriate setting for FLASH LVL. Darken the surroundings by covering the lens, and press PHOTO lightly so that your camcorder starts to the appropriate brightness. Recording still images in CAMERA mode Recording images with the... flash, it is not easy to focus on the subject automatically, for example, when recording in the dark, use forced flash in a bright location. • When recording with the flash The flash ...
...71) for focusing manually. 51 To change FLASH LVL to find the most appropriate setting for FLASH LVL. Darken the surroundings by covering the lens, and press PHOTO lightly so that your camcorder starts to the appropriate brightness. Recording still images in CAMERA mode Recording images with the... flash, it is not easy to focus on the subject automatically, for example, when recording in the dark, use forced flash in a bright location. • When recording with the flash The flash ...

Operating Instructions
Page 54
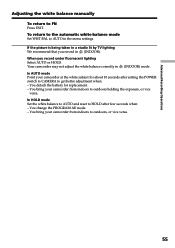
Adjusting the white balance manually You can manually adjust and set the white balance. S. LIGHT AUTO SHTR EXIT AUTO HOLD OUTDOOR INDOOR EXEC RET. 1 54 Normally white balance is automatically adjusted. (1) Set the POWER switch to CAMERA or MEMORY/NETWORK (DCR-IP55 only) . (2) Press FN to display ...PAGE1. (3) Press MENU, then select WHT BAL in in the menu settings to select a desired white balance mode (p. 175). This adjustment makes white subjects look white and allows more natural color balance. HOLD : Recording a...
Adjusting the white balance manually You can manually adjust and set the white balance. S. LIGHT AUTO SHTR EXIT AUTO HOLD OUTDOOR INDOOR EXEC RET. 1 54 Normally white balance is automatically adjusted. (1) Set the POWER switch to CAMERA or MEMORY/NETWORK (DCR-IP55 only) . (2) Press FN to display ...PAGE1. (3) Press MENU, then select WHT BAL in in the menu settings to select a desired white balance mode (p. 175). This adjustment makes white subjects look white and allows more natural color balance. HOLD : Recording a...
Operating Instructions
Page 55
...correctly in a studio lit by TV lighting We recommend that you record under fluorescent lighting Select AUTO or HOLD. In HOLD mode Set the white balance to AUTO and reset to HOLD after setting the POWER switch to CAMERA to get better adjustment when: - You bring your camcorder at... from indoors to outdoors, or vice versa. 55 You detach the battery for about 10 seconds after few seconds when: - Advanced Recording Operations Adjusting the white balance manually To return to AUTO in the menu settings. You change the PROGRAM AE mode. - If the picture is being taken in n...
...correctly in a studio lit by TV lighting We recommend that you record under fluorescent lighting Select AUTO or HOLD. In HOLD mode Set the white balance to AUTO and reset to HOLD after setting the POWER switch to CAMERA to get better adjustment when: - You bring your camcorder at... from indoors to outdoors, or vice versa. 55 You detach the battery for about 10 seconds after few seconds when: - Advanced Recording Operations Adjusting the white balance manually To return to AUTO in the menu settings. You change the PROGRAM AE mode. - If the picture is being taken in n...

Operating Instructions
Page 61
... menu settings to FN Press EXIT. Recording still images When you cannot use following functions: - S. LIGHT B&W AUTO SHTR SOLARIZE PASTEL MOSAIC EXEC RET. 1 CAMERA MEMORY/ NET- WORK VCR (CHG) OFF ON MODE POWER To return to select a desired 2 FN 3 MANUAL SET STBY EXIT PROGRAM AE P EFFECT... contrast of the picture are reversed. ART WHT BAL SEPIA N. OLD MOVIE - B&W : The picture is sepia. Picture effect You can digitally process images to OFF (CHG) The picture effect is emphasized, and the picture looks like those in picture effect mode (p. 175).
... menu settings to FN Press EXIT. Recording still images When you cannot use following functions: - S. LIGHT B&W AUTO SHTR SOLARIZE PASTEL MOSAIC EXEC RET. 1 CAMERA MEMORY/ NET- WORK VCR (CHG) OFF ON MODE POWER To return to select a desired 2 FN 3 MANUAL SET STBY EXIT PROGRAM AE P EFFECT... contrast of the picture are reversed. ART WHT BAL SEPIA N. OLD MOVIE - B&W : The picture is sepia. Picture effect You can digitally process images to OFF (CHG) The picture effect is emphasized, and the picture looks like those in picture effect mode (p. 175).

Operating Instructions
Page 64
...work in the slow shutter mode. •The following functions do not work during digital effect: - When recording in the OLD MOVIE mode: - Using special effects - Digital effect Notes •The following functions do not work in the slow shutter mode ...Auto focus may not be automatically canceled. Picture effect - Focus manually using a tripod. Fader - PROGRAM AE When you set the POWER switch to OFF (CHG) The digital...
...work in the slow shutter mode. •The following functions do not work during digital effect: - When recording in the OLD MOVIE mode: - Using special effects - Digital effect Notes •The following functions do not work in the slow shutter mode ...Auto focus may not be automatically canceled. Picture effect - Focus manually using a tripod. Fader - PROGRAM AE When you set the POWER switch to OFF (CHG) The digital...

Operating Instructions
Page 66
Using the PROGRAM AE (1) Set the POWER switch to CAMERA or MEMORY/NETWORK (DCR-IP55 only). (2) Press FN to display PAGE1. (3) Press MENU, then select PROGRAM AE in in the menu settings to far distance, you cannot take close-ups ... SPOTLIGHT PORTRAIT SPORTS BEACH&SKI SUNSETMOON LANDSCAPE EXEC RET. 1 To return to focus only on subjects in the middle to select a desired mode (p. 175). 2 FN 3 MANUAL SET PROGRAM AE P EFFECT FLASH LVL WHT BAL N.
Using the PROGRAM AE (1) Set the POWER switch to CAMERA or MEMORY/NETWORK (DCR-IP55 only). (2) Press FN to display PAGE1. (3) Press MENU, then select PROGRAM AE in in the menu settings to far distance, you cannot take close-ups ... SPOTLIGHT PORTRAIT SPORTS BEACH&SKI SUNSETMOON LANDSCAPE EXEC RET. 1 To return to focus only on subjects in the middle to select a desired mode (p. 175). 2 FN 3 MANUAL SET PROGRAM AE P EFFECT FLASH LVL WHT BAL N.

Operating Instructions
Page 68
Adjusting the exposure manually You can adjust and set NIGHTSHOT to the automatic exposure mode Press AUTO in the following functions do not work: - night scenes) faithfully (1) Set the POWER switch to CAMERA or MEMORY/NETWORK (DCR-IP55 only). (2) Press FN to PAGE1. 2 FN...+ To return to the automatic exposure mode: - Normally the exposure is backlit - The subject is automatically adjusted. To record dark pictures (e.g. The EXPOSURE screen appears. (4) Press MANUAL. (5) Adjust the exposure using -/+. - : to dim + : to PAGE1. The display returns to brighten (6) Press ...
Adjusting the exposure manually You can adjust and set NIGHTSHOT to the automatic exposure mode Press AUTO in the following functions do not work: - night scenes) faithfully (1) Set the POWER switch to CAMERA or MEMORY/NETWORK (DCR-IP55 only). (2) Press FN to PAGE1. 2 FN...+ To return to the automatic exposure mode: - Normally the exposure is backlit - The subject is automatically adjusted. To record dark pictures (e.g. The EXPOSURE screen appears. (4) Press MANUAL. (5) Adjust the exposure using -/+. - : to dim + : to PAGE1. The display returns to brighten (6) Press ...


