
Operating Instructions
Page 151
...Memory Stick" image USB jack* Connection cable USB cable (supplied) i.LINK cable (optional) USB cable (supplied) Computer environment requirements Reference pages For Windows users For Macintosh users USB connector, editing software i.LINK (IEEE 1394), connector editing software USB connector, editing software 154 - 156 158 - 159... you will not be able to view images saved on a "Memory Stick" or recorded on a tape on your camcorder to a computer in order to install the i.LINK driver or the USB driver correctly. For details about your camcorder to a computer without a USB jack Use an...
...Memory Stick" image USB jack* Connection cable USB cable (supplied) i.LINK cable (optional) USB cable (supplied) Computer environment requirements Reference pages For Windows users For Macintosh users USB connector, editing software i.LINK (IEEE 1394), connector editing software USB connector, editing software 154 - 156 158 - 159... you will not be able to view images saved on a "Memory Stick" or recorded on a tape on your camcorder to a computer in order to install the i.LINK driver or the USB driver correctly. For details about your camcorder to a computer without a USB jack Use an...

Operating Instructions
Page 153
...Note To view images on a tape using the i.LINK cable (For Windows users) You can also record images edited with MovieShaker Ver.3.1 for MICROMV. Connecting your camcorder to ...recorded on your computer, you have to the computer. Computer i.LINK connector i.LINK (MICROMV Interface) i.LINK cable (optional) Viewing Images Using your Computer Before installing the i.LINK driver and the application software into your camcorder to install the i.LINK driver and the application software into your computer, be equipped. Recommended computer environment Recommended Windows...
...Note To view images on a tape using the i.LINK cable (For Windows users) You can also record images edited with MovieShaker Ver.3.1 for MICROMV. Connecting your camcorder to ...recorded on your computer, you have to the computer. Computer i.LINK connector i.LINK (MICROMV Interface) i.LINK cable (optional) Viewing Images Using your Computer Before installing the i.LINK driver and the application software into your camcorder to install the i.LINK driver and the application software into your computer, be equipped. Recommended computer environment Recommended Windows...

Operating Instructions
Page 154
... it is required. Furthermore, if you download pictures from your camcorder and pictures recorded on a tape on your computer OS: Microsoft Windows 98SE, Windows Me, Windows 2000 Professional, Windows XP Home Edition or Windows XP Professional Standard installation is necessary to install DirectX. You cannot hear sound if...and your computer using the USB cable (For Windows users) Complete installation of the image files edited) Display: 4 MB VRAM video card, Minimum 800 × 600 dot High color (16 bit color, 65 000 colors), Direct Draw display driver capability (At 800 × 600 dot or...
... it is required. Furthermore, if you download pictures from your camcorder and pictures recorded on a tape on your computer OS: Microsoft Windows 98SE, Windows Me, Windows 2000 Professional, Windows XP Home Edition or Windows XP Professional Standard installation is necessary to install DirectX. You cannot hear sound if...and your computer using the USB cable (For Windows users) Complete installation of the image files edited) Display: 4 MB VRAM video card, Minimum 800 × 600 dot High color (16 bit color, 65 000 colors), Direct Draw display driver capability (At 800 × 600 dot or...

Operating Instructions
Page 156
...your computer. See page 153 about the recommended computer environment. 156 Connecting your camcorder to your computer using the USB cable (For Windows users) Installing the USB driver Start the following operation without connecting the USB cable to your camcorder". If you connect the USB cable before USB... is set to "Making the computer recognize your computer. Notes •If you are using Windows XP, log in the CD-ROM drive of your computer is complete, the USB driver will not be properly registered. Carry out installation again in accordance with the steps on the screen....
...your computer. See page 153 about the recommended computer environment. 156 Connecting your camcorder to your computer using the USB cable (For Windows users) Installing the USB driver Start the following operation without connecting the USB cable to your camcorder". If you connect the USB cable before USB... is set to "Making the computer recognize your computer. Notes •If you are using Windows XP, log in the CD-ROM drive of your computer is complete, the USB driver will not be properly registered. Carry out installation again in accordance with the steps on the screen....

Operating Instructions
Page 158
...starts up and the "Select Settings Language" screen appears. (4) Select the language for installation. (5) Follow the on your computer and allow Windows to load. (2) Insert the supplied CD-ROM into the CD-ROM drive of your computer, continue installation after a while. (3) Move the... Drive). Follow the on your computer. After installation is complete, restart your computer using the USB cable (For Windows users) Installing PIXELA ImageMixer Make sure USB driver installation is not installed on -screen messages to install DirectX 8.0a. Connecting your camcorder to your computer. 158
...starts up and the "Select Settings Language" screen appears. (4) Select the language for installation. (5) Follow the on your computer and allow Windows to load. (2) Insert the supplied CD-ROM into the CD-ROM drive of your computer, continue installation after a while. (3) Move the... Drive). Follow the on your computer. After installation is complete, restart your computer using the USB cable (For Windows users) Installing PIXELA ImageMixer Make sure USB driver installation is not installed on -screen messages to install DirectX 8.0a. Connecting your camcorder to your computer. 158

Operating Instructions
Page 159
...." 159 Your computer recognizes your computer using the USB cable (For Windows users) Making the computer recognize your camcorder Viewing images recorded on -screen messages so that the Add Hardware Wizard recognizes that the USB drivers have been installed. For Windows 2000 Professional, Windows XP users: (5) After the "Files Needed" screen appears. Be sure to...
...." 159 Your computer recognizes your computer using the USB cable (For Windows users) Making the computer recognize your camcorder Viewing images recorded on -screen messages so that the Add Hardware Wizard recognizes that the USB drivers have been installed. For Windows 2000 Professional, Windows XP users: (5) After the "Files Needed" screen appears. Be sure to...

Operating Instructions
Page 160
You cannot install the USB driver if a "Memory Stick" is not in your camcorder Be sure to the USB connector on your computer using the supplied USB cable. Connecting your camcorder to your computer using the USB cable (For Windows users) Viewing images recorded on a "Memory Stick" (1) Insert a "Memory Stick" into your camcorder. (2) Connect...
You cannot install the USB driver if a "Memory Stick" is not in your camcorder Be sure to the USB connector on your computer using the supplied USB cable. Connecting your camcorder to your computer using the USB cable (For Windows users) Viewing images recorded on a "Memory Stick" (1) Insert a "Memory Stick" into your camcorder. (2) Connect...

Operating Instructions
Page 161
... "Pick a category" after clicking "Control Panel", click "Switch to correctly install the USB driver. Perform the following procedure to classic view" instead. Viewing images recorded on a tape Step 1: Uninstall the incorrect USB driver 1 Turn on your computer and allow Windows to load. 2 Connect the AC power adaptor, and set the POWER switch to VCR...
... "Pick a category" after clicking "Control Panel", click "Switch to correctly install the USB driver. Perform the following procedure to classic view" instead. Viewing images recorded on a tape Step 1: Uninstall the incorrect USB driver 1 Turn on your computer and allow Windows to load. 2 Connect the AC power adaptor, and set the POWER switch to VCR...

Operating Instructions
Page 162
Step 2: Install the USB driver on the supplied CD-ROM Perform the entire procedure described in "Installing the USB driver" on your camcorder, and then disconnect the USB cable. 7 Restart your computer using the USB cable (For Windows users) Windows 2000 Professional Windows XP 6 Turn the POWER switch to (CHG) OFF on page 156. 162 Connecting your camcorder to your computer.
Step 2: Install the USB driver on the supplied CD-ROM Perform the entire procedure described in "Installing the USB driver" on your camcorder, and then disconnect the USB cable. 7 Restart your computer using the USB cable (For Windows users) Windows 2000 Professional Windows XP 6 Turn the POWER switch to (CHG) OFF on page 156. 162 Connecting your camcorder to your computer.

Operating Instructions
Page 163
... your Computer Connecting your camcorder to your computer using the USB cable (For Windows users) Viewing images recorded on a "Memory Stick" Step1: Uninstall the incorrect USB driver 1 Turn on your computer and allow Windows to load. 2 Insert a "Memory Stick" into your camcorder. 3 Connect... "Control Panel" t "System", and click "Device Manager". 6 Select "Other devices". Windows 2000 Professional: Select "My Computer" t "Control Panel" t "System" t "Hardware", and click the "Device Manager" button. Ex: (?)Sony Handycam 7 Turn the POWER switch to the (USB) jack on your camcorder using the USB...
... your Computer Connecting your camcorder to your computer using the USB cable (For Windows users) Viewing images recorded on a "Memory Stick" Step1: Uninstall the incorrect USB driver 1 Turn on your computer and allow Windows to load. 2 Insert a "Memory Stick" into your camcorder. 3 Connect... "Control Panel" t "System", and click "Device Manager". 6 Select "Other devices". Windows 2000 Professional: Select "My Computer" t "Control Panel" t "System" t "Hardware", and click the "Device Manager" button. Ex: (?)Sony Handycam 7 Turn the POWER switch to the (USB) jack on your camcorder using the USB...

Operating Instructions
Page 164
... a tape on your computer (p. 156, 158). USB Streaming (For Windows users) Capturing images with "PIXELA ImageMixer Ver.1.0 for Sony" You need to install the USB driver and PIXELA ImageMixer to view images recorded on a tape on your computer - The "PIXELA ImageMixer Ver.1.0 for Sony". The title screen appears. (5) Click on your camcorder. Select USB STREAM...
... a tape on your computer (p. 156, 158). USB Streaming (For Windows users) Capturing images with "PIXELA ImageMixer Ver.1.0 for Sony" You need to install the USB driver and PIXELA ImageMixer to view images recorded on a tape on your computer - The "PIXELA ImageMixer Ver.1.0 for Sony". The title screen appears. (5) Click on your camcorder. Select USB STREAM...

Operating Instructions
Page 167
...the procedure on your computer - MEMORY MIX 167 Viewing Images Using your Computer Viewing images recorded on a tape on page 161. This is inserted. •Indicators in the standby mode... all running applications, then restart your computer was connected to noise, etc. - Super NightShot - Digital effect - Images of different color systems to that are captured into your computer. •If you...on the bottom of the USB driver was completed. USB Streaming (For Windows users) Notes •When you capture a fast moving picture, the preview window may occur. Carry out the...
...the procedure on your computer - MEMORY MIX 167 Viewing Images Using your Computer Viewing images recorded on a tape on page 161. This is inserted. •Indicators in the standby mode... all running applications, then restart your computer was connected to noise, etc. - Super NightShot - Digital effect - Images of different color systems to that are captured into your computer. •If you...on the bottom of the USB driver was completed. USB Streaming (For Windows users) Notes •When you capture a fast moving picture, the preview window may occur. Carry out the...
MovieShaker v3.1 Operating Instructions
Page 6
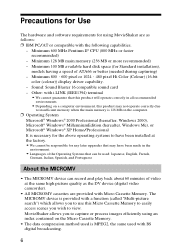
... images efficiently using MovieShaker are as the DV device (digital video camcorder). • All MICROMV cassettes are provided with...480 pixel Hi Color (Colour) (16-bit color (colour)) display driver capability. - The MICROMV device is MPEG2, the same used : ...digital broadcasting. 6 Minimum 128 MB main memory (256 MB or more recommended) - Other: with i.LINK (IEEE1394) terminal • We cannot guarantee that can record... Windows® 2000 Professional (hereafter, Windows 2000), Microsoft® Windows® MillenniumEdition (hereafter, Windows Me), or Microsoft® Windows®...
... images efficiently using MovieShaker are as the DV device (digital video camcorder). • All MICROMV cassettes are provided with...480 pixel Hi Color (Colour) (16-bit color (colour)) display driver capability. - The MICROMV device is MPEG2, the same used : ...digital broadcasting. 6 Minimum 128 MB main memory (256 MB or more recommended) - Other: with i.LINK (IEEE1394) terminal • We cannot guarantee that can record... Windows® 2000 Professional (hereafter, Windows 2000), Microsoft® Windows® MillenniumEdition (hereafter, Windows Me), or Microsoft® Windows®...
Marketing Specifications
Page 2
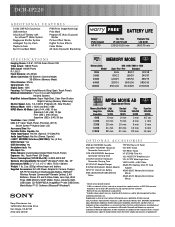
...Sony. All rights reserved. DCR-IP220 ADDITIONAL FEATURES 14 Bit DXP A/D Conversion USB Interface InfoLithium® Battery with AccuPower™ Meter System Progressive Shutter System Intelligent Pop-Up Flash Playback Zoom Spot Focus/Spot Meter PIM (Print Image Matching) Print Mark Program AE (Auto Exposure) Modes Picture Effect Modes Digital... an IEEE 1394 connector may not communicate with USB Driver, MovieShaker™ 3.1 Software (Microsoft® Windows®) Sony Electronics Inc. 16765 West Bernardo Drive San Diego, CA 92127 www.sony.com/di MEMORY MODE Memory Stick Media 4 8MB ...
...Sony. All rights reserved. DCR-IP220 ADDITIONAL FEATURES 14 Bit DXP A/D Conversion USB Interface InfoLithium® Battery with AccuPower™ Meter System Progressive Shutter System Intelligent Pop-Up Flash Playback Zoom Spot Focus/Spot Meter PIM (Print Image Matching) Print Mark Program AE (Auto Exposure) Modes Picture Effect Modes Digital... an IEEE 1394 connector may not communicate with USB Driver, MovieShaker™ 3.1 Software (Microsoft® Windows®) Sony Electronics Inc. 16765 West Bernardo Drive San Diego, CA 92127 www.sony.com/di MEMORY MODE Memory Stick Media 4 8MB ...


